sidebarDepth: 3
sidebar: auto
Artist tutorial
Using Artist objects to render on the canvas.
There are three layers to the matplotlib API.
- the
matplotlib.backend_bases.FigureCanvasis the area onto which the figure is drawn - the
matplotlib.backend_bases.Rendereris the object which knows how to draw on theFigureCanvas - and the
matplotlib.artist.Artistis the object that knows how to use a renderer to paint onto the canvas.
The FigureCanvas and
Renderer handle all the details of
talking to user interface toolkits like wxPython or drawing languages like PostScript®, and
the Artist handles all the high level constructs like representing
and laying out the figure, text, and lines. The typical user will
spend 95% of their time working with the Artists.
There are two types of Artists: primitives and containers. The primitives
represent the standard graphical objects we want to paint onto our canvas:
Line2D, Rectangle,
Text, AxesImage, etc., and
the containers are places to put them (Axis,
Axes and Figure). The
standard use is to create a Figure instance, use
the Figure to create one or more Axes or
Subplot instances, and use the Axes instance
helper methods to create the primitives. In the example below, we create a
Figure instance using matplotlib.pyplot.figure(), which is a
convenience method for instantiating Figure instances and connecting them
with your user interface or drawing toolkit FigureCanvas. As we will
discuss below, this is not necessary — you can work directly with PostScript,
PDF Gtk+, or wxPython FigureCanvas instances, instantiate your Figures
directly and connect them yourselves — but since we are focusing here on the
Artist API we’ll let pyplot handle some of those details
for us:
import matplotlib.pyplot as pltfig = plt.figure()ax = fig.add_subplot(2, 1, 1) # two rows, one column, first plot
The Axes is probably the most important
class in the matplotlib API, and the one you will be working with most
of the time. This is because the Axes is the plotting area into
which most of the objects go, and the Axes has many special helper
methods (plot(),
text(),
hist(),
imshow()) to create the most common
graphics primitives (Line2D,
Text,
Rectangle,
Image, respectively). These helper methods
will take your data (e.g., numpy arrays and strings) and create
primitive Artist instances as needed (e.g., Line2D), add them to
the relevant containers, and draw them when requested. Most of you
are probably familiar with the Subplot,
which is just a special case of an Axes that lives on a regular
rows by columns grid of Subplot instances. If you want to create
an Axes at an arbitrary location, simply use the
add_axes() method which takes a list
of [left, bottom, width, height] values in 0-1 relative figure
coordinates:
fig2 = plt.figure()ax2 = fig2.add_axes([0.15, 0.1, 0.7, 0.3])
Continuing with our example:
import numpy as npt = np.arange(0.0, 1.0, 0.01)s = np.sin(2*np.pi*t)line, = ax.plot(t, s, color='blue', lw=2)
In this example, ax is the Axes instance created by the
fig.add_subplot call above (remember Subplot is just a
subclass of Axes) and when you call ax.plot, it creates a
Line2D instance and adds it to the Axes.lines list. In the interactive ipython session below, you can see that the
Axes.lines list is length one and contains the same line that was
returned by the line, = ax.plot... call:
In [101]: ax.lines[0]Out[101]: <matplotlib.lines.Line2D instance at 0x19a95710>In [102]: lineOut[102]: <matplotlib.lines.Line2D instance at 0x19a95710>
If you make subsequent calls to ax.plot (and the hold state is “on”
which is the default) then additional lines will be added to the list.
You can remove lines later simply by calling the list methods; either
of these will work:
del ax.lines[0]ax.lines.remove(line) # one or the other, not both!
The Axes also has helper methods to configure and decorate the x-axis and y-axis tick, tick labels and axis labels:
xtext = ax.set_xlabel('my xdata') # returns a Text instanceytext = ax.set_ylabel('my ydata')
When you call ax.set_xlabel,
it passes the information on the Text
instance of the XAxis. Each Axes
instance contains an XAxis and a
YAxis instance, which handle the layout and
drawing of the ticks, tick labels and axis labels.
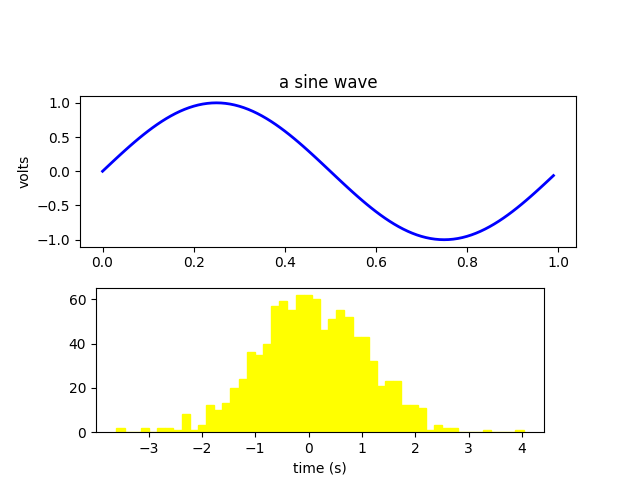
Try creating the figure below.
import numpy as npimport matplotlib.pyplot as pltfig = plt.figure()fig.subplots_adjust(top=0.8)ax1 = fig.add_subplot(211)ax1.set_ylabel('volts')ax1.set_title('a sine wave')t = np.arange(0.0, 1.0, 0.01)s = np.sin(2*np.pi*t)line, = ax1.plot(t, s, color='blue', lw=2)# Fixing random state for reproducibilitynp.random.seed(19680801)ax2 = fig.add_axes([0.15, 0.1, 0.7, 0.3])n, bins, patches = ax2.hist(np.random.randn(1000), 50,facecolor='yellow', edgecolor='yellow')ax2.set_xlabel('time (s)')plt.show()
Customizing your objects
Every element in the figure is represented by a matplotlib
Artist, and each has an extensive list of
properties to configure its appearance. The figure itself contains a
Rectangle exactly the size of the figure,
which you can use to set the background color and transparency of the
figures. Likewise, each Axes bounding box
(the standard white box with black edges in the typical matplotlib
plot, has a Rectangle instance that determines the color,
transparency, and other properties of the Axes. These instances are
stored as member variables Figure.patch and Axes.patch (“Patch” is a name inherited from
MATLAB, and is a 2D “patch” of color on the figure, e.g., rectangles,
circles and polygons). Every matplotlib Artist has the following
properties
Property Description
alpha The transparency - a scalar from 0-1
animated A boolean that is used to facilitate animated drawing
axes The axes that the Artist lives in, possibly None
clip_box The bounding box that clips the Artist
clip_on Whether clipping is enabled
clip_path The path the artist is clipped to
contains A picking function to test whether the artist contains the pick point
figure The figure instance the artist lives in, possibly None
label A text label (e.g., for auto-labeling)
picker A python object that controls object picking
transform The transformation
visible A boolean whether the artist should be drawn
zorder A number which determines the drawing order
rasterized Boolean; Turns vectors into raster graphics (for compression & eps transparency)
Each of the properties is accessed with an old-fashioned setter or getter (yes we know this irritates Pythonistas and we plan to support direct access via properties or traits but it hasn’t been done yet). For example, to multiply the current alpha by a half:
a = o.get_alpha()o.set_alpha(0.5*a)
If you want to set a number of properties at once, you can also use
the set method with keyword arguments. For example:
o.set(alpha=0.5, zorder=2)
If you are working interactively at the python shell, a handy way to
inspect the Artist properties is to use the
matplotlib.artist.getp() function (simply
getp() in pyplot), which lists the properties
and their values. This works for classes derived from Artist as
well, e.g., Figure and Rectangle. Here are the Figure rectangle
properties mentioned above:
In [149]: matplotlib.artist.getp(fig.patch)alpha = 1.0animated = Falseantialiased or aa = Trueaxes = Noneclip_box = Noneclip_on = Falseclip_path = Nonecontains = Noneedgecolor or ec = wfacecolor or fc = 0.75figure = Figure(8.125x6.125)fill = 1hatch = Noneheight = 1label =linewidth or lw = 1.0picker = Nonetransform = <Affine object at 0x134cca84>verts = ((0, 0), (0, 1), (1, 1), (1, 0))visible = Truewidth = 1window_extent = <Bbox object at 0x134acbcc>x = 0y = 0zorder = 1
The docstrings for all of the classes also contain the Artist
properties, so you can consult the interactive “help” or the
matplotlib.artist for a listing of properties for a given object.
Object containers
Now that we know how to inspect and set the properties of a given
object we want to configure, we need to know how to get at that object.
As mentioned in the introduction, there are two kinds of objects:
primitives and containers. The primitives are usually the things you
want to configure (the font of a Text
instance, the width of a Line2D) although
the containers also have some properties as well — for example the
Axes Artist is a
container that contains many of the primitives in your plot, but it
also has properties like the xscale to control whether the xaxis
is ‘linear’ or ‘log’. In this section we’ll review where the various
container objects store the Artists that you want to get at.
Figure container
The top level container Artist is the
matplotlib.figure.Figure, and it contains everything in the
figure. The background of the figure is a
Rectangle which is stored in
Figure.patch. As
you add subplots (add_subplot()) and
axes (add_axes()) to the figure
these will be appended to the Figure.axes. These are also returned by the
methods that create them:
In [156]: fig = plt.figure()In [157]: ax1 = fig.add_subplot(211)In [158]: ax2 = fig.add_axes([0.1, 0.1, 0.7, 0.3])In [159]: ax1Out[159]: <matplotlib.axes.Subplot instance at 0xd54b26c>In [160]: print(fig.axes)[<matplotlib.axes.Subplot instance at 0xd54b26c>, <matplotlib.axes.Axes instance at 0xd3f0b2c>]
Because the figure maintains the concept of the “current axes” (see
Figure.gca and
Figure.sca) to support the
pylab/pyplot state machine, you should not insert or remove axes
directly from the axes list, but rather use the
add_subplot() and
add_axes() methods to insert, and the
delaxes() method to delete. You are
free however, to iterate over the list of axes or index into it to get
access to Axes instances you want to customize. Here is an
example which turns all the axes grids on:
for ax in fig.axes:ax.grid(True)
The figure also has its own text, lines, patches and images, which you
can use to add primitives directly. The default coordinate system for
the Figure will simply be in pixels (which is not usually what you
want) but you can control this by setting the transform property of
the Artist you are adding to the figure.
More useful is “figure coordinates” where (0, 0) is the bottom-left of
the figure and (1, 1) is the top-right of the figure which you can
obtain by setting the Artist transform to fig.transFigure:
import matplotlib.lines as linesfig = plt.figure()l1 = lines.Line2D([0, 1], [0, 1], transform=fig.transFigure, figure=fig)l2 = lines.Line2D([0, 1], [1, 0], transform=fig.transFigure, figure=fig)fig.lines.extend([l1, l2])plt.show()

Here is a summary of the Artists the figure contains
Figure attribute Description
axes A list of Axes instances (includes Subplot)
patch The Rectangle background
images A list of FigureImages patches - useful for raw pixel display
legends A list of Figure Legend instances (different from Axes.legends)
lines A list of Figure Line2D instances (rarely used, see Axes.lines)
patches A list of Figure patches (rarely used, see Axes.patches)
texts A list Figure Text instances
Axes container
The matplotlib.axes.Axes is the center of the matplotlib
universe — it contains the vast majority of all the Artists used
in a figure with many helper methods to create and add these
Artists to itself, as well as helper methods to access and
customize the Artists it contains. Like the
Figure, it contains a
Patch
patch which is a
Rectangle for Cartesian coordinates and a
Circle for polar coordinates; this patch
determines the shape, background and border of the plotting region:
ax = fig.add_subplot(111)rect = ax.patch # a Rectangle instancerect.set_facecolor('green')
When you call a plotting method, e.g., the canonical
plot() and pass in arrays or lists of
values, the method will create a matplotlib.lines.Line2D()
instance, update the line with all the Line2D properties passed as
keyword arguments, add the line to the Axes.lines container, and returns it to you:
In [213]: x, y = np.random.rand(2, 100)In [214]: line, = ax.plot(x, y, '-', color='blue', linewidth=2)
plot returns a list of lines because you can pass in multiple x, y
pairs to plot, and we are unpacking the first element of the length
one list into the line variable. The line has been added to the
Axes.lines list:
In [229]: print(ax.lines)[<matplotlib.lines.Line2D instance at 0xd378b0c>]
Similarly, methods that create patches, like
bar() creates a list of rectangles, will
add the patches to the Axes.patches list:
In [233]: n, bins, rectangles = ax.hist(np.random.randn(1000), 50, facecolor='yellow')In [234]: rectanglesOut[234]: <a list of 50 Patch objects>In [235]: print(len(ax.patches))
You should not add objects directly to the Axes.lines or
Axes.patches lists unless you know exactly what you are doing,
because the Axes needs to do a few things when it creates and adds
an object. It sets the figure and axes property of the Artist, as
well as the default Axes transformation (unless a transformation
is set). It also inspects the data contained in the Artist to
update the data structures controlling auto-scaling, so that the view
limits can be adjusted to contain the plotted data. You can,
nonetheless, create objects yourself and add them directly to the
Axes using helper methods like
add_line() and
add_patch(). Here is an annotated
interactive session illustrating what is going on:
In [262]: fig, ax = plt.subplots()# create a rectangle instanceIn [263]: rect = matplotlib.patches.Rectangle( (1,1), width=5, height=12)# by default the axes instance is NoneIn [264]: print(rect.get_axes())None# and the transformation instance is set to the "identity transform"In [265]: print(rect.get_transform())<Affine object at 0x13695544># now we add the Rectangle to the AxesIn [266]: ax.add_patch(rect)# and notice that the ax.add_patch method has set the axes# instanceIn [267]: print(rect.get_axes())Axes(0.125,0.1;0.775x0.8)# and the transformation has been set tooIn [268]: print(rect.get_transform())<Affine object at 0x15009ca4># the default axes transformation is ax.transDataIn [269]: print(ax.transData)<Affine object at 0x15009ca4># notice that the xlimits of the Axes have not been changedIn [270]: print(ax.get_xlim())(0.0, 1.0)# but the data limits have been updated to encompass the rectangleIn [271]: print(ax.dataLim.bounds)(1.0, 1.0, 5.0, 12.0)# we can manually invoke the auto-scaling machineryIn [272]: ax.autoscale_view()# and now the xlim are updated to encompass the rectangleIn [273]: print(ax.get_xlim())(1.0, 6.0)# we have to manually force a figure drawIn [274]: ax.figure.canvas.draw()
There are many, many Axes helper methods for creating primitive
Artists and adding them to their respective containers. The table
below summarizes a small sampling of them, the kinds of Artist they
create, and where they store them
Helper method Artist Container
ax.annotate - text annotations Annotate ax.texts
ax.bar - bar charts Rectangle ax.patches
ax.errorbar - error bar plots Line2D and Rectangle ax.lines and ax.patches
ax.fill - shared area Polygon ax.patches
ax.hist - histograms Rectangle ax.patches
ax.imshow - image data AxesImage ax.images
ax.legend - axes legends Legend ax.legends
ax.plot - xy plots Line2D ax.lines
ax.scatter - scatter charts PolygonCollection ax.collections
ax.text - text Text ax.texts
In addition to all of these Artists, the Axes contains two
important Artist containers: the XAxis
and YAxis, which handle the drawing of the
ticks and labels. These are stored as instance variables
xaxis and
yaxis. The XAxis and YAxis
containers will be detailed below, but note that the Axes contains
many helper methods which forward calls on to the
Axis instances so you often do not need to
work with them directly unless you want to. For example, you can set
the font color of the XAxis ticklabels using the Axes helper
method:
for label in ax.get_xticklabels():label.set_color('orange')
Below is a summary of the Artists that the Axes contains
Axes attribute Description
artists A list of Artist instances
patch Rectangle instance for Axes background
collections A list of Collection instances
images A list of AxesImage
legends A list of Legend instances
lines A list of Line2D instances
patches A list of Patch instances
texts A list of Text instances
xaxis matplotlib.axis.XAxis instance
yaxis matplotlib.axis.YAxis instance
Axis containers
The matplotlib.axis.Axis instances handle the drawing of the
tick lines, the grid lines, the tick labels and the axis label. You
can configure the left and right ticks separately for the y-axis, and
the upper and lower ticks separately for the x-axis. The Axis
also stores the data and view intervals used in auto-scaling, panning
and zooming, as well as the Locator and
Formatter instances which control where
the ticks are placed and how they are represented as strings.
Each Axis object contains a label attribute
(this is what pyplot modifies in calls to
xlabel() and ylabel()) as
well as a list of major and minor ticks. The ticks are
XTick and YTick instances,
which contain the actual line and text primitives that render the ticks and
ticklabels. Because the ticks are dynamically created as needed (e.g., when
panning and zooming), you should access the lists of major and minor ticks
through their accessor methods get_major_ticks()
and get_minor_ticks(). Although the ticks contain
all the primitives and will be covered below, Axis instances have accessor
methods that return the tick lines, tick labels, tick locations etc.:
fig, ax = plt.subplots()axis = ax.xaxisaxis.get_ticklocs()
axis.get_ticklabels()
note there are twice as many ticklines as labels because by
axis.get_ticklines()
by default you get the major ticks back
axis.get_ticklines()
but you can also ask for the minor ticks
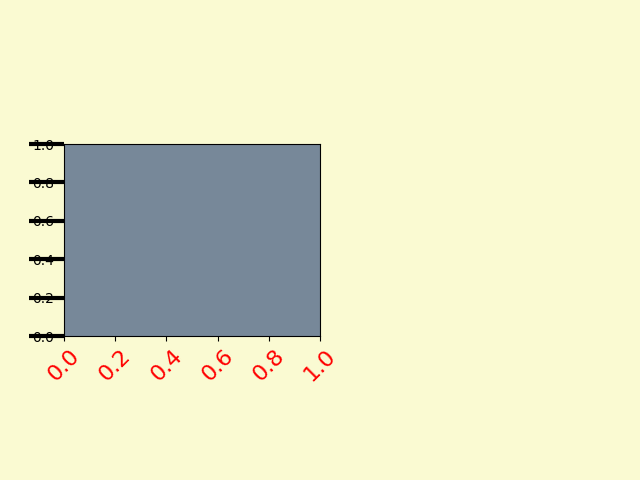
axis.get_ticklines(minor=True)# Here is a summary of some of the useful accessor methods of the ``Axis``# (these have corresponding setters where useful, such as# set_major_formatter)## ====================== =========================================================# Accessor method Description# ====================== =========================================================# get_scale The scale of the axis, e.g., 'log' or 'linear'# get_view_interval The interval instance of the axis view limits# get_data_interval The interval instance of the axis data limits# get_gridlines A list of grid lines for the Axis# get_label The axis label - a Text instance# get_ticklabels A list of Text instances - keyword minor=True|False# get_ticklines A list of Line2D instances - keyword minor=True|False# get_ticklocs A list of Tick locations - keyword minor=True|False# get_major_locator The matplotlib.ticker.Locator instance for major ticks# get_major_formatter The matplotlib.ticker.Formatter instance for major ticks# get_minor_locator The matplotlib.ticker.Locator instance for minor ticks# get_minor_formatter The matplotlib.ticker.Formatter instance for minor ticks# get_major_ticks A list of Tick instances for major ticks# get_minor_ticks A list of Tick instances for minor ticks# grid Turn the grid on or off for the major or minor ticks# ====================== =========================================================## Here is an example, not recommended for its beauty, which customizes# the axes and tick properties# plt.figure creates a matplotlib.figure.Figure instancefig = plt.figure()rect = fig.patch # a rectangle instancerect.set_facecolor('lightgoldenrodyellow')ax1 = fig.add_axes([0.1, 0.3, 0.4, 0.4])rect = ax1.patchrect.set_facecolor('lightslategray')for label in ax1.xaxis.get_ticklabels():# label is a Text instancelabel.set_color('red')label.set_rotation(45)label.set_fontsize(16)for line in ax1.yaxis.get_ticklines():# line is a Line2D instanceline.set_color('green')line.set_markersize(25)line.set_markeredgewidth(3)plt.show()
Tick containers
The matplotlib.axis.Tick is the final container object in our
descent from the Figure to the
Axes to the Axis
to the Tick. The Tick contains the tick
and grid line instances, as well as the label instances for the upper
and lower ticks. Each of these is accessible directly as an attribute
of the Tick.
Tick attribute Description
tick1line Line2D instance
tick2line Line2D instance
gridline Line2D instance
label1 Text instance
label2 Text instance
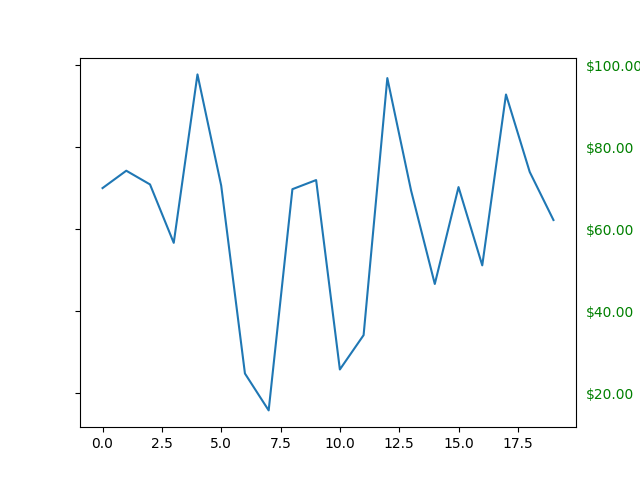
Here is an example which sets the formatter for the right side ticks with dollar signs and colors them green on the right side of the yaxis
import matplotlib.ticker as ticker# Fixing random state for reproducibilitynp.random.seed(19680801)fig, ax = plt.subplots()ax.plot(100*np.random.rand(20))formatter = ticker.FormatStrFormatter('$%1.2f')ax.yaxis.set_major_formatter(formatter)for tick in ax.yaxis.get_major_ticks():tick.label1.set_visible(False)tick.label2.set_visible(True)tick.label2.set_color('green')plt.show()
Download

若有收获,就点个赞吧
0 人点赞
