在本教程中,我们将创建两个简单的 Java Spring 独立应用。 我们将使用 NetBeans 来构建应用。
Spring 是流行的 Java 应用框架。 它提供了用于企业应用编程的各种库和工具。 这也是一个非常好的集成系统,可以帮助将各种企业组件粘合在一起。
Spring ApplicationContext是用于为应用提供配置的中央接口。 ClassPathXmlApplicationContext是ApplicationContext的实现,该实现从位于类路径上的 XML 文件加载配置定义。 AnnotationConfigApplicationContext创建一个新的应用上下文,该上下文从给定的带注解的类派生 Bean 定义。
pom.xml
<?xml version="1.0" encoding="UTF-8"?><project xmlns="http://maven.apache.org/POM/4.0.0"xmlns:xsi="http://www.w3.org/2001/XMLSchema-instance"xsi:schemaLocation="http://maven.apache.org/POM/4.0.0 http://maven.apache.org/xsd/maven-4.0.0.xsd"><modelVersion>4.0.0</modelVersion><groupId>com.zetcode</groupId><artifactId>SpringStandaloneEx2</artifactId><version>1.0-SNAPSHOT</version><packaging>jar</packaging><properties><project.build.sourceEncoding>UTF-8</project.build.sourceEncoding><maven.compiler.source>1.8</maven.compiler.source><maven.compiler.target>1.8</maven.compiler.target><spring-version>4.3.0.RELEASE</spring-version></properties><dependencies><dependency><groupId>org.springframework</groupId><artifactId>spring-core</artifactId><version>${spring-version}</version></dependency><dependency><groupId>org.springframework</groupId><artifactId>spring-beans</artifactId><version>${spring-version}</version></dependency><dependency><groupId>org.springframework</groupId><artifactId>spring-context</artifactId><version>${spring-version}</version></dependency></dependencies></project>
我们将 Maven 构建文件用于两个应用。 它包含必要的 Spring 依赖关系。
具有ClassPathXmlApplicationContext的 Spring 应用
我们在 NetBeans IDE 中创建一个新的 Maven Java SE 应用。
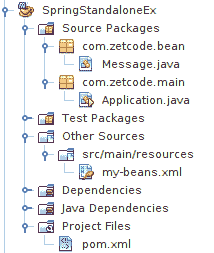
图:NetBeans 中的 Spring 项目结构
在项目中,有四个文件:Message.java,Application.java,my-beans.xml和pom.xml。
Message.java
package com.zetcode.bean;public class Message {private String message;public void setMessage(String message){this.message = message;}public String getMessage(){return message;}}
Message是我们的应用中使用的简单 Java Bean。
my-beans.xml
<?xml version="1.0" encoding="UTF-8"?><beans xmlns="http://www.springframework.org/schema/beans"xmlns:xsi="http://www.w3.org/2001/XMLSchema-instance"xsi:schemaLocation="http://www.springframework.org/schema/beanshttp://www.springframework.org/schema/beans/spring-beans.xsd"><bean id="mymessage" class="com.zetcode.bean.Message"><property name="message" value="Hello there!"/></bean></beans>
我们将Message类制成 Spring Bean; 现在,它由 Spring 容器管理。 我们还为message属性提供了一个值。 my-beans.xml位于src/main/resources子目录中。
Application.java
package com.zetcode.main;import com.zetcode.bean.Message;import org.springframework.context.ApplicationContext;import org.springframework.context.support.ClassPathXmlApplicationContext;public class Application {public static void main(String[] args) {ApplicationContext context =new ClassPathXmlApplicationContext("my-beans.xml");Message obj = (Message) context.getBean("mymessage");String msg = obj.getMessage();System.out.println(msg);}}
Application设置 Spring 应用。
ApplicationContext context =new ClassPathXmlApplicationContext("my-beans.xml");
从my-beans.xml文件,创建ApplicationContext。
Message obj = (Message) context.getBean("mymessage");
从应用上下文中,我们检索Message bean。
String msg = obj.getMessage();System.out.println(msg);
我们调用 bean 的getMessage()方法,并将消息打印到控制台。
Hello there!
这是应用的输出。
具有AnnotationConfigApplicationContext的 Spring 应用
在第二个示例中,我们将使用AnnotationConfigApplicationContext创建 Spring ApplicationContext。
Message.java
package com.zetcode.bean;import org.springframework.stereotype.Component;@Componentpublic class Message {private String message = "Hello there!";public void setMessage(String message){this.message = message;}public String getMessage(){return message;}}
Message bean 用@Component注解修饰。 此类由 Spring 自动检测。
Application.java
package com.zetcode.main;import com.zetcode.bean.Message;import org.springframework.beans.factory.annotation.Autowired;import org.springframework.context.ApplicationContext;import org.springframework.context.annotation.AnnotationConfigApplicationContext;import org.springframework.context.annotation.ComponentScan;@ComponentScan(basePackages = "com.zetcode")public class Application {public static void main(String[] args) {ApplicationContext context= new AnnotationConfigApplicationContext(Application.class);Application p = context.getBean(Application.class);p.start();}@Autowiredprivate Message message;private void start() {System.out.println("Message: " + message.getMessage());}}
这是主要的Application类。
@ComponentScan(basePackages = "com.zetcode")
使用@ComponentScan注解,我们告诉 Spring 在哪里寻找组件。
ApplicationContext context= new AnnotationConfigApplicationContext(Application.class);
ApplicationContext由注解创建。
@Autowiredprivate Message message;private void start() {System.out.println("Message: " + message.getMessage());}
使用@Autowired注解,Message bean 被注入到message变量中。
在本教程中,我们创建了两个独立的 Spring 应用。 第一个使用 XML 文件,第二个使用注解。 您可能也对相关教程感兴趣: Spring Web 应用简介, Spring Boot 优先 Web 应用或 Java 教程。

若有收获,就点个赞吧
0 人点赞
