在 Qyoto C# 编程教程的这一部分中,我们将进行绘图。
当我们在京都进行绘图时,QPainter类非常有用。 绘图事件通过OnPaintEvent()方法接收。 若要进行自定义绘图,我们必须重新实现此方法。
图案
在《京都议定书》中,我们可以使用各种图案来填充形状的内部。
using System;using QtCore;using QtGui;/*** ZetCode Qyoto C# tutorial** This program draws nine rectangles.* The interiors are filled with* different built-in patterns.** @author Jan Bodnar* website zetcode.com* last modified November 2012*/public class QyotoApp : QMainWindow{public QyotoApp(){WindowTitle = "Patterns";PaintEvent += OnPaintEvent;Resize(350, 280);Move(300, 300);Show();}private void OnPaintEvent(object sender, QEventArgs<QPaintEvent> e){QPainter ptr = new QPainter(this);DrawPatterns(ptr);ptr.End();}void DrawPatterns(QPainter ptr){ptr.SetPen(Qt.PenStyle.NoPen);ptr.SetBrush(Qt.BrushStyle.HorPattern);ptr.DrawRect(10, 15, 90, 60);ptr.SetBrush(Qt.BrushStyle.VerPattern);ptr.DrawRect(130, 15, 90, 60);ptr.SetBrush(Qt.BrushStyle.CrossPattern);ptr.DrawRect(250, 15, 90, 60);ptr.SetBrush(Qt.BrushStyle.Dense7Pattern);ptr.DrawRect(10, 105, 90, 60);ptr.SetBrush(Qt.BrushStyle.Dense6Pattern);ptr.DrawRect(130, 105, 90, 60);ptr.SetBrush(Qt.BrushStyle.Dense5Pattern);ptr.DrawRect(250, 105, 90, 60);ptr.SetBrush(Qt.BrushStyle.BDiagPattern);ptr.DrawRect(10, 195, 90, 60);ptr.SetBrush(Qt.BrushStyle.FDiagPattern);ptr.DrawRect(130, 195, 90, 60);ptr.SetBrush(Qt.BrushStyle.DiagCrossPattern);ptr.DrawRect(250, 195, 90, 60);}[STAThread]public static int Main(String[] args){new QApplication(args);new QyotoApp();return QApplication.Exec();}}
在代码示例中,我们将绘制九个矩形,并用不同的画笔图案填充它们。
PaintEvent += OnPaintEvent;
在绘制事件中执行绘制。 我们将OnPaintEvent()方法插入到绘画事件。
private void OnPaintEvent(object sender, QEventArgs<QPaintEvent> e){QPainter ptr = new QPainter(this);DrawPatterns(ptr);ptr.End();}
当需要重绘窗口区域时,将调用OnPaintEvent()方法。 当我们调整窗口大小,最大化或最小化窗口时,就会发生这种情况。在此方法中,我们创建了QPainter对象。 该对象用于完成 Qyoto 中的所有绘图。 绘图本身被委托给DrawPatterns()方法。 End()方法释放绘图时使用的资源。
ptr.SetPen(Qt.PenStyle.NoPen);
笔对象用于绘制形状的轮廓。 在我们的示例中,我们将不使用笔。
ptr.SetBrush(Qt.BrushStyle.HorPattern);
我们将水平图案设置为画笔。
ptr.DrawRect(10, 15, 90, 60);
我们使用当前的笔和画笔绘制一个矩形。 该方法的前两个参数是 x,y 坐标。 最后两个参数是矩形的宽度和高度。
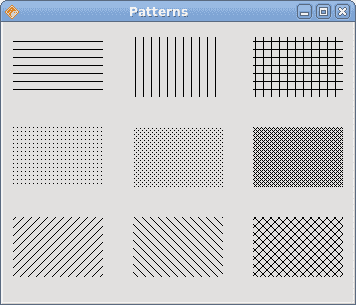
图:图案
形状
Qyoto 绘图 API 可以绘制各种形状。 以下编程代码示例将显示其中的一些。
using System;using System.Collections.Generic;using QtGui;using QtCore;/*** ZetCode Qyoto C# tutorial** This program draws basic shapes* available in Qyoto.** @author Jan Bodnar* website zetcode.com* last modified November 2012*/public class QyotoApp : QMainWindow{public QyotoApp(){WindowTitle = "Shapes";PaintEvent += OnPaintEvent;Resize(350, 280);Move(300, 300);Show();}private void OnPaintEvent(object sender, QEventArgs<QPaintEvent> e){QPainter ptr = new QPainter(this);DrawShapes(ptr);ptr.End();}void DrawShapes(QPainter ptr){ptr.SetRenderHint(QPainter.RenderHint.Antialiasing);ptr.Pen = new QPen(new QBrush(new QColor("Gray")), 1);ptr.Brush = new QColor("Gray");QPainterPath path1 = new QPainterPath();path1.MoveTo(5, 5);path1.CubicTo(40, 5, 50, 50, 99, 99);path1.CubicTo(5, 99, 50, 50, 5, 5);ptr.DrawPath(path1);ptr.DrawPie(130, 20, 90, 60, 30*16, 120*16);ptr.DrawChord(240, 30, 90, 60, 0, 16*180);ptr.DrawRoundRect(20, 120, 80, 50);List<QPoint> points = new List<QPoint>();points.Add(new QPoint(130, 140));points.Add(new QPoint(180, 170));points.Add(new QPoint(180, 140));points.Add(new QPoint(220, 110));points.Add(new QPoint(140, 100));QPolygon polygon = new QPolygon(points);ptr.DrawPolygon(polygon);ptr.DrawRect(250, 110, 60, 60);QPointF baseline = new QPointF(20, 250);QFont font = new QFont("Georgia", 55);QPainterPath path2 = new QPainterPath();path2.AddText(baseline, font, "Q");ptr.DrawPath(path2);ptr.DrawEllipse(140, 200, 60, 60);ptr.DrawEllipse(240, 200, 90, 60);}[STAThread]public static int Main(String[] args){new QApplication(args);new QyotoApp();return QApplication.Exec();}}
在此代码示例中,我们在窗口上绘制了九种不同的形状。 复杂路径,饼图,和弦,圆角矩形,多边形,矩形,基于字符的形状,圆形和椭圆形。
ptr.SetRenderHint(QPainter.RenderHint.Antialiasing);
我们在示例中使用抗锯齿。 抗锯齿形状看起来更好,但是绘制它们需要更多时间。
ptr.Pen = new QPen(new QBrush(new QColor("Gray")), 1);ptr.Brush = new QColor("Gray");
我们使用深灰色的笔和画笔绘制形状。
QPainterPath path1 = new QPainterPath();path1.MoveTo(5, 5);path1.CubicTo(40, 5, 50, 50, 99, 99);path1.CubicTo(5, 99, 50, 50, 5, 5);ptr.DrawPath(path1);
使用QPainterPath对象创建第一个复杂形状。 QPainterPath类为绘图操作提供了一个容器。 画家路径是由许多图形构造块(例如矩形,椭圆形,直线和曲线)组成的对象。
ptr.DrawPie(130, 20, 90, 60, 30*16, 120*16);ptr.DrawChord(240, 30, 90, 60, 0, 16*180);ptr.DrawRoundRect(20, 120, 80, 50);
这三行画出一个饼图,一个和弦和一个圆角矩形。
List<QPoint> points = new List<QPoint>();points.Add(new QPoint(130, 140));points.Add(new QPoint(180, 170));points.Add(new QPoint(180, 140));points.Add(new QPoint(220, 110));points.Add(new QPoint(140, 100));QPolygon polygon = new QPolygon(points);ptr.DrawPolygon(polygon);
我们使用五个点的列表来创建多边形。
QPointF baseline = new QPointF(20, 250);QFont font = new QFont("Georgia", 55);QPainterPath path2 = new QPainterPath();path2.AddText(baseline, font, "Q");ptr.DrawPath(path2);
这些线创建基于字符的形状。
ptr.DrawEllipse(140, 200, 60, 60);ptr.DrawEllipse(240, 200, 90, 60);
这两条线分别创建一个圆和一个椭圆。
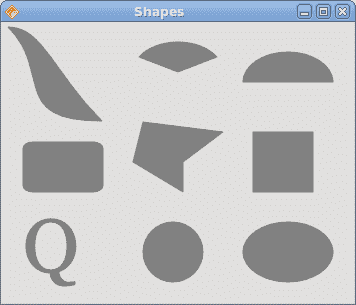
图:形状
透明矩形
透明性是指能够透视材料的质量。 了解透明度的最简单方法是想象一块玻璃或水。 从技术上讲,光线可以穿过玻璃,这样我们就可以看到玻璃后面的物体。
在计算机图形学中,我们可以使用 alpha 合成来实现透明效果。 Alpha 合成是将图像与背景组合以创建部分透明外观的过程。 合成过程使用 Alpha 通道。 (wikipedia.org,answers.com)
using System;using QtCore;using QtGui;/*** ZetCode Qyoto C# tutorial** This program draws ten rectangles with* different levels of transparency.** @author Jan Bodnar* website zetcode.com* last modified November 2012*/public class QyotoApp : QMainWindow{public QyotoApp(){WindowTitle = "Transparent rectangles";PaintEvent += OnPaintEvent;Resize(590, 90);Move(300, 300);Show();}private void OnPaintEvent(object sender, QEventArgs<QPaintEvent> e){QPainter ptr = new QPainter(this);DrawRectangles(ptr);ptr.End();}void DrawRectangles(QPainter ptr){ptr.SetPen(Qt.PenStyle.NoPen);for (int i=1; i<11; i++){ptr.Brush = new QColor(0, 0, 255, i*25);ptr.DrawRect(50*i, 20, 40, 40);}}[STAThread]public static int Main(String[] args){new QApplication(args);new QyotoApp();return QApplication.Exec();}}
在示例中,我们将绘制十个具有不同透明度级别的矩形。
ptr.SetPen(Qt.PenStyle.NoPen);
我们不用笔。
for (int i=1; i<11; i++){ptr.Brush = new QColor(0, 0, 255, i*25);ptr.DrawRect(50*i, 20, 40, 40);}
QColor对象的最后一个参数是 alpha 透明度值。

图:透明矩形
绘制文字
在最后一个示例中,我们将在窗口上绘制文本。
using System;using QtCore;using QtGui;/*** ZetCode Qyoto C# tutorial** This program draws text* on the window.** @author Jan Bodnar* website zetcode.com* last modified November 2012*/public class QyotoApp : QMainWindow{public QyotoApp(){WindowTitle = "Soulmate";PaintEvent += OnPaintEvent;Resize(370, 240);Move(300, 300);Show();}private void OnPaintEvent(object sender, QEventArgs<QPaintEvent> e){QPainter ptr = new QPainter(this);DrawLyrics(ptr);ptr.End();}void DrawLyrics(QPainter ptr){ptr.Brush = new QColor(25, 25, 25);ptr.Font = new QFont("Courier", 10);ptr.DrawText(new QPoint(20, 30),"Most relationships seem so transitory");ptr.DrawText(new QPoint(20, 60),"They're good but not the permanent one");ptr.DrawText(new QPoint(20, 120),"Who doesn't long for someone to hold");ptr.DrawText(new QPoint(20, 150),"Who knows how to love without being told");ptr.DrawText(new QPoint(20, 180),"Somebody tell me why I'm on my own");ptr.DrawText(new QPoint(20, 210),"If there's a soulmate for everyone");}[STAThread]public static int Main(String[] args){new QApplication(args);new QyotoApp();return QApplication.Exec();}}
我们在窗口上画一首歌歌词。
ptr.Font = new QFont("Courier", 10);
我们为文本设置了 Courier 字体。
ptr.DrawText(new QPoint(20, 30),"Most relationships seem so transitory");
DrawText()方法用于在x = 20,y = 30处绘制文本。
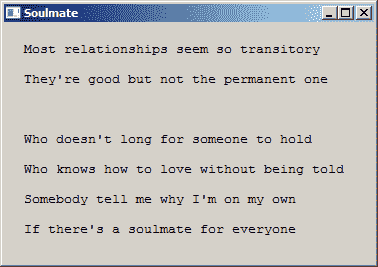
图:绘制文本
在 Qyoto C# 编程教程的这一部分中,我们做了一些绘图。

若有收获,就点个赞吧
0 人点赞
