在 PyCairo 教程的这一部分中,我们将讨论剪切和遮罩操作。
剪裁
剪裁是将绘图限制为特定区域。 这样做是出于效率方面的考虑,并会产生有趣的效果。 PyCairo 具有clip()方法来设置裁剪。
#!/usr/bin/python'''ZetCode PyCairo tutorialThis program shows how to performclipping in PyCairo.author: Jan Bodnarwebsite: zetcode.comlast edited: August 2012'''from gi.repository import Gtk, GLibimport cairoimport mathimport randomclass Example(Gtk.Window):def __init__(self):super(Example, self).__init__()self.init_ui()self.load_image()self.init_vars()def init_ui(self):self.darea = Gtk.DrawingArea()self.darea.connect("draw", self.on_draw)self.add(self.darea)GLib.timeout_add(100, self.on_timer)self.set_title("Clipping")self.resize(300, 200)self.set_position(Gtk.WindowPosition.CENTER)self.connect("delete-event", Gtk.main_quit)self.show_all()def load_image(self):self.image = cairo.ImageSurface.create_from_png("beckov.png")def init_vars(self):self.pos_x = 128self.pos_y = 128self.radius = 40self.delta = [3, 3]def on_timer(self):self.pos_x += self.delta[0]self.pos_y += self.delta[1]self.darea.queue_draw()return Truedef on_draw(self, wid, cr):w, h = self.get_size()if (self.pos_x < 0 + self.radius):self.delta[0] = random.randint(5, 9)elif (self.pos_x > w - self.radius):self.delta[0] = -random.randint(5, 9)if (self.pos_y < 0 + self.radius):self.delta[1] = random.randint(5, 9)elif (self.pos_y > h - self.radius):self.delta[1] = -random.randint(5, 9)cr.set_source_surface(self.image, 1, 1)cr.arc(self.pos_x, self.pos_y, self.radius, 0, 2*math.pi)cr.clip()cr.paint()def main():app = Example()Gtk.main()if __name__ == "__main__":main()
在此示例中,我们将裁剪图像。 圆圈在窗口区域上移动并显示基础图像的一部分。 这就像我们从孔中看一样。
def load_image(self):self.image = cairo.ImageSurface.create_from_png("beckov.png")
这是基础图像。 每个计时器周期,我们都会看到此图像的一部分。
if (self.pos_x < 0 + self.radius):self.delta[0] = random.randint(5, 9)elif (self.pos_x > w - self.radius):self.delta[0]= -random.randint(5, 9)
如果圆碰到窗口的左侧或右侧,则圆的移动方向会随机变化。 顶部和底部也一样。
cr.arc(self.pos_x, self.pos_y, self.radius, 0, 2*math.pi)
此行为 Cairo 上下文添加了一条循环路径。
cr.clip()
clip()设置剪切区域。 裁剪区域是当前使用的路径。 当前路径是通过arc()方法调用创建的。
cr.paint()
paint()在当前剪裁区域内的任何地方绘制当前源。
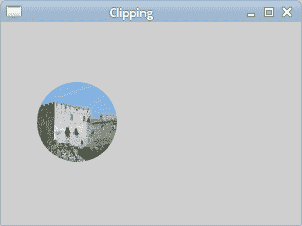
图:剪裁
遮罩
在将源应用于表面之前,先对其进行过滤。 遮罩用作过滤器。 遮罩确定在哪里应用源,在哪里不应用。 遮罩的不透明部分允许复制源。 透明零件不允许将源复制到表面。
#!/usr/bin/python'''ZetCode PyCairo tutorialThis program demonstrates masking.author: Jan Bodnarwebsite: zetcode.comlast edited: August 2012'''from gi.repository import Gtkimport cairoclass Example(Gtk.Window):def __init__(self):super(Example, self).__init__()self.init_ui()self.load_image()def init_ui(self):darea = Gtk.DrawingArea()darea.connect("draw", self.on_draw)self.add(darea)self.set_title("Masking")self.resize(310, 100)self.set_position(Gtk.WindowPosition.CENTER)self.connect("delete-event", Gtk.main_quit)self.show_all()def load_image(self):self.ims = cairo.ImageSurface.create_from_png("omen.png")def on_draw(self, wid, cr):cr.mask_surface(self.ims, 0, 0);cr.fill()def main():app = Example()Gtk.main()if __name__ == "__main__":main()
在该示例中,遮罩确定在哪里绘画和在哪里不绘画。
cr.mask_surface(self.ims, 0, 0);cr.fill()
我们使用图像作为遮罩,从而将其显示在窗口上。
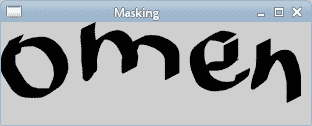
图:遮罩
蒙蔽效果
在此代码示例中,我们将忽略图像。 这类似于我们使用卷帘所做的。
#!/usr/bin/python'''ZetCode PyCairo tutorialThis program creates a blind downeffect using masking operation.author: Jan Bodnarwebsite: zetcode.comlast edited: August 2012'''from gi.repository import Gtk, GLibimport cairoimport mathclass Example(Gtk.Window):def __init__(self):super(Example, self).__init__()self.init_ui()self.load_image()self.init_vars()def init_ui(self):self.darea = Gtk.DrawingArea()self.darea.connect("draw", self.on_draw)self.add(self.darea)GLib.timeout_add(35, self.on_timer)self.set_title("Blind down")self.resize(325, 250)self.set_position(Gtk.WindowPosition.CENTER)self.connect("delete-event", Gtk.main_quit)self.show_all()def load_image(self):self.image = cairo.ImageSurface.create_from_png("beckov.png")def init_vars(self):self.timer = Trueself.h = 0self.iw = self.image.get_width()self.ih = self.image.get_height()self.ims = cairo.ImageSurface(cairo.FORMAT_ARGB32,self.iw, self.ih)def on_timer(self):if (not self.timer):return Falseself.darea.queue_draw()return Truedef on_draw(self, wid, cr):ic = cairo.Context(self.ims)ic.rectangle(0, 0, self.iw, self.h)ic.fill()self.h += 1if (self.h == self.ih):self.timer = Falsecr.set_source_surface(self.image, 10, 10)cr.mask_surface(self.ims, 10, 10)def main():app = Example()Gtk.main()if __name__ == "__main__":main()
盲目效应背后的想法很简单。 图像高度为 h 像素。 我们绘制高度为 1px 的 0、1、2 … 线。 每个周期,图像的一部分高 1px,直到整个图像可见为止。
def load_image(self):self.image = cairo.ImageSurface.create_from_png("beckov.png")
在load_image()方法中,我们从 PNG 图像创建图像表面。
def init_vars(self):self.timer = Trueself.h = 0self.iw = self.image.get_width()self.ih = self.image.get_height()self.ims = cairo.ImageSurface(cairo.FORMAT_ARGB32,self.iw, self.ih)
在init_vars()方法中,我们初始化一些变量。 我们启动self.timer和self.h变量。 我们得到加载图像的宽度和高度。 然后我们创建一个空的图像表面。 它将用我们之前创建的图像表面的像素线填充。
ic = cairo.Context(self.ims)
我们从空图像源创建一个 cairo 上下文。
ic.rectangle(0, 0, self.iw, self.h)ic.fill()
我们在最初为空的图像中绘制一个矩形。 矩形每个周期将高出 1 像素。 以这种方式创建的图像稍后将用作遮罩。
self.h += 1
要显示的图像高度增加一个单位。
if (self.h == self.ih):self.timer = False
当我们在 GTK 窗口上绘制整个图像时,我们将停止timer方法。
cr.set_source_surface(self.image, 10, 10)cr.mask_surface(self.ims, 10, 10)
城堡的图像被设置为绘画的来源。 mask_surface()使用表面的 Alpha 通道作为遮罩来绘制电流源。
本章介绍了 PyCairo 中的剪裁和遮罩。

若有收获,就点个赞吧
0 人点赞
