JavaFX 包含javafx.scene.effect包,该包具有执行各种视觉效果的一组或类。 在本章中,我们创建DropShadow,Reflection,Lighting,GaussianBlur,SepiaTone和PerspectiveTransform效果。 我们还将展示如何组合多种效果。
通过setEffect()方法将效果应用于节点的effectProperty。
阴影
DropShadow是一种高级效果,可使用指定的颜色,半径和偏移量在内容后面渲染阴影。
DropShadowEx.java
package com.zetcod;import javafx.application.Application;import javafx.scene.Scene;import javafx.scene.effect.DropShadow;import javafx.scene.layout.StackPane;import javafx.scene.paint.Color;import javafx.scene.shape.Rectangle;import javafx.stage.Stage;/*** ZetCode JavaFX tutorial** This program applies a DropShadow effect* on a Rectangle.** Author: Jan Bodnar* Website: zetcode.com* Last modified: June 2015*/public class DropShadowEx extends Application {@Overridepublic void start(Stage stage) {initUI(stage);}private void initUI(Stage stage) {StackPane root = new StackPane();Rectangle rect = new Rectangle(0, 0, 100, 100);rect.setFill(Color.GREENYELLOW);DropShadow ds = new DropShadow(15, Color.DARKGREEN);rect.setEffect(ds);root.getChildren().add(rect);Scene scene = new Scene(root, 250, 200, Color.WHITESMOKE);stage.setTitle("DropShadow");stage.setScene(scene);stage.show();}public static void main(String[] args) {launch(args);}}
该示例在矩形周围创建阴影。
Rectangle rect = new Rectangle(0, 0, 100, 100);rect.setFill(Color.GREENYELLOW);
构造一个绿色黄色矩形。
DropShadow ds = new DropShadow(15, Color.DARKGREEN);
创建DropShadow效果。 构造器接受半径和颜色。
rect.setEffect(ds);
通过setEffect()方法应用效果。
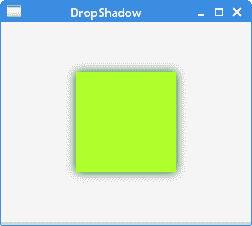
图:DropShadow
反射
Reflection是一种将输入的反射版本呈现在实际输入内容之下的效果。
ReflectionEx.java
package com.zetcode;import javafx.application.Application;import javafx.scene.Scene;import javafx.scene.effect.Reflection;import javafx.scene.layout.StackPane;import javafx.scene.paint.Color;import javafx.scene.text.Font;import javafx.scene.text.FontWeight;import javafx.scene.text.Text;import javafx.stage.Stage;/*** ZetCode JavaFX tutorial** This program applies a Reflection effect* on a Text node.** Author: Jan Bodnar* Website: zetcode.com* Last modified: June 2015*/public class ReflectionEx extends Application {@Overridepublic void start(Stage stage) {initUI(stage);}private void initUI(Stage stage) {StackPane root = new StackPane();Text text = new Text();text.setText("ZetCode");text.setFill(Color.STEELBLUE);text.setFont(Font.font("Serif", FontWeight.BOLD, 60));Reflection ref = new Reflection();text.setEffect(ref);root.getChildren().add(text);Scene scene = new Scene(root, 300, 250, Color.WHITESMOKE);stage.setTitle("Reflection");stage.setScene(scene);stage.show();}public static void main(String[] args) {launch(args);}}
本示例在Text节点上应用Reflection效果。
Text text = new Text();text.setText("ZetCode");text.setFill(Color.STEELBLUE);text.setFont(Font.font("Serif", FontWeight.BOLD, 60));
创建一个Text控件。 它的油漆是STEELBLUE。 字体变为粗体和放大。
Reflection ref = new Reflection();text.setEffect(ref);
将创建默认的Reflection并将其应用于文本控件。
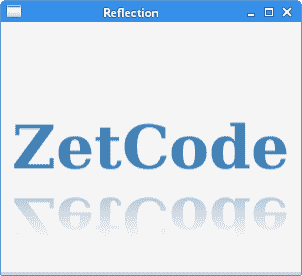
图:反射
灯光
Lighting模拟照在给定内容上的光源,该光源可用于为平面对象提供更逼真的三维外观。 Light源的setAzimuth()方法设置方位角-光源的方向角。
LightingEx.java
package com.zetcode;import javafx.application.Application;import javafx.beans.property.DoubleProperty;import javafx.beans.property.SimpleDoubleProperty;import javafx.geometry.Insets;import javafx.scene.Scene;import javafx.scene.control.Slider;import javafx.scene.effect.Light;import javafx.scene.effect.Lighting;import javafx.scene.layout.VBox;import javafx.scene.paint.Color;import javafx.scene.text.Font;import javafx.scene.text.FontWeight;import javafx.scene.text.Text;import javafx.stage.Stage;/*** ZetCode JavaFX tutorial** This program applies a Lighting effect on* a Text control. The azimuth of the light is* controlled by a Slider.** Author: Jan Bodnar* Website: zetcode.com* Last modified: June 2015*/public class LightingEx extends Application {@Overridepublic void start(Stage stage) {initUI(stage);}private void initUI(Stage stage) {VBox root = new VBox(30);root.setPadding(new Insets(10));DoubleProperty azimuth = new SimpleDoubleProperty(0);Light.Distant light = new Light.Distant();light.setAzimuth(0);Lighting lighting = new Lighting(light);lighting.setSurfaceScale(5.0);Text text = new Text();text.setText("ZetCode");text.setFill(Color.LIGHTSKYBLUE);text.setFont(Font.font(null, FontWeight.BOLD, 60));Slider slider = new Slider(1, 360, 0);azimuth.bind(slider.valueProperty());slider.valueProperty().addListener(event -> {light.setAzimuth(azimuth.get());lighting.setLight(light);text.setEffect(lighting);});text.setEffect(lighting);root.getChildren().addAll(slider, text);Scene scene = new Scene(root, 300, 250, Color.WHITESMOKE);stage.setTitle("Lighting");stage.setScene(scene);stage.show();}public static void main(String[] args) {launch(args);}}
本示例对Text控件应用Lighting效果。 光的方位角由Slider控制。
Light.Distant light = new Light.Distant();light.setAzimuth(0);
创建一个Light源。
Lighting lighting = new Lighting(light);
该行使用指定的光源创建Lighting的新实例。
Text text = new Text();text.setText("ZetCode");text.setFill(Color.LIGHTSKYBLUE);text.setFont(Font.font(null, FontWeight.BOLD, 60));
这是在其上设置了Lighting效果的Text控件。
Slider slider = new Slider(1, 360, 0);azimuth.bind(slider.valueProperty());slider.valueProperty().addListener(event -> {light.setAzimuth(azimuth.get());lighting.setLight(light);text.setEffect(lighting);});
Slider控件管理光源的方位角。
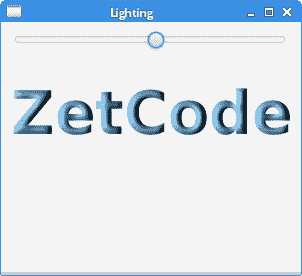
图:Lighting
高斯模糊
GaussianBlur是使用具有可配置半径的高斯卷积核的模糊效果。
GaussianBlurEx.java
package com.zetcode;import javafx.application.Application;import static javafx.application.Application.launch;import javafx.beans.property.DoubleProperty;import javafx.beans.property.SimpleDoubleProperty;import javafx.geometry.Insets;import javafx.scene.Scene;import javafx.scene.control.Slider;import javafx.scene.effect.GaussianBlur;import javafx.scene.layout.VBox;import javafx.scene.paint.Color;import javafx.scene.text.Font;import javafx.scene.text.Text;import javafx.stage.Stage;/*** ZetCode JavaFX tutorial** This program applies a GaussianBlur effect on* a Text control. The radius of the blur is* controlled by a Slider.** Author: Jan Bodnar* Website: zetcode.com* Last modified: June 2015*/public class GaussianBlurEx extends Application {@Overridepublic void start(Stage stage) {initUI(stage);}private void initUI(Stage stage) {VBox root = new VBox(30);root.setPadding(new Insets(10));DoubleProperty radius = new SimpleDoubleProperty(0);Text blurredText = new Text("Inception");blurredText.setFont(Font.font(38));Slider slider = new Slider(1, 20, 1);radius.bind(slider.valueProperty());slider.valueProperty().addListener(event -> {blurredText.setEffect(new GaussianBlur(radius.get()));});root.getChildren().addAll(slider, blurredText);Scene scene = new Scene(root, 300, 250, Color.WHITESMOKE);stage.setTitle("Blur effect");stage.setScene(scene);stage.show();}public static void main(String[] args) {launch(args);}}
本示例对Text控件应用GaussianBlur效果。 模糊的半径由Slider控制。
Text blurredText = new Text("Inception");blurredText.setFont(Font.font(38));
模糊效果将应用于此文本控件。
Slider slider = new Slider(1, 20, 1);radius.bind(slider.valueProperty());slider.valueProperty().addListener(event -> {blurredText.setEffect(new GaussianBlur(radius.get()));});
Slider控件管理GaussianBlur效果的radius属性。
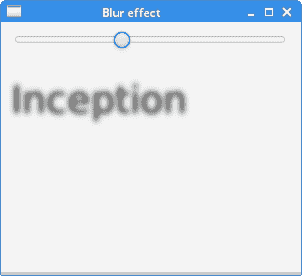
图:GaussianBlur
棕褐色调
SepiaTone是产生棕褐色调效果的滤镜,类似于古董照片。
SepiaToneEx.java
package com.zetcode;import javafx.application.Application;import javafx.beans.binding.Bindings;import javafx.scene.CacheHint;import javafx.scene.Scene;import javafx.scene.effect.ColorAdjust;import javafx.scene.effect.Effect;import javafx.scene.effect.SepiaTone;import javafx.scene.image.Image;import javafx.scene.image.ImageView;import javafx.scene.layout.StackPane;import javafx.scene.paint.Color;import javafx.stage.Stage;/*** ZetCode JavaFX tutorial** This program applies a SepiaTone effect* on an Image when a mouse pointer is over* the image.** Author: Jan Bodnar* Website: zetcode.com* Last modified: June 2015*/public class SepiaToneEx extends Application {@Overridepublic void start(Stage stage) {initUI(stage);}private void initUI(Stage stage) {StackPane root = new StackPane();Image image = new Image("file:mushroom.png");ImageView iw = new ImageView(image);SepiaTone sepia = new SepiaTone();iw.effectProperty().bind(Bindings.when(iw.hoverProperty()).then((Effect) sepia).otherwise((Effect) null));iw.setCache(true);iw.setCacheHint(CacheHint.SPEED);root.getChildren().add(iw);Scene scene = new Scene(root);stage.setTitle("SepiaTone");scene.setFill(Color.WHITESMOKE);stage.setScene(scene);stage.show();}public static void main(String[] args) {launch(args);}}
当鼠标指针悬停在图像上时,该示例在Image上应用SepiaTone效果。
Image image = new Image("file:mushroom.png");ImageView iw = new ImageView(image);
我们从磁盘加载Image并创建一个ImageView控件。
SepiaTone sepia = new SepiaTone();iw.effectProperty().bind(Bindings.when(iw.hoverProperty()).then((Effect) sepia).otherwise((Effect) null));
当鼠标指针位于ImageView控件的边界上时,将设置SepiaTone效果。
iw.setCache(true);iw.setCacheHint(CacheHint.SPEED);
出于性能原因,将缓存节点渲染。
透视变换
PerspectiveTransform提供输入内容的非仿射变换。 它通常用于在二维内容上创建三维效果。
PerspectiveEx.java
package com.zetcode;import javafx.application.Application;import javafx.scene.Scene;import javafx.scene.effect.PerspectiveTransform;import javafx.scene.layout.Pane;import javafx.scene.layout.StackPane;import javafx.scene.paint.Color;import javafx.scene.shape.Rectangle;import javafx.stage.Stage;/*** ZetCode JavaFX tutorial** This program creates a chessboard* with a PerspectiveTransform effect.** Author: Jan Bodnar* Website: zetcode.com* Last modified: June 2015*/public class PerspectiveEx extends Application {private final int SIZE = 50;@Overridepublic void start(Stage stage) {initUI(stage);}private void initUI(Stage stage) {StackPane root = new StackPane();Pane board = new Pane();for (int row = 0; row < 8; row++) {for (int col = 0; col < 8; col++) {Rectangle r = new Rectangle(col * SIZE, row*SIZE,SIZE, SIZE);if ((col+row) % 2 == 0) {r.setFill(Color.WHITE);} else {r.setFill(Color.BLACK);}board.getChildren().add(r);}}PerspectiveTransform e = new PerspectiveTransform();e.setUlx(30); // Upper-left pointe.setUly(170);e.setUrx(370); // Upper-right pointe.setUry(170);e.setLlx(0); // Lower-left pointe.setLly(300);e.setLrx(400); // Lower-right pointe.setLry(300);board.setEffect(e);root.getChildren().add(board);Scene scene = new Scene(root, Color.WHITESMOKE);stage.setTitle("ChessBoard");stage.setScene(scene);stage.show();}public static void main(String[] args) {launch(args);}}
该示例形成具有PerspectiveTransform效果的棋盘。
for (int row = 0; row < 8; row++) {for (int col = 0; col < 8; col++) {Rectangle r = new Rectangle(col * SIZE, row*SIZE,SIZE, SIZE);if ((col+row) % 2 == 0) {r.setFill(Color.WHITE);} else {r.setFill(Color.BLACK);}board.getChildren().add(r);}}
此代码产生 64 个矩形。 矩形具有黑色和白色。
PerspectiveTransform e = new PerspectiveTransform();e.setUlx(30); // Upper-left pointe.setUly(170);e.setUrx(370); // Upper-right pointe.setUry(170);e.setLlx(0); // Lower-left pointe.setLly(300);e.setLrx(400); // Lower-right pointe.setLry(300);board.setEffect(e);
实例化一个PerspectiveTransform并将其应用于该节点。 我们提供四个角点的 x 和 y 坐标。 这些点形成一个矩形,在其中渲染效果。
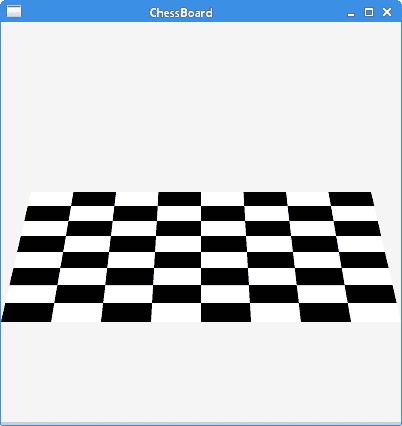
图:Chessboard
组合效果
可以组合效果。 如果已经设置了一种效果,则setEffect()方法将替换一种效果。 为了组合多种效果,我们使用Effect的setInput()方法。
CombiningEffectsEx.java
package com.zetcode;import javafx.application.Application;import javafx.scene.Scene;import javafx.scene.effect.Light;import javafx.scene.effect.Lighting;import javafx.scene.effect.Reflection;import javafx.scene.layout.StackPane;import javafx.scene.paint.Color;import javafx.scene.text.Font;import javafx.scene.text.FontWeight;import javafx.scene.text.Text;import javafx.stage.Stage;/*** ZetCode JavaFX tutorial** This program combines a Reflection effect* with a Lighting effect on a Text node.** Author: Jan Bodnar* Website: zetcode.com* Last modified: June 2015*/public class CombiningEffectsEx extends Application {@Overridepublic void start(Stage stage) {initUI(stage);}private void initUI(Stage stage) {StackPane root = new StackPane();Light.Distant light = new Light.Distant();light.setAzimuth(50);Lighting lighting = new Lighting();lighting.setLight(light);lighting.setSurfaceScale(5);Text text = new Text();text.setText("ZetCode");text.setFill(Color.CADETBLUE);text.setFont(Font.font(null, FontWeight.BOLD, 60));Reflection ref = new Reflection();ref.setInput(lighting);text.setEffect(ref);root.getChildren().add(text);Scene scene = new Scene(root, 300, 250, Color.WHITESMOKE);stage.setTitle("Combining effects");stage.setScene(scene);stage.show();}public static void main(String[] args) {launch(args);}}
该示例程序在Text节点上结合了Reflection效果和Lighting效果。
Light.Distant light = new Light.Distant();light.setAzimuth(50);Lighting lighting = new Lighting();lighting.setLight(light);lighting.setSurfaceScale(5.0);
这些行创建Lighting效果。
Text text = new Text();text.setText("ZetCode");text.setFill(Color.CADETBLUE);text.setFont(Font.font(null, FontWeight.BOLD, 60));
创建一个Text控件。 字体是放大和粗体。 文本的颜色是CADETBLUE。
Reflection ref = new Reflection();ref.setInput(lighting);
构造了Reflection效果。 使用setInput()方法将其与照明效果结合在一起。
text.setEffect(ref);
效果的最终组合通过setEffect()方法应用于节点。
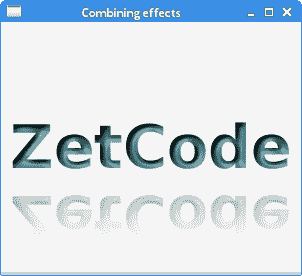
图:组合效果
在本章中,我们创建了几种视觉效果。

若有收获,就点个赞吧
0 人点赞
