在 Java SWT 编程教程的这一部分中,我们将介绍一些 SWT 小部件。
小部件是 GUI 应用的基本构建块。 将小部件视为乐高玩具的一部分。 多年来,几个小部件已成为所有 OS 平台上所有工具包中的标准。 例如,按钮,复选框或滚动条。
Label
Label是显示字符串或图像的不可选择的用户界面对象。 此外,它可以显示水平或垂直线。
LabelEx.java
package com.zetcode;import org.eclipse.swt.SWT;import org.eclipse.swt.graphics.Point;import org.eclipse.swt.widgets.Display;import org.eclipse.swt.widgets.Label;import org.eclipse.swt.widgets.Shell;/*** ZetCode Java SWT tutorial** This program uses the Label widget to* show lyrics of a song.** Author: Jan Bodnar* Website: zetcode.com* Last modified: June 2015*/public class LabelEx {final String lyrics ="And I know that he knows I'm unfaithful\n"+"And it kills him inside\n"+"To know that I am happy with some other guy\n"+"I can see him dyin'\n"+"\n"+"I don't wanna do this anymore\n"+"I don't wanna be the reason why\n"+"Every time I walk out the door\n"+"I see him die a little more inside\n"+"I don't wanna hurt him anymore\n"+"I don't wanna take away his life\n"+"I don't wanna be... A murderer";public LabelEx(Display display) {initUI(display);}private void initUI(Display display) {Shell shell = new Shell(display, SWT.SHELL_TRIM | SWT.CENTER);Label label = new Label(shell, SWT.LEFT);label.setText(lyrics);Point p = label.computeSize(SWT.DEFAULT, SWT.DEFAULT);label.setBounds(5, 5, p.x+5, p.y+5);shell.setText("Unfaithful");shell.pack();shell.open();while (!shell.isDisposed()) {if (!display.readAndDispatch()) {display.sleep();}}}@SuppressWarnings("unused")public static void main(String[] args) {Display display = new Display();LabelEx ex = new LabelEx(display);display.dispose();}}
该代码示例在窗口上显示了一些歌词。
String lyrics ="And I know that he knows I'm unfaithful\n"+"And it kills him inside\n"+...
我们构建多行文本。
Label label = new Label(shell, SWT.LEFT);label.setText(lyrics);
Label小部件已创建; SWT.LEFT选项使其文本保持左对齐。
Point p = label.computeSize(SWT.DEFAULT, SWT.DEFAULT);label.setBounds(5, 5, p.x+5, p.y+5);
我们计算文本的大小,以便在文本周围放置一些空间。
shell.pack();
pack()方法将窗口调整为首选大小。 足够大以显示标签小部件。
CheckBox
在 SWT 中,复选按钮是Button的特例。 它是具有两种状态的窗口小部件:打开和关闭。 接通状态通过复选标记显示。 它用来表示一些布尔属性。
CheckButtonEx.java
package com.zetcode;import org.eclipse.swt.SWT;import org.eclipse.swt.layout.RowLayout;import org.eclipse.swt.widgets.Button;import org.eclipse.swt.widgets.Display;import org.eclipse.swt.widgets.Shell;/*** ZetCode Java SWT tutorial** This program uses a check button* widget to show/hide the title* of the window.** Author: Jan Bodnar* Website: zetcode.com* Last modified: June 2015*/public class CheckButtonEx {private Shell shell;public CheckButtonEx(Display display) {initUI(display);}private void initUI(Display display) {shell = new Shell(display);RowLayout layout = new RowLayout();layout.marginLeft = 30;layout.marginTop = 30;shell.setLayout(layout);Button cb = new Button(shell, SWT.CHECK);cb.setText("Show title");cb.setSelection(true);cb.addListener(SWT.Selection, event -> onButtonSelect(cb));shell.setText("Check button");shell.setSize(250, 200);shell.open();while (!shell.isDisposed()) {if (!display.readAndDispatch()) {display.sleep();}}}private void onButtonSelect(Button cb) {if (cb.getSelection()) {shell.setText("Check button");} else {shell.setText("");}}@SuppressWarnings("unused")public static void main(String[] args) {Display display = new Display();CheckButtonEx ex = new CheckButtonEx(display);display.dispose();}}
窗口标题的显示取决于检查按钮的状态。
Button cb = new Button(shell, SWT.CHECK);cb.setText("Show title");
通过将SWT.CHECK传递给Button构造器来创建复选按钮小部件。 setText()方法设置按钮的标签。
cb.setSelection(true);
默认情况下标题是可见的,因此我们默认使用setSelection()方法选择复选按钮。
cb.addListener(SWT.Selection, event -> onButtonSelect(cb));
我们向按钮的SWT.Selection事件类型添加一个监听器对象。
private void onButtonSelect(Button cb) {if (cb.getSelection()) {shell.setText("Check button");} else {shell.setText("");}}
在onButtonSelect()方法内部,我们根据选中按钮的状态显示或隐藏窗口的标题。 确认按钮的状态通过getSelection()方法确定。

图:复选按钮
Spinner
Spinner控件允许从一系列值中选择一个数字。 可以通过单击向上和向下箭头或通过按下和向上键或向上键和来选择该值。 向下翻页键。
SpinnerEx.java
package com.zetcode;import org.eclipse.swt.SWT;import org.eclipse.swt.layout.RowData;import org.eclipse.swt.layout.RowLayout;import org.eclipse.swt.widgets.Display;import org.eclipse.swt.widgets.Label;import org.eclipse.swt.widgets.Shell;import org.eclipse.swt.widgets.Spinner;public class SpinnerEx {private Label label;public SpinnerEx(Display display) {initUI(display);}private void initUI(Display display) {Shell shell = new Shell(display, SWT.SHELL_TRIM | SWT.CENTER);RowLayout layout = new RowLayout();layout.marginLeft = 10;layout.marginTop = 10;layout.spacing = 30;layout.center = true;shell.setLayout(layout);Spinner spinner = new Spinner(shell, SWT.BORDER);spinner.setMinimum(0);spinner.setMaximum(100);spinner.setSelection(0);spinner.setIncrement(1);spinner.setPageIncrement(10);spinner.setLayoutData(new RowData(30, -1));spinner.addListener(SWT.Selection, event -> onSelected(spinner));label = new Label(shell, SWT.NONE);label.setText("0");shell.setText("Spinner");shell.setSize(200, 150);shell.open();while (!shell.isDisposed()) {if (!display.readAndDispatch()) {display.sleep();}}}private void onSelected(Spinner spinner) {String val = spinner.getText();label.setText(val);label.pack();}@SuppressWarnings("unused")public static void main(String[] args) {Display display = new Display();SpinnerEx ex = new SpinnerEx(display);display.dispose();}}
该示例具有Spinner和Label。 从微调器中选择的值显示在标签中。
Spinner spinner = new Spinner(shell, SWT.BORDER);
创建Spinner控件的实例。
spinner.setMinimum(0);spinner.setMaximum(100);spinner.setSelection(0);spinner.setIncrement(1);spinner.setPageIncrement(10);
我们使用微调器 API 指定最小,最大,当前,增量和页面增量值。
spinner.addListener(SWT.Selection, event -> onSelected(spinner));
等待微调器选择事件的监听器已添加到控件中。 触发事件时,将调用onSelected()方法。
private void onSelected(Spinner spinner) {String val = spinner.getText();label.setText(val);label.pack();}
我们获得微调器的当前值,并将其设置为标签组件。
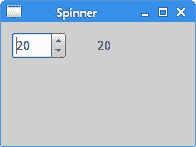
图:旋钮
List小部件
List小部件使用户可以从项目列表中选择一个选项。 列表可以是单选或多选。
ListWidgetEx.java
package com.zetcode;import org.eclipse.swt.SWT;import org.eclipse.swt.layout.FormAttachment;import org.eclipse.swt.layout.FormData;import org.eclipse.swt.layout.FormLayout;import org.eclipse.swt.widgets.Display;import org.eclipse.swt.widgets.Label;import org.eclipse.swt.widgets.List;import org.eclipse.swt.widgets.Shell;/*** ZetCode Java SWT tutorial** This program shows the List widget.** Author: Jan Bodnar* Website: zetcode.com* Last modified: June 2015*/public class ListWidgetEx {private Label status;public ListWidgetEx(Display display) {initUI(display);}private void initUI(Display display) {Shell shell = new Shell(display);status = new Label(shell, SWT.NONE);status.setText("Ready");FormLayout layout = new FormLayout();layout.marginHeight = 5;layout.marginWidth = 5;layout.spacing = 5;shell.setLayout(layout);FormData labelData = new FormData();labelData.left = new FormAttachment(0);labelData.right = new FormAttachment(100);labelData.bottom = new FormAttachment(100);status.setLayoutData(labelData);List list = new List(shell, SWT.BORDER);list.add("Aliens");list.add("Capote");list.add("Neverending story");list.add("Starship troopers");list.add("Exorcist");list.add("Omen");list.addListener(SWT.Selection, event -> onListItemSelect(list));FormData listData = new FormData();listData.width = 250;listData.height = 200;listData.left = new FormAttachment(shell, 0);listData.top = new FormAttachment(shell, 0);listData.right = new FormAttachment(100, 0);listData.bottom = new FormAttachment(status, 0);list.setLayoutData(listData);shell.setText("List");shell.pack();shell.open();while (!shell.isDisposed()) {if (!display.readAndDispatch()) {display.sleep();}}}private void onListItemSelect(List list) {String[] items = list.getSelection();status.setText(items[0]);}@SuppressWarnings("unused")public static void main(String[] args) {Display display = new Display();ListWidgetEx ex = new ListWidgetEx(display);display.dispose();}}
在此示例中,从列表小部件中选择的项目显示在状态栏中。
status = new Label(shell, SWT.NONE);status.setText("Ready");
标签小部件用于状态栏。 SWT 不将本机窗口小部件用于状态栏。
FormLayout layout = new FormLayout();layout.marginHeight = 5;layout.marginWidth = 5;layout.spacing = 5;shell.setLayout(layout);
我们使用FormLayout小部件在窗口上排列小部件。 设置了一些边距和间距。
FormData labelData = new FormData();labelData.left = new FormAttachment(0);labelData.right = new FormAttachment(100);labelData.bottom = new FormAttachment(100);status.setLayoutData(labelData);
此代码将状态标签粘贴在窗口底部; 状态栏的通常位置。
List list = new List(shell, SWT.BORDER);
List小部件已创建。 默认选择模式是单选。
list.add("Aliens");list.add("Capote");list.add("Neverending story");list.add("Starship troopers");list.add("Exorcist");list.add("Omen");
它充满了数据。
list.addListener(SWT.Selection, event -> onListItemSelect(list));
我们将选择监听器添加到List小部件。 在列表选择事件中,将调用onListItemSelect()方法。
FormData listData = new FormData();listData.width = 250;listData.height = 200;listData.left = new FormAttachment(shell, 0);listData.top = new FormAttachment(shell, 0);listData.right = new FormAttachment(100, 0);listData.bottom = new FormAttachment(status, 0);list.setLayoutData(listData);
此代码使List小部件占据了窗口区域的大部分。 width和height属性指定列表的首选大小。
private void onListItemSelect(List list) {String[] items = list.getSelection();status.setText(items[0]);}
在onListItemSelect()内部,我们确定列表中的选定项目并将其设置为状态栏。
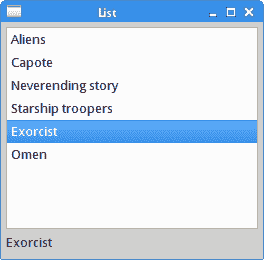
图:List小部件
Slider
Slider是一个小部件,可让用户通过在有限间隔内滑动旋钮以图形方式选择一个值。 我们的示例将显示音量控制。
SliderEx.java
package com.zetcode;import org.eclipse.swt.SWT;import org.eclipse.swt.graphics.Device;import org.eclipse.swt.graphics.Image;import org.eclipse.swt.layout.RowData;import org.eclipse.swt.layout.RowLayout;import org.eclipse.swt.widgets.Display;import org.eclipse.swt.widgets.Label;import org.eclipse.swt.widgets.Shell;import org.eclipse.swt.widgets.Slider;/*** ZetCode Java SWT tutorial** In this program, we use the slider* widget to create a volume control** Author: Jan Bodnar* Website: zetcode.com* Last modified: June 2015*/public class SliderEx {private Shell shell;private Label label;private Image mute;private Image min;private Image med;private Image max;public SliderEx(Display display) {initUI(display);}private void loadImages() {Device dev = shell.getDisplay();try {mute = new Image(dev, "mute.png");min = new Image(dev, "min.png");med = new Image(dev, "med.png");max = new Image(dev, "max.png");} catch(Exception e) {System.out.println("Cannot load images");System.out.println(e.getMessage());System.exit(1);}}private void initUI(Display display) {shell = new Shell(display, SWT.SHELL_TRIM | SWT.CENTER);loadImages();RowLayout layout = new RowLayout();layout.marginLeft = 30;layout.marginTop = 30;layout.spacing = 30;layout.fill = true;shell.setLayout(layout);Slider slider = new Slider(shell, SWT.HORIZONTAL);slider.setMaximum(100);slider.setLayoutData(new RowData(180, -1));label = new Label(shell, SWT.IMAGE_PNG);label.setImage(mute);slider.addListener(SWT.Selection, event -> onSelection(slider));shell.setText("Slider");shell.setSize(350, 200);shell.open();while (!shell.isDisposed()) {if (!display.readAndDispatch()) {display.sleep();}}}private void onSelection(Slider slider) {int value = slider.getSelection();if (value == 0) {label.setImage(mute);label.pack();} else if (value > 0 && value <= 30) {label.setImage(min);} else if (value > 30 && value < 80) {label.setImage(med);} else {label.setImage(max);}}@Overridepublic void finalize() {mute.dispose();med.dispose();min.dispose();max.dispose();}public static void main(String[] args) {Display display = new Display();SliderEx ex = new SliderEx(display);ex.finalize();display.dispose();}}
在上面的示例中,我们有一个Slider和一个Label小部件。 通过拖动滑块的旋钮,我们可以更改标签中显示的Image。
try {mute = new Image(dev, "mute.png");min = new Image(dev, "min.png");med = new Image(dev, "med.png");max = new Image(dev, "max.png");} catch(Exception e) {System.out.println("Cannot load images");System.out.println(e.getMessage());System.exit(1);}
图像从磁盘加载。
Slider slider = new Slider(shell, SWT.HORIZONTAL);slider.setMaximum(100);
Slider小部件已创建。 最大值为 100。
label = new Label(shell, SWT.IMAGE_PNG);label.setImage(mute);
使用SWT.IMAGE_PNG参数,标签窗口小部件显示 PNG 图像。 setImage()方法将图像设置为标签。
slider.addListener(SWT.Selection, event -> onSelection(slider));
监听器已添加到滑块小部件。
int value = slider.getSelection();
在onSelection()方法内部,我们使用getSelection()方法获得滑块控件的值。
if (value == 0) {label.setImage(mute);label.pack();} else if (value > 0 && value <= 30) {label.setImage(min);} else if (value > 30 && value < 80) {label.setImage(med);} else {label.setImage(max);}
根据获得的值,我们在标签小部件中更改图片。
@Overridepublic void finalize() {mute.dispose();med.dispose();min.dispose();max.dispose();}
最后,资源被释放。
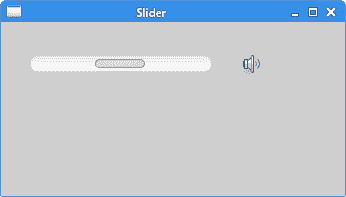
图:Slider小部件
Combo小部件
Combo是一个小部件,允许用户从选项的下拉列表中进行选择。
ComboEx.java
package com.zetcode;import org.eclipse.swt.SWT;import org.eclipse.swt.layout.RowData;import org.eclipse.swt.layout.RowLayout;import org.eclipse.swt.widgets.Combo;import org.eclipse.swt.widgets.Display;import org.eclipse.swt.widgets.Label;import org.eclipse.swt.widgets.Shell;/*** ZetCode Java SWT tutorial** In this program, we use the Combo* widget to select an option.* The selected option is shown in the* Label widget.** Author: Jan Bodnar* Website: zetcode.com* Last modified: June 2015*/public class ComboEx {private Label label;public ComboEx(Display display) {initUI(display);}private void initUI(Display display) {Shell shell = new Shell(display, SWT.SHELL_TRIM | SWT.CENTER);RowLayout layout = new RowLayout(SWT.VERTICAL);layout.marginLeft = 50;layout.marginTop = 30;layout.spacing = 30;shell.setLayout(layout);Combo combo = new Combo(shell, SWT.DROP_DOWN);combo.add("Ubuntu");combo.add("Fedora");combo.add("Arch");combo.add("Red Hat");combo.add("Mint");combo.setLayoutData(new RowData(150, -1));label = new Label(shell, SWT.LEFT);label.setText("...");combo.addListener(SWT.Selection, event -> onSelected(combo));shell.setText("Combo");shell.setSize(300, 250);shell.open();while (!shell.isDisposed()) {if (!display.readAndDispatch()) {display.sleep();}}}private void onSelected(Combo combo) {label.setText(combo.getText());label.pack();}@SuppressWarnings("unused")public static void main(String[] args) {Display display = new Display();ComboEx ex = new ComboEx(display);display.dispose();}}
该示例显示了一个组合和一个标签。 该组合具有六个选项的列表。 这些是 Linux 发行版的名称。 标签窗口小部件显示了从组合框中选择的选项。
Combo combo = new Combo(shell, SWT.DROP_DOWN);
Combo小部件已创建。
combo.add("Ubuntu");combo.add("Fedora");combo.add("Mandriva");combo.add("Red Hat");combo.add("Mint");
组合框小部件充满了数据。
private void onSelected(Combo combo) {label.setText(combo.getText());label.pack();}
我们将所选文本设置为标签小部件。 pack()方法使标签适合组合中新字符串的大小。

图:Combo小部件
在 Java SWT 教程的这一部分中,我们描述了 SWT 库的一些小部件。

若有收获,就点个赞吧
0 人点赞
