在这里,我们将演示如何创建自己的自定义控件。 Windows API 具有各种预先构建的控件的集合。 必须手动创建更多特定的控件。 我们使用 GDI 创建自定义控件。
刻录控件
可以在各种媒体刻录应用中找到此控件,例如 Nero 刻录 ROM。
#include <windows.h>#include <commctrl.h>#include <wchar.h>LRESULT CALLBACK PanelProc(HWND, UINT, WPARAM, LPARAM);LRESULT CALLBACK WndProc(HWND, UINT, WPARAM, LPARAM);HINSTANCE g_hinst;LRESULT g_pos = 150;int WINAPI wWinMain(HINSTANCE hInstance, HINSTANCE hPrevInstance,PWSTR lpCmdLine, int nCmdShow){HWND hwnd;MSG msg;WNDCLASSW wc = {0};wc.lpszClassName = L"Application";wc.hInstance = hInstance;wc.hbrBackground = GetSysColorBrush(COLOR_3DFACE);wc.lpfnWndProc = WndProc;wc.hCursor = LoadCursor(0, IDC_ARROW);g_hinst = hInstance;RegisterClassW(&wc);hwnd = CreateWindowW(wc.lpszClassName, L"Burning control",WS_OVERLAPPEDWINDOW | WS_VISIBLE | WS_CLIPCHILDREN,100, 100, 400, 250, 0, 0, hInstance, 0);while( GetMessage(&msg, NULL, 0, 0)) {DispatchMessage(&msg);}return (int) msg.wParam;}LRESULT CALLBACK WndProc(HWND hwnd, UINT msg,WPARAM wParam, LPARAM lParam){static HWND hwndTrack, hwndBurn;WNDCLASSW rwc = {0};INITCOMMONCONTROLSEX InitCtrlEx;InitCtrlEx.dwSize = sizeof(INITCOMMONCONTROLSEX);InitCtrlEx.dwICC = ICC_BAR_CLASSES;InitCommonControlsEx(&InitCtrlEx);switch(msg){case WM_CREATE:rwc.lpszClassName = L"BurningControl";rwc.hbrBackground = GetSysColorBrush(COLOR_BTNFACE);rwc.style = CS_HREDRAW;rwc.lpfnWndProc = PanelProc;rwc.hCursor = LoadCursor(0, IDC_ARROW);RegisterClassW(&rwc);hwndBurn = CreateWindowExW(WS_EX_STATICEDGE , L"BurningControl", NULL,WS_CHILD | WS_VISIBLE, 0, 330, 490, 30, hwnd, (HMENU)1, NULL, NULL);hwndTrack = CreateWindowExW(0, TRACKBAR_CLASSW, NULL,WS_CHILD | WS_VISIBLE | TBS_FIXEDLENGTH | TBS_NOTICKS,40, 25, 150, 25, hwnd, (HMENU) 2, g_hinst, NULL);SendMessage(hwndTrack, TBM_SETRANGE, TRUE, MAKELONG(0, 750));SendMessage(hwndTrack, TBM_SETPAGESIZE, 0, 20);SendMessage(hwndTrack, TBM_SETTICFREQ, 20, 0);SendMessage(hwndTrack, TBM_SETPOS, TRUE, 150);break;case WM_SIZE:SetWindowPos(hwndBurn, NULL, 0, HIWORD(lParam)-30,LOWORD(lParam), 30, SWP_NOZORDER);break;case WM_HSCROLL:g_pos = SendMessage(hwndTrack, TBM_GETPOS, 0, 0);InvalidateRect(hwndBurn, NULL, TRUE);break;case WM_DESTROY:PostQuitMessage(0);break;}return DefWindowProcW(hwnd, msg, wParam, lParam);}LRESULT CALLBACK PanelProc(HWND hwnd, UINT msg,WPARAM wParam, LPARAM lParam){HBRUSH hBrushYellow, hBrushRed, holdBrush;HPEN hPen, holdPen;HFONT hFont, holdFont;PAINTSTRUCT ps;RECT rect, rect2;wchar_t *cap[] = { L"75", L"150", L"225", L"300", L"375", L"450",L"525", L"600", L"675"};HDC hdc;int till;int step, full;int i;switch(msg){case WM_PAINT:hdc = BeginPaint(hwnd, &ps);GetClientRect(hwnd, &rect);till = (rect.right / 750.0) * g_pos;step = rect.right / 10.0;full = (rect.right / 750.0) * 700;hBrushYellow = CreateSolidBrush(RGB(255, 255, 184));hBrushRed = CreateSolidBrush(RGB(255, 110, 110));hPen = CreatePen(PS_NULL, 1, RGB(0, 0, 0));holdPen = SelectObject(hdc, hPen);hFont = CreateFontW(13, 0, 0, 0, FW_MEDIUM, 0, 0, 0, 0,0, 0, 0, 0, L"Tahoma");holdFont = SelectObject(hdc, hFont);if(till > full) {SelectObject(hdc, hBrushYellow);Rectangle(hdc, 0, 0, full, 30);holdBrush = SelectObject(hdc, hBrushRed);Rectangle(hdc, full, 0, till, 30);} else {holdBrush = SelectObject(hdc, hBrushYellow);Rectangle(hdc, 0, 0, till, 30);}SelectObject(hdc, holdPen);for ( i = 1; i < 10; i++) {MoveToEx(hdc, i*step, 0, NULL);LineTo(hdc, i*step, 7);rect2.bottom = 28;rect2.top = 8;rect2.left = i*step-10;rect2.right = i*step+10;SetBkMode(hdc, TRANSPARENT) ;DrawTextW(hdc, cap[i-1], wcslen(cap[i-1]), &rect2, DT_CENTER);}SelectObject(hdc, holdBrush);DeleteObject(hBrushYellow);DeleteObject(hBrushRed);DeleteObject(hPen);SelectObject(hdc, holdFont);DeleteObject(hFont);EndPaint(hwnd, &ps);break;}return DefWindowProcW(hwnd, msg, wParam, lParam);}
在我们的示例中,我们显示一个轨迹栏控件和我们的自定义刻录控件。 跟踪栏控件用于控制刻录控件的状态。
刻录控件是一个简单的窗口。 它放置在父窗口的底部。 它在WM_PAINT消息期间被完全绘制。 使用 GDI 函数调用绘制线条,文本和背景。
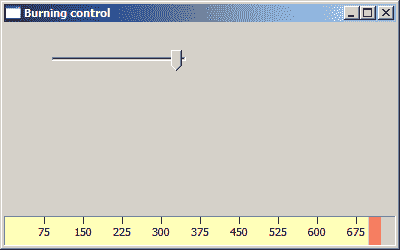
图:刻录控件
在 Windows API 教程的这一部分中,我们创建了刻录自定义控件。

若有收获,就点个赞吧
0 人点赞
