在 PyCairo 教程的这一部分中,我们将讨论透明度。 我们将提供一些基本定义和三个有趣的透明度示例。
透明性是指能够透视材料的质量。 了解透明度的最简单方法是想象一块玻璃或水。 从技术上讲,光线可以穿过玻璃,这样我们就可以看到玻璃后面的物体。
在计算机图形学中,我们可以使用 alpha 合成实现透明效果。 Alpha 合成是将图像与背景组合以创建部分透明外观的过程。 合成过程使用 alpha 通道。 Alpha 通道是图形文件格式的 8 位层,用于表达半透明性(透明度)。 每个像素的额外八位用作掩码,表示 256 级半透明。
(answers.com,wikipedia.org)
透明矩形
第一个示例将绘制十个透明度不同的矩形。
def on_draw(self, wid, cr):for i in range(1, 11):cr.set_source_rgba(0, 0, 1, i*0.1)cr.rectangle(50*i, 20, 40, 40)cr.fill()
set_source_rgba()方法具有 alpha 参数以提供透明度。
for i in range(1, 11):cr.set_source_rgba(0, 0, 1, i*0.1)cr.rectangle(50*i, 20, 40, 40)cr.fill()
此代码创建十个矩形,其 alpha 值从 0.1 到 1。
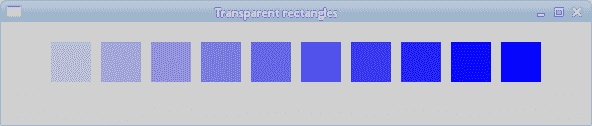
图:透明矩形
泡芙效果
在以下示例中,我们创建一个粉扑效果。 该示例将显示一个不断增长的居中文本,该文本将从某个点逐渐淡出。 这是一个非常常见的效果,我们经常可以在 Flash 动画中看到它。 paint_with_alpha()方法对于产生效果至关重要。
#!/usr/bin/python'''ZetCode PyCairo tutorialThis program creates a 'puff'effect.author: Jan Bodnarwebsite: zetcode.comlast edited: August 2012'''from gi.repository import Gtk, GLibimport cairoclass cv(object):SPEED = 14TEXT_SIZE_MAX = 20ALPHA_DECREASE = 0.01SIZE_INCREASE = 0.8class Example(Gtk.Window):def __init__(self):super(Example, self).__init__()self.init_ui()def init_ui(self):self.darea = Gtk.DrawingArea()self.darea.connect("draw", self.on_draw)self.add(self.darea)self.timer = Trueself.alpha = 1.0self.size = 1.0GLib.timeout_add(cv.SPEED, self.on_timer)self.set_title("Puff")self.resize(350, 200)self.set_position(Gtk.WindowPosition.CENTER)self.connect("delete-event", Gtk.main_quit)self.show_all()def on_timer(self):if not self.timer: return Falseself.darea.queue_draw()return Truedef on_draw(self, wid, cr):w, h = self.get_size()cr.set_source_rgb(0.5, 0, 0)cr.paint()cr.select_font_face("Courier", cairo.FONT_SLANT_NORMAL,cairo.FONT_WEIGHT_BOLD)self.size = self.size + cv.SIZE_INCREASEif self.size > cv.TEXT_SIZE_MAX:self.alpha = self.alpha - cv.ALPHA_DECREASEcr.set_font_size(self.size)cr.set_source_rgb(1, 1, 1)(x, y, width, height, dx, dy) = cr.text_extents("ZetCode")cr.move_to(w/2 - width/2, h/2)cr.text_path("ZetCode")cr.clip()cr.paint_with_alpha(self.alpha)if self.alpha <= 0:self.timer = Falsedef main():app = Example()Gtk.main()if __name__ == "__main__":main()
该示例在窗口上创建一个逐渐增长和褪色的文本。
class cv(object):SPEED = 14TEXT_SIZE_MAX = 20ALPHA_DECREASE = 0.01SIZE_INCREASE = 0.8
在这里,我们定义了示例中使用的一些常量。
self.alpha = 1.0self.size = 1.0
这两个变量存储当前的 alpha 值和文本大小。
GLib.timeout_add(cv.SPEED, self.on_timer)
每 14 毫秒调用一次on_timer()方法。
def on_timer(self):if not self.timer: return Falseself.darea.queue_draw()return True
在on_timer()方法中,我们使用queue_draw()方法重绘绘图区域小部件。
def on_draw(self, wid, cr):w, h = self.get_size()cr.set_source_rgb(0.5, 0, 0)cr.paint()cr.select_font_face("Courier", cairo.FONT_SLANT_NORMAL,cairo.FONT_WEIGHT_BOLD)...
在on_draw()方法中,我们获得窗口工作区的宽度和高度。 这些值用于使文本居中。 我们用一些深红色填充窗口的背景。 我们为文本选择一种 Courier 字体。
(x, y, width, height, dx, dy) = cr.text_extents("ZetCode")
我们得到了文本指标。 我们将仅使用文本宽度。
cr.move_to(w/2 - width/2, h/2)
我们移动到文本将在窗口上居中的位置。
cr.text_path("ZetCode")cr.clip()cr.paint_with_alpha(self.alpha)
我们使用text_path()方法获得文本的路径。 我们使用clip()方法将绘画限制为当前路径。 paint_with_alpha()方法使用 alpha 值的掩码在当前剪裁区域内的任何地方绘制当前源。
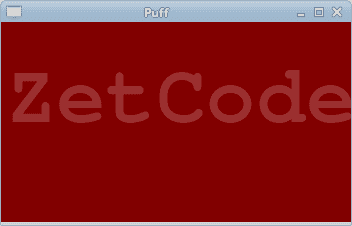
图:粉扑效果
反射图像
在下一个示例中,我们显示反射图像。 这种效果使人产生幻觉,好像图像在水中被反射一样。
#!/usr/bin/python'''ZetCode PyCairo tutorialThis program creates an image reflection.author: Jan Bodnarwebsite: zetcode.comlast edited: August 2012'''from gi.repository import Gtkimport cairoimport sysclass Example(Gtk.Window):def __init__(self):super(Example, self).__init__()self.init_ui()self.load_image()self.init_vars()def init_ui(self):darea = Gtk.DrawingArea()darea.connect("draw", self.on_draw)self.add(darea)self.set_title("Reflection")self.resize(300, 350)self.set_position(Gtk.WindowPosition.CENTER)self.connect("delete-event", Gtk.main_quit)self.show_all()def load_image(self):try:self.s = cairo.ImageSurface.create_from_png("slanec.png")except Exception, e:print e.messagesys.exit(1)def init_vars(self):self.imageWidth = self.s.get_width()self.imageHeight = self.s.get_height()self.gap = 40self.border = 20def on_draw(self, wid, cr):w, h = self.get_size()lg = cairo.LinearGradient(w/2, 0, w/2, h*3)lg.add_color_stop_rgba(0, 0, 0, 0, 1)lg.add_color_stop_rgba(h, 0.2, 0.2, 0.2, 1)cr.set_source(lg)cr.paint()cr.set_source_surface(self.s, self.border, self.border)cr.paint()alpha = 0.7step = 1.0 / self.imageHeightcr.translate(0, 2 * self.imageHeight + self.gap)cr.scale(1, -1)i = 0while(i < self.imageHeight):cr.rectangle(self.border, self.imageHeight-i,self.imageWidth, 1)i = i + 1cr.save()cr.clip()cr.set_source_surface(self.s, self.border,self.border)alpha = alpha - stepcr.paint_with_alpha(alpha)cr.restore()def main():app = Example()Gtk.main()if __name__ == "__main__":main()
窗户上显示了一座城堡的倒影。
def load_image(self):try:self.s = cairo.ImageSurface.create_from_png("slanec.png")except Exception, e:print e.messagesys.exit(1)
在load_image()方法中,从 PNG 图像创建图像表面。
def init_vars(self):self.imageWidth = self.s.get_width()self.imageHeight = self.s.get_height()self.gap = 40self.border = 20
在init_vars()方法内部,我们获得图像的宽度和高度。 我们还定义了两个变量。
lg = cairo.LinearGradient(w/2, 0, w/2, h*3)lg.add_color_stop_rgba(0, 0, 0, 0, 1)lg.add_color_stop_rgba(h, 0.2, 0.2, 0.2, 1)cr.set_source(lg)cr.paint()
窗口的背景填充有渐变颜料。 涂料是从黑色到深灰色的平滑混合。
cr.translate(0, 2 * self.imageHeight + self.gap)cr.scale(1, -1)
此代码翻转图像并将其转换为原始图像下方。 平移操作是必需的,因为缩放操作会使图像上下颠倒并向上平移图像。 要了解发生了什么,只需拍摄一张照片并将其放在桌子上即可。 并翻转它。
i = 0while(i < self.imageHeight):cr.rectangle(self.border, self.imageHeight-i,self.imageWidth, 1)i = i + 1cr.save()cr.clip()cr.set_source_surface(self.s, self.border,self.border)alpha = alpha - stepcr.paint_with_alpha(alpha)cr.restore()
这是最后一部分。 我们使第二个图像透明。 但是透明度不是恒定的。 图像逐渐淡出。 反射的图像逐行绘制。 clip()方法将图形限制为高度为 1 的矩形。paint_with_alpha()在绘制图像表面的当前剪裁时会考虑透明度。
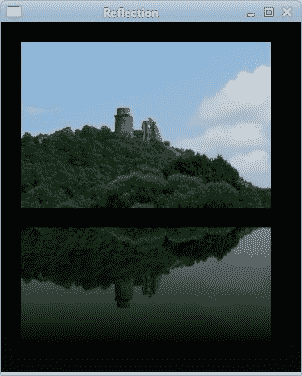
图:反射图像
等待演示
在此示例中,我们使用透明效果创建一个等待演示。 我们将绘制 8 条线,这些线将逐渐消失,从而产生一种错觉,即一条线在移动。 此类效果通常用于通知用户幕后正在进行繁重的任务。 一个示例是通过互联网流式传输视频。
#!/usr/bin/python'''ZetCode PyCairo tutorialThis program creates a 'waiting' effect.author: Jan Bodnarwebsite: zetcode.comlast edited: August 2012'''from gi.repository import Gtk, GLibimport cairoimport mathclass cv(object):trs = (( 0.0, 0.15, 0.30, 0.5, 0.65, 0.80, 0.9, 1.0 ),( 1.0, 0.0, 0.15, 0.30, 0.5, 0.65, 0.8, 0.9 ),( 0.9, 1.0, 0.0, 0.15, 0.3, 0.5, 0.65, 0.8 ),( 0.8, 0.9, 1.0, 0.0, 0.15, 0.3, 0.5, 0.65 ),( 0.65, 0.8, 0.9, 1.0, 0.0, 0.15, 0.3, 0.5 ),( 0.5, 0.65, 0.8, 0.9, 1.0, 0.0, 0.15, 0.3 ),( 0.3, 0.5, 0.65, 0.8, 0.9, 1.0, 0.0, 0.15 ),( 0.15, 0.3, 0.5, 0.65, 0.8, 0.9, 1.0, 0.0, ))SPEED = 100CLIMIT = 1000NLINES = 8class Example(Gtk.Window):def __init__(self):super(Example, self).__init__()self.init_ui()def init_ui(self):self.darea = Gtk.DrawingArea()self.darea.connect("draw", self.on_draw)self.add(self.darea)self.count = 0GLib.timeout_add(cv.SPEED, self.on_timer)self.set_title("Waiting")self.resize(250, 150)self.set_position(Gtk.WindowPosition.CENTER)self.connect("delete-event", Gtk.main_quit)self.show_all()def on_timer(self):self.count = self.count + 1if self.count >= cv.CLIMIT:self.count = 0self.darea.queue_draw()return Truedef on_draw(self, wid, cr):cr.set_line_width(3)cr.set_line_cap(cairo.LINE_CAP_ROUND)w, h = self.get_size()cr.translate(w/2, h/2)for i in range(cv.NLINES):cr.set_source_rgba(0, 0, 0, cv.trs[self.count%8][i])cr.move_to(0.0, -10.0)cr.line_to(0.0, -40.0)cr.rotate(math.pi/4)cr.stroke()def main():app = Example()Gtk.main()if __name__ == "__main__":main()
我们用八个不同的 alpha 值绘制八条线。
class cv(object):trs = (( 0.0, 0.15, 0.30, 0.5, 0.65, 0.80, 0.9, 1.0 ),( 1.0, 0.0, 0.15, 0.30, 0.5, 0.65, 0.8, 0.9 ),( 0.9, 1.0, 0.0, 0.15, 0.3, 0.5, 0.65, 0.8 ),( 0.8, 0.9, 1.0, 0.0, 0.15, 0.3, 0.5, 0.65 ),( 0.65, 0.8, 0.9, 1.0, 0.0, 0.15, 0.3, 0.5 ),( 0.5, 0.65, 0.8, 0.9, 1.0, 0.0, 0.15, 0.3 ),( 0.3, 0.5, 0.65, 0.8, 0.9, 1.0, 0.0, 0.15 ),( 0.15, 0.3, 0.5, 0.65, 0.8, 0.9, 1.0, 0.0, ))...
这是此演示中使用的透明度值的二维元组。 有 8 行,每行一种状态。 8 行中的每行将连续使用这些值。
SPEED = 100CLIMIT = 1000NLINES = 8
SPEED常数控制动画的速度。 CLIMIT是self.count变量的最大数量。 达到此限制后,变量将重置为 0。NLINES是示例中绘制的行数。
GLib.timeout_add(cv.SPEED, self.on_timer)
我们使用计时器函数来创建动画。 on_timer()方法的每个cv.SPEED ms 被调用。
def on_timer(self):self.count = self.count + 1if self.count >= cv.CLIMIT:self.count = 0self.darea.queue_draw()return True
在on_timer()方法中,我们增加self.count变量。 如果变量达到cv.CLIMIT常量,则将其设置为 0。我们防止溢出,并且不使用大数。
def on_draw(self, wid, cr):cr.set_line_width(3)cr.set_line_cap(cairo.LINE_CAP_ROUND)...
我们使线条更粗一些,以便更好地显示它们。 我们用带帽的线画线。
w, h = self.get_size()cr.translate(w/2, h/2)
我们将图形放置在窗口的中央。
for i in range(cv.NLINES):cr.set_source_rgba(0, 0, 0, cv.trs[self.count%8][i])cr.move_to(0.0, -10.0)cr.line_to(0.0, -40.0)cr.rotate(math.pi/4)cr.stroke()
在for循环中,我们绘制了 8 条具有不同透明度值的旋转线。 线以 45 度角分开。
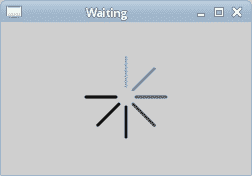
图:等待 demo
在 PyCairo 教程的这一部分中,我们介绍了透明度。

若有收获,就点个赞吧
0 人点赞
