事件是每个 GUI 应用不可或缺的一部分。 所有 GUI 应用都是事件驱动的。 应用会对在其生命周期内生成的不同事件类型做出反应。 事件主要由应用的用户生成。 但是它们也可以通过其他方式生成,例如互联网连接,窗口管理器或计时器。 当应用启动时,将创建一个主循环。 该应用位于主循环中,并等待事件生成。 当我们退出应用时,主循环退出。
定义
事件是来自底层框架(通常是 GUI 工具箱)的应用级信息。事件循环是一种程序结构,用于等待并调度器中的事件或消息。 事件循环反复查找事件以对其进行处理。调度器是将事件映射到事件处理器的过程。 事件处理器是对事件做出反应的方法。
事件对象是与事件关联的对象。 通常是一个窗口。事件类型是已生成的唯一事件。
一个简单的事件示例
在 wxWidgets 中处理事件的传统方法是使用静态事件表。这受 Microsoft 基础类(MFC)的影响。 一种更灵活,更现代的方法是使用Connect()方法。 我们在整个 wxWidgets 教程中都使用它。
事件表
在下一个示例中,我们显示一个使用事件表的示例。
button.h
#include <wx/wx.h>class MyButton : public wxFrame{public:MyButton(const wxString& title);void OnQuit(wxCommandEvent& event);private:DECLARE_EVENT_TABLE()};
button.cpp
#include "button.h"MyButton::MyButton(const wxString& title): wxFrame(NULL, wxID_ANY, title, wxDefaultPosition, wxSize(270, 150)){wxPanel *panel = new wxPanel(this, wxID_ANY);wxButton *button = new wxButton(panel, wxID_EXIT,wxT("Quit"), wxPoint(20, 20));Centre();}void MyButton::OnQuit(wxCommandEvent& WXUNUSED(event)){Close(true);}BEGIN_EVENT_TABLE(MyButton, wxFrame)EVT_BUTTON(wxID_EXIT, MyButton::OnQuit)END_EVENT_TABLE()
main.h
#include <wx/wx.h>class MyApp : public wxApp{public:virtual bool OnInit();};
main.cpp
#include "main.h"#include "button.h"IMPLEMENT_APP(MyApp)bool MyApp::OnInit(){MyButton *button = new MyButton(wxT("Button"));button->Show(true);return true;}
在我们的示例中,我们创建一个简单的按钮。 通过单击按钮,我们关闭应用。
private:DECLARE_EVENT_TABLE()
在头文件中,我们使用DECLARE_EVENT_TABLE()宏声明一个事件表。
BEGIN_EVENT_TABLE(MyButton, wxFrame)EVT_BUTTON(wxID_EXIT, MyButton::OnQuit)END_EVENT_TABLE()
我们通过将每个事件映射到适当的成员函数来实现事件表。
使用Connect()的示例
我们将讨论移动事件。 移动事件保存有关移动更改事件的信息。 当我们将窗口移到新位置时,将生成一个移动事件。 表示移动事件的类为wxMoveEvent。 wxEVT_MOVE是事件类型。
move.h
#include <wx/wx.h>class Move : public wxFrame{public:Move(const wxString& title);void OnMove(wxMoveEvent & event);wxStaticText *st1;wxStaticText *st2;};
move.cpp
#include "move.h"Move::Move(const wxString& title): wxFrame(NULL, wxID_ANY, title, wxDefaultPosition, wxSize(250, 130)){wxPanel *panel = new wxPanel(this, -1);st1 = new wxStaticText(panel, -1, wxT(""), wxPoint(10, 10));st2 = new wxStaticText(panel, -1, wxT(""), wxPoint(10, 30));Connect(wxEVT_MOVE, wxMoveEventHandler(Move::OnMove));Centre();}void Move::OnMove(wxMoveEvent& event){wxPoint size = event.GetPosition();st1->SetLabel(wxString::Format(wxT("x: %d"), size.x ));st2->SetLabel(wxString::Format(wxT("y: %d"), size.y ));}
main.h
#include <wx/wx.h>class MyApp : public wxApp{public:virtual bool OnInit();};
main.cpp
#include "main.h"#include "move.h"IMPLEMENT_APP(MyApp)bool MyApp::OnInit(){Move *move = new Move(wxT("Move event"));move->Show(true);return true;}
该示例显示窗口的当前位置。
Connect(wxEVT_MOVE, wxMoveEventHandler(Move::OnMove));
在这里,我们将wxEVT_MOVE事件类型与OnMove()方法连接在一起。
wxPoint size = event.GetPosition();
OnMove()方法中的事件参数是特定于特定事件的对象。 在我们的例子中,它是wxMoveEvent类的实例。 该对象保存有关事件的信息。 我们可以通过调用事件的GetPosition()方法找出当前位置。
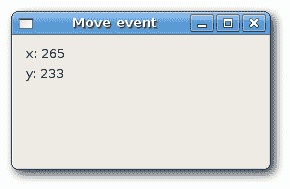
图:移动事件
事件传播
事件有两种类型:基本事件和命令事件。 它们的传播方式不同。 事件传播是事件从子小部件传播到父小部件和祖父小部件等的事件。基本事件不传播。 命令事件确实传播。 例如,wxCloseEvent是一个基本事件。 此事件传播到父窗口小部件没有任何意义。
默认情况下,在事件处理器中捕获的事件停止传播。 要继续传播,我们必须调用Skip()方法。
propagate.h
#include <wx/wx.h>class Propagate : public wxFrame{public:Propagate(const wxString& title);void OnClick(wxCommandEvent& event);};class MyPanel : public wxPanel{public:MyPanel(wxFrame *frame, int id);void OnClick(wxCommandEvent& event);};class MyButton : wxButton{public:MyButton(MyPanel *panel, int id, const wxString &label);void OnClick(wxCommandEvent& event);};
propagate.cpp
#include <iostream>#include "propagate.h"const int ID_BUTTON = 1;Propagate::Propagate(const wxString& title): wxFrame(NULL, wxID_ANY, title, wxDefaultPosition, wxSize(250, 130)){MyPanel *panel = new MyPanel(this, -1);new MyButton(panel, ID_BUTTON, wxT("Ok"));Connect(ID_BUTTON, wxEVT_COMMAND_BUTTON_CLICKED,wxCommandEventHandler(Propagate::OnClick));Centre();}void Propagate::OnClick(wxCommandEvent& event){std::cout << "event reached frame class" << std::endl;event.Skip();}MyPanel::MyPanel(wxFrame *frame, int id): wxPanel(frame, id){Connect(ID_BUTTON, wxEVT_COMMAND_BUTTON_CLICKED,wxCommandEventHandler(MyPanel::OnClick));}void MyPanel::OnClick(wxCommandEvent& event){std::cout << "event reached panel class" << std::endl;event.Skip();}MyButton::MyButton(MyPanel *mypanel, int id, const wxString& label): wxButton(mypanel, id, label, wxPoint(15, 15)){Connect(ID_BUTTON, wxEVT_COMMAND_BUTTON_CLICKED,wxCommandEventHandler(MyButton::OnClick));}void MyButton::OnClick(wxCommandEvent& event){std::cout << "event reached button class" << std::endl;event.Skip();}
main.h
#include <wx/wx.h>class MyApp : public wxApp{public:virtual bool OnInit();};
main.cpp
#include "main.h"#include "propagate.h"IMPLEMENT_APP(MyApp)bool MyApp::OnInit(){Propagate *prop = new Propagate(wxT("Propagate"));prop->Show(true);return true;}
在我们的示例中,面板上有一个按钮。 面板放置在框架小部件中。 我们为所有小部件定义一个处理器。
event reached button classevent reached panel classevent reached frame class
当我们点击按钮时,我们得到了这个。 事件从按钮传播到面板和框架。
尝试省略一些Skip()方法,看看会发生什么。
取消事件
有时我们需要停止处理事件。 为此,我们称方法Veto()。
veto.h
#include <wx/wx.h>class Veto : public wxFrame{public:Veto(const wxString& title);void OnClose(wxCloseEvent& event);};
veto.cpp
#include "veto.h"Veto::Veto(const wxString& title): wxFrame(NULL, wxID_ANY, title, wxDefaultPosition, wxSize(250, 130)){Connect(wxEVT_CLOSE_WINDOW, wxCloseEventHandler(Veto::OnClose));Centre();}void Veto::OnClose(wxCloseEvent& event){wxMessageDialog *dial = new wxMessageDialog(NULL,wxT("Are you sure to quit?"), wxT("Question"),wxYES_NO | wxNO_DEFAULT | wxICON_QUESTION);int ret = dial->ShowModal();dial->Destroy();if (ret == wxID_YES) {Destroy();} else {event.Veto();}}
main.h
#include <wx/wx.h>class MyApp : public wxApp{public:virtual bool OnInit();};
main.cpp
#include "main.h"#include "veto.h"IMPLEMENT_APP(MyApp)bool MyApp::OnInit(){Veto *veto = new Veto(wxT("Veto"));veto->Show(true);return true;}
在我们的示例中,我们处理wxCloseEvent。 当我们单击标题栏上的 X 按钮,按 Alt + F4 或从系统菜单中选择关闭时,将称为此事件。 在许多应用中,如果要进行一些更改,我们希望防止意外关闭窗口。 为此,我们必须连接wxEVT_CLOSE_WINDOW事件类型。
wxMessageDialog *dial = new wxMessageDialog(NULL,wxT("Are you sure to quit?"), wxT("Question"),wxYES_NO | wxNO_DEFAULT | wxICON_QUESTION);
在关闭事件期间,我们显示一个消息对话框。
if (ret == wxID_YES) {Destroy();} else {event.Veto();}
根据返回值,我们销毁窗口或否决事件。 注意,要关闭窗口,我们必须调用Destroy()方法。 通过调用Close()方法,我们将陷入无尽的循环。
窗口标识符
窗口标识符是在事件系统中唯一确定窗口标识的整数。 有三种创建窗口 ID 的方法:
- 让系统自动创建一个 ID。
- 使用标准标识符。
- 创建我们自己的 ID。
每个小部件都有一个 id 参数。 这是事件系统中的唯一编号。 如果我们使用多个小部件,则必须在它们之间进行区分。
wxButton(parent, -1)wxButton(parent, wxID_ANY)
如果为 ID 参数提供 -1 或wxID_ANY,则让 wxWidgets 自动为我们创建一个 ID。 自动创建的 ID 始终为负,而用户指定的 ID 必须始终为正。 当我们不需要更改窗口小部件状态时,通常使用此选项。 例如,静态文本在应用的生命周期内将永远不会更改。 如果需要,我们仍然可以获取 ID。 有一种方法GetId(),它将为我们确定 ID。
应尽可能使用标准标识符。 标识符可以在某些平台上提供一些标准的图形或行为。
ident.h
#include <wx/wx.h>class Ident : public wxFrame{public:Ident(const wxString& title);};
ident.cpp
#include "ident.h"Ident::Ident(const wxString& title): wxFrame(NULL, wxID_ANY, title, wxDefaultPosition, wxSize(200, 150)){wxPanel *panel = new wxPanel(this, -1);wxGridSizer *grid = new wxGridSizer(2, 3);grid->Add(new wxButton(panel, wxID_CANCEL), 0, wxTOP | wxLEFT, 9);grid->Add(new wxButton(panel, wxID_DELETE), 0, wxTOP, 9);grid->Add(new wxButton(panel, wxID_SAVE), 0, wxLEFT, 9);grid->Add(new wxButton(panel, wxID_EXIT));grid->Add(new wxButton(panel, wxID_STOP), 0, wxLEFT, 9);grid->Add(new wxButton(panel, wxID_NEW));panel->SetSizer(grid);Centre();}
main.h
#include <wx/wx.h>class MyApp : public wxApp{public:virtual bool OnInit();};
main.cpp
#include "main.h"#include "ident.h"IMPLEMENT_APP(MyApp)bool MyApp::OnInit(){Ident *ident = new Ident(wxT("Identifiers"));ident->Show(true);return true;}
在我们的示例中,我们在按钮上使用标准标识符。 在 Linux 上,按钮带有小图标。
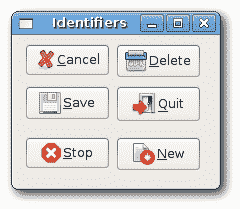
图:标识符
在本章中,我们讨论了 wxWidgets 中的事件。

若有收获,就点个赞吧
0 人点赞
