在 PyGTK 编程教程的这一部分中,我们将继续使用 Cairo 库进行绘制。
甜甜圈
在下面的示例中,我们通过旋转一堆椭圆来创建复杂的形状。
donut.py
#!/usr/bin/python# ZetCode PyGTK tutorial## This program creates a donut# with cairo library## author: jan bodnar# website: zetcode.com# last edited: February 2009import gtkimport mathclass PyApp(gtk.Window):def __init__(self):super(PyApp, self).__init__()self.set_title("Donut")self.set_size_request(350, 250)self.set_position(gtk.WIN_POS_CENTER)self.connect("destroy", gtk.main_quit)darea = gtk.DrawingArea()darea.connect("expose-event", self.expose)self.add(darea)self.show_all()def expose(self, widget, event):cr = widget.window.cairo_create()cr.set_line_width(0.5)w = self.allocation.widthh = self.allocation.heightcr.translate(w/2, h/2)cr.arc(0, 0, 120, 0, 2*math.pi)cr.stroke()for i in range(36):cr.save()cr.rotate(i*math.pi/36)cr.scale(0.3, 1)cr.arc(0, 0, 120, 0, 2*math.pi)cr.restore()cr.stroke()PyApp()gtk.main()
在此示例中,我们创建一个甜甜圈。 形状类似于曲奇,因此得名“甜甜圈”。
cr.translate(w/2, h/2)cr.arc(0, 0, 120, 0, 2*math.pi)cr.stroke()
刚开始时有一个椭圆。
for i in range(36):cr.save()cr.rotate(i*math.pi/36)cr.scale(0.3, 1)cr.arc(0, 0, 120, 0, 2*math.pi)cr.restore()cr.stroke()
旋转几圈后,有一个甜甜圈。 我们使用save()和restore()方法将每个旋转和缩放操作彼此隔离。
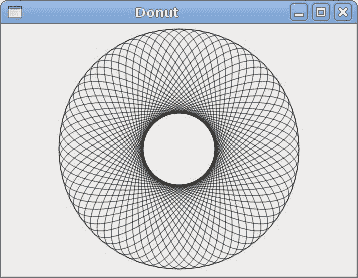
图:多纳圈
渐变
在计算机图形学中,渐变是从浅到深或从一种颜色到另一种颜色的阴影的平滑混合。 在 2D 绘图程序和绘图程序中,渐变用于创建彩色背景和特殊效果以及模拟灯光和阴影。 (answers.com)
gradients.py
#!/usr/bin/python# ZetCode PyGTK tutorial## This program works with# gradients in cairo## author: jan bodnar# website: zetcode.com# last edited: February 2009import gtkimport cairoclass PyApp(gtk.Window):def __init__(self):super(PyApp, self).__init__()self.set_title("Gradients")self.set_size_request(340, 390)self.set_position(gtk.WIN_POS_CENTER)self.connect("destroy", gtk.main_quit)darea = gtk.DrawingArea()darea.connect("expose-event", self.expose)self.add(darea)self.show_all()def expose(self, widget, event):cr = widget.window.cairo_create()lg1 = cairo.LinearGradient(0.0, 0.0, 350.0, 350.0)count = 1i = 0.1while i < 1.0:if count % 2:lg1.add_color_stop_rgba(i, 0, 0, 0, 1)else:lg1.add_color_stop_rgba(i, 1, 0, 0, 1)i = i + 0.1count = count + 1cr.rectangle(20, 20, 300, 100)cr.set_source(lg1)cr.fill()lg2 = cairo.LinearGradient(0.0, 0.0, 350.0, 0)count = 1i = 0.05while i < 0.95:if count % 2:lg2.add_color_stop_rgba(i, 0, 0, 0, 1)else:lg2.add_color_stop_rgba(i, 0, 0, 1, 1)i = i + 0.025count = count + 1cr.rectangle(20, 140, 300, 100)cr.set_source(lg2)cr.fill()lg3 = cairo.LinearGradient(20.0, 260.0, 20.0, 360.0)lg3.add_color_stop_rgba(0.1, 0, 0, 0, 1)lg3.add_color_stop_rgba(0.5, 1, 1, 0, 1)lg3.add_color_stop_rgba(0.9, 0, 0, 0, 1)cr.rectangle(20, 260, 300, 100)cr.set_source(lg3)cr.fill()PyApp()gtk.main()
在我们的示例中,我们绘制了三个具有三个不同渐变的矩形。
lg1 = cairo.LinearGradient(0.0, 0.0, 350.0, 350.0)
在这里,我们创建一个线性渐变图案。 参数指定直线,沿着该直线绘制渐变。 在我们的情况下,这是一条垂直线。
lg3 = cairo.LinearGradient(20.0, 260.0, 20.0, 360.0)lg3.add_color_stop_rgba(0.1, 0, 0, 0, 1)lg3.add_color_stop_rgba(0.5, 1, 1, 0, 1)lg3.add_color_stop_rgba(0.9, 0, 0, 0, 1)
我们定义色标以产生渐变图案。 在这种情况下,渐变是黑色和黄色的混合。 通过添加两个黑色和一个黄色色标,我们创建了一个水平渐变图案。 这些停止实际上是什么意思? 在我们的情况下,我们从黑色开始,该颜色将以大小的 1/10 停止。 然后,我们开始逐渐涂成黄色,最终达到形状的中心。 黄色停在大小的 9/10,我们再次开始用黑色绘图,直到结束。

图:渐变
泡泡
在以下示例中,我们创建一个粉扑效果。 该示例将显示一个不断增长的居中文本,该文本将从某个点逐渐淡出。 这是一个非常常见的效果,您经常可以在 Flash 动画中看到它。
puff.py
#!/usr/bin/python# ZetCode PyGTK tutorial## This program creates a puff# effect## author: jan bodnar# website: zetcode.com# last edited: February 2009import gtkimport glibimport cairoclass PyApp(gtk.Window):def __init__(self):super(PyApp, self).__init__()self.set_title("Puff")self.resize(350, 200)self.set_position(gtk.WIN_POS_CENTER)self.connect("destroy", gtk.main_quit)self.darea = gtk.DrawingArea()self.darea.connect("expose-event", self.expose)self.add(self.darea)self.timer = Trueself.alpha = 1.0self.size = 1.0glib.timeout_add(14, self.on_timer)self.show_all()def on_timer(self):if not self.timer: return Falseself.darea.queue_draw()return Truedef expose(self, widget, event):cr = widget.window.cairo_create()w = self.allocation.widthh = self.allocation.heightcr.set_source_rgb(0.5, 0, 0)cr.paint()cr.select_font_face("Courier", cairo.FONT_SLANT_NORMAL, cairo.FONT_WEIGHT_BOLD)self.size = self.size + 0.8if self.size > 20:self.alpha = self.alpha - 0.01cr.set_font_size(self.size)cr.set_source_rgb(1, 1, 1)(x, y, width, height, dx, dy) = cr.text_extents("ZetCode")cr.move_to(w/2 - width/2, h/2)cr.text_path("ZetCode")cr.clip()cr.stroke()cr.paint_with_alpha(self.alpha)if self.alpha <= 0:self.timer = FalsePyApp()gtk.main()
该示例在窗口上创建一个逐渐增长和褪色的文本。
glib.timeout_add(14, self.on_timer)
每隔 14 毫秒调用一次on_timer()方法。
def on_timer(self):if not self.timer: return Falseself.darea.queue_draw()return True
在on_timer()方法中,我们在绘图区域上调用queue_draw()方法,该方法会触发曝光信号。
cr.set_source_rgb(0.5, 0, 0)cr.paint()
我们将背景色设置为深红色。
self.size = self.size + 0.8
每个周期,字体大小将增加 0.8 个单位。
if self.size > 20:self.alpha = self.alpha - 0.01
字体大小大于 20 后开始淡出。
(x, y, width, height, dx, dy) = cr.text_extents("ZetCode")
我们得到了文本指标。
cr.move_to(w/2 - width/2, h/2)
我们使用文本指标将文本放在窗口的中心。
cr.text_path("ZetCode")cr.clip()
我们获取文本的路径,并为其设置当前的片段区域。
cr.stroke()cr.paint_with_alpha(self.alpha)
我们绘制当前路径并考虑 alpha 值。
图:粉扑
反射
在下一个示例中,我们显示反射图像。 这种美丽的效果使人产生幻觉,好像图像在水中被反射一样。
reflection.py
#!/usr/bin/python# -*- coding: utf-8 -*-# ZetCode PyGTK tutorial## This program creates an# image reflection## author: Jan Bodnar# website: zetcode.com# last edited: April 2011import gtkimport cairoimport sysclass PyApp(gtk.Window):def __init__(self):super(PyApp, self).__init__()self.set_title("Reflection")self.resize(300, 350)self.set_position(gtk.WIN_POS_CENTER)self.connect("destroy", gtk.main_quit)darea = gtk.DrawingArea()darea.connect("expose-event", self.expose)self.add(darea)try:self.surface = cairo.ImageSurface.create_from_png("slanec.png")except Exception, e:print e.messagesys.exit(1)self.imageWidth = self.surface.get_width()self.imageHeight = self.surface.get_height()self.gap = 40self.border = 20self.show_all()def expose(self, widget, event):cr = widget.window.cairo_create()w = self.allocation.widthh = self.allocation.heightlg = cairo.LinearGradient(w/2, 0, w/2, h*3)lg.add_color_stop_rgba(0, 0, 0, 0, 1)lg.add_color_stop_rgba(h, 0.2, 0.2, 0.2, 1)cr.set_source(lg)cr.paint()cr.set_source_surface(self.surface, self.border, self.border)cr.paint()alpha = 0.7step = 1.0 / self.imageHeightcr.translate(0, 2 * self.imageHeight + self.gap)cr.scale(1, -1)i = 0while(i < self.imageHeight):cr.rectangle(self.border, self.imageHeight-i, self.imageWidth, 1)i = i + 1cr.save()cr.clip()cr.set_source_surface(self.surface, self.border, self.border)alpha = alpha - stepcr.paint_with_alpha(alpha)cr.restore()PyApp()gtk.main()
该示例显示了一个反射的城堡。
lg = cairo.LinearGradient(w/2, 0, w/2, h*3)lg.add_color_stop_rgba(0, 0, 0, 0, 1)lg.add_color_stop_rgba(h, 0.2, 0.2, 0.2, 1)cr.set_source(lg)cr.paint()
背景充满了渐变的油漆。 涂料是从黑色到深灰色的平滑混合。
cr.translate(0, 2 * self.imageHeight + self.gap)cr.scale(1, -1)
此代码翻转图像并将其转换为原始图像下方。 平移操作是必需的,因为缩放操作会使图像上下颠倒并向上平移图像。 要了解发生了什么,只需拍摄一张照片并将其放在桌子上即可。 现在翻转它。
cr.rectangle(self.border, self.imageHeight-i, self.imageWidth, 1)i = i + 1cr.save()cr.clip()cr.set_source_surface(self.surface, self.border, self.border)alpha = alpha - stepcr.paint_with_alpha(alpha)cr.restore()
这是最后一部分。 我们使第二个图像透明。 但是透明度不是恒定的。 图像逐渐淡出。 反射的图像逐行绘制。 clip()方法将图形限制为高度为 1 的矩形。paint_with_alpha()在绘制图像表面的当前片段时会考虑透明度。

图:反射
等待
在此示例中,我们使用透明效果创建一个等待演示。 我们将绘制 8 条线,这些线将逐渐消失,从而产生一条线在移动的错觉。 这种效果通常用于通知用户,一项艰巨的任务正在幕后进行。 一个示例是通过互联网流式传输视频。
waiting.py
#!/usr/bin/python# ZetCode PyGTK tutorial## This program creates an# waiting effect## author: jan bodnar# website: zetcode.com# last edited: February 2009import gtkimport glibimport mathimport cairotrs = (( 0.0, 0.15, 0.30, 0.5, 0.65, 0.80, 0.9, 1.0 ),( 1.0, 0.0, 0.15, 0.30, 0.5, 0.65, 0.8, 0.9 ),( 0.9, 1.0, 0.0, 0.15, 0.3, 0.5, 0.65, 0.8 ),( 0.8, 0.9, 1.0, 0.0, 0.15, 0.3, 0.5, 0.65 ),( 0.65, 0.8, 0.9, 1.0, 0.0, 0.15, 0.3, 0.5 ),( 0.5, 0.65, 0.8, 0.9, 1.0, 0.0, 0.15, 0.3 ),( 0.3, 0.5, 0.65, 0.8, 0.9, 1.0, 0.0, 0.15 ),( 0.15, 0.3, 0.5, 0.65, 0.8, 0.9, 1.0, 0.0, ))class PyApp(gtk.Window):def __init__(self):super(PyApp, self).__init__()self.set_title("Waiting")self.set_size_request(250, 150)self.set_position(gtk.WIN_POS_CENTER)self.connect("destroy", gtk.main_quit)self.darea = gtk.DrawingArea()self.darea.connect("expose-event", self.expose)self.add(self.darea)self.count = 0glib.timeout_add(100, self.on_timer)self.show_all()def on_timer(self):self.count = self.count + 1self.darea.queue_draw()return Truedef expose(self, widget, event):cr = widget.window.cairo_create()cr.set_line_width(3)cr.set_line_cap(cairo.LINE_CAP_ROUND)w = self.allocation.widthh = self.allocation.heightcr.translate(w/2, h/2)for i in range(8):cr.set_source_rgba(0, 0, 0, trs[self.count%8][i])cr.move_to(0.0, -10.0)cr.line_to(0.0, -40.0)cr.rotate(math.pi/4)cr.stroke()PyApp()gtk.main()
我们用八个不同的 alpha 值绘制八条线。
glib.timeout_add(100, self.on_timer)
我们使用计时器函数来创建动画。
trs = (( 0.0, 0.15, 0.30, 0.5, 0.65, 0.80, 0.9, 1.0 ),...)
这是此演示中使用的透明度值的二维元组。 有 8 行,每行一种状态。 8 行中的每行将连续使用这些值。
cr.set_line_width(3)cr.set_line_cap(cairo.LINE_CAP_ROUND)
我们使线条更粗一些,以便更好地显示它们。 我们用圆帽画线。 他们看起来更好。
cr.set_source_rgba(0, 0, 0, trs[self.count%8][i]
在这里,我们定义了一条线的透明度值。
cr.move_to(0.0, -10.0)cr.line_to(0.0, -40.0)cr.rotate(math.pi/4)cr.stroke()
这些代码行将绘制八行中的每行。

图:等待
在 PyGTK 编程库的这一章中,我们使用 Cairo 库进行了一些更高级的绘制。

若有收获,就点个赞吧
0 人点赞
