在 JRuby Swing 编程教程的这一部分中,我们将介绍布局管理器。
在设计应用的 GUI 时,我们决定要使用哪些组件以及如何在应用中组织这些组件。 为了组织我们的组件,我们使用专门的不可见对象,称为布局管理器。 Swing 工具箱包含两种组件。 容器和子项。 容器将子项分组为合适的布局。 要创建布局,我们使用布局管理器。
绝对定位
在大多数情况下,程序员应使用布局管理器。 在某些情况下,我们可以使用绝对定位。 在绝对定位中,程序员以像素为单位指定每个组件的位置和大小。 如果调整窗口大小,则组件的大小和位置不会更改。 在各种平台上,应用看起来都不同,在 Linux 上看起来不错,在 Mac OS 上看起来不太正常。 在应用中更改字体可能会破坏布局。 如果将应用翻译成另一种语言,则必须重做布局。 对于所有这些问题,仅在有理由时才使用绝对定位。
#!/usr/local/bin/jruby# ZetCode JRuby Swing tutorial## In this program, we lay out three images# using absolute positioning.## author: Jan Bodnar# website: www.zetcode.com# last modified: December 2010include Javaimport java.awt.Colorimport javax.swing.ImageIconimport javax.swing.JLabelimport javax.swing.JPanelimport javax.swing.JFrameclass Example < JFramedef initializesuper "Absolute"self.initUIenddef initUIpanel = JPanel.newpanel.setLayout nilpanel.setBackground Color.new 66, 66, 66self.getContentPane.add panelrot = ImageIcon.new "rotunda.jpg"rotLabel = JLabel.new rotrotLabel.setBounds 20, 20, rot.getIconWidth, rot.getIconHeightmin = ImageIcon.new "mincol.jpg"minLabel = JLabel.new minminLabel.setBounds 40, 160, min.getIconWidth, min.getIconHeightbar = ImageIcon.new "bardejov.jpg"barLabel = JLabel.new barbarLabel.setBounds 170, 50, bar.getIconWidth, bar.getIconHeightpanel.add rotLabelpanel.add minLabelpanel.add barLabelself.setDefaultCloseOperation JFrame::EXIT_ON_CLOSEself.setSize 350, 300self.setLocationRelativeTo nilself.setVisible trueendendExample.new
在此示例中,我们使用绝对定位显示了三幅图像。
panel.setLayout nil
Swing 中的容器已经具有默认的布局管理器。 JPanel具有FlowLayout管理器作为其默认布局管理器。 我们将setLayout方法与nil参数一起使用,以删除默认的布局管理器,而改用绝对定位。
rot = ImageIcon.new "rotunda.jpg"rotLabel = JLabel.new rotrotLabel.setBounds 20, 20, rot.getIconWidth, rot.getIconHeight
我们创建一个ImageIcon对象。 我们将图标放入JLabel组件中以显示它。 然后,我们使用setBounds方法将标签放置在面板上。 前两个参数是标签的 x,y 位置。 第 3 和第 4 个参数是图标的宽度和高度。
panel.add rotLabel
我们将标签添加到面板容器中。
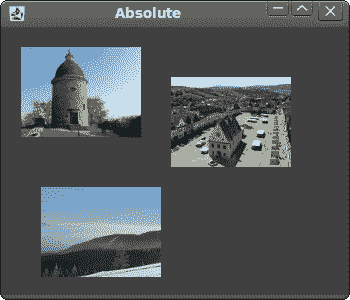
图:绝对定位
按钮示例
在下面的示例中,我们将在窗口的右下角放置两个按钮。
#!/usr/local/bin/jruby# ZetCode JRuby Swing tutorial## In this program, we use the BoxLayout# manager to position two buttons in the# bottom right corner of the window.## author: Jan Bodnar# website: www.zetcode.com# last modified: December 2010include Javaimport java.awt.Dimensionimport javax.swing.JButtonimport javax.swing.JPanelimport javax.swing.JFrameimport javax.swing.BoxLayoutimport javax.swing.Boxclass Example < JFramedef initializesuper "Buttons"self.initUIenddef initUIbasic = JPanel.newbasic.setLayout BoxLayout.new basic, BoxLayout::Y_AXISself.add basicbasic.add Box.createVerticalGluebottom = JPanel.newbottom.setLayout BoxLayout.new bottom, BoxLayout::X_AXISbottom.setAlignmentX 1.0okButton = JButton.new "OK"closeButton = JButton.new "Close"bottom.add okButtonbottom.add Box.createRigidArea Dimension.new 5, 0bottom.add closeButtonbottom.add Box.createRigidArea Dimension.new 15, 0basic.add bottombasic.add Box.createRigidArea Dimension.new 0, 15self.setDefaultCloseOperation JFrame::EXIT_ON_CLOSEself.setSize 300, 200self.setLocationRelativeTo nilself.setVisible trueendendExample.new
我们将创建两个面板。 基本面板具有垂直框布局。 底部面板有一个水平面板。 我们将在基础面板中放置一个底部面板。 我们将右对齐底部面板。 窗口顶部和底部面板之间的空间是可扩展的。 这是通过垂直胶水完成的。
basic = JPanel.newbasic.setLayout BoxLayout.new basic, BoxLayout::Y_AXIS...bottom = JPanel.newbottom.setLayout BoxLayout.new bottom, BoxLayout::X_AXIS
基本面板具有垂直框布局。 底部面板具有水平框布局。
bottom.setAlignmentX 1.0
底部面板右对齐。
basic.add Box.createVerticalGlue
我们创建一个垂直胶水。 胶水是垂直可扩展的白色空间,它将带有按钮的水平框推到底部。
okButton = JButton.new "OK"closeButton = JButton.new "Close"
这是两个将进入窗口右下角的按钮。
bottom.add okButtonbottom.add Box.createRigidArea Dimension.new 5, 0
我们将“确定”按钮放入水平框中。 我们在按钮旁边放置了一些刚性空间。 这样两个按钮之间会有一些空间。
basic.add Box.createRigidArea Dimension.new 0, 15
我们在按钮和窗口的边框之间留出一些空间。
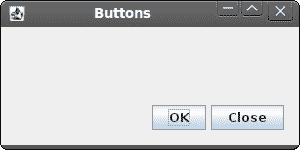
图:按钮示例
Windows 示例
以下示例使用GroupLayout管理器创建 Windows 对话框。 该对话框来自 JDeveloper 应用。
GroupLayout管理器将布局的创建分为两个步骤。 第一步,我们沿着水平轴布置组件。 在第二步中,我们沿垂直轴布置组件。 这在布局管理器中是一个不寻常的想法,但效果很好。
有两种类型的安排:顺序安排和并行安排。 在两种布局中,我们都可以顺序或并行排列组件。 在水平布局中,一行组件称为顺序组。 一列组件称为并行组。 在垂直布局中,一列组件称为顺序组。 一排组件称为并行组。 您必须正确理解这些定义才能与GroupLayout管理器一起使用。
#!/usr/local/bin/jruby# ZetCode JRuby Swing tutorial## In this program, GroupLayout# manager to create a Windows# example.## author: Jan Bodnar# website: www.zetcode.com# last modified: December 2010include Javaimport java.awt.Dimensionimport java.awt.Colorimport javax.swing.JButtonimport javax.swing.SwingConstantsimport javax.swing.JFrameimport javax.swing.JLabelimport javax.swing.JTextAreaimport javax.swing.BorderFactoryimport javax.swing.GroupLayoutclass Example < JFramedef initializesuper "Windows"self.initUIenddef initUIlayout = GroupLayout.new self.getContentPaneself.getContentPane.setLayout layoutlayout.setAutoCreateGaps truelayout.setAutoCreateContainerGaps trueself.setPreferredSize Dimension.new 350, 300windows = JLabel.new "Windows"area = JTextArea.newarea.setEditable falsearea.setBorder BorderFactory.createLineBorder Color.grayactivateButton = JButton.new "Activate"closeButton = JButton.new "Close"helpButton = JButton.new "Help"okButton = JButton.new "OK"sg = layout.createSequentialGrouppg1 = layout.createParallelGrouppg2 = layout.createParallelGrouppg1.addComponent windowspg1.addComponent areapg1.addComponent helpButtonsg.addGroup pg1pg2.addComponent activateButtonpg2.addComponent closeButtonpg2.addComponent okButtonsg.addGroup pg2layout.setHorizontalGroup sgsg1 = layout.createSequentialGroupsg2 = layout.createSequentialGrouppg1 = layout.createParallelGrouppg2 = layout.createParallelGroupsg1.addComponent windowspg1.addComponent areasg2.addComponent activateButtonsg2.addComponent closeButtonpg1.addGroup sg2sg1.addGroup pg1pg2.addComponent helpButtonpg2.addComponent okButtonsg1.addGroup pg2layout.setVerticalGroup sg1layout.linkSize SwingConstants::HORIZONTAL,okButton, helpButton, closeButton, activateButtonself.packself.setDefaultCloseOperation JFrame::EXIT_ON_CLOSEself.setLocationRelativeTo nilself.setVisible trueendendExample.new
我们使用GroupLayout管理器创建由六个组件组成的布局。 组件组沿两个轴形成。
sg = layout.createSequentialGrouppg1 = layout.createParallelGrouppg2 = layout.createParallelGrouppg1.addComponent windowspg1.addComponent areapg1.addComponent helpButtonsg.addGroup pg1pg2.addComponent activateButtonpg2.addComponent closeButtonpg2.addComponent okButtonsg.addGroup pg2layout.setHorizontalGroup sg
第一步,我们有一个水平布局。 它由两组平行的三个部分组成。
sg1 = layout.createSequentialGroupsg2 = layout.createSequentialGrouppg1 = layout.createParallelGrouppg2 = layout.createParallelGroupsg1.addComponent windowspg1.addComponent areasg2.addComponent activateButtonsg2.addComponent closeButtonpg1.addGroup sg2sg1.addGroup pg1pg2.addComponent helpButtonpg2.addComponent okButtonsg1.addGroup pg2layout.setVerticalGroup sg1
垂直布局有点复杂。 首先,我们添加一个组件。 然后,我们添加一个包含单个组件的并行组和一个包含两个组件的顺序组。 最后,我们添加两个组件的并行组。
layout.linkSize SwingConstants::HORIZONTAL,okButton, helpButton, closeButton, activateButton
此代码使所有按钮的大小相同。 我们只需要设置它们的宽度,因为默认情况下它们的高度已经相同。
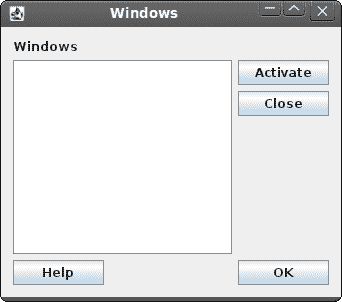
图:窗口示例
查看示例的屏幕截图。 注意,可以将组件分为垂直和水平组件集。 例如,标签,区域和“帮助”按钮组件可以形成垂直的组件组。 这正是GroupLayout管理器所做的。 它通过形成组件的垂直和水平组来布局组件。
在 JRuby Swing 教程的这一部分中,我们提到了组件的布局管理。

若有收获,就点个赞吧
0 人点赞
