Canvas是可以使用GraphicsContext提供的一组图形命令绘制的图像。 它是进行绘图的高级工具。
GraphicsContext用于使用缓冲区向Canvas发出绘图调用。
简单的线条
在第一个示例中,我们绘制了简单的线条。 线是基本的图形基元。 需要两个坐标才能形成一条线。
SimpleLinesEx.java
package com.zetcode;import javafx.application.Application;import javafx.scene.Scene;import javafx.scene.canvas.Canvas;import javafx.scene.canvas.GraphicsContext;import javafx.scene.layout.Pane;import javafx.stage.Stage;/*** ZetCode JavaFX tutorial** This program draws three lines which* form a rectangle.** Author: Jan Bodnar* Website: zetcode.com* Last modified: June 2015*/public class SimpleLinesEx extends Application {@Overridepublic void start(Stage stage) {initUI(stage);}private void initUI(Stage stage) {Pane root = new Pane();Canvas canvas = new Canvas(300, 300);GraphicsContext gc = canvas.getGraphicsContext2D();drawLines(gc);root.getChildren().add(canvas);Scene scene = new Scene(root, 300, 250, Color.WHITESMOKE);stage.setTitle("Lines");stage.setScene(scene);stage.show();}private void drawLines(GraphicsContext gc) {gc.beginPath();gc.moveTo(30.5, 30.5);gc.lineTo(150.5, 30.5);gc.lineTo(150.5, 150.5);gc.lineTo(30.5, 30.5);gc.stroke();}public static void main(String[] args) {launch(args);}}
该示例绘制了形成矩形的三条线。
Canvas canvas = new Canvas(300, 300);
Canvas的宽度和高度指定了将画布绘制命令渲染到的图像的大小。 所有绘图操作都被裁剪到该图像的边界。
GraphicsContext gc = canvas.getGraphicsContext2D();
getGraphicsContext2D()返回与画布关联的GraphicsContext。
drawLines(gc);
该图形委托给drawLines()方法。
gc.beginPath();
线图元表示为路径元素。 beginPath()方法开始一个新路径。
gc.moveTo(30.5, 30.5);
moveTo()方法将当前路径的起点移动到指定的坐标。
gc.lineTo(150.5, 30.5);gc.lineTo(150.5, 150.5);gc.lineTo(30.5, 30.5);
lineTo()方法将线段添加到当前路径。
gc.stroke();
stroke()方法使用当前的描边绘图描边路径。
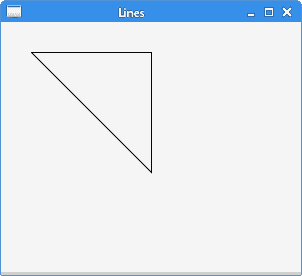
图:直线
描边和填充
描边用于绘制形状的轮廓。 填充用于绘制形状的内部。
StrokeFillEx.java
package com.zetcode;import javafx.application.Application;import javafx.scene.Scene;import javafx.scene.canvas.Canvas;import javafx.scene.canvas.GraphicsContext;import javafx.scene.layout.Pane;import javafx.scene.paint.Color;import javafx.stage.Stage;/*** ZetCode JavaFX tutorial** This program draws an outline of a circle* and fills an interior of a circle.** Author: Jan Bodnar* Website: zetcode.com* Last modified: June 2015*/public class StrokeFillEx extends Application {@Overridepublic void start(Stage stage) {initUI(stage);}private void initUI(Stage stage) {Pane root = new Pane();Canvas canvas = new Canvas(300, 300);GraphicsContext gc = canvas.getGraphicsContext2D();doDrawing(gc);root.getChildren().add(canvas);Scene scene = new Scene(root, 300, 250, Color.WHITESMOKE);stage.setTitle("Stroke and fill");stage.setScene(scene);stage.show();}private void doDrawing(GraphicsContext gc) {gc.setStroke(Color.FORESTGREEN.brighter());gc.setLineWidth(5);gc.strokeOval(30, 30, 80, 80);gc.setFill(Color.FORESTGREEN);gc.fillOval(130, 30, 80, 80);}public static void main(String[] args) {launch(args);}}
该示例绘制了圆的轮廓并填充了圆的内部。
gc.setStroke(Color.FORESTGREEN.brighter());
setStroke()方法设置当前的笔触绘图属性。 默认颜色是黑色。 GraphicsContext的笔触方法使用该属性。
gc.setLineWidth(5);
setLineWidth()设置当前线宽。
gc.strokeOval(130, 30, 80, 80);
strokeOval()方法使用当前的描边绘图描边椭圆。
gc.setFill(Color.FORESTGREEN);
setFill()方法设置当前的填充涂料属性。 默认颜色是黑色。 GraphicsContext的填充方法使用该属性。
gc.fillOval(30, 30, 80, 80);
fillOval()使用当前的填充颜料填充椭圆形。
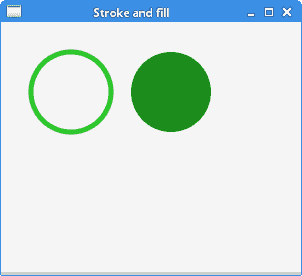
图:描边和填充
颜色
Color类用于处理 JavaFX 中的颜色。 有许多预定义的颜色。 可以使用 RGB 或 HSB 颜色模型创建自定义颜色值。
ColoursEx.java
package com.zetcode;import javafx.application.Application;import javafx.scene.Scene;import javafx.scene.canvas.Canvas;import javafx.scene.canvas.GraphicsContext;import javafx.scene.layout.Pane;import javafx.scene.paint.Color;import javafx.stage.Stage;/*** ZetCode JavaFX tutorial** This program draws six circles in six* different colours.** Author: Jan Bodnar* Website: zetcode.com* Last modified: June 2015*/public class ColoursEx extends Application {@Overridepublic void start(Stage stage) {initUI(stage);}private void initUI(Stage stage) {Pane root = new Pane();Canvas canvas = new Canvas(300, 300);GraphicsContext gc = canvas.getGraphicsContext2D();drawShapes(gc);root.getChildren().add(canvas);Scene scene = new Scene(root, 280, 200, Color.WHITESMOKE);stage.setTitle("Colours");stage.setScene(scene);stage.show();}private void drawShapes(GraphicsContext gc) {gc.setFill(Color.CADETBLUE);gc.fillOval(30, 30, 50, 50);gc.setFill(Color.DARKRED);gc.fillOval(110, 30, 50, 50);gc.setFill(Color.STEELBLUE);gc.fillOval(190, 30, 50, 50);gc.setFill(Color.BURLYWOOD);gc.fillOval(30, 110, 50, 50);gc.setFill(Color.LIGHTSEAGREEN);gc.fillOval(110, 110, 50, 50);gc.setFill(Color.CHOCOLATE);gc.fillOval(190, 110, 50, 50);}public static void main(String[] args) {launch(args);}}
该示例使用预定义的颜色值绘制六个圆。
gc.setFill(Color.CADETBLUE);
预定义的Color.CADETBLUE颜色设置为当前填充。
gc.fillOval(30, 30, 50, 50);
圆形对象的内部填充有当前的fill属性。
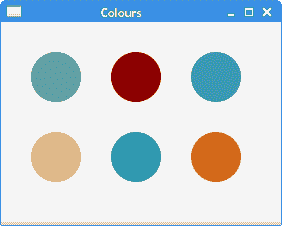
图:颜色
渐变
在计算机图形学中,渐变是从浅到深或从一种颜色到另一种颜色的阴影的平滑混合。 在绘图和绘图程序中,渐变用于创建彩色背景和特殊效果以及模拟灯光和阴影。 有两种类型的渐变:线性渐变和径向渐变。
线性渐变
线性渐变是沿直线平滑混合颜色。 它由LinearGradient类定义。
LinearGradientEx.java
package com.zetcode;import javafx.application.Application;import javafx.scene.Scene;import javafx.scene.canvas.Canvas;import javafx.scene.canvas.GraphicsContext;import javafx.scene.layout.Pane;import javafx.scene.paint.Color;import javafx.scene.paint.CycleMethod;import javafx.scene.paint.LinearGradient;import javafx.scene.paint.Stop;import javafx.stage.Stage;/** ZetCode JavaFX tutorial** This program draws a linear gradient.** Author: Jan Bodnar* Website: zetcode.com* Last modified: August 2016*/public class LinearGradientEx extends Application {@Overridepublic void start(Stage stage) {initUI(stage);}private void initUI(Stage stage) {Pane root = new Pane();Canvas canvas = new Canvas(300, 300);GraphicsContext gc = canvas.getGraphicsContext2D();doDrawing(gc);root.getChildren().add(canvas);Scene scene = new Scene(root, 300, 250, Color.WHITESMOKE);stage.setTitle("Linear gradient");stage.setScene(scene);stage.show();}private void doDrawing(GraphicsContext gc) {Stop[] stops1 = new Stop[] { new Stop(0.2, Color.BLACK),new Stop(0.5, Color.RED), new Stop(0.8, Color.BLACK)};LinearGradient lg1 = new LinearGradient(0, 0, 1, 0, true,CycleMethod.NO_CYCLE, stops1);gc.setFill(lg1);gc.fillRect(50, 30, 200, 180);}public static void main(String[] args) {launch(args);}}
在示例中,我们用线性渐变填充矩形。
Stop[] stops1 = new Stop[] { new Stop(0.2, Color.BLACK),new Stop(0.5, Color.RED), new Stop(0.8, Color.BLACK)};
我们定义渐变的停止点。 它们指定如何沿渐变分布颜色。
LinearGradient lg1 = new LinearGradient(0, 0, 1, 0, true,CycleMethod.NO_CYCLE, stops1);
前四个参数指定渐变绘制所沿的线。 第五个参数是比例参数,它设置坐标是否与该渐变填充的形状成比例。 第六个参数设置渐变的循环方法。 最后一个参数为停止点。
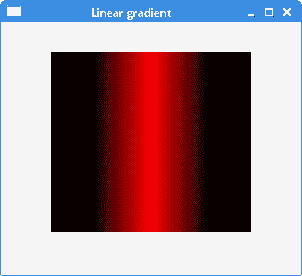
图:LinearGradient
径向渐变
径向渐变是圆和焦点之间颜色或阴影的平滑混合。 径向渐变由RadialGradient类定义。
RadialGradientEx.java
package com.zetcode;import javafx.application.Application;import javafx.scene.Scene;import javafx.scene.canvas.Canvas;import javafx.scene.canvas.GraphicsContext;import javafx.scene.layout.Pane;import javafx.scene.paint.Color;import javafx.scene.paint.CycleMethod;import javafx.scene.paint.RadialGradient;import javafx.scene.paint.Stop;import javafx.stage.Stage;/** ZetCode JavaFX tutorial** This program draws a radial gradient.** Author: Jan Bodnar* Website: zetcode.com* Last modified: August 2016*/public class RadialGradientEx extends Application {@Overridepublic void start(Stage stage) {initUI(stage);}private void initUI(Stage stage) {Pane root = new Pane();Canvas canvas = new Canvas(300, 300);GraphicsContext gc = canvas.getGraphicsContext2D();doDrawing(gc);root.getChildren().add(canvas);Scene scene = new Scene(root, 300, 250, Color.WHITESMOKE);stage.setTitle("Radial gradient");stage.setScene(scene);stage.show();}private void doDrawing(GraphicsContext gc) {Stop[] stops1 = new Stop[] { new Stop(0, Color.RED),new Stop(1, Color.BLACK)};RadialGradient lg1 = new RadialGradient(0, 0, 0.5, 0.5, 0.8, true,CycleMethod.NO_CYCLE, stops1);gc.setFill(lg1);gc.fillOval(30, 30, 150, 150);}public static void main(String[] args) {launch(args);}}
该示例使用径向渐变填充圆。
Stop[] stops1 = new Stop[] { new Stop(0, Color.RED),new Stop(1, Color.BLACK)};
我们定义渐变的终止值。
RadialGradient lg1 = new RadialGradient(0, 0, 0.5, 0.5, 0.8, true,CycleMethod.NO_CYCLE, stops1);
创建了一个径向渐变。 前两个参数是聚焦角和聚焦距离。 接下来的两个参数是渐变圆的圆心的 x 和 y 坐标。 第五个参数是定义颜色渐变范围的圆的半径。

图:RadialGradient
形状
矩形,椭圆形,弧形是基本的几何形状。 GraphicsContext包含用于绘制这些形状的轮廓和内部的方法。
ShapesEx.java
package com.zetcode;import javafx.application.Application;import javafx.scene.Scene;import javafx.scene.canvas.Canvas;import javafx.scene.canvas.GraphicsContext;import javafx.scene.layout.Pane;import javafx.scene.paint.Color;import javafx.scene.shape.ArcType;import javafx.stage.Stage;/*** ZetCode JavaFX tutorial** This program paints six different* shapes.** Author: Jan Bodnar* Website: zetcode.com* Last modified: June 2015*/public class ShapesEx extends Application {@Overridepublic void start(Stage stage) {initUI(stage);}private void initUI(Stage stage) {Pane root = new Pane();Canvas canvas = new Canvas(320, 300);GraphicsContext gc = canvas.getGraphicsContext2D();drawShapes(gc);root.getChildren().add(canvas);Scene scene = new Scene(root, 300, 200, Color.WHITESMOKE);stage.setTitle("Shapes");stage.setScene(scene);stage.show();}private void drawShapes(GraphicsContext gc) {gc.setFill(Color.GRAY);gc.fillOval(30, 30, 50, 50);gc.fillOval(110, 30, 80, 50);gc.fillRect(220, 30, 50, 50);gc.fillRoundRect(30, 120, 50, 50, 20, 20);gc.fillArc(110, 120, 60, 60, 45, 180, ArcType.OPEN);gc.fillPolygon(new double[]{220, 270, 220},new double[]{120, 170, 170}, 3);}public static void main(String[] args) {launch(args);}}
该示例使用图形上下文的fill方法绘制了六个不同的形状。
gc.setFill(Color.GRAY);
形状涂成灰色。
gc.fillOval(30, 30, 50, 50);gc.fillOval(110, 30, 80, 50);
fillOval()方法绘制一个圆和一个椭圆。 前两个参数是 x 和 y 坐标。 第三个和第四个参数是椭圆的宽度和高度。
gc.fillRect(220, 30, 50, 50);
fillRect()使用当前的填充颜料填充矩形。
gc.fillRoundRect(30, 120, 50, 50, 20, 20);
fillRoundRect()绘制一个矩形,其角是圆形的。 该方法的最后两个参数是矩形角的圆弧宽度和圆弧高度。
gc.fillArc(110, 120, 60, 60, 45, 180, ArcType.OPEN);
fillArc()方法使用当前的填充涂料填充圆弧。 最后三个参数是起始角度,角度扩展和闭合类型。
gc.fillPolygon(new double[]{220, 270, 220},new double[]{120, 170, 170}, 3);
fillPolygon()方法使用当前设置的填充涂料用给定的点填充多边形。 在我们的例子中,它绘制了一个直角三角形。 第一个参数是包含多边形点的 x 坐标的数组,第二个参数是包含多边形点的 y 坐标的数组。 最后一个参数是形成多边形的点数。
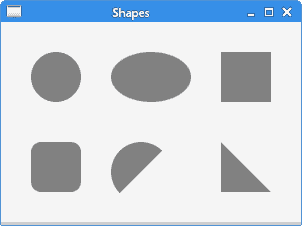
图:颜色
星形
可以使用strokePolygon()和fillPolygon()方法绘制更复杂的形状。 下一个示例绘制一个星形。
StarShapeEx.java
package com.zetcode;import javafx.application.Application;import javafx.scene.Scene;import javafx.scene.canvas.Canvas;import javafx.scene.canvas.GraphicsContext;import javafx.scene.layout.Pane;import javafx.scene.paint.Color;import javafx.stage.Stage;/*** ZetCode JavaFX tutorial** This program draws a Star shape on* a Canvas.** Author: Jan Bodnar* Website: zetcode.com* Last modified: June 2015*/public class StarShapeEx extends Application {@Overridepublic void start(Stage stage) {initUI(stage);}private void initUI(Stage stage) {Pane root = new Pane();Canvas canvas = new Canvas(300, 300);GraphicsContext gc = canvas.getGraphicsContext2D();drawStarShape(gc);root.getChildren().add(canvas);Scene scene = new Scene(root, 300, 250, Color.WHITESMOKE);stage.setTitle("Star");stage.setScene(scene);stage.show();}private void drawStarShape(GraphicsContext gc) {double xpoints[] = {10, 85, 110, 135, 210, 160,170, 110, 50, 60};double ypoints[] = {85, 75, 10, 75, 85, 125,190, 150, 190, 125};gc.strokePolygon(xpoints, ypoints, xpoints.length);}public static void main(String[] args) {launch(args);}}
该示例绘制了星形的轮廓。 形状由十个坐标组成。
double xpoints[] = {10, 85, 110, 135, 210, 160,170, 110, 50, 60};double ypoints[] = {85, 75, 10, 75, 85, 125,190, 150, 190, 125};
这些是形状的 x 和 y 坐标。
gc.strokePolygon(xpoints, ypoints, xpoints.length);
使用strokePolygon()方法绘制形状。
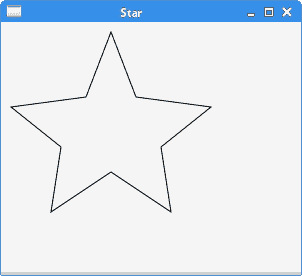
图:星星 shape
透明矩形
透明性是指能够透视材料的质量。 在计算机图形学中,我们可以使用 alpha 合成来实现透明效果。 Alpha 合成是将图像与背景组合以创建部分透明外观的过程。
TransparentRectanglesEx.java
package com.zetcode;import javafx.application.Application;import javafx.scene.Scene;import javafx.scene.canvas.Canvas;import javafx.scene.canvas.GraphicsContext;import javafx.scene.layout.Pane;import javafx.scene.paint.Color;import javafx.stage.Stage;/*** ZetCode JavaFX tutorial** This program draws ten rectangles with different* levels of transparency.** Author: Jan Bodnar* Website: zetcode.com* Last modified: June 2015*/public class TransparentRectanglesEx extends Application {@Overridepublic void start(Stage stage) {initUI(stage);}private void initUI(Stage stage) {Pane root = new Pane();Canvas canvas = new Canvas(600, 300);GraphicsContext gc = canvas.getGraphicsContext2D();drawRectangles(gc);root.getChildren().add(canvas);Scene scene = new Scene(root, 600, 100, Color.WHITESMOKE);stage.setTitle("Transparent rectangles");stage.setScene(scene);stage.show();}private void drawRectangles(GraphicsContext gc) {for (int i = 1; i <= 10; i++) {float alpha = i * 0.1f;gc.setFill(Color.FORESTGREEN);gc.setGlobalAlpha(alpha);gc.fillRect(50 * i, 20, 40, 40);}}public static void main(String[] args) {launch(args);}}
该示例绘制了十个具有不同透明度级别的矩形。
float alpha = i * 0.1f;
在每个for周期中计算一个 alpha 值。
gc.setGlobalAlpha(alpha);
setGlobalAlpha()方法设置当前状态的全局 alpha。
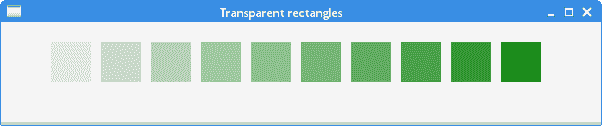
图:透明矩形
在本章中,我们在Canvas节点上执行了绘制操作。

若有收获,就点个赞吧
0 人点赞
