在 Java 2D 教程的这一部分中,我们创建一些基本的和更高级的形状。 我们用纯色,渐变和纹理填充形状。
基本形状
首先,我们绘制一些基本的 Java 2D 形状。
BasicShapes.java
package com.zetcode;import java.awt.Color;import java.awt.EventQueue;import java.awt.Graphics;import java.awt.Graphics2D;import java.awt.RenderingHints;import java.awt.geom.Ellipse2D;import javax.swing.JFrame;import javax.swing.JPanel;class Surface extends JPanel {private void doDrawing(Graphics g) {Graphics2D g2d = (Graphics2D) g;g2d.setPaint(new Color(150, 150, 150));RenderingHints rh = new RenderingHints(RenderingHints.KEY_ANTIALIASING,RenderingHints.VALUE_ANTIALIAS_ON);rh.put(RenderingHints.KEY_RENDERING,RenderingHints.VALUE_RENDER_QUALITY);g2d.setRenderingHints(rh);g2d.fillRect(30, 20, 50, 50);g2d.fillRect(120, 20, 90, 60);g2d.fillRoundRect(250, 20, 70, 60, 25, 25);g2d.fill(new Ellipse2D.Double(10, 100, 80, 100));g2d.fillArc(120, 130, 110, 100, 5, 150);g2d.fillOval(270, 130, 50, 50);}@Overridepublic void paintComponent(Graphics g) {super.paintComponent(g);doDrawing(g);}}public class BasicShapesEx extends JFrame {public BasicShapesEx() {initUI();}private void initUI() {add(new Surface());setTitle("Basic shapes");setSize(350, 250);setLocationRelativeTo(null);setDefaultCloseOperation(JFrame.EXIT_ON_CLOSE);}public static void main(String[] args) {EventQueue.invokeLater(new Runnable() {@Overridepublic void run() {BasicShapesEx ex = new BasicShapesEx();ex.setVisible(true);}});}}
在此示例中,我们在面板上绘制了六个基本形状:正方形,矩形,圆角矩形,椭圆形,弧形和圆形。
g2d.setPaint(new Color(150, 150, 150));
形状将以灰色背景绘制。
g2d.fillRect(20, 20, 50, 50);g2d.fillRect(120, 20, 90, 60);
fillRect()方法用于绘制矩形和正方形。 前两个参数是要绘制的形状的 x,y 坐标。 最后两个参数是形状的宽度和高度。
g2d.fillRoundRect(250, 20, 70, 60, 25, 25);
在这里,我们创建一个圆角矩形。 最后两个参数是四个角处圆弧的水平和垂直直径。
g2d.fill(new Ellipse2D.Double(10, 100, 80, 100));
fill()方法绘制给定形状的内部-椭圆。
g2d.fillArc(120, 130, 110, 100, 5, 150);
fillArc()方法填充覆盖指定矩形的圆弧或椭圆弧。 圆弧是圆的圆周的一部分。
g2d.fillOval(270, 130, 50, 50);
使用fillOval()方法绘制一个圆。
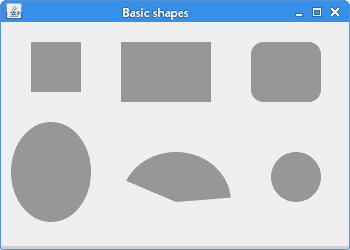
图:基本形状
一般路径
可以使用GeneralPath构造更复杂的形状。 它代表由直线,二次贝塞尔曲线和三次贝塞尔曲线构成的几何路径。
下面的示例使用此类创建星形。
StarEx.java
package com.zetcode;import java.awt.Color;import java.awt.EventQueue;import java.awt.Graphics;import java.awt.Graphics2D;import java.awt.RenderingHints;import java.awt.geom.GeneralPath;import javax.swing.JFrame;import javax.swing.JPanel;class Surface extends JPanel {private final double points[][] = {{ 0, 85 }, { 75, 75 }, { 100, 10 }, { 125, 75 },{ 200, 85 }, { 150, 125 }, { 160, 190 }, { 100, 150 },{ 40, 190 }, { 50, 125 }, { 0, 85 }};private void doDrawing(Graphics g) {Graphics2D g2d = (Graphics2D) g.create();g2d.setRenderingHint(RenderingHints.KEY_ANTIALIASING,RenderingHints.VALUE_ANTIALIAS_ON);g2d.setRenderingHint(RenderingHints.KEY_RENDERING,RenderingHints.VALUE_RENDER_QUALITY);g2d.setPaint(Color.gray);g2d.translate(25, 5);GeneralPath star = new GeneralPath();star.moveTo(points[0][0], points[0][1]);for (int k = 1; k < points.length; k++)star.lineTo(points[k][0], points[k][1]);star.closePath();g2d.fill(star);g2d.dispose();}@Overridepublic void paintComponent(Graphics g) {super.paintComponent(g);doDrawing(g);}}public class StarEx extends JFrame {public StarEx() {initUI();}private void initUI() {add(new Surface());setTitle("Star");setSize(350, 250);setLocationRelativeTo(null);setDefaultCloseOperation(JFrame.EXIT_ON_CLOSE);}public static void main(String[] args) {EventQueue.invokeLater(new Runnable() {@Overridepublic void run() {StarEx ex = new StarEx();ex.setVisible(true);}});}}
我们从一系列角度创造一颗星星。
private final double points[][] = {{ 0, 85 }, { 75, 75 }, { 100, 10 }, { 125, 75 },{ 200, 85 }, { 150, 125 }, { 160, 190 }, { 100, 150 },{ 40, 190 }, { 50, 125 }, { 0, 85 }};
这些是星星的坐标。
GeneralPath star = new GeneralPath();
在这里,我们实例化了GeneralPath类。
star.moveTo(points[0][0], points[0][1]);
我们移到GeneralPath的初始坐标。
for (int k = 1; k < points.length; k++)star.lineTo(points[k][0], points[k][1]);
在这里,我们连接星的所有坐标。
star.closePath();g2d.fill(star);
我们封闭路径并填充星星内部。

图:星星
区域
创建复杂形状的另一种方法是组成区域。 Area存储和操纵二维空间的封闭区域的与分辨率无关的描述。 可以通过加,减,交,异或运算来操纵它。
AreasEx.java
package com.zetcode;import java.awt.Color;import java.awt.EventQueue;import java.awt.Graphics;import java.awt.Graphics2D;import java.awt.RenderingHints;import java.awt.geom.Area;import java.awt.geom.Ellipse2D;import java.awt.geom.Rectangle2D;import javax.swing.JFrame;import javax.swing.JPanel;class Surface extends JPanel {public void doDrawing(Graphics g) {Graphics2D g2d = (Graphics2D) g;RenderingHints rh = new RenderingHints(RenderingHints.KEY_ANTIALIASING,RenderingHints.VALUE_ANTIALIAS_ON);rh.put(RenderingHints.KEY_RENDERING,RenderingHints.VALUE_RENDER_QUALITY);g2d.setRenderingHints(rh);g2d.setPaint(Color.gray);Area a1 = new Area(new Rectangle2D.Double(20, 20, 100, 100));Area a2 = new Area(new Ellipse2D.Double(50, 50, 100, 100));a1.subtract(a2);g2d.fill(a1);Area a3 = new Area(new Rectangle2D.Double(150, 20, 100, 100));Area a4 = new Area(new Ellipse2D.Double(150, 20, 100, 100));a3.subtract(a4);g2d.fill(a3);Area a5 = new Area(new Rectangle2D.Double(280, 20, 100, 100));Area a6 = new Area(new Ellipse2D.Double(320, 40, 100, 100));a5.add(a6);g2d.fill(a5);}@Overridepublic void paintComponent(Graphics g) {super.paintComponent(g);doDrawing(g);}}public class AreasEx extends JFrame {public AreasEx() {initUI();}private void initUI() {add(new Surface());setTitle("Areas");setSize(450, 200);setLocationRelativeTo(null);setDefaultCloseOperation(JFrame.EXIT_ON_CLOSE);}public static void main(String[] args) {EventQueue.invokeLater(new Runnable() {@Overridepublic void run() {AreasEx ex = new AreasEx();ex.setVisible(true);}});}}
该示例通过操纵区域来创建三种不同的形状。
Area a1 = new Area(new Rectangle2D.Double(20, 20, 100, 100));Area a2 = new Area(new Ellipse2D.Double(50, 50, 100, 100));a1.subtract(a2);g2d.fill(a1);
此代码通过从矩形中减去椭圆来构造形状。
Area a5 = new Area(new Rectangle2D.Double(280, 20, 100, 100));Area a6 = new Area(new Ellipse2D.Double(320, 40, 100, 100));a5.add(a6);g2d.fill(a5);
这些线通过在椭圆上添加矩形来构造形状。
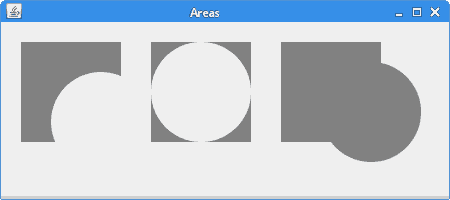
图:区域
色彩
Color类用于处理 Java 2D 中的颜色。 要使用当前颜色填充矩形,我们使用fillRect()方法。
ColoursEx.java
package com.zetcode;import java.awt.Color;import java.awt.EventQueue;import java.awt.Graphics;import java.awt.Graphics2D;import javax.swing.JFrame;import javax.swing.JPanel;class Surface extends JPanel {public void doDrawing(Graphics g) {Graphics2D g2d = (Graphics2D) g;g2d.setColor(new Color(125, 167, 116));g2d.fillRect(10, 10, 90, 60);g2d.setColor(new Color(42, 179, 231));g2d.fillRect(130, 10, 90, 60);g2d.setColor(new Color(70, 67, 123));g2d.fillRect(250, 10, 90, 60);g2d.setColor(new Color(130, 100, 84));g2d.fillRect(10, 100, 90, 60);g2d.setColor(new Color(252, 211, 61));g2d.fillRect(130, 100, 90, 60);g2d.setColor(new Color(241, 98, 69));g2d.fillRect(250, 100, 90, 60);g2d.setColor(new Color(217, 146, 54));g2d.fillRect(10, 190, 90, 60);g2d.setColor(new Color(63, 121, 186));g2d.fillRect(130, 190, 90, 60);g2d.setColor(new Color(31, 21, 1));g2d.fillRect(250, 190, 90, 60);}@Overridepublic void paintComponent(Graphics g) {super.paintComponent(g);doDrawing(g);}}public class ColoursEx extends JFrame {public ColoursEx() {initUI();}private void initUI() {add(new Surface());setTitle("Colours");setSize(360, 300);setLocationRelativeTo(null);setDefaultCloseOperation(JFrame.EXIT_ON_CLOSE);}public static void main(String[] args) {EventQueue.invokeLater(new Runnable() {@Overridepublic void run() {ColoursEx ex = new ColoursEx();ex.setVisible(true);}});}}
在示例中,我们绘制了九个彩色矩形。
Graphics2D g2d = (Graphics2D) g;
更改图形上下文的color属性时,无需创建Graphics2D类的副本或重置该值。
g2d.setColor(new Color(125, 167, 116));
使用Color类创建新的颜色。 构造器的参数是新颜色的红色,绿色和蓝色部分。 setColor()方法将图形上下文的当前颜色设置为指定的颜色值。 所有后续图形操作均使用此颜色值。
g2d.fillRect(10, 15, 90, 60);
为了用颜色填充矩形,我们使用fillRect()方法。
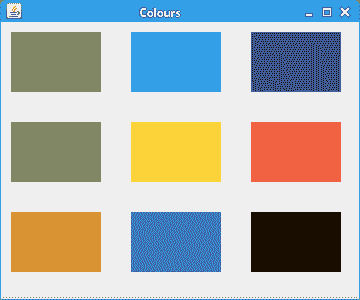
图:颜色
渐变
在计算机图形学中,渐变是从浅到深或从一种颜色到另一种颜色的阴影的平滑混合。 在 2D 绘图程序和绘画程序中,渐变用于创建彩色背景和特殊效果以及模拟灯光和阴影。 (answers.com)
GradientsEx.java
package com.zetcode;import java.awt.Color;import java.awt.EventQueue;import java.awt.GradientPaint;import java.awt.Graphics;import java.awt.Graphics2D;import javax.swing.JFrame;import javax.swing.JPanel;class Surface extends JPanel {private void doDrawing(Graphics g) {Graphics2D g2d = (Graphics2D) g.create();GradientPaint gp1 = new GradientPaint(5, 5,Color.red, 20, 20, Color.black, true);g2d.setPaint(gp1);g2d.fillRect(20, 20, 300, 40);GradientPaint gp2 = new GradientPaint(5, 25,Color.yellow, 20, 2, Color.black, true);g2d.setPaint(gp2);g2d.fillRect(20, 80, 300, 40);GradientPaint gp3 = new GradientPaint(5, 25,Color.green, 2, 2, Color.black, true);g2d.setPaint(gp3);g2d.fillRect(20, 140, 300, 40);GradientPaint gp4 = new GradientPaint(25, 25,Color.blue, 15, 25, Color.black, true);g2d.setPaint(gp4);g2d.fillRect(20, 200, 300, 40);GradientPaint gp5 = new GradientPaint(0, 0,Color.orange, 0, 20, Color.black, true);g2d.setPaint(gp5);g2d.fillRect(20, 260, 300, 40);g2d.dispose();}@Overridepublic void paintComponent(Graphics g) {super.paintComponent(g);doDrawing(g);}}public class GradientsEx extends JFrame {public GradientsEx() {initUI();}private void initUI() {add(new Surface());setTitle("Gradients");setSize(350, 350);setLocationRelativeTo(null);setDefaultCloseOperation(JFrame.EXIT_ON_CLOSE);}public static void main(String[] args) {EventQueue.invokeLater(new Runnable() {@Overridepublic void run() {GradientsEx ex = new GradientsEx();ex.setVisible(true);}});}}
我们的代码示例展示了五个带有渐变的矩形。
GradientPaint gp4 = new GradientPaint(25, 25,Color.blue, 15, 25, Color.black, true);
要使用渐变,我们使用GradientPaint类。 通过操纵颜色值以及起点和终点,我们可以获得不同的结果。
g2d.setPaint(gp4);
通过调用setPaint()方法激活渐变。
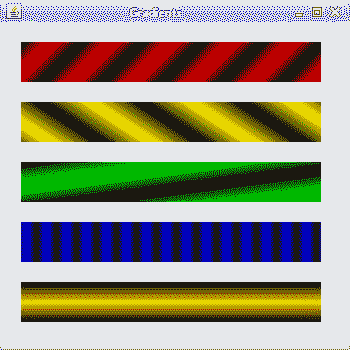
图:渐变
纹理
纹理是应用于形状的位图图像。 要在 Java 2D 中使用纹理,我们使用TexturePaint类。 通过setPaint()方法应用纹理。
TexturesEx.java
package com.zetcode;import java.awt.EventQueue;import java.awt.Graphics;import java.awt.Graphics2D;import java.awt.Rectangle;import java.awt.TexturePaint;import java.awt.image.BufferedImage;import java.io.File;import java.io.IOException;import java.util.logging.Level;import java.util.logging.Logger;import javax.imageio.ImageIO;import javax.swing.JFrame;import javax.swing.JPanel;class Surface extends JPanel {private BufferedImage slate;private BufferedImage java;private BufferedImage pane;private TexturePaint slatetp;private TexturePaint javatp;private TexturePaint panetp;public Surface() {loadImages();}private void loadImages() {try {slate = ImageIO.read(new File("slate.png"));java = ImageIO.read(new File("java.png"));pane = ImageIO.read(new File("pane.png"));} catch (IOException ex) {Logger.getLogger(Surface.class.getName()).log(Level.SEVERE, null, ex);}}private void doDrawing(Graphics g) {Graphics2D g2d = (Graphics2D) g.create();slatetp = new TexturePaint(slate, new Rectangle(0, 0, 90, 60));javatp = new TexturePaint(java, new Rectangle(0, 0, 90, 60));panetp = new TexturePaint(pane, new Rectangle(0, 0, 90, 60));g2d.setPaint(slatetp);g2d.fillRect(10, 15, 90, 60);g2d.setPaint(javatp);g2d.fillRect(130, 15, 90, 60);g2d.setPaint(panetp);g2d.fillRect(250, 15, 90, 60);g2d.dispose();}@Overridepublic void paintComponent(Graphics g) {super.paintComponent(g);doDrawing(g);}}public class TexturesEx extends JFrame {public TexturesEx() {initUI();}private void initUI() {add(new Surface());setTitle("Textures");setSize(360, 120);setLocationRelativeTo(null);setDefaultCloseOperation(JFrame.EXIT_ON_CLOSE);}public static void main(String[] args) {EventQueue.invokeLater(new Runnable() {@Overridepublic void run() {TexturesEx ex = new TexturesEx();ex.setVisible(true);}});}}
在代码示例中,我们用三个不同的纹理填充三个矩形。
slate = ImageIO.read(new File("slate.png"));
使用ImageIO类,我们将图像读取到缓冲图像中。
slatetp = new TexturePaint(slate, new Rectangle(0, 0, 90, 60));
我们从缓冲图像中创建一个TexturePaint类。
g2d.setPaint(slatetp);g2d.fillRect(10, 15, 90, 60);
我们用纹理填充矩形。
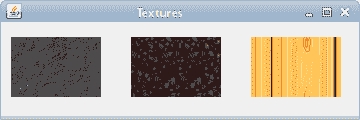
图:纹理
在 Java 2D 教程的这一部分中,我们介绍了 Java 2D 库的一些基本形状和更高级的形状。

若有收获,就点个赞吧
0 人点赞
