在 Qyoto C# 编程教程的这一部分中,我们将展示如何创建自定义窗口小部件。
大多数工具包通常仅提供最常用的窗口小部件,例如按钮,文本窗口小部件,滑块等。没有工具箱可以提供所有可能的窗口小部件。 程序员必须自己创建此类小部件。 他们使用工具箱提供的绘图工具来完成此任务。 有两种可能性。 程序员可以修改或增强现有的小部件。 或者,他可以从头开始创建自定义窗口小部件。
在本章中,我们将创建两个自定义窗口小部件。 刻录小部件和 Led 小部件。
刻录小部件
在下一个示例中,我们将创建一个自定义刻录小部件。 可以在 Nero 或 K3B 之类的应用中看到此小部件。 该小部件将从头开始创建。
burning.cs
using System;using QtCore;using QtGui;public class Burning : QWidget{const int PANEL_HEIGHT = 30;const int DISTANCE = 19;const int LINE_WIDTH = 5;const int DIVISIONS = 10;const float FULL_CAPACITY = 700f;const float MAX_CAPACITY = 750f;QColor redColor = new QColor(255, 175, 175);QColor yellowColor = new QColor(255, 255, 184);QWidget parent;String[] num ={"75", "150", "225", "300","375", "450", "525", "600","675"};public Burning(QWidget parent){this.parent = parent;MinimumHeight = PANEL_HEIGHT;}protected override void OnPaintEvent(QPaintEvent pe){QPainter ptr = new QPainter(this);DrawWidget(ptr);ptr.End();}void DrawWidget(QPainter ptr){QyotoApp burn = (QyotoApp) parent;float slid_width = burn.GetCurrentWidth();float width = Size.Width;float step = width / DIVISIONS;float till = (width / MAX_CAPACITY) * slid_width;float full = (width / MAX_CAPACITY) * FULL_CAPACITY;if (slid_width > FULL_CAPACITY){ptr.Pen = yellowColor;ptr.Brush = yellowColor;ptr.DrawRect(new QRectF(0, 0, full, PANEL_HEIGHT));ptr.Pen = redColor;ptr.Brush = redColor;ptr.DrawRect(new QRectF(full+1, 0, till-full, PANEL_HEIGHT));} else{if (slid_width > 0){ptr.Pen = yellowColor;ptr.Brush = yellowColor;ptr.DrawRect(new QRectF(0, 0, till, PANEL_HEIGHT));}}ptr.Pen = new QColor(90, 90, 90);ptr.SetBrush(BrushStyle.NoBrush);ptr.DrawRect(0, 0, Size.Width-1, PANEL_HEIGHT-1);QFont newFont = ptr.Font;newFont.PointSize = 7;ptr.Font = newFont;QFontMetrics metrics = new QFontMetrics(newFont);for (int i = 1; i <= num.Length; i++){ptr.DrawLine(new QLineF(i*step, 1, i*step, LINE_WIDTH));int w = metrics.Width(num[i-1]);ptr.DrawText(new QPointF(i*step-w/2, DISTANCE), num[i-1]);}}}
在这个文件中,我们创建了刻录小部件。
public class Burning : QWidget{...
自定义窗口小部件基于QWidget类。
const int PANEL_HEIGHT = 30;const int DISTANCE = 19;const int LINE_WIDTH = 5;const int DIVISIONS = 10;const float FULL_CAPACITY = 700f;const float MAX_CAPACITY = 750f;
这些是重要的常数。 PANEL_HEIGHT定义自定义窗口小部件的高度。 DISTANCE是比例尺上的数字与其父边框顶部之间的距离。 LINE_WIDTH是垂直线的宽度。 DIVISIONS是秤的数量。 FULL_CAPACITY是媒体的容量。 达到目标后,就会发生过度刻录。 这通过红色可视化。 MAX_CAPACITY是介质的最大容量。
String[] num ={"75", "150", "225", "300","375", "450", "525", "600","675"};
我们使用这些数字来构建刻录小部件的比例。
protected override void OnPaintEvent(QPaintEvent pe){QPainter ptr = new QPainter(this);DrawWidget(ptr);ptr.End();}
自定义窗口小部件的图形委托给DrawWidget()方法。
QyotoApp burn = (QyotoApp) parent;
我们检索对父窗口小部件的引用。
float slid_width = burn.GetCurrentWidth();
我们使用它来获取当前选定的滑块值。
float width = Size.Width;
我们得到小部件的宽度。 自定义窗口小部件的宽度是动态的。 用户可以调整大小。
float till = (width / MAX_CAPACITY) * slid_width;float full = (width / MAX_CAPACITY) * FULL_CAPACITY;
我们使用width变量进行转换。 在比例尺值和自定义小部件的度量之间。 请注意,我们使用浮点值。 我们在绘图中获得了更高的精度。
ptr.Pen = redColor;ptr.Brush = redColor;ptr.DrawRect(new QRectF(full+1, 0, till-full, PANEL_HEIGHT));
这三行画出红色矩形,表示过度燃烧。
ptr.DrawRect(0, 0, Size.Width-1, PANEL_HEIGHT-1);
这是小部件的周长。 外部矩形。
ptr.DrawLine(new QLineF(i*step, 1, i*step, LINE_WIDTH));
在这里,我们画出小的垂直线。
QFontMetrics metrics = new QFontMetrics(newFont);...int w = metrics.Width(num[i-1]);ptr.DrawText(new QPointF(i*step-w/2, DISTANCE), num[i-1]);
在这里,我们在比例尺上绘制数字。 为了精确定位数字,我们必须获得字符串的宽度。
main.cs
using System;using QtCore;using QtGui;/*** ZetCode Qyoto C# tutorial** In this program, we create* a custom Burning widget.** @author Jan Bodnar* website zetcode.com* last modified October 2012*/public class QyotoApp : QWidget{const int MAX_CAPACITY = 750;QSlider slider;QWidget widget;int cur_width;public QyotoApp(){WindowTitle = "The Burning Widget";InitUI();Resize(370, 200);Move(300, 300);Show();}void InitUI(){slider = new QSlider(Qt.Orientation.Horizontal , this);slider.Maximum = MAX_CAPACITY;slider.SetGeometry(50, 50, 130, 30);slider.ValueChanged += OnValueChanged;QVBoxLayout vbox = new QVBoxLayout(this);QHBoxLayout hbox = new QHBoxLayout();vbox.AddStretch(1);widget = new Burning(this);hbox.AddWidget(widget, 0);vbox.AddLayout(hbox);Layout = vbox;}[Q_SLOT]void OnValueChanged(int val){cur_width = val;widget.Repaint();}public int GetCurrentWidth(){return cur_width;}[STAThread]public static int Main(String[] args){new QApplication(args);new QyotoApp();return QApplication.Exec();}}
这是主文件。 在这里,我们创建滑块小部件并使用我们的自定义小部件。
widget = new Burning(this);hbox.AddWidget(widget, 0);
我们创建了刻录小部件的实例,并将其添加到水平框中。
[Q_SLOT]void OnValueChanged(int val){cur_width = val;widget.Repaint();}
当滑块的值更改时,我们将其存储在cur_width变量中,然后重新绘制自定义窗口小部件。
public int GetCurrentWidth(){return cur_width;}
定制小部件调用此方法以获取实际的滑块值。
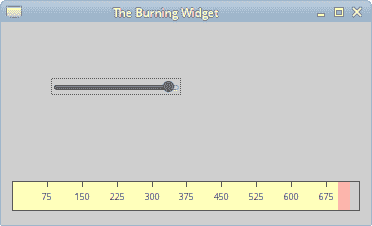
图:刻录小部件
Led 小部件
Led 小部件是一个灯泡,可以将其设置为不同的颜色。 在我们的例子中是红色,绿色,橙色和黑色。 该自定义窗口小部件仅使用 SVG 图像创建。 有四个 SVG 图像。 每个用于 Led 小部件的一种状态。
要编译该示例,我们需要引用qyoto-qtsvg.dll库。 例如,在我们的系统上,我们将-r:/usr/local/lib/mono/qyoto/qyoto-qtsvg.dll添加到了编译选项。
led.cs
using System;using QtCore;using QtGui;using QtSvg;public class Led : QWidget{string[] cols;int col;public Led(QWidget parent){const int GREEN = 1;col = GREEN;SetMinimumSize(50, 50);SetMaximumSize(50, 50);cols = new string[] { "red.svg", "green.svg","orange.svg", "black.svg" };}public void SetColour(int newColour){col = newColour;Update();}protected override void OnPaintEvent(QPaintEvent e){QPainter ptr = new QPainter(this);DrawCustomWidget(ptr);ptr.End();}void DrawCustomWidget(QPainter ptr){QSvgRenderer srnd = new QSvgRenderer();srnd.Load(cols[col]);srnd.Render(ptr);}}
在led.cs类中,我们构建了自定义窗口小部件。
const int GREEN = 1;col = GREEN;
当一切正常时,GREEN常量指示 Led 小部件的状态。 颜色变量定义窗口小部件的当前状态。
SetMinimumSize(50, 50);SetMaximumSize(50, 50);
这两条线强制窗口小部件具有恒定的大小。 SVG 图像的大小为50x50。
cols = new string[] { "red.svg", "green.svg","orange.svg", "black.svg" };
我们将 SVG 图像文件名存储在cols数组中。
public void SetColour(int newColour){col = newColour;Update();}
SetColour()方法将col变量设置为新值。 我们调用Update()方法重绘 Led 小部件以反映新状态。
void DrawCustomWidget(QPainter ptr){QSvgRenderer srnd = new QSvgRenderer();srnd.Load(cols[col]);srnd.Render(ptr);}
在DrawCustomWidget()方法中,我们使用QSvgRenderer类显示 SVG 图像。
main.cs
using Qyoto;using QtCore;using QtGui;/*** ZetCode Qyoto C# tutorial** This program creates a custom Led* widget.** @author Jan Bodnar* website zetcode.com* last modified October 2012*/public class QyotoApp : QWidget{const int RED = 0;const int GREEN = 1;const int ORANGE = 2;const int BLACK = 3;Led led;public QyotoApp(){WindowTitle = "Led widget";SetupUI();Resize(250, 150);Move(300, 300);Show();}public void SetupUI(){QVBoxLayout vbox = new QVBoxLayout();QHBoxLayout hbox = new QHBoxLayout();led = new Led(this);hbox.AddWidget(led);vbox.AddStretch(1);vbox.AddLayout(hbox);vbox.AddStretch(1);QHBoxLayout hbox2 = new QHBoxLayout();QPushButton pb1 = new QPushButton("Normal", this);QPushButton pb2 = new QPushButton("Warning", this);QPushButton pb3 = new QPushButton("Emergency", this);QPushButton pb4 = new QPushButton("Off", this);hbox2.AddWidget(pb1);hbox2.AddWidget(pb2);hbox2.AddWidget(pb3);hbox2.AddWidget(pb4);vbox.AddLayout(hbox2);Connect(pb1, SIGNAL("clicked()"), this, SLOT("OnClicked()"));Connect(pb2, SIGNAL("clicked()"), this, SLOT("OnClicked()"));Connect(pb3, SIGNAL("clicked()"), this, SLOT("OnClicked()"));Connect(pb4, SIGNAL("clicked()"), this, SLOT("OnClicked()"));Layout = vbox;}[Q_SLOT]public void OnClicked(){QPushButton sender = (QPushButton) this.Sender();string text = sender.Text;if (text == "Normal"){led.SetColour(GREEN);}else if (text == "Warning"){led.SetColour(ORANGE);}else if (text == "Emergency"){led.SetColour(RED);}else if (text == "Off"){led.SetColour(BLACK);}}[STAThread]public static int Main(String[] args){new QApplication(args);new QyotoApp();return QApplication.Exec();}}
这是main.cs文件。 我们连续有四个按钮,窗口中央有一个 Led 小部件。 这四个按钮控制 Led 小部件的状态。 Led 小部件有四个状态。 正常,警告,紧急和关闭。
led = new Led(this);hbox.AddWidget(led);
我们创建 Led 小部件的实例并将其放入水平框中。
else if ( text == "Warning"){led.SetColour(ORANGE);}
如果单击警告按钮,则 LED 小部件的颜色将变为橙色。 更准确地说,将加载并显示一个新的橙色 SVG 图像。
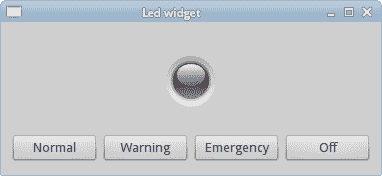
图:Led 小部件显示“关闭”状态
在 Qyoto C# 教程的这一部分中,我们演示了如何创建自定义窗口小部件。

若有收获,就点个赞吧
0 人点赞
