Mono Winforms 教程继续进行控件的布局管理。 在将控件放置在其父容器上之后,我们必须确保其布局正确。
Anchor
控件的Anchor属性确定如何使用其父控件调整其大小。 锚是海洋世界中的一个术语。 当船锚掉入水中时,船就固定在某个地方。 Winforms 控件也是如此。
Winforms 中的每个控件都可以具有以下AnchorStyles值之一:
TopLeftRightBottom
注意,控件不限于一个值。 他们可以使用|组合这些值。 运算符。
Anchor基本示例
下面的示例显示一个非常基本的示例,演示Anchor属性。
anchor.cs
using System;using System.Drawing;using System.Windows.Forms;class MForm : Form {public MForm() {Text = "Anchor";Size = new Size(210, 210);Button btn1 = new Button();btn1.Text = "Button";btn1.Parent = this;btn1.Location = new Point(30, 30);Button btn2 = new Button();btn2.Text = "Button";btn2.Parent = this;btn2.Location = new Point(30, 80);btn2.Anchor = AnchorStyles.Right;CenterToScreen();}}class MApplication {public static void Main() {MForm mf = new MForm();Application.Run(mf);}}
这是一个非常基本的代码示例,清楚地显示了Anchor属性的含义。 我们在表单上有两个按钮。 第一个按钮具有默认的AnchorStyles值,即AnchorStyles.Left。 第二个按钮明确设置了AnchorStyles.Right。
btn2.Anchor = AnchorStyles.Right;
我们将第二个按钮的Anchor属性明确设置为AnchorStyles.Right值。
现在看看以下两个图像。 左边的是开始时显示的应用。 调整大小后,右侧显示相同的应用。 第一个按钮与表单的左边界和上边界保持距离。 第二个按钮与表单的右边框保持距离。 但是它在垂直方向上没有保持任何距离。
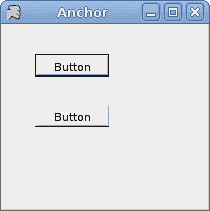

图:调整大小前后
Dock
Dock属性允许我们将控件粘贴到父窗体或控件的特定边缘。
以下是可能的DockStyle值。
TopLeftRightBottomFillNone
编辑器骨架
以下代码示例演示了正在使用的Dock属性。
editor.cs
using System;using System.Drawing;using System.Windows.Forms;class MForm : Form {public MForm() {Text = "Editor";Size = new Size(210, 180);MainMenu mainMenu = new MainMenu();MenuItem file = mainMenu.MenuItems.Add("&File");file.MenuItems.Add(new MenuItem("E&xit",new EventHandler(this.OnExit), Shortcut.CtrlX));Menu = mainMenu;TextBox tb = new TextBox();tb.Parent = this;tb.Dock = DockStyle.Fill;tb.Multiline = true;StatusBar sb = new StatusBar();sb.Parent = this;sb.Text = "Ready";CenterToScreen();}void OnExit(object sender, EventArgs e) {Close();}}class MApplication {public static void Main() {Application.Run(new MForm());}}
我们显示一个菜单栏和一个状态栏。 其余区域由TextBox控件占用。
TextBox tb = new TextBox();tb.Parent = this;
在这里,我们创建TextBox控件。 Form容器被设置为文本框的父级。
tb.Dock = DockStyle.Fill;
此代码行使TextBox控件占用了表单容器内的剩余空间。
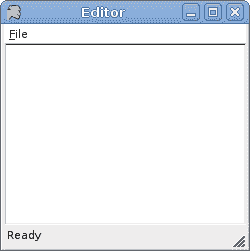
图:编辑器骨架
固定按钮
下一个示例显示了位于窗体右下角的两个按钮。
anchoredbuttons.cs
using System;using System.Drawing;using System.Windows.Forms;class MForm : Form {private int WIDTH = 250;private int HEIGHT = 150;private int BUTTONS_SPACE = 15;private int PANEL_SPACE = 8;private int CLOSE_SPACE = 10;public MForm() {Text = "Anchor";Size = new Size(WIDTH, HEIGHT);Button ok = new Button();int PANEL_HEIGHT = ok.Height + PANEL_SPACE;Panel panel = new Panel();panel.Height = PANEL_HEIGHT;panel.Dock = DockStyle.Bottom;panel.Parent = this;int x = ok.Width * 2 + BUTTONS_SPACE;int y = (PANEL_HEIGHT - ok.Height) / 2;ok.Text = "Ok";ok.Parent = panel;ok.Location = new Point(WIDTH-x, y);ok.Anchor = AnchorStyles.Right;Button close = new Button();x = close.Width;close.Text = "Close";close.Parent = panel;close.Location = new Point(WIDTH-x-CLOSE_SPACE, y);close.Anchor = AnchorStyles.Right;CenterToScreen();}}class MApplication {public static void Main() {Application.Run(new MForm());}}
该示例在对话框的右下角显示确定,关闭按钮,这在对话框窗口中很常见。
private int WIDTH = 250;private int HEIGHT = 150;
WIDTH和HEIGHT变量确定应用窗口的宽度和高度。
private int BUTTONS_SPACE = 15;private int PANEL_SPACE = 8;private int CLOSE_SPACE = 10;
BUTTONS_SPACE是“确定”和“关闭”按钮之间的空间。 PANEL_SPACE是面板和表单底部之间的空间。 最后,CLOSE_SPACE变量设置“关闭”按钮和表单右边框之间的间隔。
int PANEL_HEIGHT = ok.Height + PANEL_SPACE;
在这里,我们计算面板的高度。 面板的高度基于“确定”按钮的高度。 并且我们添加了一些额外的空间,以使按钮不会太靠近边框。
Panel panel = new Panel();panel.Height = PANEL_HEIGHT;panel.Dock = DockStyle.Bottom;panel.Parent = this
在这里,我们创建和管理Panel控件。 在此示例中,它用作按钮的容器。 它被粘贴到表单的底部边框。 然后将按钮放置在面板内。
ok.Text = "Ok";ok.Parent = panel;ok.Location = new Point(WIDTH-x, y);ok.Anchor = AnchorStyles.Right;
“确定”按钮的父级设置为面板小部件。 计算位置。 并且Anchor属性设置为右侧。 另一个按钮的创建类似。
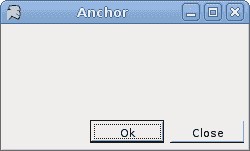
图:固定按钮
播放器骨架
Mono Winforms 教程这一部分的最后一个示例显示了一个更复杂的示例。 它是音乐播放器的骨架。
player.cs
using System;using System.Drawing;using System.Windows.Forms;class MForm : Form {public MForm() {Text = "Player";Size = new Size(350, 280);MainMenu mainMenu = new MainMenu();MenuItem file = mainMenu.MenuItems.Add("&File");MenuItem playm = mainMenu.MenuItems.Add("&Play");MenuItem view = mainMenu.MenuItems.Add("&View");MenuItem tools = mainMenu.MenuItems.Add("&Tools");MenuItem favourites = mainMenu.MenuItems.Add("&Favourites");MenuItem help = mainMenu.MenuItems.Add("&Help");file.MenuItems.Add(new MenuItem("E&xit",new EventHandler(this.OnExit), Shortcut.CtrlX));Menu = mainMenu;Panel panel = new Panel();panel.Parent = this;panel.BackColor = Color.Black;panel.Dock = DockStyle.Fill;Panel buttonPanel = new Panel();buttonPanel.Parent = this;buttonPanel.Height = 40;buttonPanel.Dock = DockStyle.Bottom;Button pause = new Button();pause.FlatStyle = FlatStyle.Popup;pause.Parent = buttonPanel;pause.Location = new Point(5, 10);pause.Size = new Size(25, 25);pause.Image = new Bitmap("pause.png");Button play = new Button();play.FlatStyle = FlatStyle.Popup;play.Parent = buttonPanel;play.Location = new Point(35, 10);play.Size = new Size(25, 25);play.Image = new Bitmap("play.png");Button forward = new Button();forward.FlatStyle = FlatStyle.Popup;forward.Parent = buttonPanel;forward.Location = new Point(80, 10);forward.Size = new Size(25, 25);forward.Image = new Bitmap("forward.png");Button backward = new Button();backward.FlatStyle = FlatStyle.Popup;backward.Parent = buttonPanel;backward.Location = new Point(110, 10);backward.Size = new Size(25, 25);backward.Image = new Bitmap("backward.png");TrackBar tb = new TrackBar();tb.Parent = buttonPanel;tb.TickStyle = TickStyle.None;tb.Size = new Size(150, 25);tb.Location = new Point(200, 10);tb.Anchor = AnchorStyles.Right;Button audio = new Button();audio.FlatStyle = FlatStyle.Popup;audio.Parent = buttonPanel;audio.Size = new Size(25, 25);audio.Image = new Bitmap("audio.png");audio.Location = new Point(170, 10);audio.Anchor = AnchorStyles.Right;StatusBar sb = new StatusBar();sb.Parent = this;sb.Text = "Ready";CenterToScreen();}void OnExit(object sender, EventArgs e) {Close();}}class MApplication {public static void Main() {Application.Run(new MForm());}}
这是一个更复杂的示例,它同时显示了Dock和Anchor属性。
MainMenu mainMenu = new MainMenu();MenuItem file = mainMenu.MenuItems.Add("&File");...Menu = mainMenu;
在这里,我们创建菜单栏。
Panel panel = new Panel();panel.Parent = this;panel.BackColor = Color.Black;panel.Dock = DockStyle.Fill;
这是黑色的面板,占据了菜单栏,状态栏和控制面板剩余的所有剩余空间。
Panel buttonPanel = new Panel();buttonPanel.Parent = this;buttonPanel.Height = 40;buttonPanel.Dock = DockStyle.Bottom;
这是控制面板。 它的父级是表单容器。 它被粘贴到表格的底部。 高度为 40 像素。 在此控制面板内部,我们放置了所有按钮和轨迹仪。
Button pause = new Button();pause.FlatStyle = FlatStyle.Popup;pause.Parent = buttonPanel;pause.Location = new Point(5, 10);pause.Size = new Size(25, 25);pause.Image = new Bitmap("pause.png");
暂停按钮是具有默认Anchor属性值的四个按钮之一。 该按钮的样式设置为平面,因为它看起来更好。 我们在按钮上放置一个位图。
tb.Anchor = AnchorStyles.Right;...audio.Anchor = AnchorStyles.Right;
最后两个控件固定在右侧。
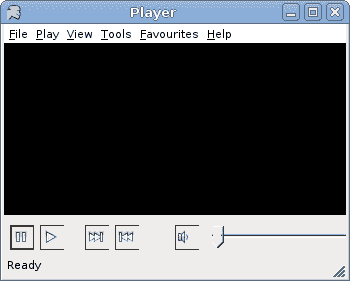
图:播放器骨架
Mono Winforms 教程的这一部分是关于控件的布局管理的。 我们实践了 Winforms 库提供的各种可能性。

若有收获,就点个赞吧
0 人点赞
