在 Tkinter 教程的这一部分中,我们将进行一些绘制。 在Canvas小部件上完成了 Tkinter 的绘制。 Canvas是用于在 Tkinter 中进行图形处理的高级工具。
它可用于创建图表,自定义窗口小部件或创建游戏。
直线
线是简单的几何图元。 create_line()方法在Canvas上创建一个订单项。
lines.py
#!/usr/bin/env python3"""ZetCode Tkinter tutorialThe example draws lines on the Canvas.Author: Jan BodnarLast modified: April 2019Website: www.zetcode.com"""from tkinter import Tk, Canvas, Frame, BOTHclass Example(Frame):def __init__(self):super().__init__()self.initUI()def initUI(self):self.master.title("Lines")self.pack(fill=BOTH, expand=1)canvas = Canvas(self)canvas.create_line(15, 25, 200, 25)canvas.create_line(300, 35, 300, 200, dash=(4, 2))canvas.create_line(55, 85, 155, 85, 105, 180, 55, 85)canvas.pack(fill=BOTH, expand=1)def main():root = Tk()ex = Example()root.geometry("400x250+300+300")root.mainloop()if __name__ == '__main__':main()
在代码示例中,我们绘制了简单的线条。
canvas.create_line(15, 25, 200, 25)
create_line()方法的参数是直线起点和终点的 x 和 y 坐标。
canvas.create_line(300, 35, 300, 200, dash=(4, 2))
画一条垂直线。 dash选项指定线条的虚线图案。 我们有一条线,由 4px 虚线和 2px 间隔的交替部分组成。
canvas.create_line(55, 85, 155, 85, 105, 180, 55, 85)
create_line()方法可以取多个点。 这条线画了一个三角形。
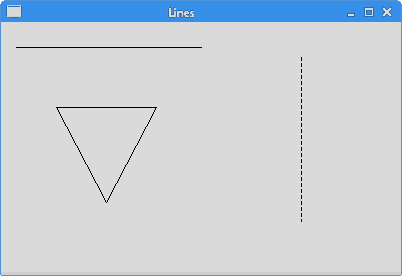
图:直线
颜色
颜色是代表红色,绿色和蓝色(RGB)强度值的组合的对象。
colours.py
#!/usr/bin/env python3"""ZetCode Tkinter tutorialThis program draws threerectangles filled with differentcolours.Author: Jan BodnarLast modified: April 2019Website: www.zetcode.com"""from tkinter import Tk, Canvas, Frame, BOTHclass Example(Frame):def __init__(self):super().__init__()self.initUI()def initUI(self):self.master.title("Colours")self.pack(fill=BOTH, expand=1)canvas = Canvas(self)canvas.create_rectangle(30, 10, 120, 80,outline="#fb0", fill="#fb0")canvas.create_rectangle(150, 10, 240, 80,outline="#f50", fill="#f50")canvas.create_rectangle(270, 10, 370, 80,outline="#05f", fill="#05f")canvas.pack(fill=BOTH, expand=1)def main():root = Tk()ex = Example()root.geometry("400x100+300+300")root.mainloop()if __name__ == '__main__':main()
在代码示例中,我们绘制了三个矩形,并用不同的颜色值填充了它们。
canvas = Canvas(self)
我们创建Canvas小部件。
canvas.create_rectangle(30, 10, 120, 80,outline="#fb0", fill="#fb0")
create_rectangle()在画布上创建一个矩形项目。 前四个参数是两个边界点的 x 和 y 坐标:左上角点和右下角点。 使用outline参数,我们可以控制矩形轮廓的颜色。 同样,fill参数为矩形的内部提供颜色。
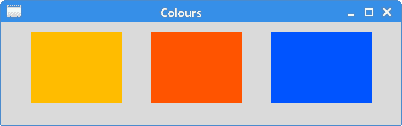
图:颜色
形状
我们可以在Canvas上绘制各种形状。 以下代码示例将显示其中的一些。
shapes.py
#!/usr/bin/env python3"""ZetCode Tkinter tutorialIn this script, we draw basicshapes on the canvas.Author: Jan BodnarLast modified: April 2019Website: www.zetcode.com"""from tkinter import Tk, Canvas, Frame, BOTHclass Example(Frame):def __init__(self):super().__init__()self.initUI()def initUI(self):self.master.title("Shapes")self.pack(fill=BOTH, expand=1)canvas = Canvas(self)canvas.create_oval(10, 10, 80, 80, outline="#f11",fill="#1f1", width=2)canvas.create_oval(110, 10, 210, 80, outline="#f11",fill="#1f1", width=2)canvas.create_rectangle(230, 10, 290, 60,outline="#f11", fill="#1f1", width=2)canvas.create_arc(30, 200, 90, 100, start=0,extent=210, outline="#f11", fill="#1f1", width=2)points = [150, 100, 200, 120, 240, 180, 210,200, 150, 150, 100, 200]canvas.create_polygon(points, outline='#f11',fill='#1f1', width=2)canvas.pack(fill=BOTH, expand=1)def main():root = Tk()ex = Example()root.geometry("330x220+300+300")root.mainloop()if __name__ == '__main__':main()
我们在窗口上绘制五个不同的形状:一个圆形,一个椭圆形,一个矩形,一个弧形和一个多边形。 轮廓以红色绘制,内部以绿色绘制。 轮廓的宽度为 2 像素。
canvas.create_oval(10, 10, 80, 80, outline="#f11",fill="#1f1", width=2)
此处create_oval()方法用于创建圈子项目。 前四个参数是圆的边界框坐标。 换句话说,它们是在其中绘制圆的框的左上和右下点的 x 和 y 坐标。
canvas.create_rectangle(230, 10, 290, 60,outline="#f11", fill="#1f1", width=2)
我们创建一个矩形项目。 坐标还是要绘制的矩形的边界框。
canvas.create_arc(30, 200, 90, 100, start=0,extent=210, outline="#f11", fill="#1f1", width=2)
该代码行创建了一条弧。 圆弧是圆的圆周的一部分。 我们提供边界框。 start参数是圆弧的起始角度。 extent是角度大小。
points = [150, 100, 200, 120, 240, 180, 210,200, 150, 150, 100, 200]canvas.create_polygon(points, outline='#f11',fill='#1f1', width=2)
创建一个多边形。 它是具有多个角的形状。 要在 Tkinter 中创建多边形,我们向create_polygon()方法提供了多边形坐标列表。
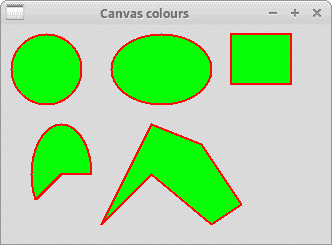
图:形状
绘制图像
在下面的示例中,我们在画布上绘制一个图像项。
draw_image.py
#!/usr/bin/env python3"""ZetCode Tkinter tutorialIn this script, we draw an imageon the canvas.Author: Jan BodnarLast modified: April 2019Website: www.zetcode.com"""from tkinter import Tk, Canvas, Frame, BOTH, NWfrom PIL import Image, ImageTkclass Example(Frame):def __init__(self):super().__init__()self.initUI()def initUI(self):self.master.title("High Tatras")self.pack(fill=BOTH, expand=1)self.img = Image.open("tatras.jpg")self.tatras = ImageTk.PhotoImage(self.img)canvas = Canvas(self, width=self.img.size[0]+20,height=self.img.size[1]+20)canvas.create_image(10, 10, anchor=NW, image=self.tatras)canvas.pack(fill=BOTH, expand=1)def main():root = Tk()ex = Example()root.mainloop()if __name__ == '__main__':main()
该示例在画布上显示图像。
from PIL import Image, ImageTk
从 PIL(Python 图像库)模块,导入Image和ImageTk模块。
self.img = Image.open("tatras.jpg")self.tatras = ImageTk.PhotoImage(self.img)
Tkinter 在内部不支持 JPG 图像。 解决方法是,使用Image和ImageTk模块。
canvas = Canvas(self, width=self.img.size[0]+20,height=self.img.size[1]+20)
我们创建Canvas小部件。 它考虑了图像的大小。 它比实际图像大小宽 20px,高 20px。
canvas.create_image(10, 10, anchor=NW, image=self.tatras)
我们使用create_image()方法在画布上创建一个图像项。 为了显示整个图像,它固定在北部和西部。 image参数提供要显示的照片图像。
绘制文字
在最后一个示例中,我们将在窗口上绘制文本。
draw_text.py
#!/usr/bin/env python3"""ZetCode Tkinter tutorialIn this script, we draw texton the window.Author: Jan BodnarLast modified: April 2019Website: www.zetcode.com"""from tkinter import Tk, Canvas, Frame, BOTH, Wclass Example(Frame):def __init__(self):super().__init__()self.initUI()def initUI(self):self.master.title("Lyrics")self.pack(fill=BOTH, expand=1)canvas = Canvas(self)canvas.create_text(20, 30, anchor=W, font="Purisa",text="Most relationships seem so transitory")canvas.create_text(20, 60, anchor=W, font="Purisa",text="They're good but not the permanent one")canvas.create_text(20, 130, anchor=W, font="Purisa",text="Who doesn't long for someone to hold")canvas.create_text(20, 160, anchor=W, font="Purisa",text="Who knows how to love without being told")canvas.create_text(20, 190, anchor=W, font="Purisa",text="Somebody tell me why I'm on my own")canvas.create_text(20, 220, anchor=W, font="Purisa",text="If there's a soulmate for everyone")canvas.pack(fill=BOTH, expand=1)def main():root = Tk()ex = Example()root.geometry("420x250+300+300")root.mainloop()if __name__ == '__main__':main()
我们在窗口上画一首歌的歌词。
canvas.create_text(20, 30, anchor=W, font="Purisa",text="Most relationships seem so transitory")
前两个参数是文本中心点的 x 和 y 坐标。 如果我们将文本项锚定在西方,则文本将从该位置开始。 font参数提供文本的字体,text参数是要显示的文本。
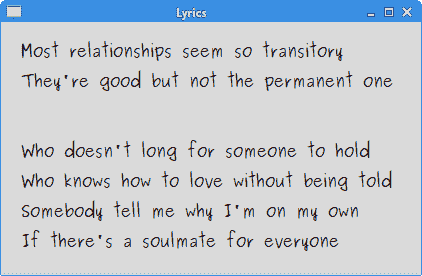
图:绘制文本
在 Tkinter 教程的这一部分中,我们做了一些绘图。

若有收获,就点个赞吧
0 人点赞
