在 Qyoto C# 编程教程的这一部分中,我们将继续绘图。 我们将提供一些更复杂的示例。
甜甜圈形状
第一个示例通过旋转一堆椭圆来创建复杂的形状。
using System;using QtCore;using QtGui;/*** ZetCode Qyoto C# tutorial** This program draws a donut* shape.** @author Jan Bodnar* website zetcode.com* last modified November 2012*/public class QyotoApp : QMainWindow{public QyotoApp(){WindowTitle = "Donut";PaintEvent += OnPaintEvent;Resize(350, 280);Move(300, 300);Show();}private void OnPaintEvent(object sender, QEventArgs<QPaintEvent> e){QPainter ptr = new QPainter(this);DrawDonut(ptr);ptr.End();}void DrawDonut(QPainter ptr){QColor col = new QColor();col.SetNamedColor("#333333");ptr.Pen = new QPen(col, 0.5);ptr.SetRenderHint(QPainter.RenderHint.Antialiasing);int h = Height;int w = Width;ptr.Translate(new QPoint(w/2, h/2));for (double rot=0; rot < 360.0; rot+=5.0 ){ptr.DrawEllipse(-125, -40, 250, 80);ptr.Rotate(5.0);}}[STAThread]public static int Main(String[] args){new QApplication(args);new QyotoApp();return QApplication.Exec();}}
在此示例中,我们创建一个甜甜圈。 形状类似于曲奇,因此得名“甜甜圈”。
QColor color = new QColor();color.SetNamedColor("#333333");
我们可以使用十六进制表示法来创建颜色对象。
int h = Height;int w = Width;
在这里,我们确定窗口的宽度和高度。
ptr.Translate(new QPoint(w/2, h/2));
我们将坐标系移到窗口的中间。 这样,我们使绘图在数学上更容易。
for (double rot=0; rot < 360.0; rot+=5.0 ){ptr.DrawEllipse(-125, -40, 250, 80);ptr.Rotate(5.0);}
我们绘制一个椭圆对象 72 次。 每次,我们将椭圆旋转 5 度。 这将创建我们的甜甜圈形状。
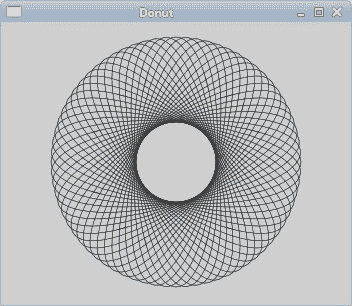
图:多纳圈
灰度图像
在下面的示例中,我们将创建一个灰度图像。
using System;using QtGui;using QtCore;/*** ZetCode Qyoto C# tutorial** In this example, we create a* grayscale image.** @author Jan Bodnar* website zetcode.com* last modified November 2012*/public class QyotoApp : QMainWindow{QImage sid;int w, h = 0;public QyotoApp(){WindowTitle = "Gray scale";PaintEvent += OnPaintEvent;LoadImage();Resize(320, 150);Move(300, 300);Show();}private void OnPaintEvent(object sender, QEventArgs<QPaintEvent> e){QPainter ptr = new QPainter(this);DrawImages(ptr);ptr.End();}void DrawImages(QPainter ptr){ptr.DrawImage(5, 15, sid);ptr.DrawImage(w + 10, 15, GrayScale(sid.Copy()));}void LoadImage(){sid = new QImage("smallsid.jpg");w = sid.Width();h = sid.Height();}QImage GrayScale(QImage img){for (int i=0; i < w; i++){for (int j=0; j < h; j++){uint c = img.Pixel(i, j);int gray = Global.qGray(c);int alpha = Global.qAlpha(c);img.SetPixel(i, j, Global.qRgba(gray, gray,gray, alpha));}}return img;}public static int Main(String[] args){new QApplication(args);new QyotoApp();return QApplication.Exec();}}
我们有一个彩色 JPG 图像。 我们把它画在窗口上。 我们创建图像的副本,将其转换为灰度并在原始图像旁边的窗口上绘制。
void LoadImage(){sid = new QImage("smallsid.jpg");w = sid.Width();h = sid.Height();}
在LoadImage()方法中,我们加载图像并获取其宽度和高度。
QImage GrayScale(QImage img){for (int i=0; i < w; i++){for (int j=0; j < h; j++){uint c = img.Pixel(i, j);int gray = Global.qGray(c);int alpha = Global.qAlpha(c);img.SetPixel(i, j, Global.qRgba(gray, gray,gray, alpha));}}return img;}
GrayScale()方法将图像转换为灰度并返回。 我们遍历图像的所有像素。 Pixel()方法返回有问题的像素。 我们使用Global.qGray()方法来获取特定像素的灰度值。 同样,我们获得 alpha 值。 最后,我们使用SetPixel()方法修改像素。 我们将灰色值用于颜色的红色,绿色和蓝色部分。
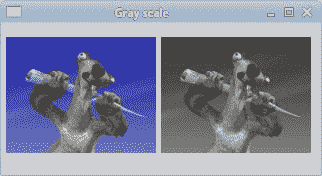
图:灰度图像
反射
在下一个示例中,我们显示反射图像。 该效果使人产生幻觉,好像图像在水中被反射一样。
using System;using QtGui;using QtCore;/*** ZetCode Qyoto C# tutorial** In this example we create a reflected image.** @author Jan Bodnar* website zetcode.com* last modified November 2012*/public class QyotoApp : QMainWindow{QImage img;QImage reflected_img;int iw, ih = 0;double initial_opacity = 0.7;double opacity = 0.7;double step = 0;const int GAP = 30;public QyotoApp(){WindowTitle = "Reflection";PaintEvent += OnPaintEvent;InitExample();Resize(300, 400);Move(150, 150);Show();}private void OnPaintEvent(object sender, QEventArgs<QPaintEvent> e){QPainter ptr = new QPainter(this);DrawImages(ptr);ptr.End();}void InitExample(){img = new QImage("slanec.png");if (img.IsNull()){Console.WriteLine("Error loading image");}iw = img.Width();ih = img.Height();step = opacity / ih;reflected_img = new QImage(iw, ih, QImage.Format.Format_RGB32);CreateReflectedImage();}void CreateReflectedImage(){QPainter fptr = new QPainter(reflected_img);int i = 0;double opacity = 0.7;while (i < ih){i++;opacity = opacity - step;fptr.Opacity = initial_opacity-opacity;fptr.DrawImage(0, i, img, 0, i, -1, 1);}fptr.End();}void DrawImages(QPainter ptr){int w = Width;int h = Height;ptr.FillRect(0, 0, w, h, Qt.GlobalColor.black);ptr.SetRenderHint(QPainter.RenderHint.Antialiasing);QRect r = new QRect(25, 15, iw, ih);ptr.DrawImage(r, img);ptr.Translate(0, 2 * ih + GAP);ptr.Scale(1, -1);ptr.DrawImage(25, 0, reflected_img);}public static int Main(String[] args){new QApplication(args);new QyotoApp();return QApplication.Exec();}}
我们从当前工作目录加载图像。 我们创建另一个相同大小的空图像。 我们将原始图像逐行复制到新的空白图像,并逐渐增加透明度。
img = new QImage("slanec.png");if (img.IsNull()){Console.WriteLine("Error loading image");}
我们加载一个 PNG 图片,并进行一些错误检查。
iw = img.Width();ih = img.Height();step = opacity / ih;
我们得到图像的宽度和高度。 步进变量控制第二张图像淡出的强度。
reflected_img = new QImage(iw, ih, QImage.Format.Format_RGB32);
创建一个新的空图像。 它具有原始图像的大小。
void CreateReflectedImage(){QPainter fptr = new QPainter(reflected_img);...
在CreateReflectedImage()方法中,我们绘制空白图像。
while (i < ih){i++;opacity = opacity - step;fptr.Opacity = initial_opacity-opacity;fptr.DrawImage(0, i, img, 0, i, -1, 1);}
我们将原始图像复制到新图像。 逐行。 不透明度在每个循环中逐步降低。
QRect r = new QRect(25, 15, iw, ih);ptr.DrawImage(r, img);
第一个图像绘制在窗口上。
ptr.Translate(0, 2 * ih + GAP);ptr.Scale(1, -1);ptr.DrawImage(25, 0, reflected_img);
在这里,我们将第二个图像向下移动,比原始图像低一些。 Scale()方法将图像上下翻转。 请注意,平移是图像高度的两倍。 这是必要的,因为缩放操作不仅会翻转图像,还会使图像向上移动。 要了解这一点,只需拍摄一张照片,将其放在桌子上并翻转即可。
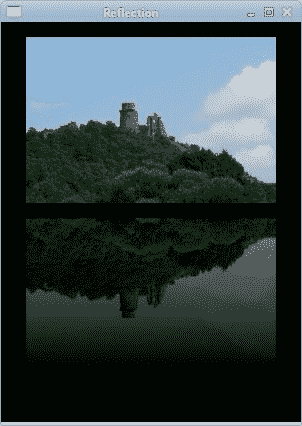
图:反射图像
等待效果
在此示例中,我们使用透明效果创建一个等待演示。 我们将绘制 8 条线,这些线将逐渐消失,从而产生一条线在移动的错觉。 此类效果通常用于通知用户幕后正在进行繁重的任务。 一个示例是通过互联网流式传输视频。
using System;using QtGui;using QtCore;/*** ZetCode Qyoto C# tutorial** This program draws basic shapes* available in Qyoto.** @author Jan Bodnar* website zetcode.com* last modified November 2012*/public class QyotoApp : QMainWindow{int count = 0;double[,] trs ={{ 0.0, 0.15, 0.30, 0.5, 0.65, 0.80, 0.9, 1.0 },{ 1.0, 0.0, 0.15, 0.30, 0.5, 0.65, 0.8, 0.9 },{ 0.9, 1.0, 0.0, 0.15, 0.3, 0.5, 0.65, 0.8 },{ 0.8, 0.9, 1.0, 0.0, 0.15, 0.3, 0.5, 0.65 },{ 0.65, 0.8, 0.9, 1.0, 0.0, 0.15, 0.3, 0.5 },{ 0.5, 0.65, 0.8, 0.9, 1.0, 0.0, 0.15, 0.3 },{ 0.3, 0.5, 0.65, 0.8, 0.9, 1.0, 0.0, 0.15 },{ 0.15, 0.3, 0.5, 0.65, 0.8, 0.9, 1.0, 0.0 }};public QyotoApp(){WindowTitle = "Waiting";PaintEvent += OnPaintEvent;InitExample();Resize(300, 200);Move(300, 300);Show();}private void OnPaintEvent(object sender, QEventArgs<QPaintEvent> e){QPainter ptr = new QPainter(this);DrawLines(ptr);ptr.End();}void InitExample(){count = 0;StartTimer(105);}void DrawLines(QPainter ptr){QPen pen = new QPen();pen.Width = 3;pen.CapStyle = PenCapStyle.RoundCap;int w = Width;int h = Height;ptr.Translate(w/2, h/2);ptr.Pen = pen;int len = trs.GetLength(0);for (int i=0; i < len; i++){ptr.Opacity = trs[count%8, i];ptr.DrawLine(0, -10, 0, -40);ptr.Rotate(45);}}protected override void OnTimerEvent(QTimerEvent e){count++;Repaint();}public static int Main(String[] args){new QApplication(args);new QyotoApp();return QApplication.Exec();}}
我们用八个不同的 alpha 值绘制八条线。
double[,] trs ={{ 0.0, 0.15, 0.30, 0.5, 0.65, 0.80, 0.9, 1.0 },{ 1.0, 0.0, 0.15, 0.30, 0.5, 0.65, 0.8, 0.9 },...
这是透明度值的数组。 有 8 行,每行一个位置。 8 行中的每行将连续使用这些值。
count = 0;StartTimer(105);
在这里,我们启动计数值并启动一个计时器。
QPen pen = new QPen();pen.Width = 3;pen.CapStyle = PenCapStyle.RoundCap;
我们使线条更粗一些,以使它们更加可见。 我们用圆帽画线。 带圆帽的线条看起来更好。
for (int i=0; i < len; i++){ptr.Opacity = trs[count%8, i];ptr.DrawLine(0, -10, 0, -40);ptr.Rotate(45);}
在此循环中,我们设置不透明度值。 我们画线并旋转它。 这产生了移动和渐隐线的错觉。
protected override void OnTimerEvent(QTimerEvent e){count++;Repaint();}
每次调用计时器事件时,我们都会增加计数值并重新绘制窗口区域。
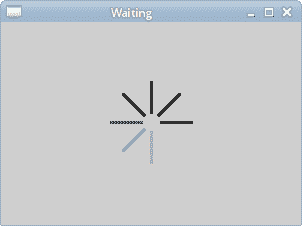
图:等待 effect
在 Qyoto C# 编程教程的这一部分中,我们结束了有关在 Qyoto 中绘图的讨论。

若有收获,就点个赞吧
0 人点赞
