在本章中,我们将展示如何在窗口或对话框中布置窗口小部件。
在设计应用的 GUI 时,我们决定使用哪些小部件以及如何在应用中组织这些小部件。 为了组织小部件,我们使用称为布局容器的专用非可见小部件。
Composite是用于放置子窗口小部件的容器。 Composite的布局管理器是通过setLayout()方法设置的。 Shell也是Composite。 它没有默认的布局管理器,在这种情况下,将使用绝对定位来放置小部件。
SWT 具有以下标准布局类:
FillLayoutRowLayoutFormLayoutGridLayout
FillLayout在单个行或列中布置大小相等的小部件。 RowLayout在行或列中布置小部件,并具有填充,环绕和间距选项。 FormLayout通过为小部件的每一侧创建附件来布局小部件。 GridLayout将小部件布置在网格中。
布局类可以具有对应的布局数据类,其中包含特定子项的布局数据。 例如,RowLayout具有名为RowData的布局数据类,GridLayout具有GridData,而FormLayout具有FormData。
绝对定位
在大多数情况下,程序员应使用布局管理器。 在某些情况下,我们也可以使用绝对定位。 在绝对定位中,程序员以像素为单位指定每个小部件的位置和大小。 如果我们调整窗口大小,则小部件的大小和位置不会改变。 在各种平台上,应用看起来都不同,在 Linux 上看起来不错,在 Mac OS 上看起来不太正常。 在应用中更改字体可能会破坏布局。 如果我们将应用翻译成另一种语言,则必须重做布局。 对于所有这些问题,仅在有理由的情况下才使用绝对定位,或者您的应用是简单的测试。
绝对定位是通过setSize(),setLocation()和setBounds()方法完成的。
AbsoluteLayoutEx.java
package com.zetcode;import org.eclipse.swt.SWT;import org.eclipse.swt.widgets.Button;import org.eclipse.swt.widgets.Display;import org.eclipse.swt.widgets.Shell;/*** ZetCode Java SWT tutorial** In this program, we position two* buttons using absolute coordinates.** Author: Jan Bodnar* Website: zetcode.com* Last modified: June 2015*/public class AbsoluteLayoutEx {public AbsoluteLayoutEx(Display display) {initUI(display);}private void initUI(Display display) {Shell shell = new Shell(display, SWT.SHELL_TRIM | SWT.CENTER);Button btn1 = new Button(shell, SWT.PUSH);btn1.setText("Button");btn1.setBounds(20, 50, 80, 30);Button btn2 = new Button(shell, SWT.PUSH);btn2.setText("Button");btn2.setSize(80, 30);btn2.setLocation(50, 100);shell.setText("Absolute layout");shell.setSize(300, 250);shell.open();while (!shell.isDisposed()) {if (!display.readAndDispatch()) {display.sleep();}}}@SuppressWarnings("unused")public static void main(String[] args) {Display display = new Display();AbsoluteLayoutEx ex = new AbsoluteLayoutEx(display);display.dispose();}}
在我们的示例中,我们使用绝对定位在窗口上放置了两个按钮。
btn1.setBounds(20, 50, 80, 30);
setBounds()方法有两件事:将按钮定位在x = 20和y = 50,并将按钮的大小设置为width = 80和height = 30。
button2.setSize(80, 30);button2.setLocation(50, 100);
在这里,我们分两个步骤进行相同的操作。 首先,我们使用setSize()方法调整按钮的大小。 然后,我们使用setLocation()方法将其定位在窗口上。
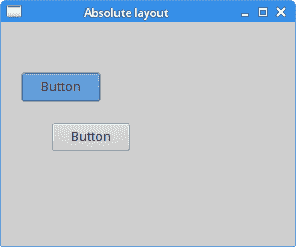
图:绝对布局
FillLayout管理器
FillLayout是最简单的布局类。 它将小部件布置在一行或一列中,迫使它们具有相同的大小。
FillLayoutEx.java
package com.zetcode;import org.eclipse.swt.SWT;import org.eclipse.swt.graphics.Device;import org.eclipse.swt.graphics.Image;import org.eclipse.swt.graphics.Rectangle;import org.eclipse.swt.layout.FillLayout;import org.eclipse.swt.widgets.Display;import org.eclipse.swt.widgets.Label;import org.eclipse.swt.widgets.Shell;/*** ZetCode Java SWT tutorial** This program demonstrates the FillLayout* manager** Author: Jan Bodnar* Website: zetcode.com* Last modified: May 2015*/public class FillLayoutEx {private Image castle;public FillLayoutEx(Display display) {initUI(display);}private void initUI(Display display) {Shell shell = new Shell(display, SWT.SHELL_TRIM | SWT.CENTER);shell.setLayout(new FillLayout());loadImage(shell);Label label = new Label(shell, SWT.IMAGE_PNG);label.setImage(castle);shell.setText("FillLayout");Rectangle rect = castle.getBounds();shell.setSize(rect.width, rect.height);shell.open();while (!shell.isDisposed()) {if (!display.readAndDispatch()) {display.sleep();}}}private void loadImage(Shell shell) {Device dev = shell.getDisplay();try {castle = new Image(dev, "redrock.png");} catch(Exception e) {System.out.println("Cannot load image");System.out.println(e.getMessage());System.exit(1);}}@Overridepublic void finalize() {castle.dispose();}public static void main(String[] args) {Display display = new Display();FillLayoutEx app = new FillLayoutEx(display);app.finalize();display.dispose();}}
在我们的示例中,我们使用此管理器显示图像。
shell.setLayout(new FillLayout());
我们将FillLayout设置为外壳的布局类。 使用setLayout()方法设置布局。
Rectangle rect = castle.getBounds();shell.setSize(rect.width, rect.height);
我们找出图片的大小来调整外壳的大小,以完全适合图像的大小。
Label label = new Label(shell, SWT.IMAGE_PNG);label.setImage(castle);
我们将图像设置为标签小部件。
private void loadImage(Shell shell) {Device dev = shell.getDisplay();try {castle = new Image(dev, "redrock.png");} catch(Exception e) {System.out.println("Cannot load image");System.out.println(e.getMessage());System.exit(1);}}
loadImage()方法从磁盘加载图像。
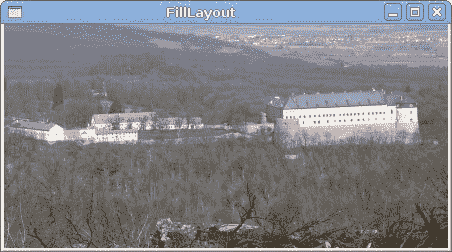
图:FillLayout
RowLayout
RowLayout管理器将所有小部件放置在一行或一列中。
RowLayoutEx.java
package com.zetcode;import org.eclipse.swt.SWT;import org.eclipse.swt.layout.RowData;import org.eclipse.swt.layout.RowLayout;import org.eclipse.swt.widgets.Button;import org.eclipse.swt.widgets.Display;import org.eclipse.swt.widgets.Shell;/*** ZetCode Java SWT tutorial** This program demonstrates the RowLayout* manager.** Author: Jan Bodnar* Website: zetcode.com* Last modified: June 2015*/public class RowLayoutEx {public RowLayoutEx(Display display) {initUI(display);}private void initUI(Display display) {Shell shell = new Shell(display, SWT.SHELL_TRIM | SWT.CENTER);RowLayout rowLayout = new RowLayout(SWT.HORIZONTAL);rowLayout.marginTop = 10;rowLayout.marginBottom = 10;rowLayout.marginLeft = 5;rowLayout.marginRight = 5;rowLayout.spacing = 10;shell.setLayout(rowLayout);Button btn1 = new Button(shell, SWT.PUSH);btn1.setText("Button");btn1.setLayoutData(new RowData(80, 30));Button btn2 = new Button(shell, SWT.PUSH);btn2.setText("Button");btn2.setLayoutData(new RowData(80, 30));Button btn3 = new Button(shell, SWT.PUSH);btn3.setText("Button");btn3.setLayoutData(new RowData(80, 30));shell.setText("RowLayout");shell.pack();shell.open();while (!shell.isDisposed()) {if (!display.readAndDispatch()) {display.sleep();}}}@SuppressWarnings("unused")public static void main(String[] args) {Display display = new Display();RowLayoutEx ex = new RowLayoutEx(display);display.dispose();}}
在我们的示例中,我们创建了三个按钮的行。
RowLayout rowLayout = new RowLayout(SWT.HORIZONTAL);
将创建水平RowLayout。 这些小部件将放置在一行中。
rowLayout.marginTop = 10;rowLayout.marginBottom = 10;rowLayout.marginLeft = 5;rowLayout.marginRight = 5;
边距指定沿容器边缘的空间。
rowLayout.spacing = 10;
spacing属性指定按钮之间的间距。
shell.setLayout(rowLayout);
我们将行布局指定为外壳布局。
Button btn1 = new Button(shell, SWT.PUSH);btn1.setText("Button");btn1.setLayoutData(new RowData(80, 30));
创建了Button。 setLayoutData()指定按钮的大小。
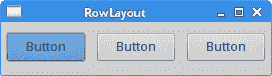
图:RowLayout管理器
按钮
在最后一个示例中,我们使用FormLayout管理器创建一个示例。 该管理器使用两个对象FormData和FormAttachment控制子项的位置和大小。
ButtonsEx.java
package com.zetcode;import org.eclipse.swt.SWT;import org.eclipse.swt.layout.FormAttachment;import org.eclipse.swt.layout.FormData;import org.eclipse.swt.layout.FormLayout;import org.eclipse.swt.widgets.Button;import org.eclipse.swt.widgets.Display;import org.eclipse.swt.widgets.Shell;/*** ZetCode Java SWT tutorial** In this program, we position two buttons* in the bottom right corner of the window.** Author: Jan Bodnar* Website: zetcode.com* Last modified: May 2015*/public class ButtonsEx {public ButtonsEx(Display display) {initUI(display);}private void initUI(Display display) {Shell shell = new Shell(display, SWT.SHELL_TRIM | SWT.CENTER);FormLayout layout = new FormLayout();shell.setLayout(layout);Button okBtn = new Button(shell, SWT.PUSH);okBtn.setText("OK");Button cancBtn = new Button(shell, SWT.PUSH);cancBtn.setText("Cancel");FormData cancelData = new FormData(80, 30);cancelData.right = new FormAttachment(98);cancelData.bottom = new FormAttachment(95);cancBtn.setLayoutData(cancelData);FormData okData = new FormData(80, 30);okData.right = new FormAttachment(cancBtn, -5, SWT.LEFT);okData.bottom = new FormAttachment(cancBtn, 0, SWT.BOTTOM);okBtn.setLayoutData(okData);shell.setText("Buttons");shell.setSize(350, 200);shell.open();while (!shell.isDisposed()) {if (!display.readAndDispatch()) {display.sleep();}}}@SuppressWarnings("unused")public static void main(String[] args) {Display display = new Display();ButtonsEx ex = new ButtonsEx(display);display.dispose();}}
在此代码示例中,我们在窗口的右下角放置了两个按钮。
FormLayout layout = new FormLayout();shell.setLayout(layout);
FormLayout管理器已创建。
Button okBtn = new Button(shell, SWT.PUSH);okBtn.setText("OK");Button cancBtn = new Button(shell, SWT.PUSH);cancBtn.setText("Cancel");
创建两个按钮并将其设置到外壳。
FormData cancelData = new FormData(80, 30);
取消按钮的大小为80x30。
cancelData.right = new FormAttachment(98);cancelData.bottom = new FormAttachment(95);
按钮的右侧附着在窗口宽度的 98% 处。 按钮的底部固定在窗口高度的 95% 处。
okData.right = new FormAttachment(cancelButton, -5, SWT.LEFT);okData.bottom = new FormAttachment(cancelButton, 0, SWT.BOTTOM);
“确定”按钮的右侧位于“取消”按钮的左侧 5 像素处。 “确定”按钮的底部与“取消”按钮的底部对齐。
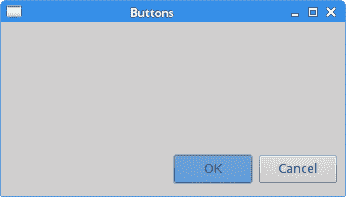
图:按钮
新建文件夹
在下面的示例中,我们使用FormLayout和RowLayout管理器创建窗口布局。
NewFolderEx.java
package com.zetcode;import org.eclipse.swt.SWT;import org.eclipse.swt.layout.FormAttachment;import org.eclipse.swt.layout.FormData;import org.eclipse.swt.layout.FormLayout;import org.eclipse.swt.layout.RowData;import org.eclipse.swt.layout.RowLayout;import org.eclipse.swt.widgets.Button;import org.eclipse.swt.widgets.Composite;import org.eclipse.swt.widgets.Display;import org.eclipse.swt.widgets.Label;import org.eclipse.swt.widgets.Shell;import org.eclipse.swt.widgets.Text;/*** ZetCode Java SWT tutorial** This program creates a layout using a* FormLayout and a RowLayout.** Author: Jan Bodnar* Website: zetcode.com* Last modified: June 2015*/public class NewFolderEx {public NewFolderEx(Display display) {initUI(display);}private void initUI(Display display) {Shell shell = new Shell(display, SWT.SHELL_TRIM | SWT.CENTER);shell.setLayout(new FormLayout());Label lbl = new Label(shell, SWT.LEFT);lbl.setText("Name:");FormData data1 = new FormData();data1.left = new FormAttachment(0, 5);data1.top = new FormAttachment(0, 10);lbl.setLayoutData(data1);Text text = new Text(shell, SWT.SINGLE);FormData data2 = new FormData();data2.left = new FormAttachment(lbl, 15);data2.top = new FormAttachment(0, 10);data2.right = new FormAttachment(100, -5);text.setLayoutData(data2);Composite com = new Composite(shell, SWT.NONE);RowLayout rowLayout = new RowLayout();com.setLayout(rowLayout);Button okBtn = new Button(com, SWT.PUSH);okBtn.setText("OK");okBtn.setLayoutData(new RowData(80, 30));Button closeBtn = new Button(com, SWT.PUSH);closeBtn.setText("Close");closeBtn.setLayoutData(new RowData(80, 30));FormData data3 = new FormData();data3.bottom = new FormAttachment(100, -5);data3.right = new FormAttachment(100, 0);com.setLayoutData(data3);Text mainText = new Text(shell, SWT.MULTI | SWT.BORDER);FormData data4 = new FormData();data4.width = 250;data4.height = 180;data4.top = new FormAttachment(text, 10);data4.left = new FormAttachment(0, 5);data4.right = new FormAttachment(100, -5);data4.bottom = new FormAttachment(com, -10);mainText.setLayoutData(data4);shell.setText("New folder");shell.pack();shell.open();while (!shell.isDisposed()) {if (!display.readAndDispatch())display.sleep();}}@SuppressWarnings("unused")public static void main(String[] args) {Display display = new Display();NewFolderEx ex = new NewFolderEx(display);display.dispose();}}
在示例中,有标签,文本和按钮小部件。
Shell shell = new Shell(display, SWT.SHELL_TRIM | SWT.CENTER);shell.setLayout(new FormLayout());
FormLayout设置为外壳的主布局管理器。
Label lbl = new Label(shell, SWT.LEFT);lbl.setText("Name:");FormData data1 = new FormData();data1.left = new FormAttachment(0, 5);data1.top = new FormAttachment(0, 10);lbl.setLayoutData(data1);
标签窗口小部件附在窗口的左上角。
Text text = new Text(shell, SWT.SINGLE);FormData data2 = new FormData();data2.left = new FormAttachment(lbl, 15);data2.top = new FormAttachment(0, 10);data2.right = new FormAttachment(100, -5);text.setLayoutData(data2);
在标签旁边,我们放置一个Text控件。 文本控件的左侧相对于标签放置。
Composite com = new Composite(shell, SWT.NONE);RowLayout rowLayout = new RowLayout();com.setLayout(rowLayout);
创建一个Composite并将其设置为RowLayout管理器。 这两个按钮进入该容器。 将RowLayout用于按钮要比直接通过FormLayout进行组织要容易一些。
Button okBtn = new Button(com, SWT.PUSH);okBtn.setText("OK");okBtn.setLayoutData(new RowData(80, 30));Button closeBtn = new Button(com, SWT.PUSH);closeBtn.setText("Close");closeBtn.setLayoutData(new RowData(80, 30));
创建两个按钮。 他们的父部件是Composite。
FormData data3 = new FormData();data3.bottom = new FormAttachment(100, -5);data3.right = new FormAttachment(100, 0);com.setLayoutData(data3);
Composite本身与FormLayout一起放置在窗口的底部。 负值是与相邻小部件或窗口边界的偏移量。
Text mainText = new Text(shell, SWT.MULTI | SWT.BORDER);FormData data4 = new FormData();data4.width = 250;data4.height = 180;data4.top = new FormAttachment(text, 10);data4.left = new FormAttachment(0, 5);data4.right = new FormAttachment(100, -5);data4.bottom = new FormAttachment(com, -10);mainText.setLayoutData(data4);
最后,创建了Text主窗口小部件。 它占用了大部分窗口区域。 width和height属性指定控件的初始首选大小。
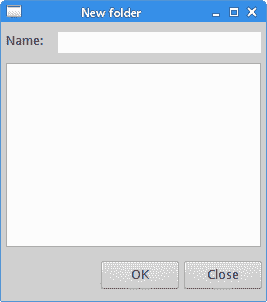
图:新文件夹
GridLayout
GridLayout管理器将其子窗口小部件放入网格中。
GridLayoutEx.java
package com.zetcode;import org.eclipse.swt.SWT;import org.eclipse.swt.graphics.Color;import org.eclipse.swt.layout.GridData;import org.eclipse.swt.layout.GridLayout;import org.eclipse.swt.widgets.Display;import org.eclipse.swt.widgets.Label;import org.eclipse.swt.widgets.Shell;/*** ZetCode Java SWT tutorial** This example presents the GridLayout.** Author: Jan Bodnar* Website: zetcode.com* Last modified: June 2015*/public class GridLayoutEx {public GridLayoutEx(Display display) {initUI(display);}private void initUI(Display display) {Shell shell = new Shell(display, SWT.SHELL_TRIM | SWT.CENTER);Color col = new Color(display, 100, 200, 100);shell.setBackground(col);col.dispose();GridLayout layout = new GridLayout(2, false);shell.setLayout(layout);Label lbl1 = new Label(shell, SWT.NONE);GridData gd1 = new GridData(SWT.FILL, SWT.FILL, true, true);lbl1.setLayoutData(gd1);Color col1 = new Color(display, 250, 155, 100);lbl1.setBackground(col1);col1.dispose();Label lbl2 = new Label(shell, SWT.NONE);GridData gd2 = new GridData(SWT.FILL, SWT.FILL, true, true);gd2.heightHint = 100;lbl2.setLayoutData(gd2);Color col2 = new Color(display, 10, 155, 100);lbl2.setBackground(col2);col2.dispose();Label lbl3 = new Label(shell, SWT.NONE);GridData gd3 = new GridData(SWT.FILL, SWT.FILL, true, true);gd3.widthHint = 300;gd3.heightHint = 100;gd3.horizontalSpan = 2;lbl3.setLayoutData(gd3);Color col3 = new Color(display, 100, 205, 200);lbl3.setBackground(col3);col3.dispose();shell.setText("Grid");shell.pack();shell.open();while (!shell.isDisposed()) {if (!display.readAndDispatch())display.sleep();}}@SuppressWarnings("unused")public static void main(String[] args) {Display display = new Display();GridLayoutEx ex = new GridLayoutEx(display);display.dispose();}}
在示例中,我们在网格中放置了三个标签。 每个标签具有不同的背景色。
Color col = new Color(display, 100, 200, 100);shell.setBackground(col);col.dispose();
setBackground()方法为外壳设置背景色。
GridLayout layout = new GridLayout(2, false);shell.setLayout(layout);
实例化GridLayout管理器并将其设置为外壳的布局管理器。 网格由 2 列组成。
Label lbl1 = new Label(shell, SWT.NONE);GridData gd1 = new GridData(SWT.FILL, SWT.FILL, true, true);lbl1.setLayoutData(gd1);
第一个标签进入网格的左上角单元格。 GridData类的四个参数使标签组件填充其单元格并在两个方向上扩展。
Label lbl2 = new Label(shell, SWT.NONE);GridData gd2 = new GridData(SWT.FILL, SWT.FILL, true, true);gd2.heightHint = 100;lbl2.setLayoutData(gd2);
第二个标签转到相邻的单元格。 heightHint属性指定标签的首选高度。 请注意,它也会影响先前的窗口小部件,因为该属性有效地设置了行的首选高度。
Label lbl3 = new Label(shell, SWT.NONE);GridData gd3 = new GridData(SWT.FILL, SWT.FILL, true, true);gd3.widthHint = 300;gd3.heightHint = 100;gd3.horizontalSpan = 2;lbl3.setLayoutData(gd3);
第三个标签进入第二行。 horizontalSpan属性使标签跨越两列。
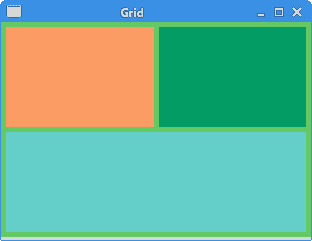
图:简单 GridLayout
计算器
在下面的示例中,我们使用GridLayout管理器创建计算器的框架。
CalculatorEx.java
package com.zetcode;import org.eclipse.swt.SWT;import org.eclipse.swt.layout.GridData;import org.eclipse.swt.layout.GridLayout;import org.eclipse.swt.widgets.Button;import org.eclipse.swt.widgets.Display;import org.eclipse.swt.widgets.Label;import org.eclipse.swt.widgets.Shell;import org.eclipse.swt.widgets.Text;/*** ZetCode Java SWT tutorial** In this program, we use the GridLayout to* create a calculator skeleton.** Author: Jan Bodnar* Website: zetcode.com* Last modified: June 2015*/public class CalculatorEx {public CalculatorEx(Display display) {initUI(display);}private void initUI(Display display) {Shell shell = new Shell(display, SWT.DIALOG_TRIM | SWT.CENTER);GridLayout gl = new GridLayout(4, true);gl.marginHeight = 5;shell.setLayout(gl);String[] buttons = {"Cls", "Bck", "", "Close", "7", "8", "9", "/", "4","5", "6", "*", "1", "2", "3", "-", "0", ".", "=", "+"};Text text = new Text(shell, SWT.SINGLE);GridData gridData = new GridData();gridData.horizontalSpan = 4;gridData.horizontalAlignment = GridData.FILL;text.setLayoutData(gridData);for (int i = 0; i < buttons.length; i++) {if (i == 2) {Label lbl = new Label(shell, SWT.CENTER);GridData gd = new GridData(SWT.FILL, SWT.FILL, false, false);lbl.setLayoutData(gd);} else {Button btn = new Button(shell, SWT.PUSH);btn.setText(buttons[i]);GridData gd = new GridData(SWT.FILL, SWT.FILL, false, false);gd.widthHint = 50;gd.heightHint = 30;btn.setLayoutData(gd);}}shell.setText("Calculator");shell.pack();shell.open();while (!shell.isDisposed()) {if (!display.readAndDispatch()) {display.sleep();}}}@SuppressWarnings("unused")public static void main(String[] args) {Display display = new Display();CalculatorEx ex = new CalculatorEx(display);display.dispose();}}
我们使用GridLayout管理器创建计算器的框架。 我们使用三种类型的小部件:文本小部件,标签小部件和几个按钮。
Shell shell = new Shell(display, SWT.DIALOG_TRIM | SWT.CENTER);
使用SWT.DIALOG_TRIM标志,使窗口不可调整大小。
GridLayout gl = new GridLayout(4, true);gl.marginHeight = 5;shell.setLayout(gl);
我们创建一个具有 4 列的GridLayout,并提供顶部和底部页边距。
Text text = new Text(shell, SWT.SINGLE);GridData gridData = new GridData();gridData.horizontalSpan = 4;gridData.horizontalAlignment = GridData.FILL;text.setLayoutData(gridData);
GridData是与GridLayout关联的布局数据对象。 使用horizontalSpan属性,我们使文本小部件跨越所有四列。 设置为GridData.FILL的horizontalAlignment使文本窗口小部件填充布局管理器分配给它的整个区域。
Button btn = new Button(shell, SWT.PUSH);btn.setText(buttons[i]);GridData gd = new GridData(SWT.FILL, SWT.FILL, false, false);gd.widthHint = 50;gd.heightHint = 30;btn.setLayoutData(gd);
在for循环内,我们创建按钮并将其放入网格中。 通过widthHint和heightHint属性,我们可以设置按钮的首选大小。
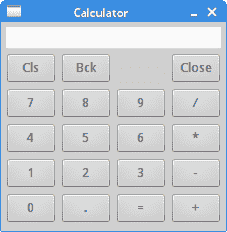
图:计算机骨架
在 Java SWT 教程的这一部分中,我们讨论了小部件的布局管理。

若有收获,就点个赞吧
0 人点赞
