在本章中,我们将继续介绍其他各种小部件。 我们将提到wxListBox,wxNotebook和wxScrolledWindow。
wxListBox
wxListBox小部件用于显示和使用项目列表。 顾名思义,它是一个矩形,里面有一个字符串列表。 我们可以使用它来显示 MP3 文件,书籍名称,较大项目的模块名称或朋友名称的列表。 可以在两种不同的状态下创建wxListBox。 在单选状态或多选状态下。 单一选择状态是默认状态。 wxListBox中有两个重要事件。 第一个是wxEVT_COMMAND_LISTBOX_SELECTED事件。 当我们在wxListBox中选择一个字符串时,将生成此事件。 第二个事件是wxEVT_COMMAND_LISTBOX_DOUBLE_CLICKED事件。 当我们双击wxListBox中的项目时会生成该文件。 wxListBox内部的元素数量在 GTK 平台上受到限制。 根据文档,当前大约有 2000 个元素。 元素从零开始编号。 如果需要,滚动条会自动显示。
Listbox.h
#include <wx/wx.h>#include <wx/listbox.h>class MyPanel : public wxPanel{public:MyPanel(wxPanel *parent);void OnNew(wxCommandEvent& event);void OnRename(wxCommandEvent& event);void OnClear(wxCommandEvent& event);void OnDelete(wxCommandEvent& event);wxListBox *m_lb;wxButton *m_newb;wxButton *m_renameb;wxButton *m_clearb;wxButton *m_deleteb;};class Listbox : public wxFrame{public:Listbox(const wxString& title);void OnDblClick(wxCommandEvent& event);wxListBox *listbox;MyPanel *btnPanel;};const int ID_RENAME = 1;const int ID_LISTBOX = 5;
Listbox.cpp
#include "listbox.h"#include <wx/textdlg.h>Listbox::Listbox(const wxString& title): wxFrame(NULL, wxID_ANY, title, wxDefaultPosition, wxSize(270, 200)){wxPanel * panel = new wxPanel(this, -1);wxBoxSizer *hbox = new wxBoxSizer(wxHORIZONTAL);listbox = new wxListBox(panel, ID_LISTBOX,wxPoint(-1, -1), wxSize(-1, -1));hbox->Add(listbox, 3, wxEXPAND | wxALL, 20);btnPanel = new MyPanel(panel);hbox->Add(btnPanel, 2, wxEXPAND | wxRIGHT, 10);Connect(wxEVT_COMMAND_LISTBOX_DOUBLECLICKED,wxCommandEventHandler(Listbox::OnDblClick));panel->SetSizer(hbox);Center();}MyPanel::MyPanel(wxPanel * parent): wxPanel(parent, wxID_ANY){wxBoxSizer *vbox = new wxBoxSizer(wxVERTICAL);Listbox *lb = (Listbox *) parent->GetParent();m_lb = lb->listbox;m_newb = new wxButton(this, wxID_NEW, wxT("New"));m_renameb = new wxButton(this, ID_RENAME, wxT("Rename"));m_deleteb = new wxButton(this, wxID_DELETE, wxT("Delete"));m_clearb = new wxButton(this, wxID_CLEAR, wxT("Clear"));Connect(wxID_NEW, wxEVT_COMMAND_BUTTON_CLICKED,wxCommandEventHandler(MyPanel::OnNew) );Connect(ID_RENAME, wxEVT_COMMAND_BUTTON_CLICKED,wxCommandEventHandler(MyPanel::OnRename) );Connect(wxID_CLEAR, wxEVT_COMMAND_BUTTON_CLICKED,wxCommandEventHandler(MyPanel::OnClear) );Connect(wxID_DELETE, wxEVT_COMMAND_BUTTON_CLICKED,wxCommandEventHandler(MyPanel::OnDelete) );vbox->Add(-1, 20);vbox->Add(m_newb);vbox->Add(m_renameb, 0, wxTOP, 5);vbox->Add(m_deleteb, 0, wxTOP, 5);vbox->Add(m_clearb, 0, wxTOP, 5);SetSizer(vbox);}void MyPanel::OnNew(wxCommandEvent& event){wxString str = wxGetTextFromUser(wxT("Add new item"));if (str.Len() > 0)m_lb->Append(str);}void MyPanel::OnClear(wxCommandEvent& event){m_lb->Clear();}void MyPanel::OnRename(wxCommandEvent& event){wxString text;wxString renamed;int sel = m_lb->GetSelection();if (sel != -1) {text = m_lb->GetString(sel);renamed = wxGetTextFromUser(wxT("Rename item"),wxT("Rename dialog"), text);}if (!renamed.IsEmpty()) {m_lb->Delete(sel);m_lb->Insert(renamed, sel);}}void MyPanel::OnDelete(wxCommandEvent& event){int sel = m_lb->GetSelection();if (sel != -1) {m_lb->Delete(sel);}}void Listbox::OnDblClick(wxCommandEvent& event){wxString text;wxString renamed;int sel = listbox->GetSelection();if (sel != -1) {text = listbox->GetString(sel);renamed = wxGetTextFromUser(wxT("Rename item"),wxT("Rename dialog"), text);}if (!renamed.IsEmpty()) {listbox->Delete(sel);listbox->Insert(renamed, sel);}}
main.h
#include <wx/wx.h>class MyApp : public wxApp{public:virtual bool OnInit();};
main.cpp
#include "main.h"#include "Listbox.h"IMPLEMENT_APP(MyApp)bool MyApp::OnInit(){Listbox *listbox = new Listbox(wxT("Listbox"));listbox->Show(true);return true;}
listbox = new wxListBox(panel, ID_LISTBOX,wxPoint(-1, -1), wxSize(-1, -1));
这是列表框窗口小部件的构造器。
在我们的示例中,我们有一个列表框和四个按钮。 这些按钮用于添加,重命名,删除和清除列表框中的所有项目。
wxString str = wxGetTextFromUser(wxT("Add new item"));if (str.Len() > 0)m_lb->Append(str);
要向列表框中添加新字符串,我们将显示一个wxGetTextFromUser对话框。 我们调用Append()方法将字符串附加到列表框。
m_lb->Clear();
清除所有项目是最简单的操作。 我们只调用Clear()方法。
int sel = m_lb->GetSelection();if (sel != -1) {m_lb->Delete(sel);}
要删除一个项目,我们找出选定的项目。 然后我们调用Delete()方法。
重命名项目需要几个步骤。
wxString text;wxString renamed;
我们定义了两个局部变量。
int sel = listbox->GetSelection();if (sel != -1) {text = listbox->GetString(sel);renamed = wxGetTextFromUser(wxT("Rename item"),wxT("Rename dialog"), text);}
我们获取选定的字符串并将其保存到重命名的变量中。
if (!renamed.IsEmpty()) {m_lb->Delete(sel);m_lb->Insert(renamed, sel);}
我们检查重命名的变量是否为空。 这是为了避免插入空字符串。 然后,我们删除旧项目并插入新项目。
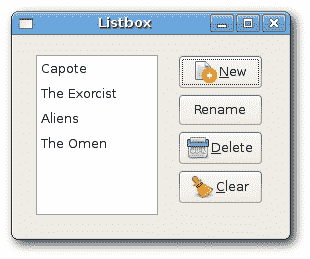
图:列表框
wxNotebook
wxNotebook小部件将多个窗口与相应的选项卡连接在一起。 您可以使用以下样式标志来定位wxNotebook小部件:
wxNB_LEFTwxNB_RIGHTwxNB_TOPwxNB_BOTTOM
默认位置为wxNB_TOP。
Notebook.h
#include <wx/wx.h>#include <wx/notebook.h>#include <wx/grid.h>class Notebook : public wxFrame{public:Notebook(const wxString& title);void OnQuit(wxCommandEvent& event);};class MyGrid : public wxGrid{public:MyGrid(wxNotebook *parent);};
Notebook.cpp
#include "Notebook.h"Notebook::Notebook(const wxString& title): wxFrame(NULL, wxID_ANY, title, wxDefaultPosition, wxSize(400, 350)){wxNotebook *nb = new wxNotebook(this, -1, wxPoint(-1, -1),wxSize(-1, -1), wxNB_BOTTOM);wxMenuBar *menubar = new wxMenuBar;wxMenu *file = new wxMenu;file->Append(wxID_EXIT, wxT("Quit"), wxT(""));menubar->Append(file, wxT("&File"));SetMenuBar(menubar);Connect(wxEVT_COMMAND_MENU_SELECTED,wxCommandEventHandler(Notebook::OnQuit));MyGrid *grid1 = new MyGrid(nb);MyGrid *grid2 = new MyGrid(nb);MyGrid *grid3 = new MyGrid(nb);nb->AddPage(grid1, wxT("Sheet1"));nb->AddPage(grid2, wxT("Sheet2"));nb->AddPage(grid3, wxT("Sheet3"));CreateStatusBar();Center();}void Notebook::OnQuit(wxCommandEvent& event){Close(true);}MyGrid::MyGrid(wxNotebook * parent): wxGrid(parent, wxID_ANY){CreateGrid(30, 30);SetRowLabelSize(50);SetColLabelSize(25);SetRowLabelAlignment(wxALIGN_RIGHT, wxALIGN_CENTRE);SetLabelFont(wxFont(9, wxFONTFAMILY_DEFAULT,wxFONTSTYLE_NORMAL, wxFONTWEIGHT_BOLD));for (int i = 0; i < 30 ; i++) {this->SetRowSize(i, 25);}}
main.h
#include <wx/wx.h>class MyApp : public wxApp{public:virtual bool OnInit();};
main.cpp
#include "main.h"#include "Notebook.h"IMPLEMENT_APP(MyApp)bool MyApp::OnInit(){Notebook *notebook = new Notebook(wxT("Notebook"));notebook->Show(true);return true;}
在此示例中,我们创建了带有三个网格的笔记本小部件。 笔记本小部件位于底部。
wxNotebook *nb = new wxNotebook(this, -1, wxPoint(-1, -1),wxSize(-1, -1), wxNB_BOTTOM);
在这里,我们创建笔记本小部件。
nb->AddPage(grid1, wxT("Sheet1"));nb->AddPage(grid2, wxT("Sheet2"));nb->AddPage(grid3, wxT("Sheet3"));
我们将三个网格对象添加到笔记本小部件中。
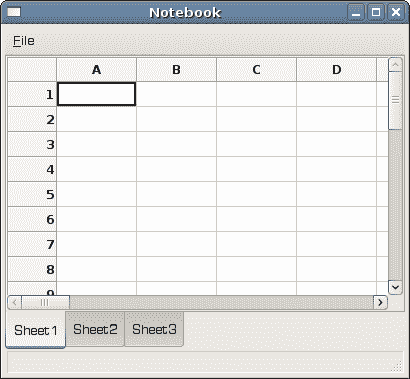
图:Notebook小部件
wxScrolledWindow
这是容器小部件之一。 当我们的区域大于窗口可以显示的区域时,此功能将非常有用。 在我们的示例中,我们演示了这种情况。 我们将大图像放入窗口。 当窗口小于我们的图像时,将自动显示滚动条。
scrolledwindow.h
#include <wx/wx.h>class ScrWindow : public wxFrame{public:ScrWindow(const wxString& title);};
scrolledwindow.cpp
#include "scrolledwindow.h"ScrWindow::ScrWindow(const wxString& title): wxFrame(NULL, wxID_ANY, title, wxDefaultPosition, wxSize(300, 200)){wxImage::AddHandler(new wxJPEGHandler);wxScrolledWindow *sw = new wxScrolledWindow(this);wxBitmap bmp(wxT("castle.jpg"), wxBITMAP_TYPE_JPEG);wxStaticBitmap *sb = new wxStaticBitmap(sw, -1, bmp);int width = bmp.GetWidth();int height = bmp.GetHeight();sw->SetScrollbars(10, 10, width/10, height/10);sw->Scroll(50,10);Center();}
main.h
#include <wx/wx.h>class MyApp : public wxApp{public:virtual bool OnInit();};
main.cpp
#include "main.h"#include "scrolledwindow.h"IMPLEMENT_APP(MyApp)bool MyApp::OnInit(){ScrWindow *sw = new ScrWindow(wxT("ScrolledWindow"));sw->Show(true);return true;}
在我们的示例中,我们显示了 Spis 城堡的图片。
wxImage::AddHandler(new wxJPEGHandler);
要处理 JPG 图像,我们必须启动wxJPEGHandler。
wxScrolledWindow *sw = new wxScrolledWindow(this);wxBitmap bmp(wxT("castle.jpg"), wxBITMAP_TYPE_JPEG);wxStaticBitmap *sb = new wxStaticBitmap(sw, -1, bmp);
我们创建一个滚动窗口,并在其中放置一个静态位图。
sw->SetScrollbars(10, 10, width/10, height/10);
我们设置滚动条。
sw->Scroll(50,10);
我们稍微滚动窗口。
在本章中,我们继续介绍 wxWidgets 库中的小部件。

若有收获,就点个赞吧
0 人点赞
