Quick Startup - Setup a Scene and Render快速启动-设置场景和渲染
The goal of this section is to quickly introduce you to the use of the c4doctane plugin. In this tutorial, you will quickly learn how to create Octane materials, Octane lights and light tags, camera tags, and, of course, creating a final render. Subsequent sections will go into more detailed information.
本节的目的是快速向您介绍 c4doctane 插件的使用。在本教程中,您将很快学习如何创建辛烷材料,辛烷灯和光标签,相机标签,当然,创建一个最终渲染。接下来的章节将进入更详细的信息。
We have provided a starter file that you can open Cinema 4D, so that you can follow along. Download the sample scene from here:
我们已经提供了一个入门文件,你可以打开 Cinema 4D,这样你就可以跟随。从这里下载样例场景:
文件需要梯方才可以下载,后续我讲我更新到百度网盘
Let’s get started!
我们开始吧!
STARTING THE LIVE VIEWER
启动实时查看器
Step 1:
Open the Cinema 4D file you downloaded. This simple scene contains a mesh of the Octane Logo in the middle with a few cloner objects, along with some animation.
第一步:
打开你下载的 Cinema 4D 文件。这个简单的场景包含一个网格的辛烷标志在中间与一些克隆对象,以及一些动画。

Step 2:
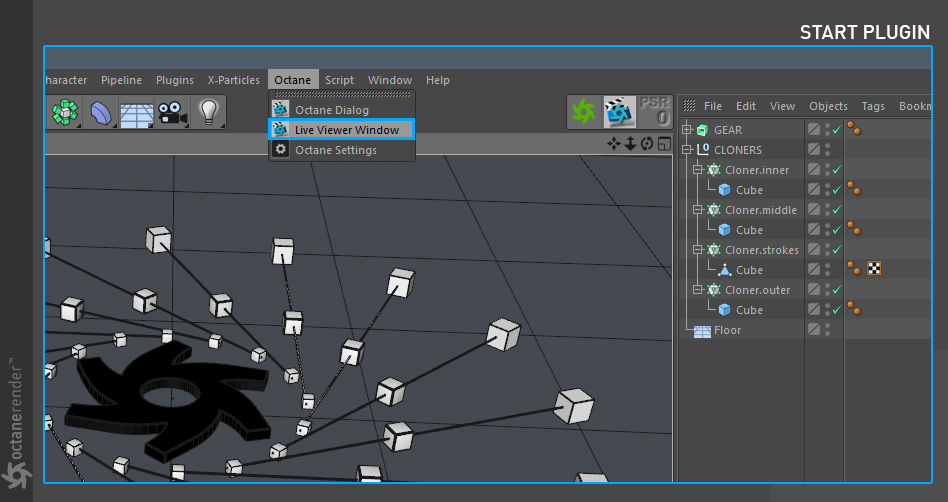
Go to the Cinema 4D Main Menu bar and choose Octane > Live Viewer Window from the Octane menu.
第二步:
进入影院4 d 主菜单栏,从辛烷值菜单中选择辛烷值 > 实时查看窗口。
Step 3:
Press the gear shaped icon as you see in the picture below, to launch the Live Viewer — the heart of Octane. The first thing to notice here is that the Live Viewer updates the scene in real time. Every move you make in Cinema 4D’s viewport will be updated in real time in the Live Viewer.
第三步
按下图中的齿轮形图标,启动 Live Viewer ー辛烷的心脏。首先要注意的是 Live Viewer 会实时更新场景。你在电影院4 d 视图中的每一个动作都会在直播观看器中实时更新。
Navigation within the Live Viewer is the same as it is in Cinema 4D’s 3D viewports. Use the same shortcuts to move around the environment.
在 Live Viewer 中的导航和在 Cinema 4 d 的3 d 视图中是一样的。使用相同的快捷方式在环境中移动。

CREATING OCTANE MATERIALS
创造辛烷材料
Step 4:
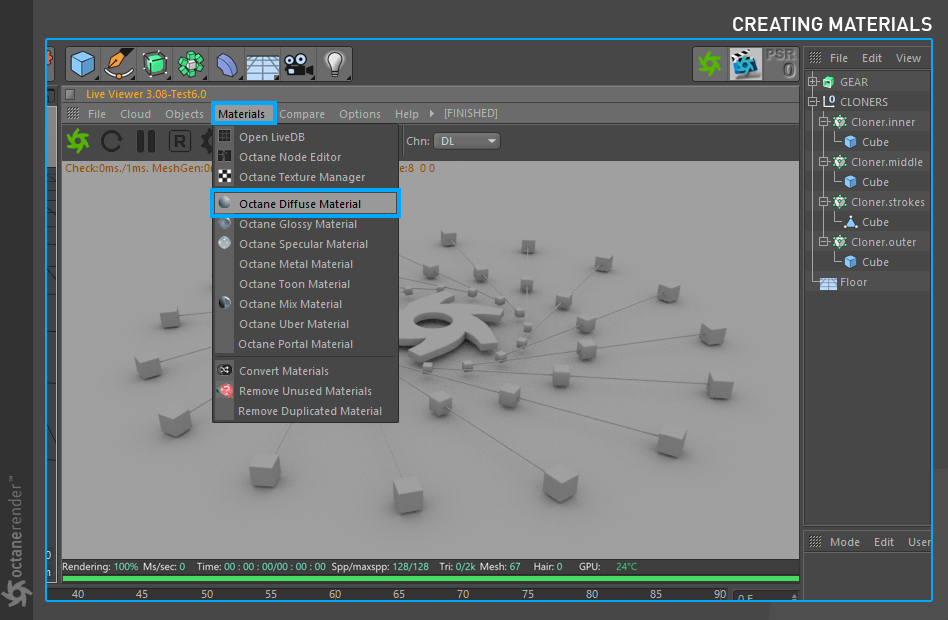
Time to add some materials to shade and add some lighting to illuminate the scene. In the Live Viewer, and choose Materials > Octane Diffuse Material (you can also create octane materials from Cinema 4D material window). This will create a new Octane Diffuse Material and place it in the Cinema 4D Material Manager. Change the material name to “InnerDiffuse”.
第四步:
时间添加一些材料,以阴影和添加一些照明场景。在 Live 查看器,并选择材料 > 辛烷漫反射材料(您也可以创建辛烷材料从电影院4d 材质窗口)。这将创建一个新的辛烷漫反射材料,并把它在电影4d 材料经理。将材质名称更改为“ Inner diffuse”。
Step 5:
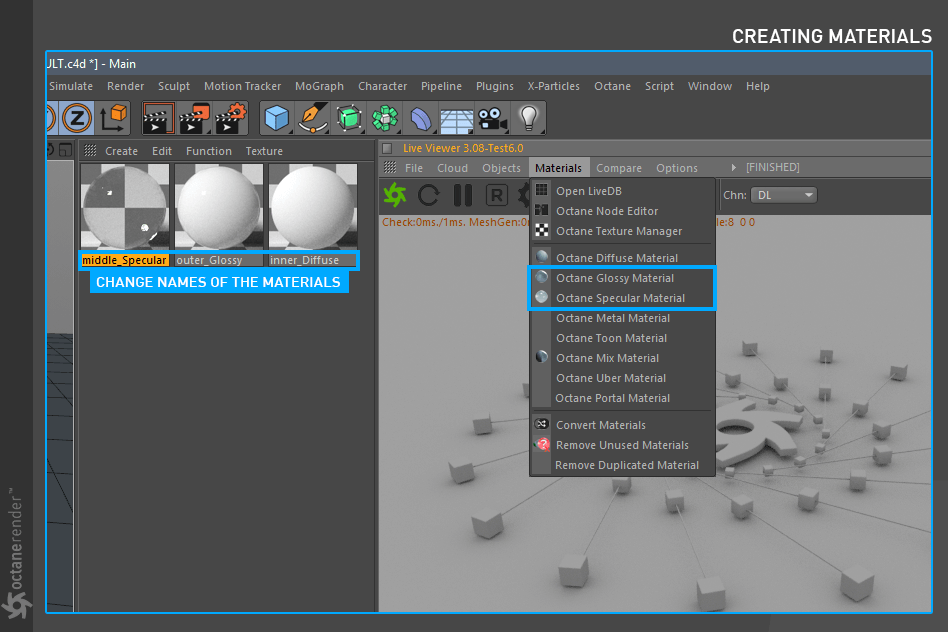
Create a Glossy and a Specular material. Change the names of the materials to “OuterGlossy” and “Middle_Specular” (double click the materials icons to change names).
第五步:
创建一个光泽和镜面材质。将材料的名称更改为“ Outer illusal”和“ Middle _ specular”(双击材料图标以更改名称)。
Step 6:
Time for more materials. Go to the material menu again from the Live Viewer window and create three more Glossy materials. Change the names to “STROKE”, “FLOOR” and “GEAR” respectively.
第六步:
更多资料时间。再次从 Live Viewer 窗口进入材质菜单,创建三个光滑材质。将名称分别更改为“ STROKE”、“ FLOOR”和“ GEAR”。

ADJUSTING MATERIAL PROPERTIES
调整材料性能
Step 7:
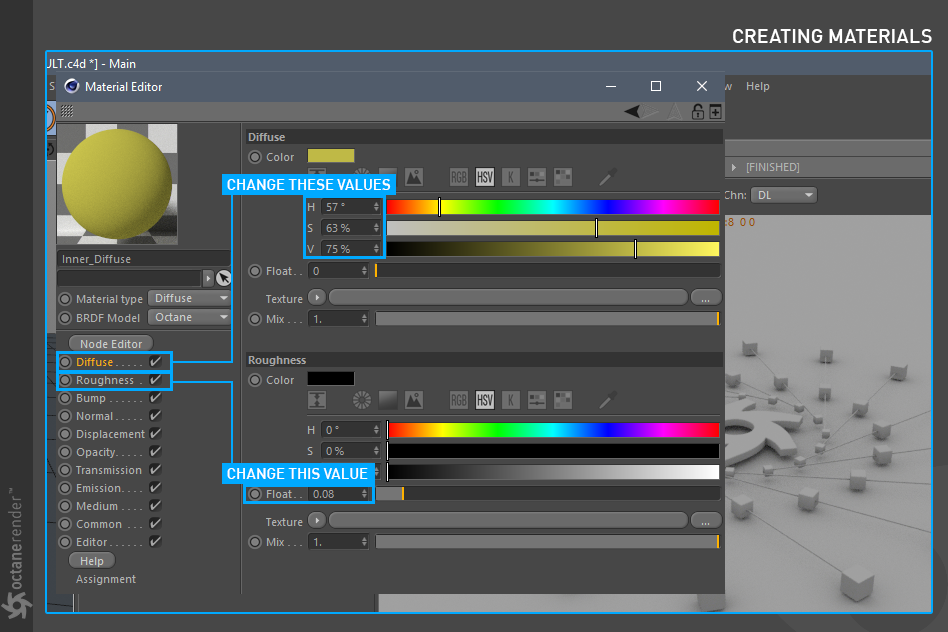
We have finished creating the materials; now we need to edit the properties of these materials to get the looks we want. First, start with the diffuse material. Double-click “Inner_Diffuse” to open the material. You will see the properties of the diffuse material in the opened window. We will explore these items in more depth in subsequent topics, but for now, change the properties of the “Inner_Diffuse” material as you see in the image below.
第七步:
我们已经完成了材料的制作; 现在我们需要编辑这些材料的属性来得到我们想要的效果。首先,从漫反射材质开始。双击“内部弥漫”打开材质。您将在打开的窗口中看到漫射材质的属性。我们将在后续主题中更深入地探讨这些项目,但是现在,更改“内部漫射”材质的属性,如下图所示。
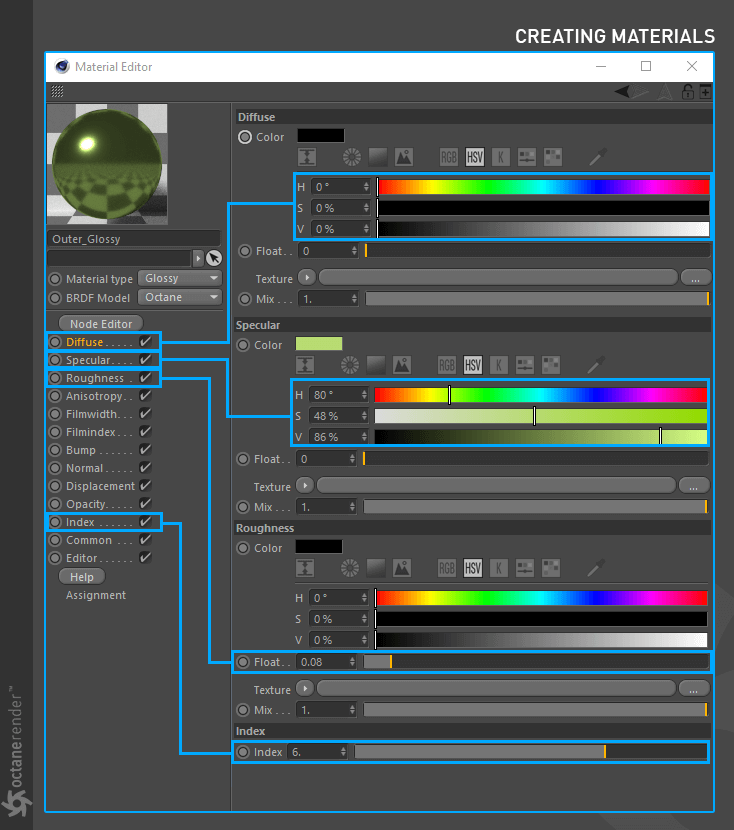
Step 8:
Now double-click the “outerglossy” material and change its properties as you see in the image below.
第八步:
现在双击“ outer glishold”材质并更改其属性,如下图所示。
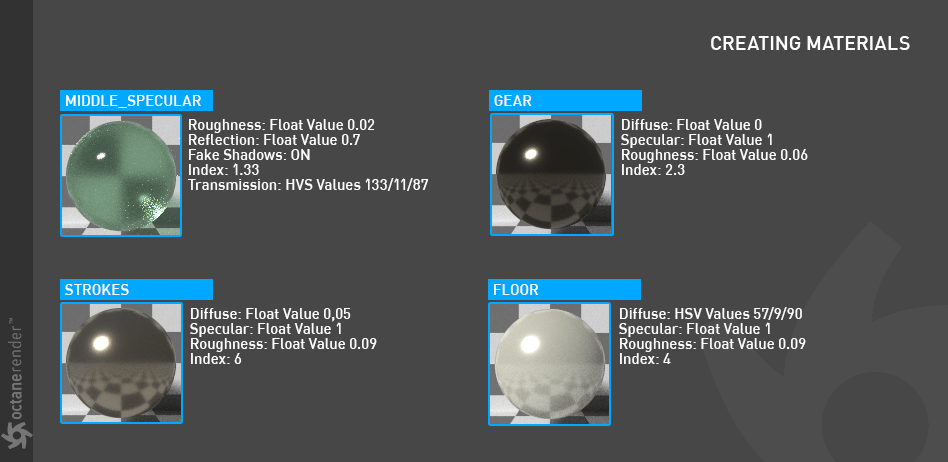
Step 9:
Now do the same procedure for the remaining four materials. These materials are “MiddleSpecular”, “GEAR”, “STROKES” and “FLOOR”. The following image shows the properties of each. Change these properties from the relevant parts of the material.
第九步:
现在对剩下的四种材料进行同样的处理。这些材料是“ Middle specular”,“ GEAR”,“ STROKES”和“ FLOOR”。下图显示了每个属性的属性。从材料的相关部分改变这些属性。
APPLY MATERIALS TO THE OBJECTS
将材料应用到物体上
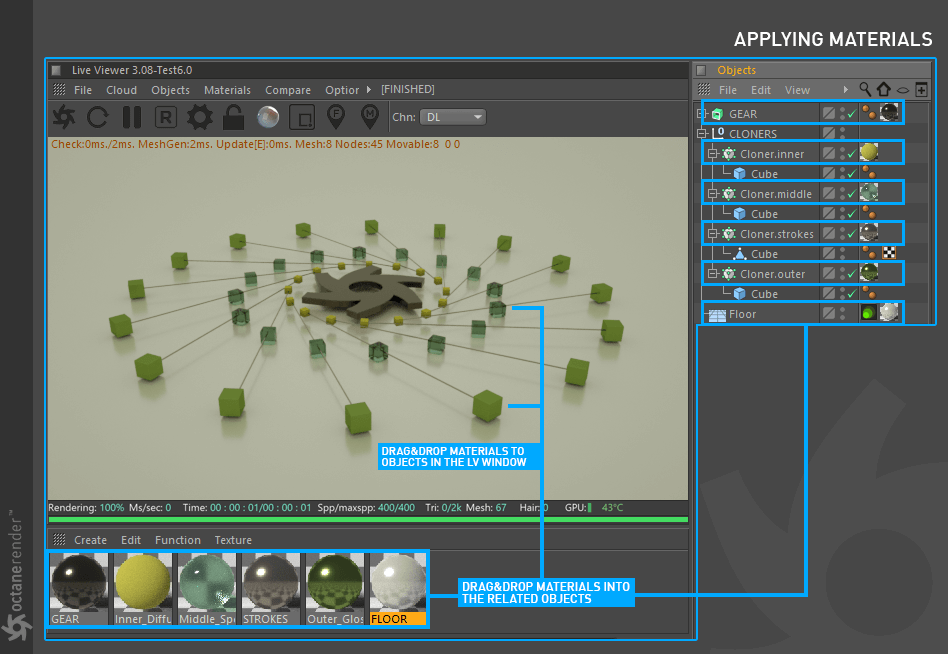
Step 10:
After setting the properties of our materials, it’s time to assign them to the corresponding objects. There are two ways to do this:
第十步:
在设置了材质的属性之后,是时候将它们分配给相应的对象了。有两种方法可以做到这一点:
1) drag and drop the material onto the object in the object manager window, or
1)拖放材质到对象管理器窗口中的对象上,或者
2) drag and drop the material onto the object in the Live Viewer window.
2)将材质拖放到 Live Viewer 窗口中的对象上。
Assign the materials to the objects as you see in the image as follows.
将材质分配给图像中的对象,如下所示。
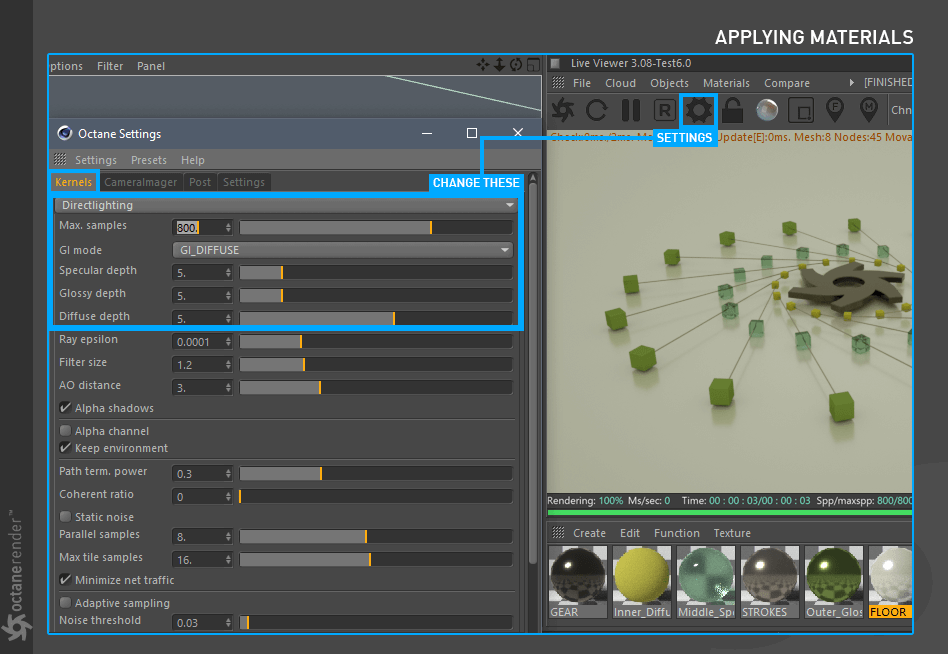
Before finishing this section, go to Settings in the Live Viewer window and change the settings in the Kernels section as shown in the image below.
在完成这一部分之前,进入 Live Viewer 窗口中的设置,修改内核部分中的设置,如下图所示。
ADD OCTANE LIGHTS TO THE SCENE
在场景中加入辛烷值灯
Although we have finished with the materials, the scene still needs work. The lighting for this scene is coming from the default light, which is just the default environment color (more information here). Relying exclusively on the default lighting is too limiting; we are going to shed some Octane Daylight on this scene. Go to the Live Viewer > Objects > Lights and select Octane Daylight.
虽然我们已经完成了材料,现场仍然需要工作。这个场景的灯光来自于默认的灯光,这只是默认的环境颜色(更多信息在这里)。完全依靠默认的照明是太有限的,我们将棚一些辛烷日光在这个场景。进入 Live Viewer > Objects > Lights,选择 Octane Daylight。

Step 12:
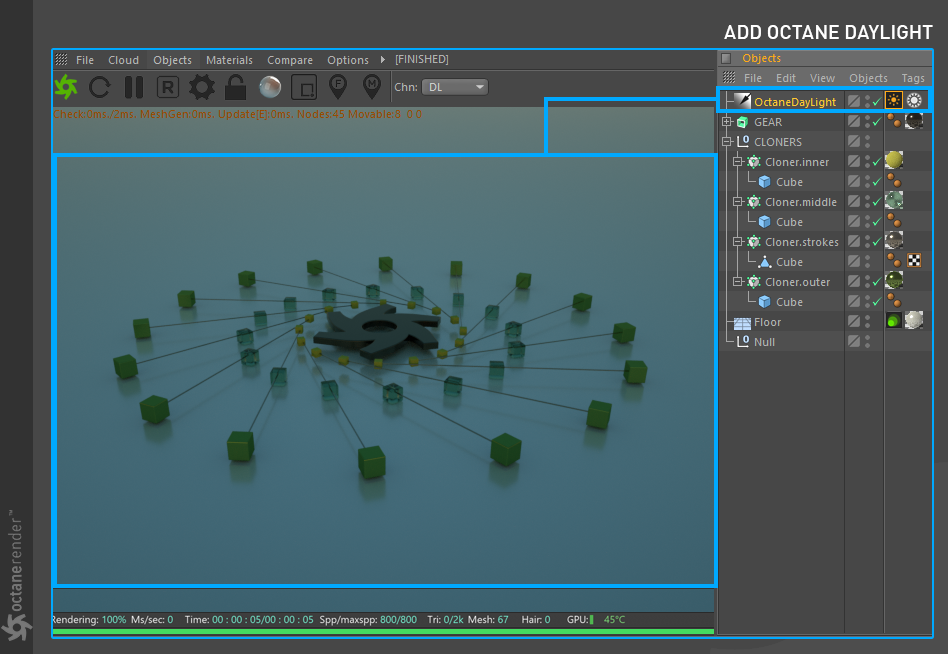
As you can see, two things happened in our scene: 1) Our picture in Live Viewer has changed and became darker and 2), an “Octane Daylight” object has been added to the Object Manager. But the current picture is darker than the previous one. Why? This is due to the default settings of Octane Daylight. Change those settings now.
第十二步:
正如你所看到的,在我们的场景中发生了两件事: 1)我们在 Live Viewer 中的图片发生了变化,变得更暗了; 2) ,一个“ Octane Daylight”对象被添加到对象管理器中。但是目前的情况比上一次更糟糕。为什么?这是由于辛烷值日光的默认设置。现在就改变这些设置。
Step 13:
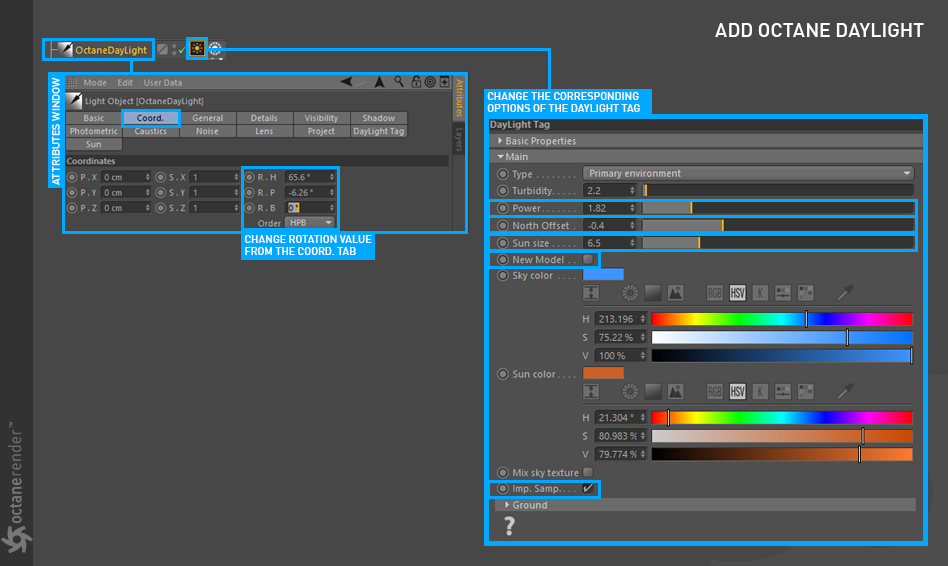
First, select Octane Daylight from Object Manager. In the Attributes Window, go to the Coord tab and change its rotation parameters as you see in the image below. Next, select the Daylight Tag and change the values you see in the image below. You can read more about Octane Daylight here.
第十三步:
首先,从对象管理器中选择 Octane Daylight。在属性窗口中,转到 Coord 选项卡并更改其旋转参数,如下图所示。接下来,选择 Daylight Tag 并更改您在下面的图片中看到的值。你可以在这里阅读更多关于辛烷日光的内容。
Step 14:
Now that we have edited the parameters of the light, the render in the Live Viewer window has changed dramatically. Notice how realistic the materials look now. We are starting to get some nice shadows from the sunlight as well.
第十四步:
现在我们已经编辑了光线的参数,Live Viewer 窗口中的渲染已经发生了巨大的变化。注意材料现在看起来有多逼真。我们也开始从阳光中得到一些美丽的阴影。

Step 15:
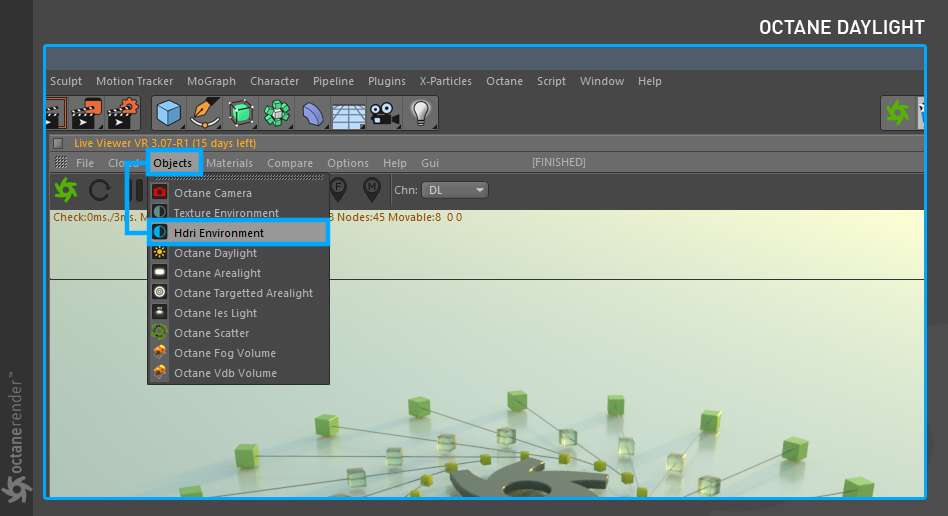
As we mentioned early on, we have environments in addition to a variety of different types of light. All these instruments can be mixed and matched to get the look we are after. Octane features an environment that can use HDRI images to light the scene as well (this is referred to as “image-based lighting”). Go to Objects > HDRI Environment, which will add an HDRI Environment Object into the scene.
第十五步:
正如我们在前面提到的,我们除了有各种不同类型的光之外,还有其他的环境。所有这些仪器都可以混合和匹配,以得到我们想要的效果。辛烷值的特点是一个环境,可以使用 HDRI 图像照亮场景,以及(这是所谓的“图像照明”)。转到 Object > HDRI Environment,这将在场景中添加一个 HDRI Environment Object。
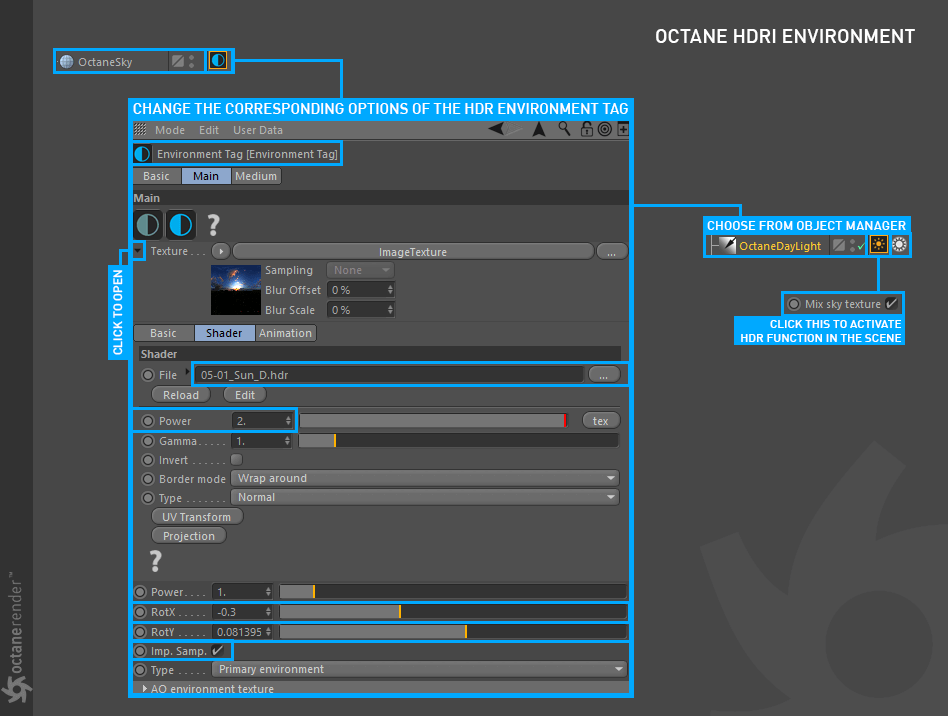
Step 16:
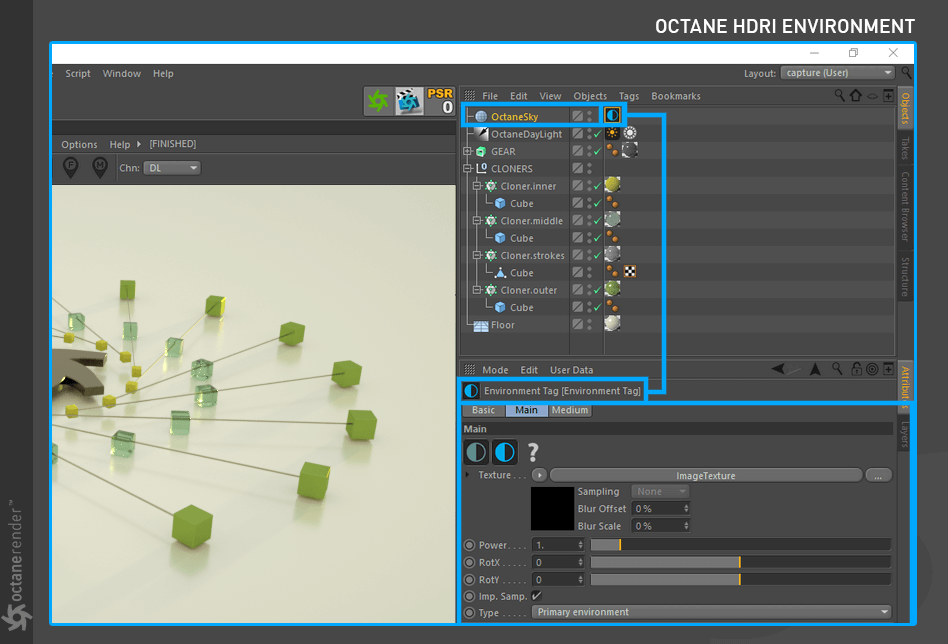
Now we have a new object named “Octane Sky” and “HDRI Environment Tag” in our scene. This lighting model requires an image in HDR format to work properly. Light values that are defined in these HDR pictures will also illuminate the scene. In this example, we used a HDR image downloaded from an Open-Source site, which can download from here or you can also use your own HDR images. Now enter the settings you see in the following images below.
第十六步:
现在我们有一个新的对象命名为“辛烷天空”和“ HDRI 环境标签”在我们的场景。这个照明模型需要 HDR 格式的图像才能正常工作。在这些 HDR 照片中定义的光值也将照亮场景。在这个示例中,我们使用了从开放源码站点下载的 HDR 映像,可以从这里下载,也可以使用自己的 HDR 映像。现在输入您在下面的图片中看到的设置。
| NOTE To use the “OctaneDaylight” and “HDR Environment” together, you need to select the Octane Daylight Tag from Object Manager and enable the “Mix sky texture” option, discussed here. 注意 要同时使用“ OctaneDaylight”和“ HDR Environment”,您需要从对象管理器中选择“ Octane Daylight Tag”并启用“ Mix sky texture”选项,如下所述。 |
|---|
**
Step 17:
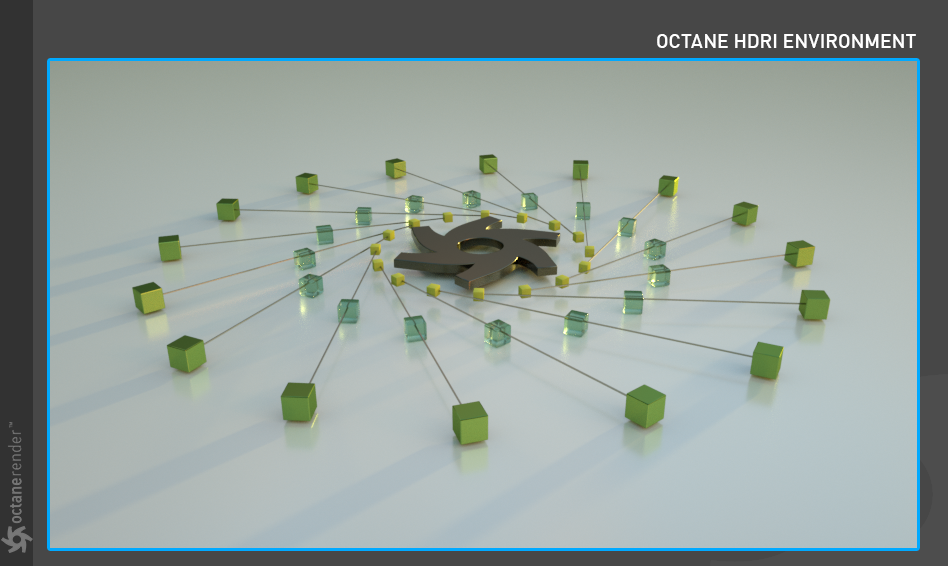
After playing with HDR values, the scene has changed as you see in the picture. Instead of the green-yellow mood, we have achieved a more consistent darkness-to-lightness ratio in the current picture.
第十七步:
在使用 HDR 值之后,如图所示,场景发生了变化。在当前的图片中,我们取代了黄绿色的氛围,实现了一个更加一致的黑暗与明亮的比例。
SETTING UP AN OCTANE CAMERA
安装一个辛烷值相机
Step 18:
The opportunity for even more realism improves when we add an actual camera to the scene.Go to Objects > Octane Camera. Now there is Octane Camera and its tag loaded into the object manager in the scene. You can adjust the camera position using the ALT + LMB / RMB / MMB, either from the viewport or from the Live Viewer window, just as you would in the Cinema 4D 3D views, as noted previously. Note the immediate illumination feedback in Live Viewer — the scene is fully lit and shaded as you do so.
第十八步:
当我们在场景中添加一个真实的相机时,更加真实的机会就来了。现在有辛烷相机和它的标签加载到现场的对象管理器。你可以使用 ALT + LMB/RMB/MMB 来调整摄像机的位置,无论是从视窗还是从 Live Viewer 窗口,就像你在电影院4d 3D 视图中所做的那样,如前所述。注意即时的光照反馈ー场景是完全照明和阴影,因为你这样做。
| INFO To look through the camera lens, click on the small box next to Octane Camera in the Object Manager. 信息 要通过相机镜头看,点击旁边的辛烷相机在对象管理器的小盒子。 |
|---|
**

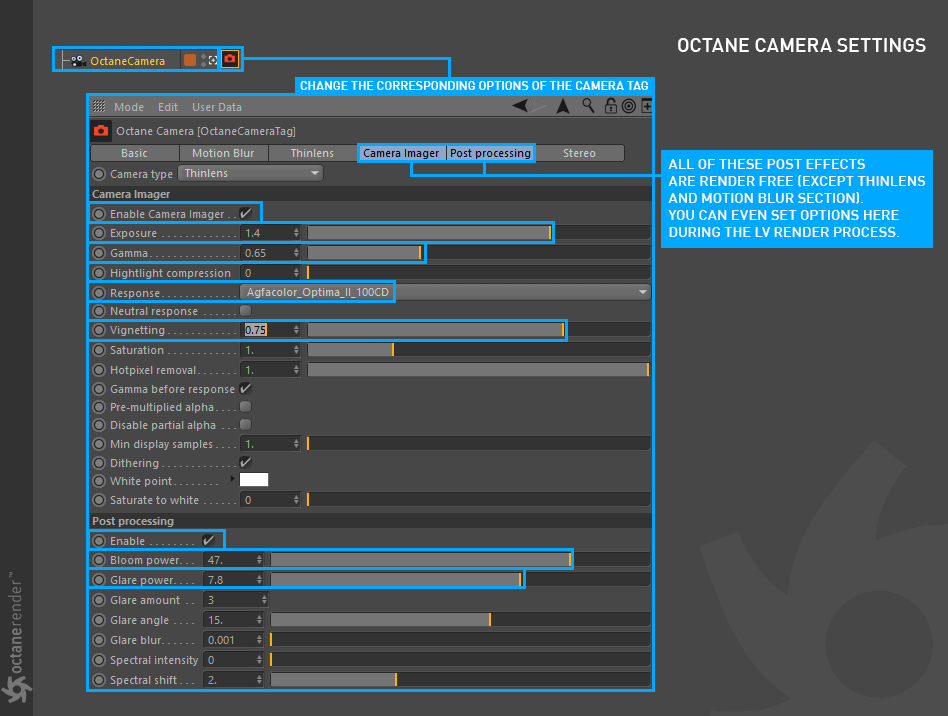
Step 19:
The Octane Camera is a standard Cinema 4D camera with an Octane Camera tag attached. Now we will change some settings of the Octane Camera tag. To do this, select Octane Camera Tag from the Object manager and change the settings you see in the illustration below.
第十九步:
辛烷相机是一个标准的电影4 d 相机与辛烷相机标签附加。现在我们将改变一些辛烷相机标签的设置。要做到这一点,选择辛烷相机标签从对象管理器和更改设置,您看到在下面的说明。
FINALIZE THE PICTURE IN LIVE VIEWER
在实时查看器中完成图片
Step 20:
Notice the difference after we made some adjustments in the Octane Camera tag? The shadows shifted a little further, the brightness-to-darkness ratio of the scene differed. This is better than before, but we are not done yet. The appearance of the glass cubes in the middle could use some help.
第二十步:
注意到差异后,我们做了一些调整辛烷相机标签?阴影又移动了一点,场景的亮度和黑暗的比例不同。这是比以前好,但我们还没有完成。中间的玻璃立方体的外观可能需要一些帮助。
Specular materials are rich and complex, and while we will not deep dive into them here, we will make a quick adjustment that will make a nice impact to the scene. Go to the Settings tab in the Live Viewer window, moving on to the Kernels section. Change the settings as you see in the second image below.
镜面材料是丰富和复杂的,虽然我们不会深入研究他们在这里,我们将作出快速调整,将作出一个很好的影响场景。转到 Live Viewer 窗口中的设置选项卡,然后转到内核部分。更改设置,如下面第二张图片所示。

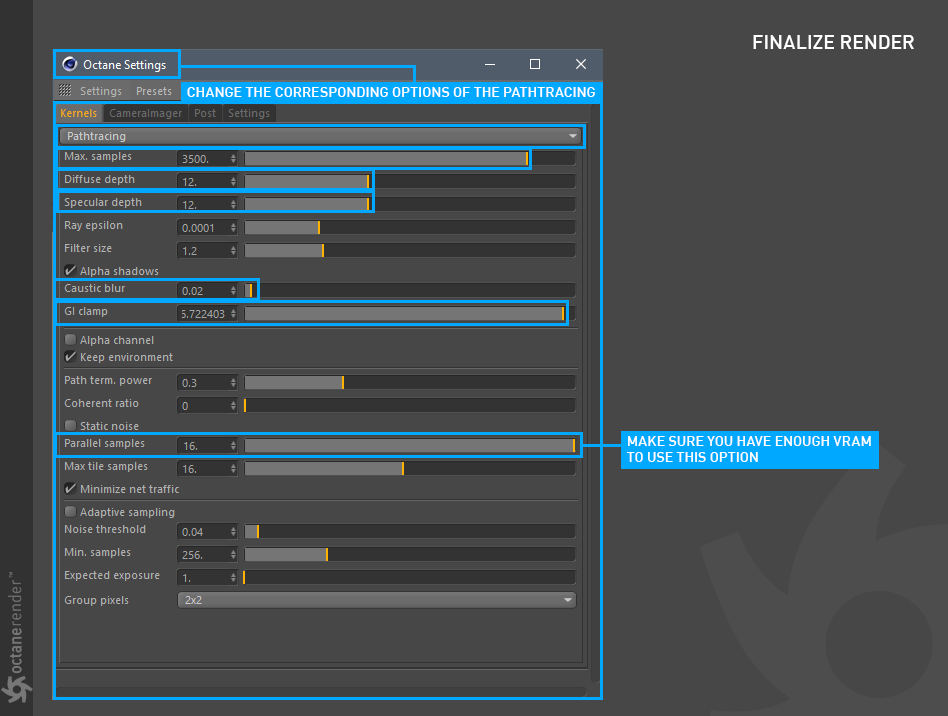
Step 21:
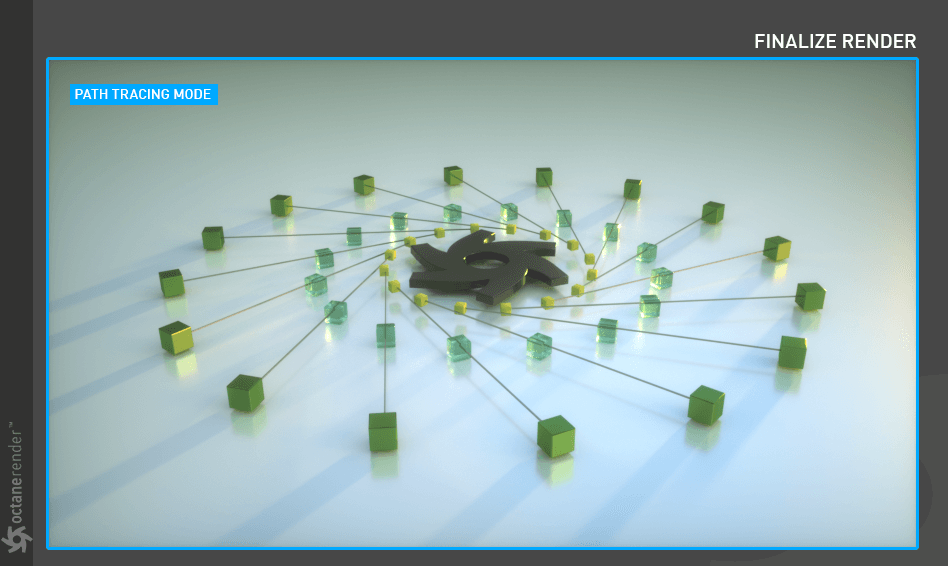
After adjusting the Path tracing settings, we now have the picture exactly as intended. The Specular Material on the middle cubes is now rendering correctly as it should: undesired shadows are gone, the reflections are a little more obvious, and a special reflection called “caustic” is now present in the scene. Additionally, the light distribution is much better than before. The reason for this is that the Path Tracing kernel is much more accurate than the Direct Light kernel. It does much more work, and, as a result, it is slower. That said, most will find that the Path Tracing kernel is the one that gets the most use.
第二十一步:
在调整了路径跟踪设置之后,我们现在有了完全符合预期的图片。中间立方体上的镜面材质现在正常渲染: 不想要的阴影消失了,反射变得更明显了,一种叫做“腐蚀性”的特殊反射现在出现在场景中。另外,光线分布也比以前好多了。这是因为路径跟踪内核比 Direct Light 内核精确得多。它能做更多的工作,因此速度更慢。也就是说,大多数人会发现路径跟踪内核是得到最多使用的内核。
The Path Tracing and PMC kernel modes produce accurate and correct results by leveraging unbiased rendering in Octane, but these kernels do take time to clean the noise that results in the scene during the image sampling. Noise is an artifact of path tracing and unbiased rendering in general.
路径跟踪和 PMC 内核模式通过利用 Octane 中的无偏渲染来产生准确和正确的结果,但是这些内核确实需要时间来清除在图像采样过程中产生的噪声。噪声通常是路径跟踪和无偏渲染的产物。
SET UP A FINAL RENDER WITH OCTANE
建立一个最终渲染与辛烷
Step 22:
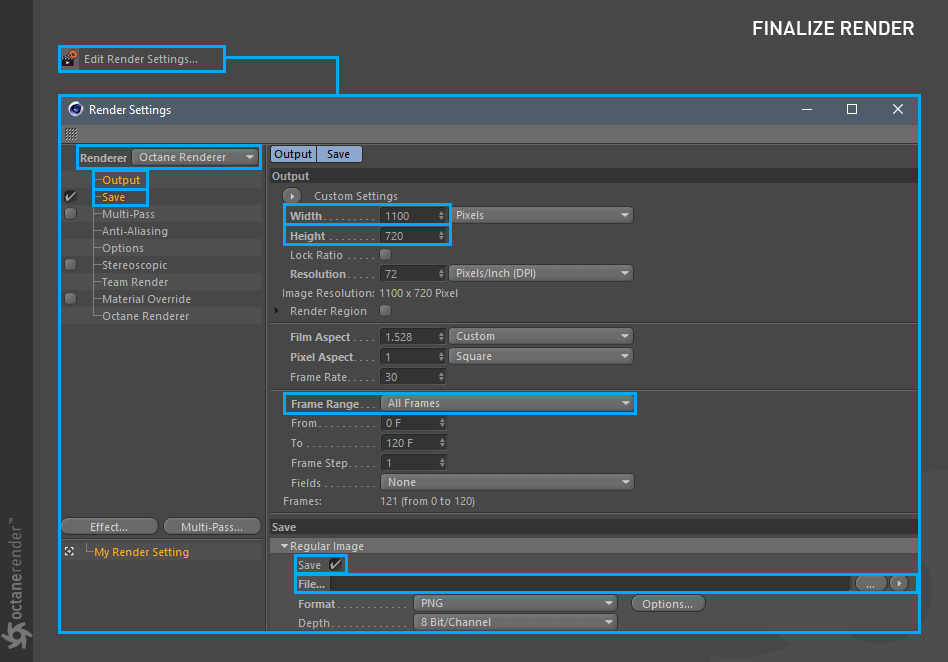
Now we will get the final output of the picture in Live Viewer. First, let’s make some adjustments for the Final Render. Select Render > Edit Render Settings from the main Cinema 4D menu bar, or press CTRL + B. This will bring up the Render Settings window; change the settings as you see in the images below.
第二十二步:
现在我们将在 Live Viewer 中得到图片的最终输出。首先,让我们为最终渲染做一些调整。选择渲染 > 编辑渲染设置从主电影4d 菜单栏,或按 CTRL + b。这将打开渲染设置窗口; 更改设置,如下图所示。
Once you have made these changes, select Render to Picture Viewer from the Render menu of Cinema 4D, or press Shift + R.
一旦你做了这些改变,选择渲染图片浏览器从渲染菜单电影4d,或按下 Shift + r。

WRAPPING IT UP
结束它
At this point, you have successfully completed your first rendering with Octane. Congratulations! Octane is one of the easier rendering engines to use, especially given the near real time photo-realistic results in Live Viewer. That said, you still need to invest the time into getting to know both Octane and proper modeling technique to effectively manage polygons, composition, and lighting.
此时,您已经成功地完成了第一个使用 Octane 的渲染。祝贺你!辛烷值是一个比较容易使用的渲染引擎,特别是考虑到在 Live Viewer 中几乎实时的照片真实感效果。也就是说,你仍然需要投入时间来了解辛烷值和适当的建模技术,以有效地管理多边形,构图和照明。
The following sections of this guide will help to fill in many of the blanks for you. Octane is a comprehensive render engine, and it takes time and patience to learn. That said, you will see a return on your investment each time you use it. It only gets better from here.
本指南的以下部分将帮助您填补许多空白。辛烷值是一个综合渲染引擎,它需要时间和耐心来学习。也就是说,你每次使用你的投资都会看到回报。从这里开始只会变得更好。

若有收获,就点个赞吧
0 人点赞
