Dirt
The Dirt generator node is one of the more versatile nodes in OctaneRender® when it comes to creating realistic materials. The Dirt generator will create a grayscale value map that considers the topology of the surface to which it is applied, depending on the settings described in the following section. The generator will create the map by determining the angle between neighboring polygons, modified by your input.
在创建逼真的材质时,污垢生成器节点是 OctaneRender® 中更通用的节点之一。 污垢生成器将创建一个灰度值映射,该映射会考虑应用它的表面的拓扑结构,具体取决于下一节中描述的设置。 生成器将通过确定由您的输入修改的相邻多边形之间的角度来创建地图。
The universal dirt system was first introduced in OctaneRender 2020.1 and replaces and improves upon the previous dirt system, by offering more control and a better look overall. The previous iteration used a uniform cosine sampling for tracing out the rays from the material surface, which resembled unbiased ambient occlusion. The universal dirt system uses an _inverted cone-_based method to control the distribution of the dirt rays, which offers a much better look than the original dirt node. This method allows you to control the way that dirt rays are sampled and distributed within the inverted cone (the apex of the cone being the point on the surface to be shaded), the results of which can be further modulated with texture input and the controls described in the following section to really finesse the results for a far more realistic look.
通用污垢系统首次在 OctaneRender 2020.1 中引入,并通过提供更多控制和更好的整体外观来替换和改进以前的污垢系统。 之前的迭代使用均匀余弦采样来追踪来自材料表面的光线,这类似于无偏环境遮挡。 通用污垢系统使用基于倒锥的方法来控制污垢光线的分布,这提供了比原始污垢节点更好的外观。 此方法允许您控制污物光线在倒置锥体内的采样和分布方式(锥体的顶点是表面上要着色的点),其结果可以通过纹理输入和控件进一步调制 在下一节中进行了描述,以真正精细化结果以获得更逼真的外观。
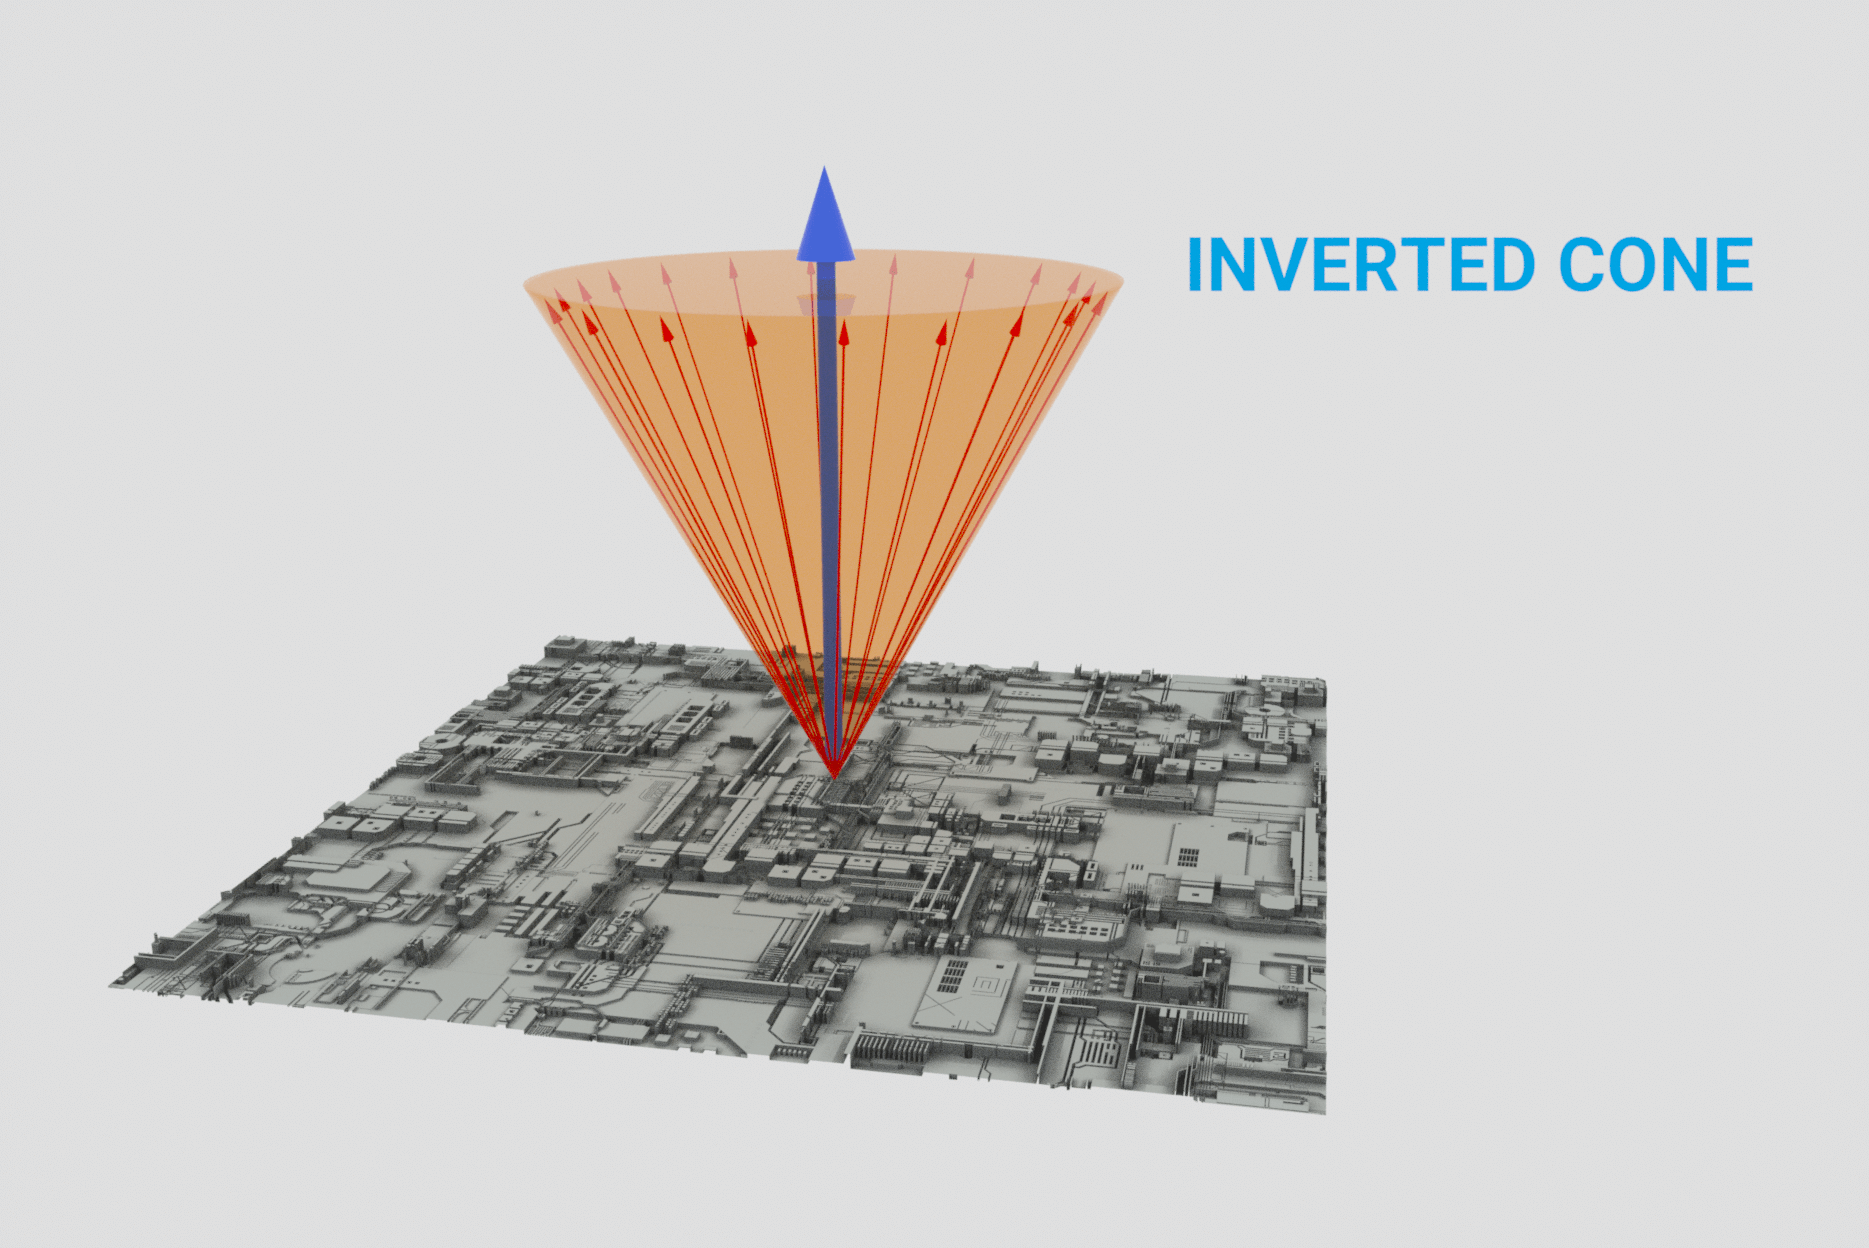
Inverted cone sampling, with apex of the cone as the origin for sampling rays. In this image, sampling rays are at 100% distribution.
倒圆锥体取样,圆锥体顶端为取样射线的原点。在这幅图像中,采样光线是100% 分布的。
The discussions that follow will explore the new components of the universal dirt system. You may wish to keep in mind the inverted cone concept in order to help you better understand some of the values presented.
下面的讨论将探讨通用污垢系统的新组件。你可能希望记住倒圆锥体的概念,以帮助你更好地理解一些值。
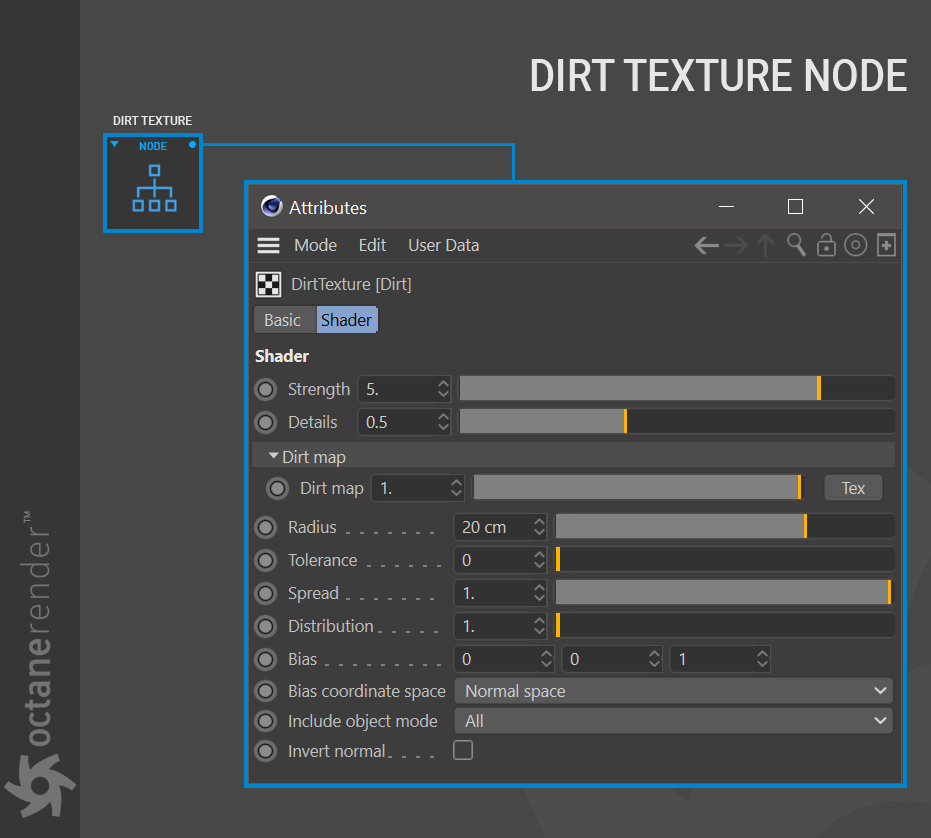
DIRT GENERATOR SETTINGS 污垢生成器设置
STRENGTH 强度
This setting controls the intensity of the dirt effect across the surface of the geometry.
这种设置控制的强度污垢的影响,通过表面的几何。
DETAILS 详细介绍
This setting controls the intensity of details revealed in the dirt texture. You can better observe this effect if your object in the scene has detailed and sharp edges. Increasing the value of this slider will cause the dirt effect to spread away from corners, while lower values keep the effect tighter.
这个设置控制在灰尘纹理中显示的细节的强度。你可以更好地观察这种效果,如果你的物体在场景中有细节和锐利的边缘。增加这个滑块的值会导致污垢效果从角落扩散开来,而较低的值会使效果更紧凑。
DIRT MAP 污垢地图
Any texture input (image texture, procedural, etc.) can be used to modulate the intensity and the spread of the dirt effect for a given distance from a surface point. Using a dirt map will help to break up the effect visually, allowing for a more natural, yet art-directed appearance.
任何纹理输入(图像纹理,过程等)都可以用来调节灰尘效应的强度和传播距离表面点给定的距离。使用污垢地图将有助于打破效果的视觉,允许一个更自然,但艺术指导的外观。
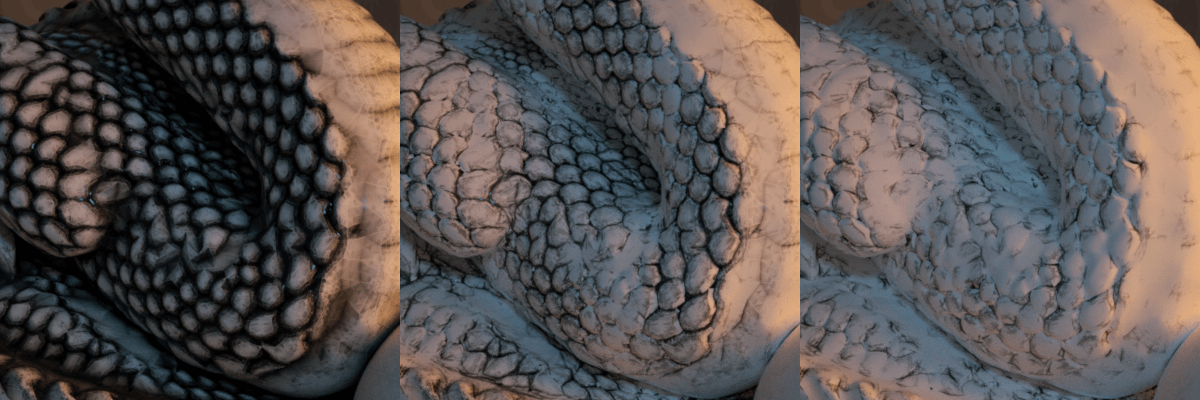
In the illustration above, the left image has just the dirt generator alone, set to a strength of 5, details at 10 and radius at 20. The center image uses a marble procedural in the direct map texture input, and the right image a ridged fractal in the texture input. The dirt map settings are the same for all three images, with only the procedural generators modulating the dirt result.
在上面的插图中,左边的图片只有污垢生成器,设置为5,细节在10,半径在20。中心图像采用大理石程序直接贴图纹理输入,右侧图像在纹理输入中使用脊状分形。污垢地图的设置是相同的所有三个图像,只有程序生成器调制污垢的结果。
RADIUS半径
This setting controls the spread of the dirt across the surface from the recessed parts of the model outward towards the more exposed parts of the model. The more you increase the radius setting, the more pronounced the dirt effect will be across your geometry.
这个设置控制着灰尘从模型的凹陷部分向外扩散到模型的更暴露的部分。你增加更多的半径设置,更明显的污垢效果将跨越你的几何。
TOLERANCE 公差
At some point, you will begin to see the outlines of polygons give away the effect of the dirt generator, and that is where the tolerance attribute becomes an ally. This setting can be used to reduce the appearance of those polygonal artifacts and let you dial in the look you want.
在某一点上,你将开始看到轮廓的多边形放弃污垢生成器的效果,这是在容忍属性成为一个盟友。这个设置可以用来减少这些多边形的工件的外观,并让您在您想要的外观拨号。
SPREAD 覆盖
The spread parameter controls the visibility of the dirt effect across the surface. Lower values produce a less noticeable effect, whereas higher values will cause the effect to become more pronounced.
传播参数控制污垢效果在表面的可见度。较低的值产生较不明显的影响,而较高的值将导致影响变得更加明显。

The illustration above shows the spread parameter in action, going from a value of 1.0 on the left, through 0.25, to 0.0, and finally, no dirt effect at all. The lower the spread is, the less pronounced the effect, since the dirt ray is always sampled in one direction.
上面的插图显示了扩散参数的作用,从左边的1.0到0.25,再到0.0,最后,完全没有灰尘效应。分布越低,效果就越不明显,因为尘埃射线总是沿着一个方向取样。
DISTRIBUTION 分布
The distribution value refers to the way that the dirt rays are distributed within the inverted cone (again, the apex of the cone being the point on the surface to be shaded). The default distribution is even (1), but you can weight that distribution using the distribution value (>1-100). The larger the distribution value, the more dirt rays will favor the edges of the cone as opposed to the center of the cone (the normal). The width of the cone itself is controlled by the spread value, discussed above.
分布值是指污垢射线在倒圆锥体内的分布方式(同样,圆锥体的顶点是要遮盖的表面上的点)。默认分布是偶数(1) ,但是您可以使用分布值(> 1-100)对该分布进行加权。越大的分布值,越多的污垢光线将有利于边缘的锥相对于中心的锥(法线)。锥体本身的宽度由上面讨论的扩展值控制。
In other words, values closer to 1 will produce a less defined dirt effect, which is spread out farther away from the edges. Values closer to 100 will tighten up the spread of the effect and darken the effect as well.
换句话说,接近1的数值会产生一种不那么明显的污垢效果,这种污垢会从边缘散布到更远的地方。值接近100将收紧效果的传播和黑暗的效果以及。

In the illustration above, the left image is with default 1.0 distribution (evenly distributed dirt rays), while the right image is with 100.0 distribution (concentrated in the normal + bias direction).
在上图中,左边的图像是默认的1.0分布(均匀分布的污垢射线) ,而右边的图像是100.0分布(集中在正常 + 偏置方向)。
BIAS 偏差
You can determine the direction of the inverted cone, and thus the dirt effect, with the bias control. This option allows for a directional input on three separate axes (X, Y and Z — a vector, in other words) to control the direction in which the base of the cone is pointing, as rotating from the apex (again, the point on the surface to be shaded). The bias works in concert with the distribution parameter, as noted previously. The Bias setting may not be as noticeable in many situations (camera angle, topology, and so on.)
可以确定倒锥的方向,从而得到污垢的影响,用偏置控制。这个选项允许在三个独立的轴(x、 y 和 z ——换句话说,是一个矢量)上进行方向输入,以控制从顶点旋转时锥体底部指向的方向(同样,表面上要阴影的点)。正如前面所提到的,这种偏见与分布参数是一致的。在许多情况下(摄像机角度、拓扑结构等)偏置设置可能不那么明显

The image above shows three different bias conditions. The image on the left has no dirt generator applied. The middle image shows unbiased, even dirt and the image on the right shows a biased dirt result.
上面的图片显示了三种不同的偏差情况。左边的图像没有应用灰尘生成器。中间的图像显示无偏见,甚至污垢和图像右侧显示一个有偏见的污垢的结果。
BIAS COORDINATE SPACE
偏置坐标空间
The bias coordinate space allows you to determine how the bias direction vector will be calculated spatially and will affect the way the dirt effect is ultimately applied to the surface. You can choose between the following:
偏置坐标空间允许您确定如何偏置方向向量将被计算空间和将影响的方式污垢效应最终应用到表面。你可以选择以下方式:
- World space: Octane will interpret the input bias controlling the cone orientation as a vector in world space, with the origin being 0,0,0.
世界空间: 辛烷将控制圆锥方向的输入偏差解释为世界空间中的一个矢量,原点为0,0,0。
Normal space: the bias vector controlling cone orientation will occur in normal space, from the shading point.
法线空间: 控制锥面方向的偏差矢量会出现在法线空间,从着色点出发。
Object space: the bias vector for cone orientation will be calculated in object space, from the center of the object as defined by the origin point set in Cinema 4D, which can be changed by you.
- 物体空间: 在物体空间中计算出锥体方向的偏差矢量,该偏差矢量由影院4d 中原点集定义的物体中心开始计算,你可以改变它。
INCLUDE OBJECT MODE
包含对象模式
This mode will determine what objects will be considered when calculating the dirt effect for the material. The options are:
这个模式将决定在计算材质的污垢效果时将考虑哪些对象。选项如下:
- All: All objects will contribute to the dirt effect for the surface if they fall within the sampling parameters.
所有: 所有物体将有助于表面污垢的影响,如果他们落在采样参数。
Self: Only the object to which the material is applied will contribute to the dirt effect. No other objects will contribute.
自我: 只有使用材料的物体才会产生污垢的效果。没有其他物体会有所贡献。
Others: Only other objects will contribute to the dirt effect. The object receiving the effect will NOT contribute.
- 其他: 只有其他物体会产生污垢效果。接收效果的物体不会产生污垢效果。
INVERT NORMAL 反转正态
This is a toggle which reverses the effect of the Dirt texture based on the normal direction of the surface.
这是一个基于表面法线方向反转脏纹理效果的开关。
DIRT PERFORMANCE 污垢性能
Depending upon several factors, the Dirt node may have a noticeable impact on render times. Here are some points to consider, as well as what you can do to address them:
取决于几个因素,Dirt 节点可能对渲染时间有明显的影响。以下是一些需要考虑的要点,以及你可以做些什么来解决这些问题:
- Dirt is a live node; calculation depends on the complexity of the geometry to which it is applied.
污垢是一个活的节点; 计算取决于它所应用到的几何形状的复杂性。
Animated geometry will update the results of the Dirt node for every frame; if you do not want the effect to change frame-to-frame, then connect the Dirt node to a Bake Texture node into a diffuse material and use a baking camera. Once you have that result, you can replace the Dirt node with the baked texture. This has the added benefit of speeding up your scene.
动态的几何图形将更新 Dirt 节点的结果,为每一帧; 如果你不想改变帧到帧的效果,然后将 Dirt 节点连接到一个 Bake 纹理节点到一个漫反射材质和使用烘焙相机。一旦你有了这个结果,你可以用烘烤的纹理替换 Dirt 节点。这样做还有一个好处,就是加快了你的拍摄速度。
Limit one Dirt node per material and you will get better performance.
- 每个材质限制一个 Dirt 节点,你会得到更好的性能。
USING THE DIRT GENERATOR: SIMPLE AND ADVANCED
使用脏物生成器: 简单和高级
The universal dirt system is one of the more versatile generators that you have in your arsenal. You can use dirt directly as an input in your material shading channels, as a mask blending multiple materials together, as a mask blending textures together, and so on. The list is effectively limitless, enhanced by the upgraded universal dirt system’s ability to modulate dirt with image textures, procedural shaders and the like. That said, you can keep things as simple as you need, or as advanced as you wish. Below we have provided two examples, one simple and one advanced.
通用污垢系统是一个更多才多艺的发电机,你有在你的军火库。你可以直接使用灰尘作为材质阴影通道的输入,作为混合多种材质的蒙版,作为混合纹理的蒙版,等等。这个列表实际上是无限的,通过升级的通用污垢系统的能力来调节污垢与图像纹理,程序着色器等等。也就是说,你可以让事情简单到你需要的程度,或者高级到你想要的程度。下面我们提供了两个例子,一个是简单的,一个是高级的。
SIMPLE 简单
Open the Node editor and prepare the setup as you see in the picture below. Create two different materials and one Octane mix material. Connect two materials into the mix material slots respectively. For the amount channel create a dirt node and change the settings.
打开 Node 编辑器并准备设置,如下图所示。创建两个不同的材料和一个辛烷混合材料。将两种材料分别连接到混合料槽中。对于数量通道,创建一个脏节点并更改设置。
ADVANCED 高级
While more complex than the previous example, if you look carefully at the image, you will see that “Dirt” is used in 2 places. One dirt node is being used as a mask between two textures in the MixText node, and the other dirt node is being used as an input to a gradient node, which is feeding into another MixText node that will ultimately be used to drive the diffuse channel in a material intended to control the reflectivity of the first material. It reads more complicated than what it actually is.
虽然比前面的例子更复杂,但是如果你仔细观察图片,你会发现“ Dirt”在两个地方使用。一个灰尘节点被用作 MixText 节点中两个纹理之间的遮罩,另一个灰尘节点被用作梯度节点的输入,梯度节点被输入到另一个 MixText 节点,该节点最终将用于驱动材质中的漫反射通道,以控制第一个材质的反射率。它读起来比实际情况更复杂。

GETTING MORE INFORMATION
获得更多信息
There are many sources of information available online, and often for free, that will discuss how to use the dirt system in Octane. In some cases, these resources will be referring to the original dirt system, but the same rules still apply. Just know that you now have more features, and the results will look even better than before. That basic principles of use for the first system have not changed.
有许多资料来源的网上,往往是免费的,这将讨论如何使用污垢系统的辛烷值。在某些情况下,这些资源将引用原始的污垢系统,但同样的规则仍然适用。只要知道你现在有了更多的功能,结果看起来会比以前更好。第一个系统使用的基本原则没有改变。

若有收获,就点个赞吧
0 人点赞
