- ACES & OCIO Quick Start
- DISABLE CINEMA 4D COLOR MANAGEMENT
- REQUIRED FILE PACKAGE: CONFIG.OCIO
- SET UP COLOR MANAGEMENT: LIVE VIEWER > SETTINGS > COLOR MANAGEMENT TAB
- LOOK DEV: LIVE VIEWER > CAMERA IMAGER TAB > OCIO
- PREPARING FINAL RENDERS: RENDER SETTINGS > OCTANE RENDERER PANEL > MAIN TAB
- IMAGE TEXTURE INPUTS
- PROOFING ACES OUTPUT
ACES & OCIO Quick Start
This section will quickly get you up to speed to use ACES/OCIO in OctaneRender®.
| ACES/OCIO Quick Start | |
|---|---|
- Disable Cinema 4D color management. |
Edit > Preferences > View option > Display Color Profile |
- Install complete config.ocio file package (all files) |
opencolorio |
- Use Automatic mode to synchronize OCIO settings in Octane |
Live Viewer > Settings > Color Management tab |
- Camera Imager must be set to ACES: sRGB - These settings apply ONLY to Live Viewer - Set Live Viewer Tone Map menu to OCIO - DO NOT USE Force Tone Mapping |
Live Viewer > Camera Imager > OCIO tab |
- Final Render Output set to ACES 2065-1 or ACEScg - Set Buffer Type to HDR (Float 32-bit) - DO NOT USE Force Tone Mapping |
Render Settings > Octane Renderer panel > Main tab |
- Enable Render Passes - Save in either EXR(Octane) or TIFF format |
Render Settings > Octane Renderer panel > Render Passes tab |
The table above contains the information required to get immediately up to speed on the ACES/OCIO implementation in Octane.
DISABLE CINEMA 4D COLOR MANAGEMENT
It is recommended that the Cinema 4D color management be disabled, as it does not presently conform to ACES/OCIO standards. Live Viewer will bypass the Cinema color management system, but Picture Viewer cannot.
REQUIRED FILE PACKAGE: CONFIG.OCIO
Config.ocio is a file package which contains references to a myriad of color lookup tables (LUTs), python configuration code, color spaces and ICC profiles included with a given ACES/OCIO installation. This file can be set up as an environmental variable so that any application on a given computer can access it, or it can be loaded individually into Octane.
The link in the table references the Academy of Motion Picture Arts & Sciences implementation of OCIO, but there are others as well. As noted above, a version of OCIO can be made available to all applications by use of an Environmental Variable, but it is also possible to choose different OCIO configurations, even if one is specified at the system level.
To download the OCIO file package, use the link in the table abpve. It may be necessary to right click and choose “Save As…” from the menu if the link will not download. You will need the contents of the entire archive for the config.ocio file to work properly and offer the various options.
| If you are familiar with creating Environmental Variables, you can set one up for your config.ocio file. This will enable ACES for ALL applications on your system that are ACES and OCIO aware. If you do go this route, the next time you launch Octane the config file will be listed in the Environment config file slot in the Color Management tab of the Octane Settings window in Live Viewer. You also have the option of using a separate config file for Octane, and that is what the Use Other config file slot is meant for. |
|---|
SET UP COLOR MANAGEMENT: LIVE VIEWER > SETTINGS > COLOR MANAGEMENT TAB
The config.ocio file is needed before any other ACES/OCIO operations can be undertaken. As noted, the location of this file can be set as an Environmental Variable. This step is not necessary, and the config.ocio file can be directly loaded into Octane in the Color Management tab. Once the config.ocio file is loaded or referenced, all the ACES/OCIO functions in Octane will be enabled.
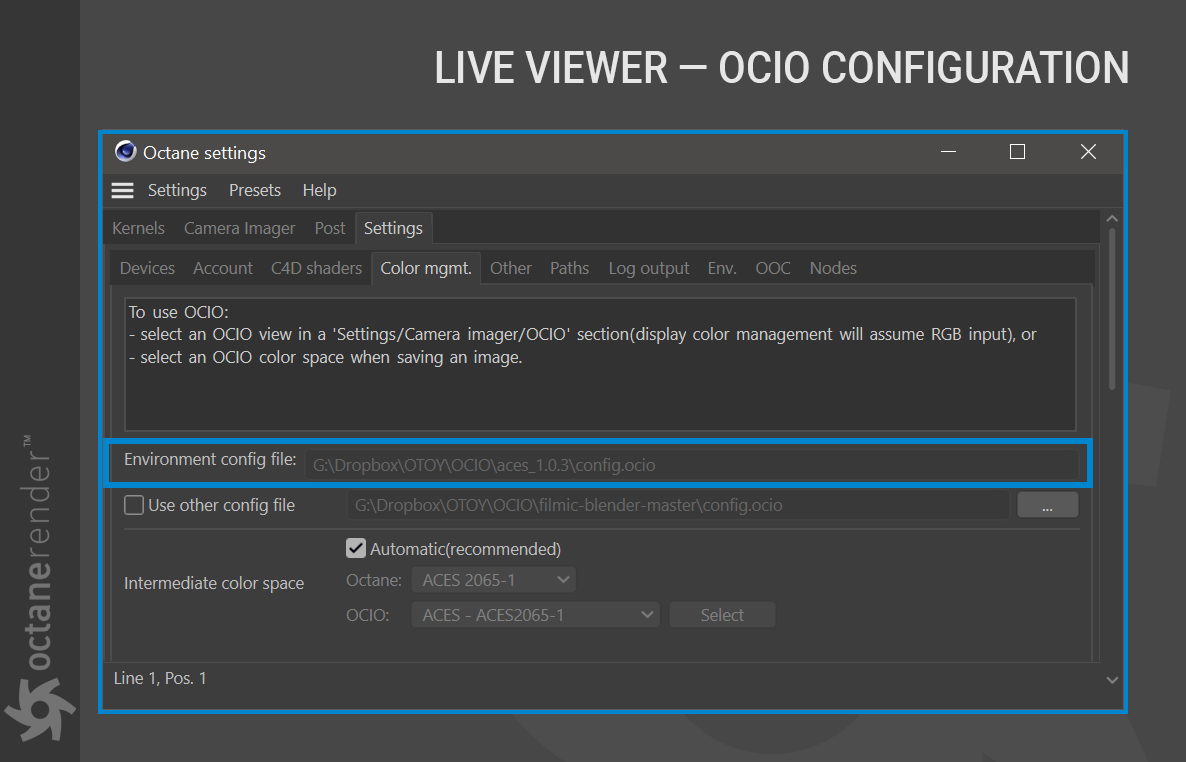
INTERMEDIATE COLOR SPACE
In the Color Management tab, the Automatic toggle will set up the Octane and OCIO intermediate color spaces for you. The Automatic toggle is enabled by default, which guarantees that the Octane and OCIO color spaces are in sync (as they must be for ACES/OCIO to work properly). To choose alternative intermediate color management, disable the Automatic switch, and additional choices will then become available. If you change these two settings, you must ensure they match each other. Some config.ocio files have a broader selection than others. The config.ocio file referenced in this topic offers only the ACES 2065-1 choice for Octane; therefore, the only option to use for OCIO is also ACES 2065-1.
VIEW AND LOOK MENUS
All the View and Look menus conform to the category assignments contained within the config.ocio file package. These options will differ depending upon the config.ocio file version you have installed (there are several). Otoy’s baseline is the ACES 1.0.3 version, though Octane will soon be using the ACES 2.0.0 version as a baseline once standards group releases the final version. You may not see any Looks available in the Looks menu as the ACES 1.0.3 config file does not have any Looks defined. Other versions do have looks defined and these looks will appear in the Looks menu.
LOOK DEV: LIVE VIEWER > CAMERA IMAGER TAB > OCIO
Live Viewer is used for look and material development. In the Camera Imager tab of the Live View settings, you are setting up the View Display Transform for the Live Viewer only. There is a duplicate of these settings in the Octane Renderer > Main tab for final renders. The Camera Imager tab sets up Live Viewer for look development by the ACES: sRGB view option. This option properly converts an ACES 2065-1 or ACEScg image for viewing on an sRGB monitor.
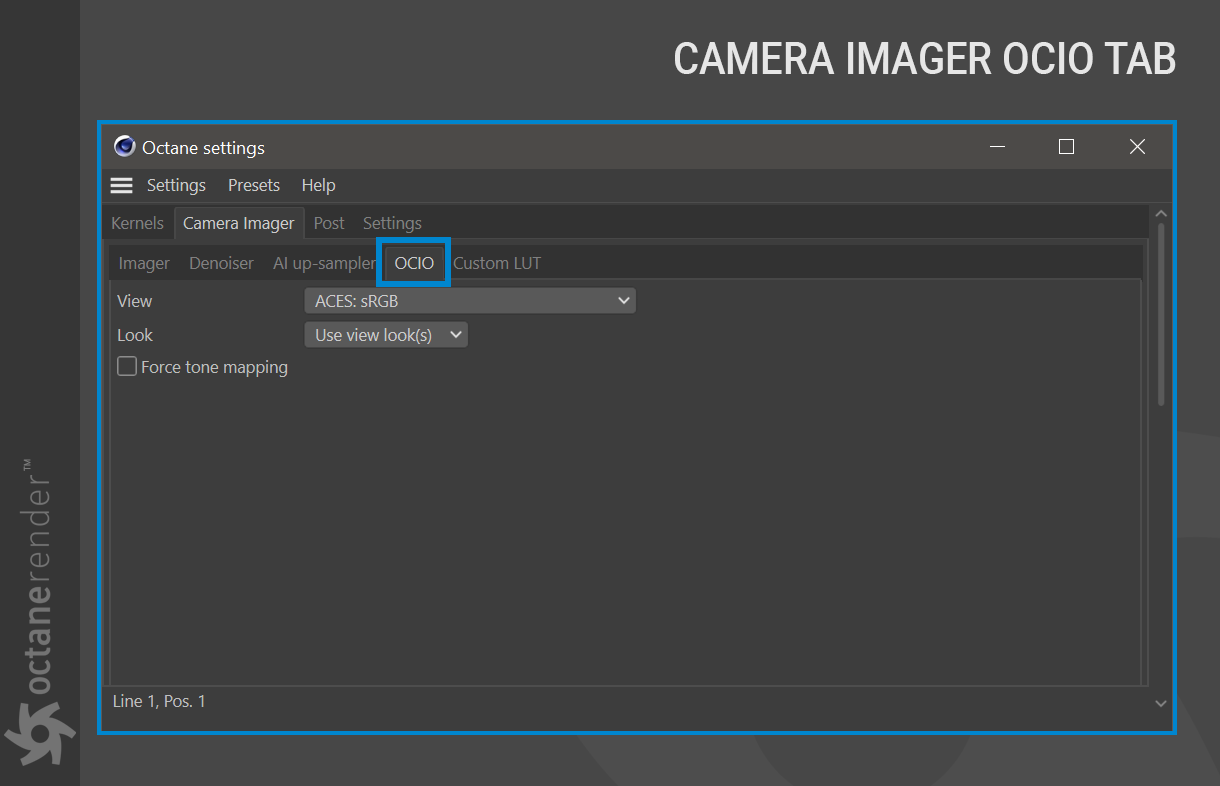
The Look menu will have options only if the config.ocio file has looks defined. The ACES 1.0.3 config.ocio package does not contain any defined looks. If that is the config installed, this menu will be empty.
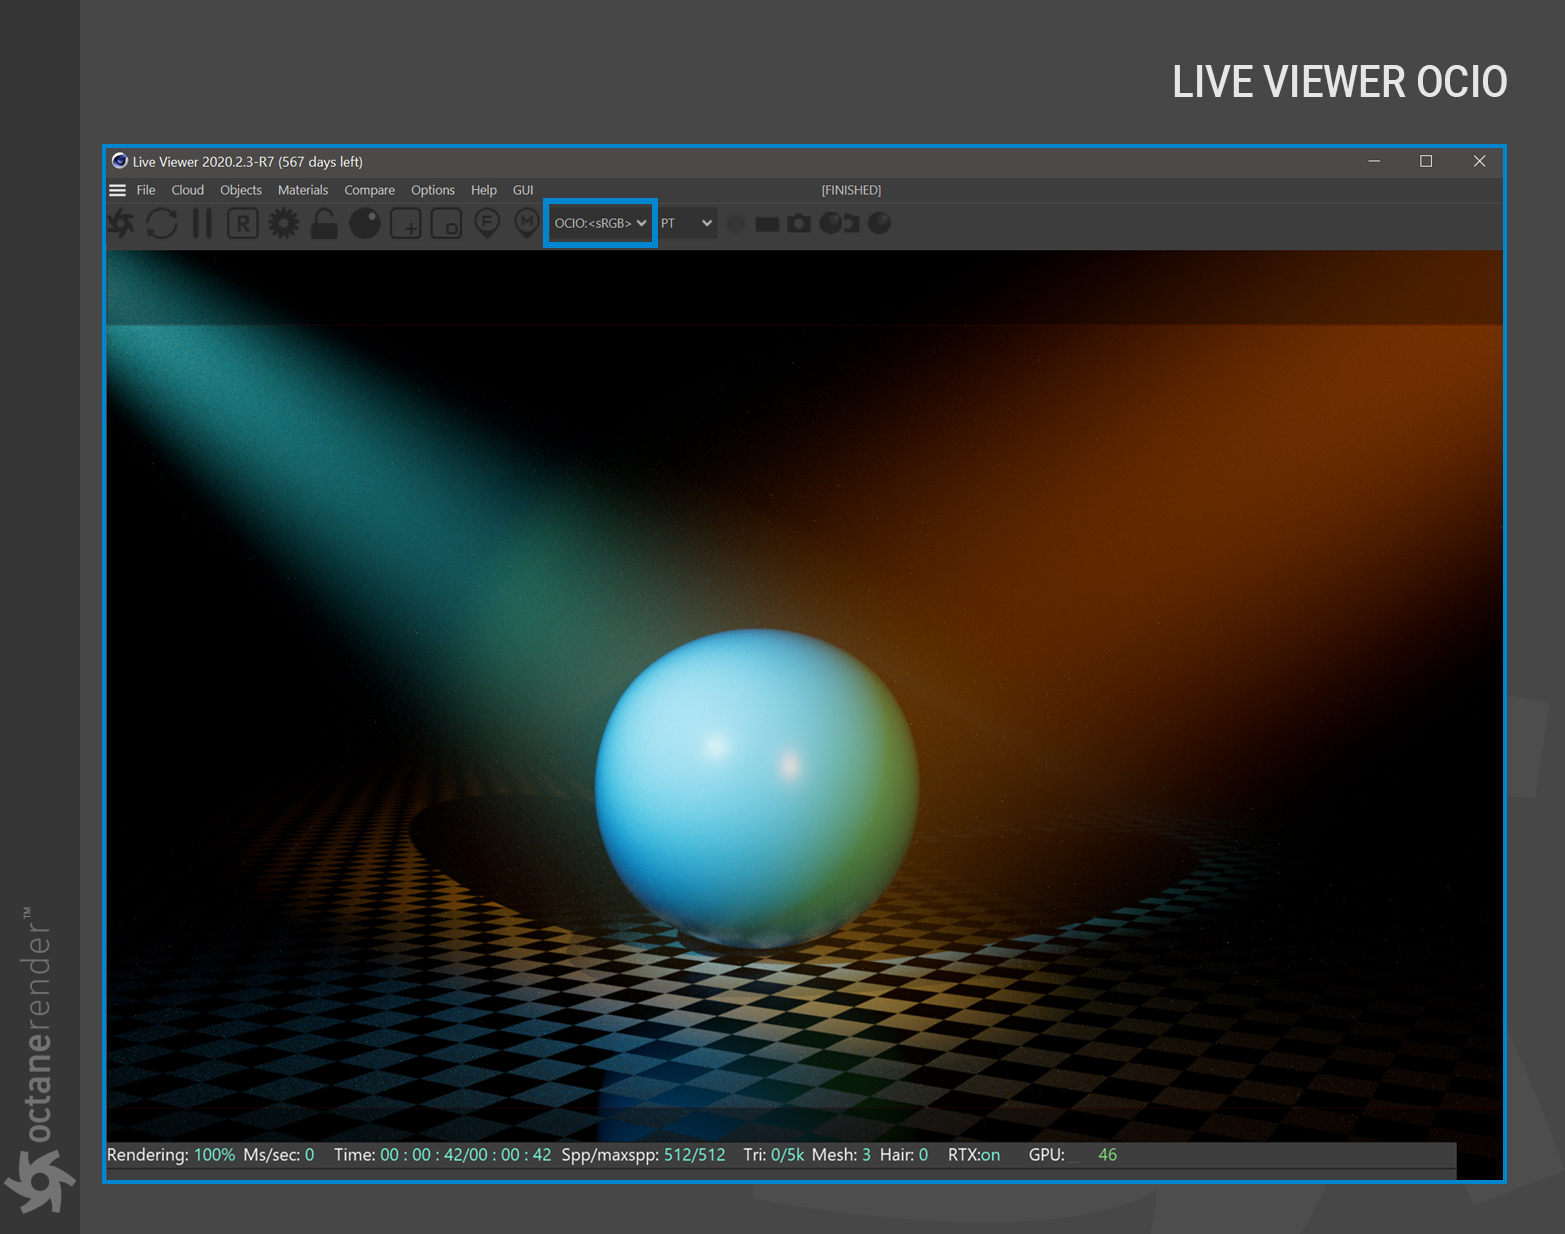
USING LIVE VIEWER FOR LOOK DEV
As ACES/OCIO is now installed, Live Viewer can now be used for accurate look and material development, once the Colorspace Switcher is set to OCIO. OCIO is the only option in the switcher which will insure accurate and consistent look development. The other options serve different purposes, such as LDR sRGB for viewing Cryptomatte and Z depth output. See Exploring the Live Viewer for more information.
PREPARING FINAL RENDERS: RENDER SETTINGS > OCTANE RENDERER PANEL > MAIN TAB
For Final render output, again in the Main tab of the Octane Renderer settings, make sure the Buffer type is set to HDR (Float 32-bit) and the Color space is set to either ACES2065-1 or ACEScg. ACES 2065-1 is the full range color space, appropriate for Octane as it is a spectral renderer, whereas ACEScg is intended for RGB render engines, and is a reduced color space. Either will work, and most compositing applications can handle the ACES 2065-1 spec.
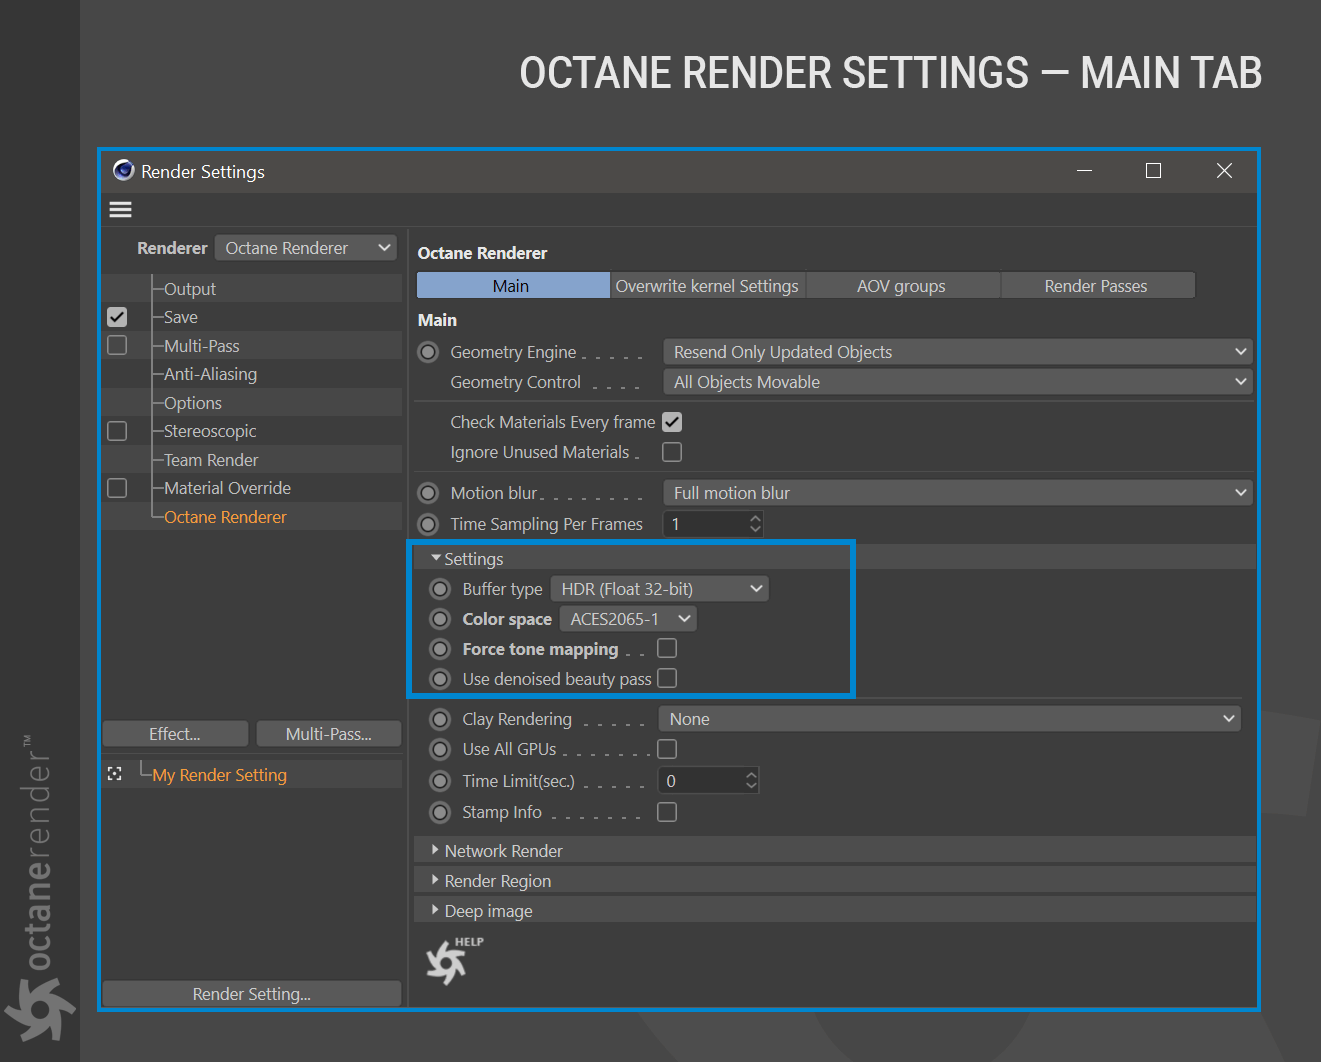
IMAGE TEXTURE INPUTS
Octane is a spectral renderer, and, as such operates internally in a color precision greater than either ACES or RGB renderers. Octane assumes that all incoming textures are using the sRGB color space (linear or non-linear assumptions are determined from the format and the settings in the Image Texture node). Octane will convert sRGB textures into spectral wide gamut color space for rendering; as such, ACES transforms are not required. There is no need to convert texture maps into an “ACES-compatible format” externally — Octane will maintain fidelity to the original, using the settings specified in the Image Texture node. Do not use pre-converted ACEScg images as textures. Doing so will result in incorrect colors for those textures. The Cinema 4D bitmap node should not be used.
PROOFING ACES OUTPUT
The Cinema 4D Picture Viewer cannot show an accurate OCIO or ACES presentation. Octane will render and write files correctly, but the image seen in the Picture Viewer will not match the Live Viewer image. Applications such as Affinity Photo can be used for proofing.
Adobe Photoshop cannot show the proper ACES/OCIO renders without a third-party plugin, link supplied in the table, below. Affinity Photo can be used as a proof system as it is ACES/OCIO compliant. Adobe After Effects, Nuke, etc. will all need plugins to properly deal with ACES/OCIO. Please refer to the documentation for those products for workflow information.
| Useful Information | |
|---|---|
- Image Texture node inputs are assumed to be sRGB at gamma 2.2, unless otherwise specified. - Normal maps are processed at gamma 1.0. |
Ensure the gamma and type values are correctly set in the Image Texture, otherwise the default values will be used. |
- DO NOT USE the Cinema 4D bitmap node for input images. |
|
|
- Adobe Photoshop cannot correctly show ACES/OCIO output without a plugin.
| https://www.exr-io.com |
|
- DO NOT SAVE with Cinema 4D’s save function
| Render Settings > Save panel |
|
- Picture Viewer cannot display an accurate ACES/OCIO result, due to Cinema 4D’s lack of support for ACES/OCIO.
|
|

若有收获,就点个赞吧
0 人点赞
