Image Tiles (UDIMs)
The Image Tiles node allows you to define UDIM-like offsets in OctaneRender. Also known as U-Dimension, the primary reason for UDIMs is image texture resolution, where you can have specific grids with close ups of specific parts of an object, such as an eye or engine in the same overall UV and texture set. By creating multiple UDIMs tiles in the grid, you can specifically tailor image maps to a needed use. The Image Tiles node will reference UDIMs as a sequentially numbered image sequence, making working with said maps in applications like Nuke or After Effects a very simple process, since these maps are treated like typical rendered frames in these applications.
Image Tiles 节点允许您在 OctaneRender 中定义类似 udim- 的偏移量。也被称为 U-Dimension,UDIMs 的主要原因是图像纹理分辨率,你可以有特定的网格与特定部分的特写镜头的对象,如眼睛或引擎在相同的整体 UV 和纹理设置。通过在网格中创建多个 UDIMs 贴图,可以专门定制所需用途的图像映射。将引用 UDIMs 作为顺序编号的图像序列,使得在 Nuke 或 After Effects 这样的应用程序中处理上述地图成为一个非常简单的过程,因为这些地图在这些应用程序中被视为典型的渲染帧。
Cinema 4D does not currently support UDIMs directly, so the Image Tiles node offers a great way to work around this restriction. It helps to follow a few simple rules:
Cinema 4D 目前不直接支持 UDIMs,所以 Image Tiles 节点提供了一个很好的方法来解决这个限制。以下是一些简单的规则:
- The Image Tile grid is arranged per U and V directions, just as UDIMs are arranged.
图像平铺网格按照 u 和 v 方向排列,就像 UDIMs 排列一样。
UDIMs have a limit of 10 grids in the U axis, though Image Tiles does not have that restriction.
UDIMs 在 u 轴上有10个网格的限制,尽管 Image Tiles 没有这个限制。
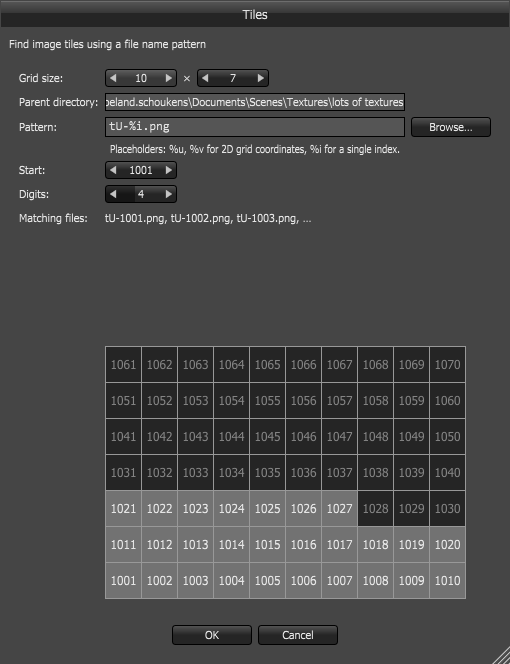
Naming conventions must be adhered to. The following illustration shows how the grid is arranged numerically:
- 必须遵守命名约定。下图显示网格是如何按数字排列的:
To use the Image Tiles node, go to the Octane Node Editor **(Live Viewer > Materials > Node Editor)** and choose Image Tiles from the Texture items in the left menu bar. Then do the following:
要使用 Image Tiles 节点,请转到 Octane Node Editor (Live Viewer > Materials > Node Editor)并从左侧菜单栏的纹理项中选择 Image Tiles。然后做以下事情:
- Select first image of the UDIM image series from the file dialog of the Image Tiles node.
从 Image Tiles 节点的文件对话框中选择 UDIM 图像系列的第一个图像。
Adjust ‘Grid size’ for width and height — the UDIM specification is designed for a maximum of 10 UV grids on the U axis; additional grids move up. There is no limit on V grids. Therefore, if you have more than 10 UDIM grids or Image Tiles, make sure that your images are named appropriately (see below).
根据宽度和高度调整“网格大小”ー UDIM 规格是为 u 轴上最多10个紫外线网格设计的; 其他网格向上移动。对 v 型网格没有限制。因此,如果您有超过10个 UDIM 网格或图像块,请确保您的图像命名正确(见下文)。
Press the button ‘Setup the Image Tiles’. This will check images and give you a proper pattern(syntax) to find rest of images. It can modify the ‘start’ and ‘digits’ parameter if it’s necessary.
按下“设置图像块”按钮。这将检查图像,并提供适当的模式(语法)来查找其余的图像。如果有必要,它可以修改‘ start’和‘ digits’参数。
Check resulting file names in ‘Files’ text list and see the texture in your model.
- 在“文件”文本列表中检查生成的文件名,并查看模型中的纹理。
| IMPORTANT重要事项 | |
|---|---|
| The Setup Image Tiles button will work properly only with UDIM images that are properly named. It will always set the start value to 1001. “设置图像块”按钮只适用于正确命名的 UDIM 图像。它总是将开始值设置为1001。 |
Make sure to manually set the Start value after using to the desired beginning UDIM value. 在使用所需的起始 UDIM 值之后,请确保手动设置 Start 值。 |
Two different naming syntaxes are possible:
两种不同的命名语法是可能的:
1- name%u%v.ext (U is the row and V is the column number — they can start from 1. U 是行,v 是列号ーー它们可以从1开始。)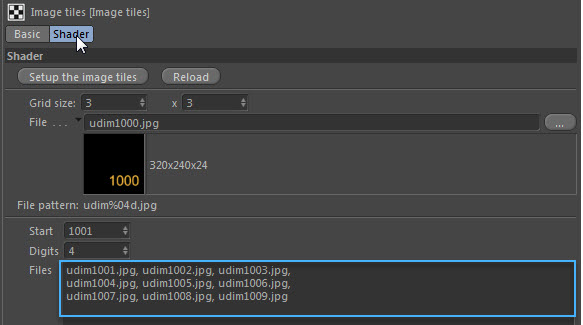
or
2- name_%i.ext (i is an index of images and should start at 1001.) Note that file naming is depending to row size and not restricted to 10 UDIM images per row.
I 是图像的索引,应该从1001开始。)请注意,文件命名取决于行大小,而不限于每行10个 UDIM 图像。
BASIC IMAGE TILE EXAMPLE
基本图像块示例
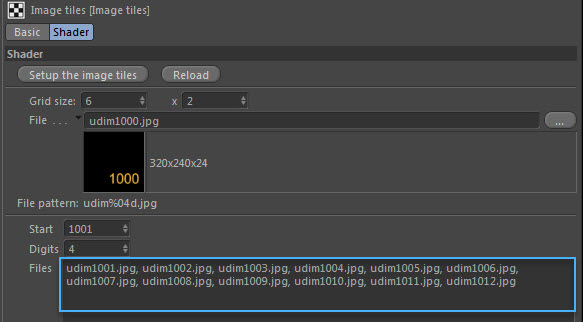
The actual UVs in the grid layout can be placed as in a few different ways, as long as they are referenced in a sequence. In the example below, the upper rectangle UVs were arranged as a 6x1 grid. The lower rectangle UVs were arranged as a 3x2 grid. The end result is identical. In each rectangle, the colored portion represents a missing UDIM image. Only five images were supplied, leaving the sixth spot empty. The color is determined by the Empty Tiles color.
网格布局中的实际 uv 可以以几种不同的方式放置,只要它们按顺序引用。在下面的例子中,上面的矩形 uv 被排列成一个6x1的网格。下方的矩形 uv 被排列成3x2的网格。最终的结果是相同的。在每个矩形中,有色部分表示缺少的 UDIM 图像。只提供了五张图片,第六张空白。颜色是由空瓦片颜色决定的。

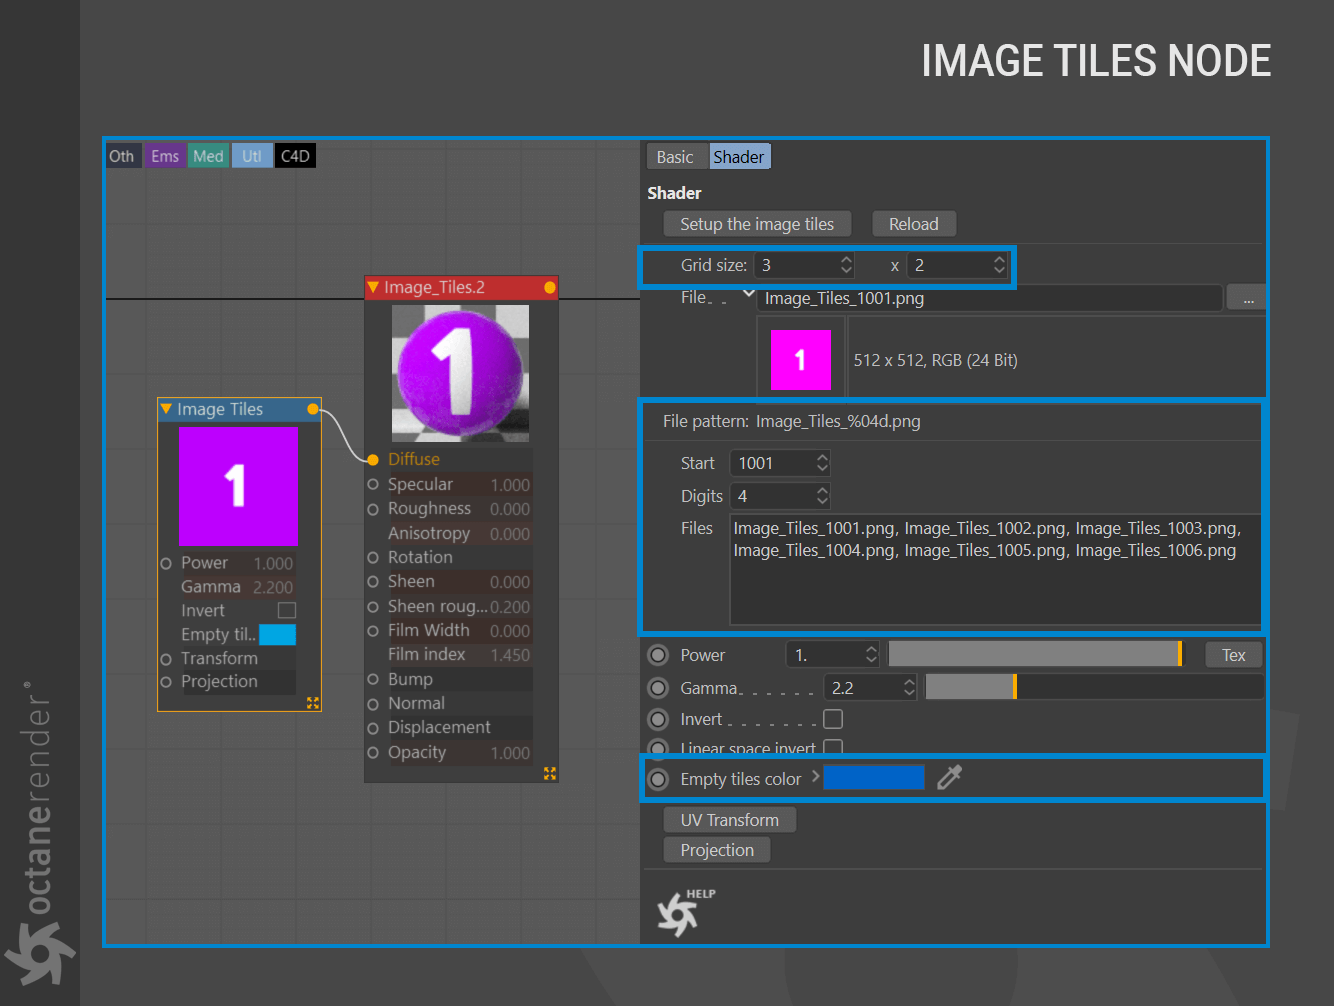
The image below illustrates the Image Tiles node as seen in the OctaneRender® node editor. You can set the grid size (the image above used these particular settings) as well as set the Empty tiles color The files to be used by the Image Tiles node are presented in the Files list. In cases where the Start UDIM number is something other than 1001, the files in the Files list may not conform, but the Image Tiles will properly render from the Start UDIM specified.
下面的图片演示了在 OctaneRender 节点编辑器中看到的 Image Tiles 节点。您可以设置网格大小(上面的图像使用了这些特定的设置) ,以及设置空白的瓷砖颜色。如果 Start UDIM 数字不是1001,那么文件列表中的文件可能不符合,但是图像块将正确地从指定的 Start UDIM 渲染。

若有收获,就点个赞吧
0 人点赞
