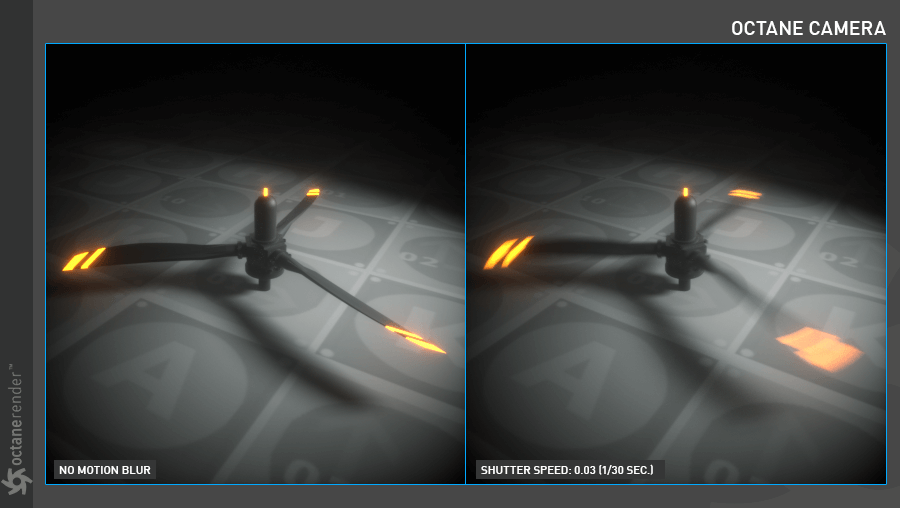
Motion Blur
Motion blur in OctaneRender® is both fast and photo-realistic, as Octane correctly mimics the way that light is captured through a lens and shutter system. To get an accurate blur, adjust the shutter value relative to the frames per second value of your scene. It is also possible to mess with reality and get a “slit-scan” effect, alá “2001: A Space Odyssey” by using longer shutter duration times.
Octane has two different motion blur options: Camera and Object Motion blur. You will see the camera motion blur when the camera is moving. Object motion blur is used when the object is animated. You can control the camera motion blur from the Octane Camera Tag and the Object motion blur from the Octane Object Tag. Detailed explanations for both will be found in this section.
| IMPORTANT NOTE
Motion blur requires use of the Octane Object tag for all objects or object parents in a hierarchy. It may be tempting to disable the motion blur option in the Octane Object tag, or to omit an Octane Object tag from a hierarchy. If motion blur is enabled, the tags are required. Omitted tags or disabled motion blur can result in odd blur artefacts; in some cases, objects that are intended to not have blur will be incorrectly motion blurred.
| | —- |
A common example of this involves locking an object to camera, so that the motion of the object relative to the camera is effectively zero. Without Octane Object tags on all the appropriate objects or object hierarchies, the object intended to appear locked to the camera will instead exhibit odd streaks. This is due to the fact that, with motion blur disabled or no Octane Object tag referenced, this object will be completely omitted from the motion calculation, resulting in an ambiguity. This is not a bug, but just how the system works. When in doubt, apply the tag and enable the blur.
CAMERA MOTION BLUR
Camera motion blur is the type of motion blur recorded when the camera in the scene is in motion. It is processed separately from object motion and can be disabled for special cases. Octane will create motion blur to match that of a physical camera and lens, which results from a combination of shutter speed, shutter angle and exposure time. The shutters on photographic and higher end motion cameras are either physically mechanical or “global,” meaning that they can capture a complete frame in the same instant, while many (typically less expensive) digital cameras use an electronic shutter (rolling shutter), which can skew elements in a frame that would otherwise be vertical. A simple example of a shutter is a round disc with a slot removed from a portion of it. This open portion allows light to hit the film or sensor and expose the image. This process creates a recognizable effect of how objects in motion are recorded in the image.

ABOUT SHUTTER SPEEDS
The definition of “Shutter Speed”: “In photography, shutter speed** or exposure time** is the length of time when the film or digital sensor inside the camera is exposed to light, also when a camera‘s shutter)is open when taking a photograph. The amount of light that reaches the filmor image sensoris proportional to the exposure time” (Source: Wikipedia).
Shutter speed determines the amount of time the shutter is open, thus exposing light to the film or sensor, which captures the image. The quality of moving images is dependent on shutter speed. The shutter speed can also determine the sharpness of the image which is also affects the amount of light reaching the camera sensor. If shutter speed is slow, a blurred image occurs.
Shutter speed values are expressed in proportions such as 16, 8, 4, 1, 1/4, 1/8, 1/16. As the number increases, your exposure increases. As the number decreases, you will have shorter exposure (like 1/15 or 1/500 of a second). “1/500” means the shutter opens and closes 500 times in a second.
For a good explanation of shutters, see this video.

MOTION BLUR SETTINGS
ENABLE
Used to turn Motion Blur on and off.
SHUTTER (SEC.)
Adjusts the amount of motion blur amount in rendered frame. To enter the real-world shutter values, determine the desired shutter speed with this calculation, as follows. For 30 frames per second, divide 1 into 30; the result is 1/30 = 0.03, and this is the value to enter into the Shutter field.

TIME SHIFT (SEC.)
Used to shift the calculation frame of the motion blur.
M.BLUR CACHES (FRAMES)
This feature determines how many frames will be cached when moving back and forth in Live Viewer. Live Viewer only knows the data in existing frames. You can store the motion data in Live Viewer by entering the number of frames to be cached in this field.
SHUTTER ALIGNMENT
Shutter alignment has three options: Before, Centered, After. In general, it specifies how the motion blur effect is calculated relative to the previous or next frames. For example, if there is a motion blur of 10 frames and you are at 20th frame; Before: Produces blur according to frames between 10-20, Center 15-25 and After 20-30.
DISABLE CAMERA M.BLUR
You can activate this feature if you want to see only the motion blur of the objects, but not the motion blur effect of the camera.
OBJECT MOTION BLUR
This option is used to apply motion blur only to objects in motion with Octane Object tags with the Motion Blur option enabled. Objects without an Octane Object tag with motion blur enabled will not be motion blurred properly and may appear incorrect.
**

OBJECT MOTION BLUR
There are four options: Disabled, Transform, Transform / Vertex, and Vertex Speed:
DISABLED
Disables motion blur for the object.
TRANSFORM
Enables motion blur to the Position, Scale and Rotation transformations of the object.
TRANSFORM/VERTEX
Motion blur is calculated for both the transform and vertex movements of the object (such as character rig deformations, hair, etc.)
VERTEX SPEED
This option calculates the correct motion blur for volumetric and fluid flow simulations. Three separate vertex maps (one for each X, Y and Z axis) are required.
MOTION BLUR WITH RENDER INSTANCES
When using a Render Instance, it is best to create the instance from the original, and animated the Instance only; place the original (with no animation) in a null object and move somewhere off-screen for the duration of the shot. To render properly, the object and parent null MUST be enabled, otherwise the Render Instance will not be visible at render time.
When using Render Instances in a Cloner, follow the same procedure, but supply the Cloner with the Render Instance instead of the original geometry. The Cloner will need to be set to Instance instead of Render Instance, as the supplied Render Instance is already an instance.
REALFLOW EXAMPLE
In the Tutorial we will add motion blur to the liquid (for example milk) poured onto a chocolate bar. We will keep the simulation fairly simple because entering the endless simulation details is beyond the scope of this tutorial. For fluid simulation we will use Next Limit’s Real Flow for Cinema 4D V2.5 plugin. In this case, make sure you have installed the Realflow Plugin before opening the scene. You can buy plugin from here.Download the scene from here
1-Open the scene. The camera angle and everything else is already set up. Go to Reaflow from the Cinema 4D menus and select “Scene”. Once selected, the Realflow system will appear in the object manager.

2- Now create an “Emitter” and a “Fluid” object. For Emitter go to the RealFlow menu and select “Circle” from “Emitters”. For Fluid object, select “Fluid” from the menu. Drag and drop the Emitter and Fluid objects into the relevant sections of the RealFlow system and make settings for both objects as shown in the image below.

3- Go to the Coord. Tab for the position of the emitter. Enter the following values: “P.X: 0 / P.Y: 308.896 / P.Z: 0” and “RB: -51.288”. Once you have entered the values, the Emitter position should look like the picture below. If not, you can manually place it directly above the chocolate bar. We will use this angle to emit the particles.

4- The chocolate bar needs to be set up. Right-click while selecting the object in Object manager and select the Realflow Tags / Collider from the menu. With this tag, the particles falling on the chocolate will interact with the object.

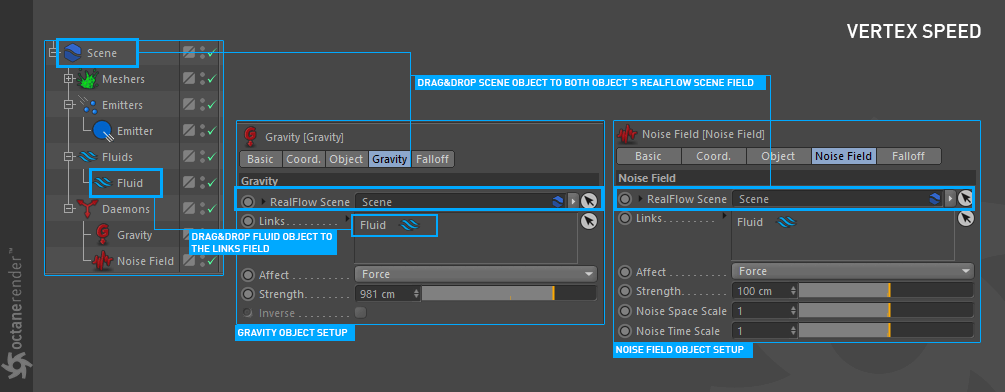
5- Add two daemon objects for the liquid spill action. Go to the menu and select “Gravity” and “Noise Field” from the Daemon Section. Leave the Setups as default. If these two objects are not automatically linked, drag and drop the related objects into the fields you see in the image below.
6- Press the play button to test the simulation. The particles that spill from the top quickly spread and interact with the chocolate bar. These particles are used to generate the render mesh. Go back to the RealFlow menu and choose “Mesher” this time. Make the settings as seen in the image below.

7-Time to set up the motion blur. To do this, right click on the “Mesher” object and select “C4Doctane Tags / Octane Object Tag” from the pop-up menu. From Tag options, go to the motion blur tab and select the Vertex Speed. Three separate tags are required for vertex speed. These tags are automatically created during Mesher object creation in Realflow. Drag and drop these tags into the vertex speed slots in the motion blur section.

8- You should get a result similar to the following image.This process will be the same for any imported simulation with motion export set, including Embergen, Houdini or X-Particles.


若有收获,就点个赞吧
0 人点赞
