Instance Range
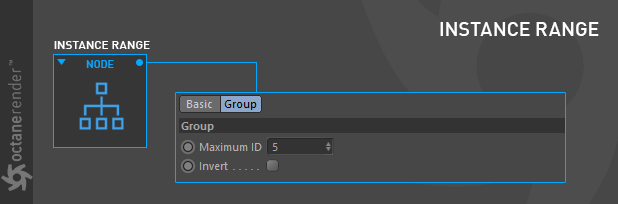
The Instance Range texture is used to hold a grayscale color with the range 0 – Maximum ID and prepares this range to be mapped to geometric instance IDs.
Instance Range 纹理用于保存范围为0-Maximum ID 的灰度颜色,并准备将该范围映射到几何实例 ID。
HOW TO USE
如何使用
Instance Range has a few uses, and these uses are described in the following mini tutorials. You can download all the scenes described in the tutorial from this link
Instance Range 有一些用途,这些用途将在下面的迷你教程中描述。您可以从这个链接下载教程中描述的所有场景**
INSTANCE RANGE SET BY OCTANE OBJECT TAG
辛烷对象标记设置的实例范围
In this example we will describe how Instance Range is made from an Octane Object Tag.
在这个例子中,我们将描述如何从辛烷对象标记实例范围。
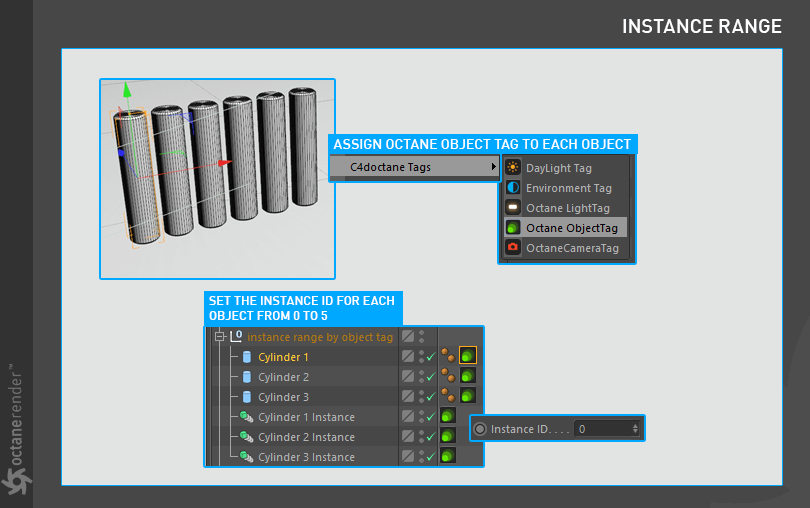
1- First create a cylinder object, setup its properties and create two copies of that Cylinder. After finishing the cylinder setups, create an Instance for each cylinder. Click the “Render Instance” setting in the Instance settings. Then make all objects into a group. As you can see in the picture, there will be 6 different objects in total.
1-首先创建一个柱面对象,设置其属性并创建该柱面的两个副本。圆柱体设置完成后,为每个圆柱体创建一个实例。单击“呈现实例”设置中的“呈现实例”设置。然后将所有对象分成一组。正如你在图片中看到的,总共有6个不同的物体。

2- Now we will set the Instance ID for each cylinder. To do this, right-click the “C4D Octane Tags” menu while selecting Objects and select “Octane Object Tag”. Then go to “Object layer” in Object Tag and define 0 to 5 Instance ID for each cylinder.
2-现在我们将为每个柱面设置 Instance ID。要做到这一点,右键单击“ C4D 辛烷标签”菜单,同时选择对象和选择“辛烷对象标签”。然后转到 Object Tag 中的“ Object layer”,为每个柱面定义0到5个实例 ID。
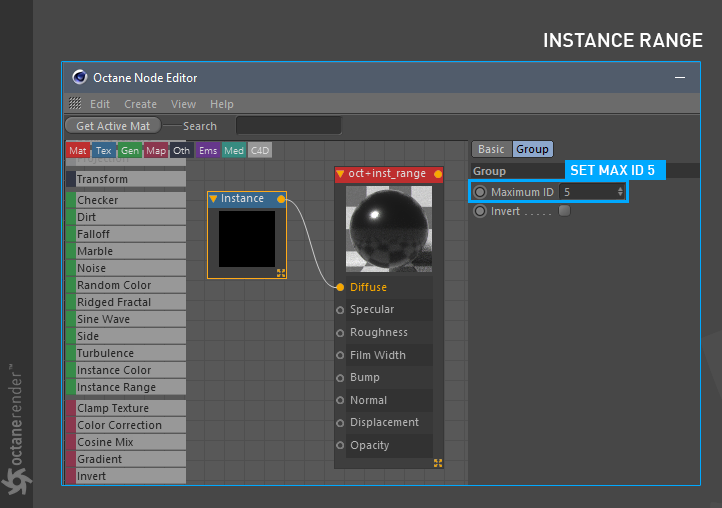
3- Next is the Material and Instance Range Setup. Use the material creation setups from previous tutorials, but this time you will use the “Instance Range” Node. When this Node is selected, enter the number 5 in the “Maximum ID” field in the options on the right side and assign the material to the cylinder group.
3-下一步是材质和实例范围设置。使用以前教程中的材质创建设置,但是这次你将使用“实例范围”节点。当这个节点被选中时,在右边的选项中的“最大 ID”字段中输入数字5,并将材料分配给圆柱体组。
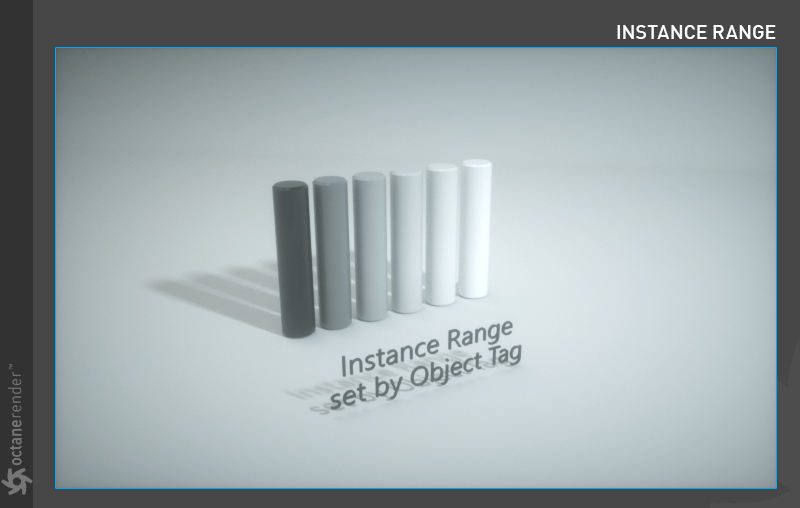
4- You should get a result similar to the following picture. As you can see, we defined the Instance ID for each cylinder object and created the Instance Range for a total of 6 objects from the material setup.
4-你应该得到一个类似于下图的结果。正如您可以看到的,我们为每个柱面对象定义了 Instance ID,并从材质设置中为总共6个对象创建了 Instance Range。
INSTANCE RANGE SET BY GRADIENT
按梯度设置的实例范围
In this example we will describe how Instance Range is made from a gradient.
在这个例子中,我们将描述实例范围是如何从一个渐变形成的。
1- First create a cylinder object, set its properties, and assign it to the Cloner. Also make the Cloner setup as shown in the picture below.
1-首先创建一个柱面对象,设置其属性,并将其分配给 Cloner。也使克隆纳设置如下图所示。
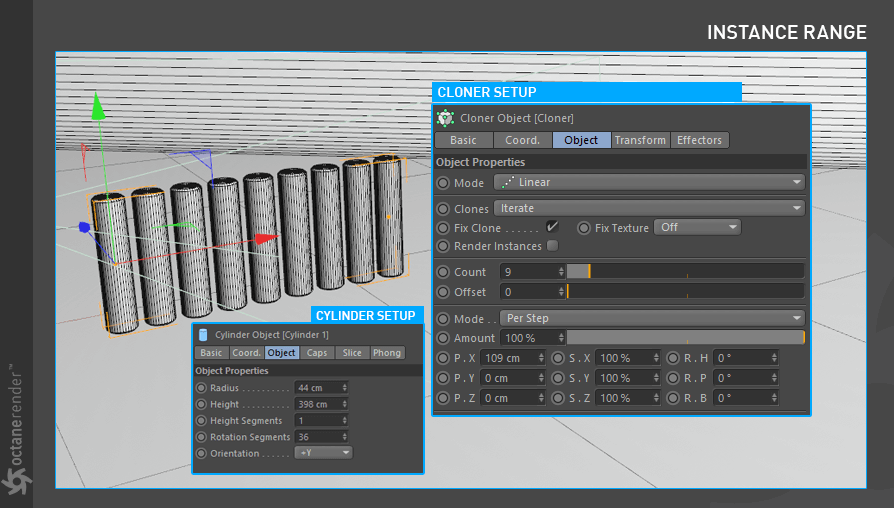
2- Create three more cylinders and position them slightly ahead of the Cloner cylinders. Then assign the “Octane Object Tag” these 3 cylinders separately. Select tags and go to the “Object layer” section of the Object Tag settings and change the Instance ID of each cylinder as you see in the picture below.
2-创建三个以上的气缸和位置他们略高于克隆人气缸。然后分配“辛烷对象标签”这3个气缸分别。选择标记并进入 Object Tag 设置的“ Object layer”部分,更改每个柱面的 Instance ID,如下图所示。

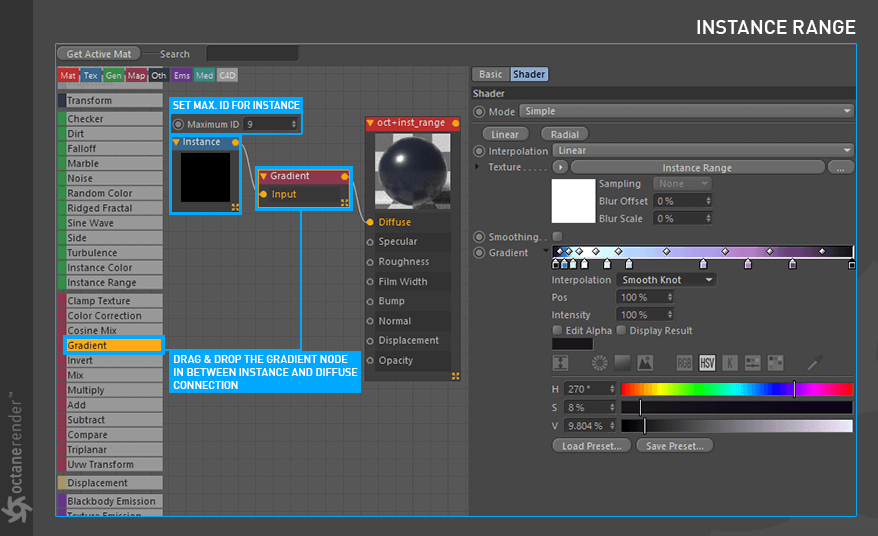
3- Next is the Material and Instance Range Setup. Use the material creation setups from previous tutorials. This time you will use the “Gradient” Node. Just Drag the Gradient Node from the Left menu and drop it between the “Instance Node” and “Diffuse Material”. The node automatically places itself between them. Set the Instance Node Maximum ID to 9 (because we have 9 Cylinder objects). Make the Gradient Setup as you see in the image below or use your own gradient colors. You can select any gradient template from the “Load Presets” button.
3-下一步是材质和实例范围设置。使用之前教程中的材质创建设置。这次您将使用“渐变”节点。只需从左侧菜单中拖动渐变节点,并将其放置在“实例节点”和“漫反射材质”之间。节点自动将自身置于它们之间。将 Instance Node Maximum ID 设置为9(因为我们有9个柱面对象)。使用渐变设置,如下图所示,或者使用自己的渐变颜色。您可以选择任何梯度模板从“加载预设”按钮。
4- Assign the material you created to the Cloner Object as well as the other 3 Cylinders. If you have done everything right, you will get a result similar to the following image. As you can see, we colored our Cylinder objects using Instance Range and Gradient. Also, if you specify an object ID in the range 0 to 9, the color in the gradient will be the corresponding color of that ID.
4-将你创建的材质分配给 Cloner 对象以及其他3个柱面。如果你所有的事情都做对了,你会得到一个类似于下面的图片的结果。正如你所看到的,我们使用实例范围和渐变为柱面对象着色。此外,如果指定范围为0到9的对象 ID,渐变中的颜色将是该 ID 的对应颜色。


若有收获,就点个赞吧
0 人点赞
