Vertex Map
The Vertex Map node is for using vertex maps to create texture effects or using restriction for deformation objects. Since this topic is a broad subject, we will explain a few examples of use. To use this node, you need to understand the Cinema 4D vertex map feature. For this, you can look at the online tutorials or Cinema 4D’s help file. You can also go to this link for Maxon online help.
“顶点映射”节点用于使用顶点映射创建纹理效果或对变形对象使用限制。由于这个主题是一个广泛的主题,我们将解释一些使用的例子。要使用这个节点,您需要了解影院4d 顶点映射功能。为此,你可以查看在线教程或 Cinema 4 d 的帮助文件。你也可以访问这个链接获得 Maxon 在线帮助。
HOW TO USE
如何使用
Below you will see a few examples of using Vertex Map with Octane. You can download and examine all the scenes from here
下面你将看到一些使用顶点图与辛烷的例子。你可以从这里下载并检查所有的场景
SIMPLE USAGE FOR TEXTURING
贴图的简单用法
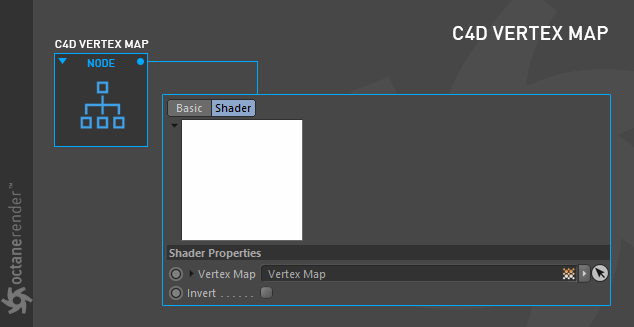
Open the Node Editor and prepare the setup as seen in the image below. Here, a vertex map has been prepared for portions of the Torus object, and the associated vertex tag appears in the Object Manager. This tag is then assigned to the Vertex Map node in the Node Editor.
打开节点编辑器,准备设置,如下图所示。这里,为 Torus 对象的部分准备了一个顶点映射,相关的顶点标记出现在对象管理器中。然后,将该标记分配给节点编辑器中的 Vertex Map 节点。

VERTEX MAP ON OCTANE SCATTER WITH RANDOM EFFECTOR
带随机效应器的汽油辛烷值散布顶点映射
**
1- Create a “Torus” object and change the options as shown in the image below.
1-创建一个“ Torus”对象,并改变如下图所示的选项。

2- Then create a “Cube” object and change the options as shown in the image below.
2-然后创建一个“立方体”对象,并改变选项,如下图所示。

3- Create a vertex map for the Torus object as in the image below. A Vertex tag will appear next to the Torus object in the Object Manager. We will use this tag in Octane Scatter Object.
3-创建一个顶点映射为环面对象,如下图所示。在对象管理器中,一个顶点标记将出现在环面对象的旁边。我们将使用此标签在辛烷散布对象。

4- Create a “Scatter Object” from the Octane Live Viewer menu. Create a Cube and make the Cube object a child of the scatter object. Then select Scatter Object and change the settings as you see in the image below. Drag and drop the torus object into the surface slot of the Octane Scatter object. Drag and drop the Vertex tag into the “Vertex Map” area.
4-创建一个“散布对象”从辛烷生活查看器菜单。创建一个多维数据集,并使多维数据集对象成为散布对象的子对象。然后选择分散对象并更改设置,如下图所示。拖放环面物体到辛烷散布物体的表面槽。将 Vertex 标签拖放到“ Vertex Map”区域中。

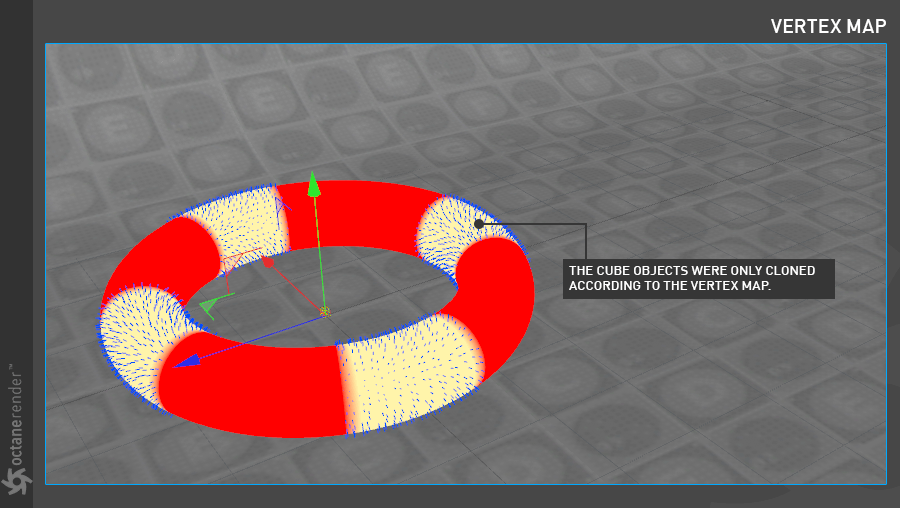
5- You can see in the image below the Vertex Map tag that you have defined, with the clones distributed across the surface of the Torus according to the vertex map. The Scatter object will clone the cube objects in the yellow regions. In this image, the clones are drawn as lines to conserve resources and improve interactive performance.
5-你可以看到在图像下面的顶点映射标签,你已经定义,与克隆分布在表面的环面根据顶点映射。散布对象将克隆黄色区域中的立方体对象。在这个图像中,克隆被绘制成线条,以节省资源并提高交互性能。
6- Use the “Random Effector” to generate some variation to the clones. Create a Random Effector from the Cinema 4D Mograph menu and drag and drop this effector into the “Effectors” section of the Octane Scatter object. This section allows you to define any Effector on the Scatter object. Change the settings you see in the picture below for the Random Effector.
6-使用“随机效应器”产生一些变异的克隆。从 Cinema 4D Mograph 菜单中创建一个随机效应器,然后拖放这个效应器到 Octane Scatter 对象的“效应器”部分。这个部分允许你在驱散物体上定义任何效应器。更改您在下面图片中看到的随机效应器的设置。

7- Create and assign a material to the clone cubes. Open the Node Editor for this and prepare the setup as you see below. After completing the setup, assign the material to the cube object.
7-创建并分配一个材料给克隆立方体。为此打开节点编辑器并准备设置,如下所示。完成设置后,将材质分配给多维数据集对象。

8- Run the Live Viewer. You should see a render like the image below. Of course other cosmetic factors (Lights, colors, post process etc.) may need to be created according to your own taste. As you can see, with the vertex map we have defined in the octane scatter object, the cubes have only been cloned according to the vertex map. You can easily use this technique in many scenarios.
8-运行直播查看器。你应该看到一个渲染像下面的图像。当然,其他的化妆品因素(灯,颜色,后处理等)可能需要根据您自己的口味创建。正如你所看到的,使用我们在辛烷散布对象中定义的顶点映射,立方体只是根据顶点映射进行克隆。您可以在许多场景中轻松地使用这种技术。

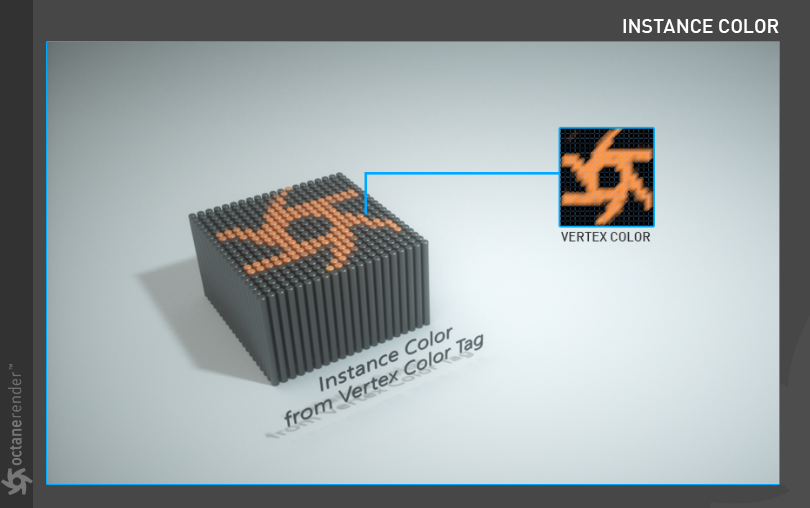
INSTANCE COLOR FROM VERTEX COLOR
顶点颜色实例颜色
This option has been discussed in detail in the “Instance Color“ section.
这个选项已经在“ Instance Color”部分详细讨论过了。

若有收获,就点个赞吧
0 人点赞
