Instance Color
The Instance Color texture is used to hold an image and prepares each pixel of the image to be mapped to geometric instance IDs. The c4doctane plugin is able to generate instances of an object and can also assign an ID to each of the instances generated such that number of instances results in a grid instance IDs. Colors can then be assigned via texture to each instance ID, in this case with an image in the Instance Color texture, matching the IDs with pixels of the image starting at the bottom left in row major order up to the top right.
Instance Color 纹理用于保存图像,并准备将图像的每个像素映射到几何实例 id。4doctane 插件可以生成一个对象的实例,也可以为生成的每个实例分配一个 ID,这样数量就可以生成一个网格实例 ID。然后可以通过纹理为每个实例 ID 分配颜色,在这种情况下,使用 Instance Color 纹理中的图像,将 ID 与图像的像素匹配,从左下角开始,按主序从右上角开始。

HOW TO USE
如何使用
Instance Color has many uses, and these uses are described in the following mini tutorials. As you follow the tutorials, you can examine them on the scene. You can download all the scenes described in the tutorial from this link
Instance Color 有许多用途,这些用途将在下面的迷你教程中描述。当您按照教程操作时,您可以在现场检查它们。您可以从这个链接下载教程中描述的所有场景

INSTANCE COLOR FROM FILE 实例颜色来自文件
In this first mini tutorial, we will describe how to apply a small texture map on to a collection of clones.
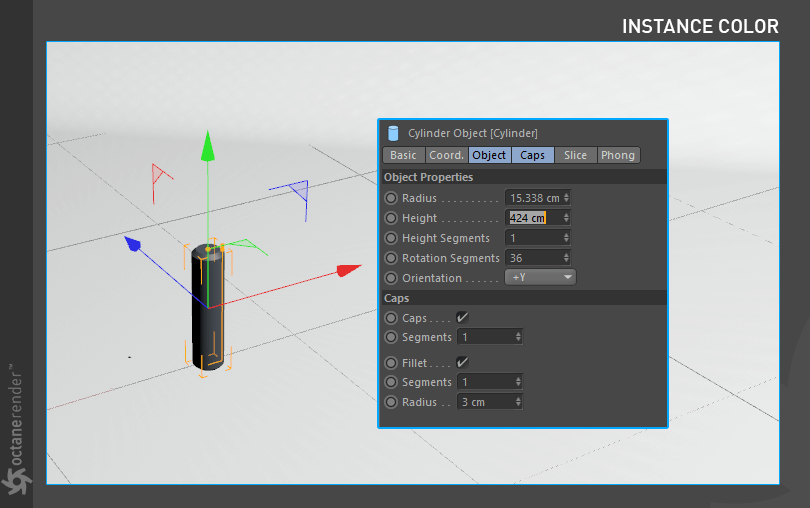
1- First create a cylinder object and change its properties as shown in the picture.
在这第一个小教程中,我们将描述如何将一个小的纹理贴图应用到克隆的集合中。
1-首先创建一个柱面对象并更改其属性,如图所示。

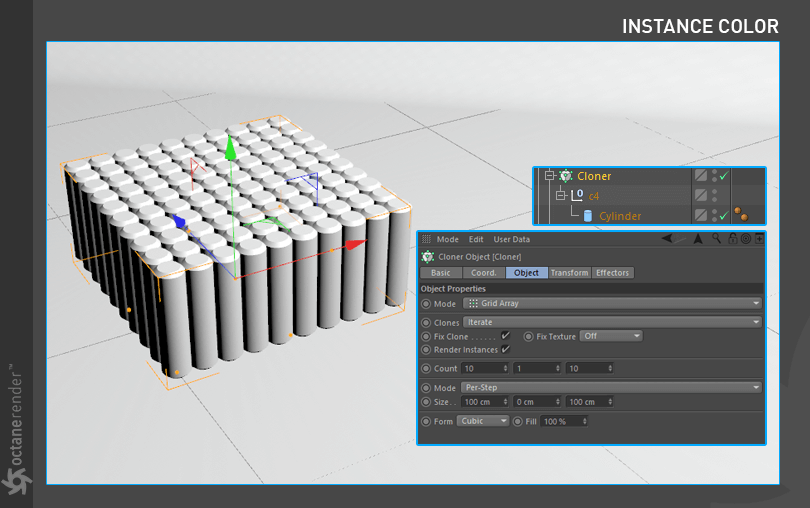
2- Then create a Cloner object and assign the cylinder object to the Cloner. Change the cloner settings as shown in the image below.
2-然后创建一个 Cloner 对象,并将柱面对象分配给 Cloner。更改克隆器设置,如下图所示。
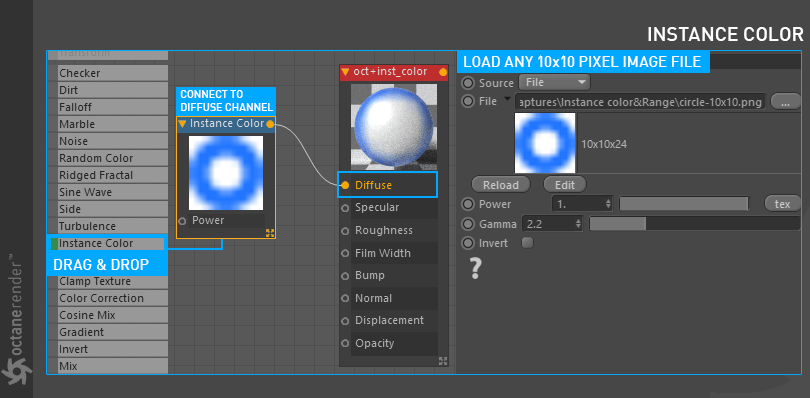
3- Next is the Material and Instance Color Setup. First create the Diffuse Material. Then open the Node Editor and drag and drop the material you created into the Node editor window. Drag the Instance Color directly to the node editor from the menu on the left. Now, when Instance Color Node is selected, connect the output pin to the input pin of the Diffuse channel of Material. Now select any image file with 10x10 pixel size from the menu on the right and load it. After the Material Setup, Assign it to Cloner Object. In the picture below you can see the material and Instance Color setup.
3-下一步是材质和实例颜色设置。首先创建漫反射材质。然后打开“节点编辑器”,将创建的材质拖放到“节点编辑器”窗口中。从左侧的菜单中直接将 Instance Color 拖动到节点编辑器。现在,当选择 Instance Color Node 时,将输出引脚连接到材质扩散通道的输入引脚。现在从右边的菜单中选择任何10x10像素大小的图像文件并加载它。材质设置完成后,将其分配给 Cloner 对象。在下面的图片中,你可以看到材质和实例颜色设置。
4- You should get a result similar to the following image. As you can see, each pixel value of our 10x10 pixel sized image created Instance Color for our 10x10 grid cylinders in Cloner. The Instance IDs of 100 cylinders in Cloner were automatically generated, similar to the Shader Effector. This works best with smaller image files. Larger sizes may crash Cinema 4D.
4-你应该得到一个类似于下图的结果。正如你所看到的,我们的10x10像素大小的图像的每个像素值为我们的10x10网格柱面创建了 Instance Color。实例 id 的100个气缸在克隆人是自动生成的,类似于着色效应器。这对于小图像文件效果最好。更大的尺寸可能会使4d 电影院崩溃。

INSTANCE COLOR FROM VERTEX COLOR
顶点颜色实例颜色
In this example we will describe how Instance Color is made from a Vertex Color.
1- First create a cylinder object and change its properties as shown in the picture.
在这个例子中,我们将描述实例颜色是如何从一个顶点颜色。
1-首先创建一个柱面对象并更改其属性,如图所示。
2- Then create a “Plane” object and change its settings shown in the image below. After entering the settings, make it editable (Press C).
2-然后创建一个“平面”对象,并改变其设置如下图所示。输入设置后,使其可编辑(按 c)。

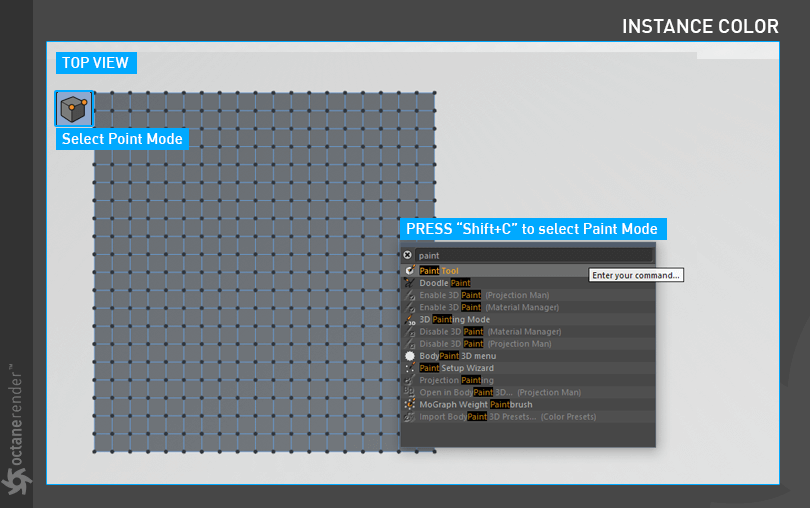
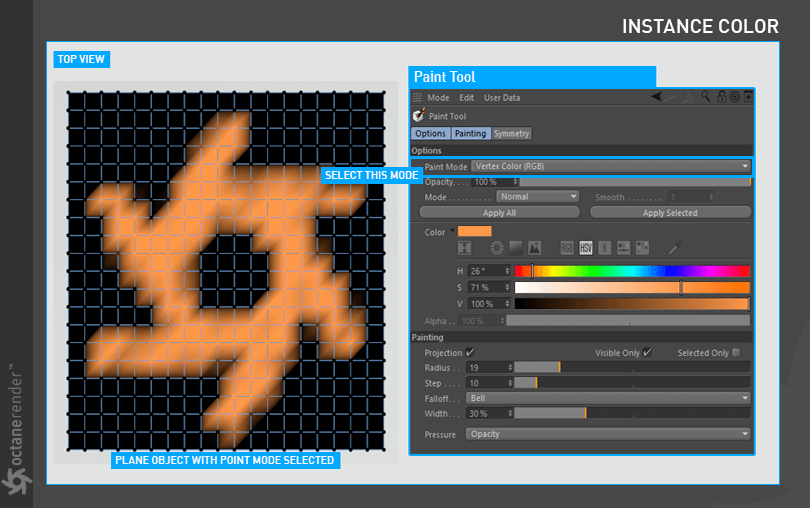
3- Now we will paint the vertices of the Plane object. Select Plane Object and then select the Point Mode.
Press Shift + C and select Paint Tool from the command menu.
3-现在我们将绘制平面物体的顶点。选择平面物体,然后选择点模式。
按下 Shift + c 并从命令菜单中选择画图工具。
4- Paint the vertex in any color and shape using the Paint menu. Do not forget to select “Vertex Color (RGB)” from the paint menu. Once the painting is finished, the “Vertex Color Tag” will be automatically created in the Object Manager, next to the plane object. You will then use this Tag as Instance Color.
4-使用画图菜单以任何颜色和形状绘制顶点。不要忘记从绘图菜单中选择“顶点颜色(RGB)”。一旦绘制完成,“顶点颜色标签”将自动创建在对象管理器,旁边的平面对象。然后您将使用此标记作为实例颜色。
5- Create a Cloner object and assign the cylinder object to the Cloner. We also need to define Plane, which we just created, as the object to which the cylinder clones will distribute. See the image below for settings.
5-创建一个 Cloner 对象,并将柱面对象分配给 Cloner。我们还需要将我们刚刚创建的 Plane 定义为柱面克隆将分布到的对象。参见下面的图片进行设置。

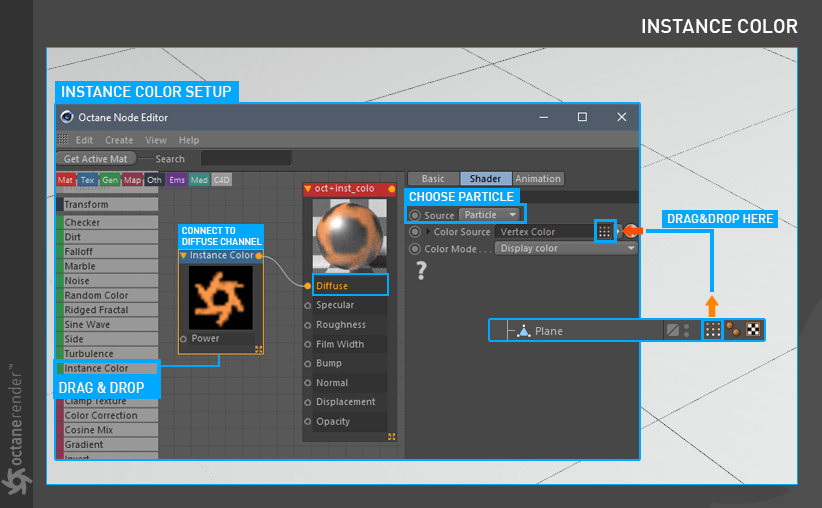
6- Next is the Material and Instance Color Setup. First create the Diffuse Material. Then open the Node Editor and drag and drop the material you created into the Node editor window. Drag the Instance Color directly to the node editor from the menu on the left. Now, when Instance Color Node is selected, connect the output pin to the input pin of the Diffuse channel of Material. Now it’s time to set the Vertex tag. When Instance Color Node is selected, select Particle as Source from the menu on the right. In the Color Source section, drag and drop the Vertex Color tag of the Plane object. After the Material Setup, Assign it to Cloner Object. In the picture below you can see the material and Instance Color setup.
6-下一步是材质和实例颜色设置。首先创建漫反射材质。然后打开“节点编辑器”,将创建的材质拖放到“节点编辑器”窗口中。从左侧的菜单中直接将 Instance Color 拖动到节点编辑器。现在,当选择 Instance Color Node 时,将输出引脚连接到材质扩散通道的输入引脚。现在是设置 Vertex 标签的时候了。当选择“实例颜色节点”时,从右侧菜单中选择“粒子作为源”。在“颜色源”部分,拖放“平面”对象的“顶点颜色”标记。材质设置完成后,将其分配给 Cloner 对象。在下面的图片中,你可以看到材质和实例颜色设置。
7- You should get a result similar to the following image. As you can see, the cylindrical objects were colored by the vertex color tag of the plane. Although it is not a very practical method, at least it gives you more control and flexibility. You can also work with more vertex counts. Remember that too many vertices will increase your cloner objects count and the system performance will diminish.
7-你应该得到一个类似于下图的结果。正如你所看到的,圆柱形物体是由平面的顶点颜色标签着色的。虽然这不是一个非常实用的方法,但至少它给了您更多的控制和灵活性。你也可以使用更多的顶点数。记住,太多的顶点会增加 cloner 对象的数量,系统性能会降低。

INSTANCE COLOR FROM PARTICLE EMITTER
粒子发射器的实例颜色
In this example we will describe how Instance Color is made from a Particle Emitter.
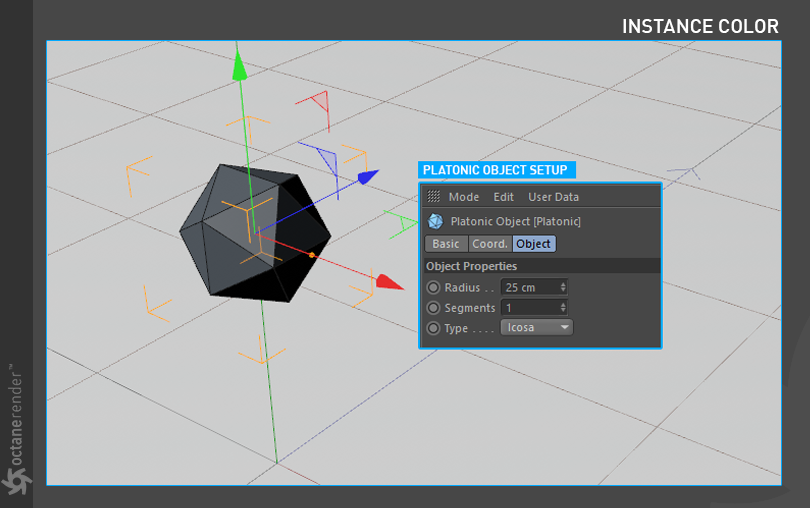
1- First create a Platonic object and change its properties as shown in the picture.
在这个例子中,我们将描述实例颜色是如何从粒子发射器。
1-首先创建一个柏拉图式的物体,并改变它的属性,如图所示。
2- Now create a standard Cinema 4D particle emitter object and change its properties as shown in the image. After you finish the setup, press the play button in the Viewport and allow the particles to flow at least 35-40 frames.
2-现在创建一个标准的 Cinema 4D 粒子发射器对象,并改变其属性,如图所示。完成设置后,在 Viewport 按下播放按钮,让粒子流动至少35-40帧。

3- Now we need to identify the emitter object as a particle to Octane. We will use the “Octane Object Tag” for this. Right-click on the Emitter object and select “Octane Object Tag” from the pop-up menu. Then select the Object Tag and drag & drop the “Platonic” object to Particle Rendering Tab. Complete the setup as shown in the following image.
3-现在我们需要确定发射器的对象作为一个粒子辛烷。我们将使用“辛烷对象标签”为此。右键点击发射器对象,并从弹出菜单中选择“辛烷值对象标签”。然后选择对象标签和拖放的“柏拉图”对象粒子渲染标签。完成如下图所示的设置。

4- Next is the Material and Instance Color Setup. Create materials and Instance Colors as you did in previous tutorials. This time, Drag and drop the “Emitter” object in the “Color Source” section of the Instance Color settings. Enter the settings you see in the picture and complete the setup. After completing the setup, assign the material to the “Platonic” object.
4-下一步是材质和实例颜色设置。创建材质和实例颜色,正如您在前面的教程中所做的。这一次,将“发射器”对象拖放到 Instance Color 设置的“ Color Source”部分。输入您在图片中看到的设置并完成设置。完成设置后,将材料分配给“柏拉图”对象。
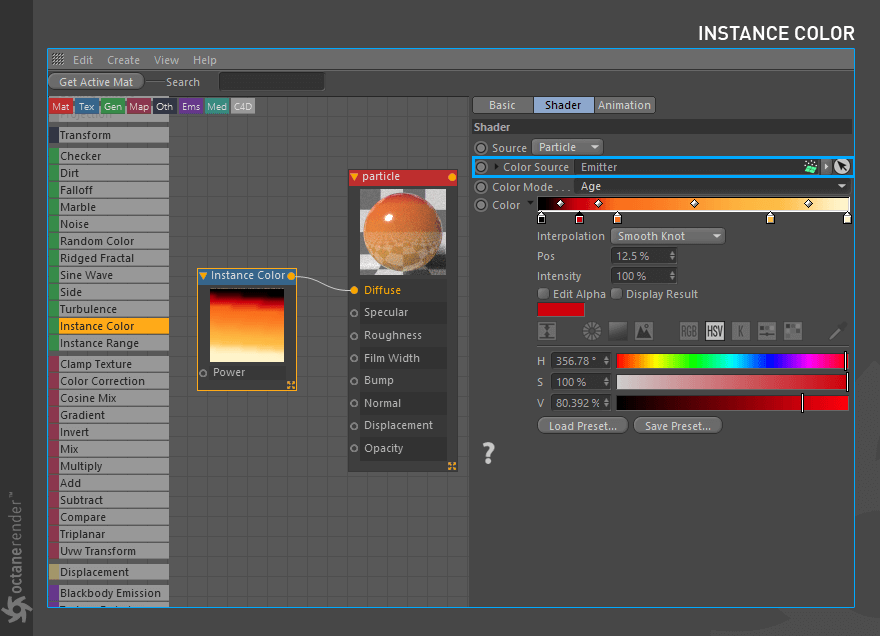
5- You should get a result similar to the following render — as you can see, Platonic objects that we have defined as Particles are created with Instance Color according to the gradient values. You can also create Instance Color from the particles’ age, speed, etc.
5-你应该得到一个类似于下面渲染的结果ー正如你所看到的,我们定义为粒子的柏拉图对象是根据渐变值用实例颜色创建的。您还可以根据粒子的年龄、速度等创建实例颜色。

INSTANCE COLOR ON OCTANE SCATTER OBJECT 辛烷分散物体的实例颜色
In this example we will apply the Instance Color to Octane Scatter Object.
1- First create a sphere object and change its properties as shown in the image.
在这个例子中,我们将应用实例颜色辛烷分散对象。
1-首先创建一个球体对象并改变其属性,如图所示。

2- Then create a “Plane” object and change its settings shown in the image below. After entering the settings, make it editable (Press C).
2-然后创建一个“平面”对象,并改变其设置如下图所示。输入设置后,使其可编辑(按 c)。

3- Now we will paint the vertices of the Plane object. Select Plane Object and then select the Point Mode.
Press Shift + C and select Paint Tool from the command menu.
3-现在我们将绘制平面物体的顶点。选择平面物体,然后选择点模式。
按下 Shift + c 并从命令菜单中选择画图工具。

4- Paint the vertex in any color and shape using the Paint menu. Do not forget to select “Vertex Color (RGB)” from the paint menu. Once the painting is finished, the “Vertex Color tag” will be automatically created in the Object Manager, next to the plane object. You will use this Tag as Instance Color later.
4-使用画图菜单以任何颜色和形状绘制顶点。不要忘记从绘图菜单中选择“顶点颜色(RGB)”。一旦绘制完成,“顶点颜色标签”将自动创建在对象管理器,旁边的平面对象。稍后您将使用此标记作为实例颜色。

5- Create a Scatter object and assign the sphere object to the Scatter. We also need to define Plane, which we just created, as the object to which the sphere clones will distribute. See the image below for settings.
5-创建一个 Scatter 对象并将球体对象分配给 Scatter。我们还需要定义我们刚刚创建的平面,作为球体克隆将分布到的对象。参见下面的图片进行设置。

6- Next is the Material and Instance Color Setup. First create the Diffuse Material. Then open the Node Editor and drag and drop the material you created into the Node editor window. Drag the Instance Color directly to the node editor from the menu on the left. Now, when Instance Color Node is selected, connect the output pin to the input pin of the Diffuse channel of Material. Now it’s time to set the Vertex tag. When Instance Color Node is selected, select Particle as Source from the menu on the right. In the Color Source section, drag and drop the Vertex Color TAG of the Plane object. After the Material Setup, Assign it to Scatter Object. In the picture below you can see the material and Instance Color setup.
6-下一步是材质和实例颜色设置。首先创建漫反射材质。然后打开“节点编辑器”,将创建的材质拖放到“节点编辑器”窗口中。从左侧的菜单中直接将 Instance Color 拖动到节点编辑器。现在,当选择 Instance Color Node 时,将输出引脚连接到材质扩散通道的输入引脚。现在是设置 Vertex 标记的时候了。当选择“实例颜色节点”时,从右侧菜单中选择“粒子作为源”。在“颜色源”部分,拖放“平面”对象的“顶点颜色”标签。在材质设置之后,将其分配给散布对象。在下面的图片中,你可以看到材质和实例颜色设置。

7- If you have done everything properly, you will get a result similar to the following picture. As you can see, the sphere objects were colored by the vertex color tag of the plane. By using Octane Scatter Object, you can get rid of the limit of Cloners and generate a large number of instances. Since Scatter Object is Octane’s native tool, it works quite fast and efficiently. In this way, you can produce millions of instances and color them as you wish.
7-如果你已经做好了所有的事情,你会得到一个类似于下面的图片的结果。正如您所看到的,球体对象是由平面的顶点颜色标记着色的。通过辛烷分散物体,你可以摆脱克隆人的限制,产生一个大的数量。因为分散对象辛烷的原生工具,它的工作相当快速和有效。通过这种方式,您可以生成数百万个实例并按照自己的意愿对它们进行涂色。

INSTANCE COLOR ON SCATTER OBJECT + MOGRAPH
分散对象的实例颜色 + MOGRAPH
In this example we will create an Instance color using Octane Scatter Object and Mograph.
1- First create a disc object and change its properties as shown in the picture.
在这个例子中,我们将使用 Octane Scatter Object 和 Mograph 创建一个实例颜色。
1-首先创建一个光盘对象并更改其属性,如图所示。

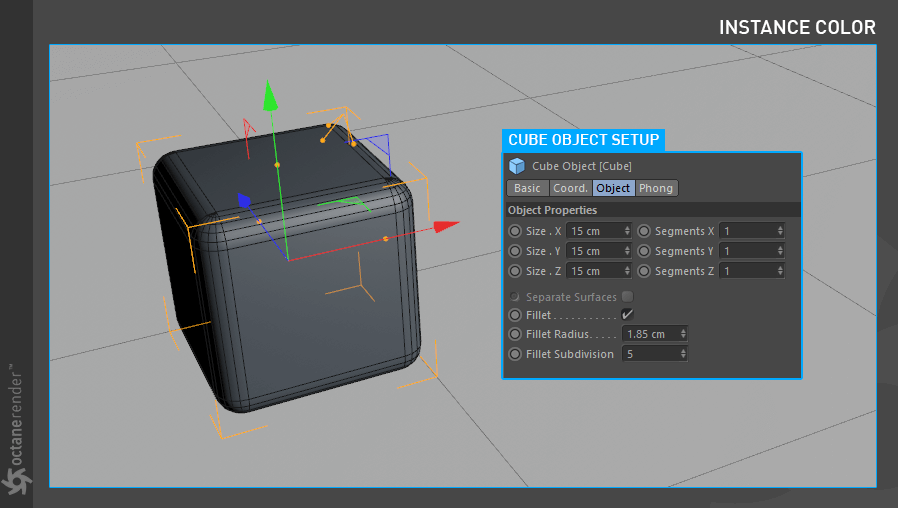
2- Now create a Cube object and change its properties as shown in the image below.
2-现在创建一个立方体对象,并改变其属性,如下图所示。
3- Create an Octane Scatter Object and make the Cube object child. Then drag and drop the Disc object to the surface section of the Scatter. The following image shows the setup.
3-创建一个辛烷散布对象,并使立方体对象的子。然后拖放光盘对象到散布的表面部分。下图显示了设置。

4- Now we will use Mograph in the Scatter Object. To do this, first create a Random Effector from the Mograph menu and drag it to the Effector section of the Octane Scatter Object. Change the “Random Effector” properties as you see in the image below.
4-现在我们将在驱散物体中使用 Mograph。要做到这一点,首先从 Mograph 菜单中创建一个随机效应器,并将其拖动到效应器部分的辛烷分散对象。更改“随机效应器”属性,如下图所示。

5- Next is the Material and Instance Color Setup. First create a Glossy Material. Then open the Node Editor and drag and drop the material you created into the Node Editor window. Drag the Instance Color directly to the node editor from the menu on the left. Now, when Instance Color node is selected, connect the output pin to the input pin of the Diffuse channel of Material. Now it’s time to set the Scatter Object as an Instance Source. When Instance Color Node is selected, select Particle as Source from the menu on the right. In the Color Source section, drag and drop the Octane Scatter Object. After the Material Setup, Assign it to Scatter Object. In the image below you can see the material and Instance Color setup.
5-下一步是材质和实例颜色设置。首先创建一个光滑的材料。然后打开“节点编辑器”,将创建的材质拖放到“节点编辑器”窗口中。从左侧的菜单中直接将 Instance Color 拖动到节点编辑器。现在,当选择 Instance Color 节点时,将输出引脚连接到材质扩散通道的输入引脚。现在是时候将 Scatter 对象设置为实例源了。当选择“实例颜色节点”时,从右侧菜单中选择“粒子作为源”。在颜色源部分,拖放辛烷分散对象。在材质设置之后,将其分配给散布对象。在下面的图片中,你可以看到材质和实例颜色设置。

6- You should get a result similar to the following image. As you can see, the cube objects were colored by the Random effector using “Instance Color”. Using the Octane Scatter Object allows the generation of a large number of instances, more so than Mograph, and you can still use all the Mograph tools.
6-你应该得到一个类似于下图的结果。正如您所看到的,立方体对象是由使用“ Instance Color”的 Random 受动器着色的。使用 Octane Scatter 对象可以生成一个大的数量,比 Mograph 更好,而且你仍然可以使用所有的 Mograph 工具。

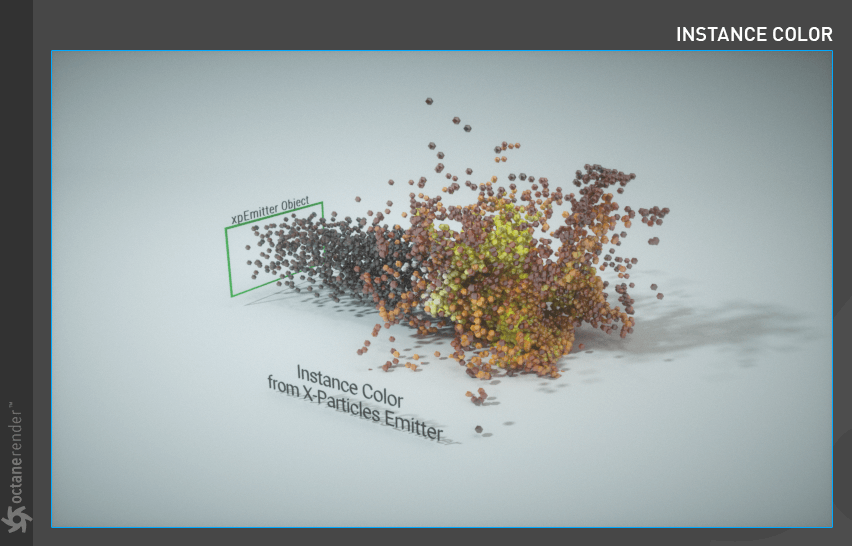
INSTANCE COLOR FROM AN X-PARTICLES EMITTER
来自 x 粒子发射器的实例颜色
In this example we will describe how Instance Color is made from an X-Particles Emitter.
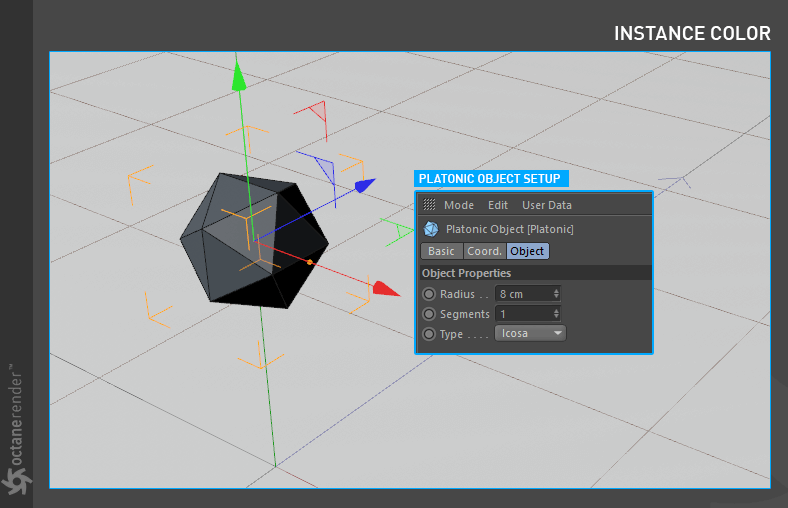
1- First create a Platonic object and change its properties as shown in the image.
在这个例子中,我们将描述实例颜色是如何从一个 x 粒子发射器。
1-首先创建一个柏拉图式的物体,并改变它的属性,如图所示。
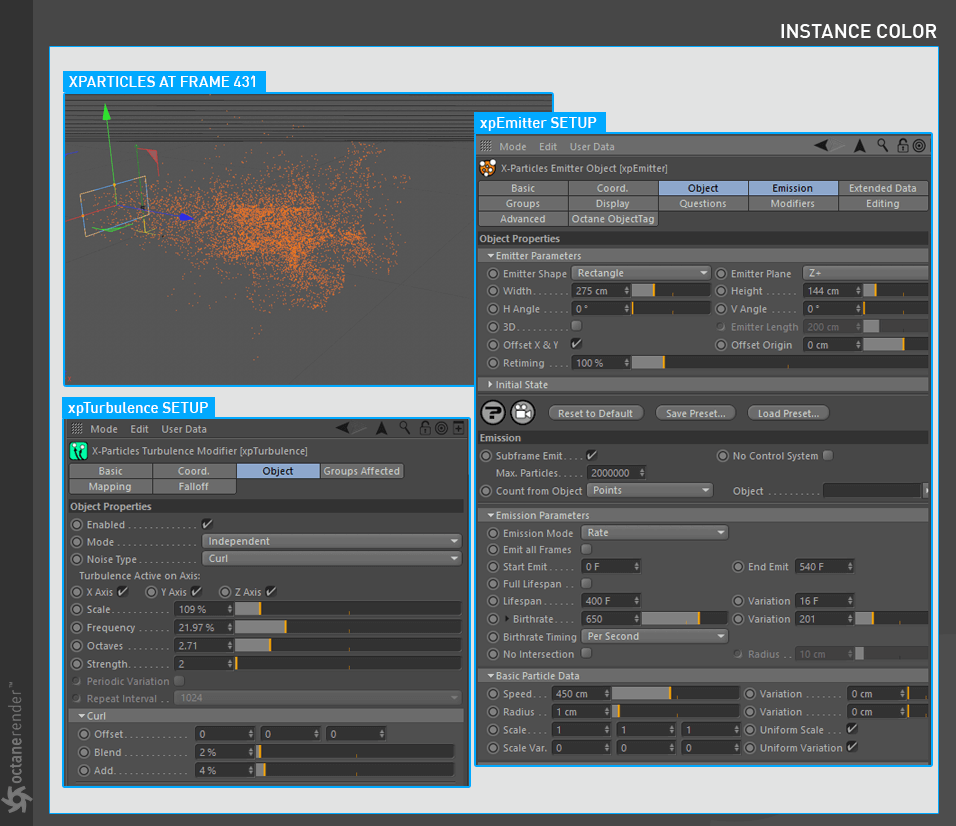
2- Now create an “xpEmitter” from the X-Particles menu and also create an “xpTurbulence” from the X-Particles/Modifiers/Motion Menu. Make the “xpEmitter” child to “xpTurbulence”. Change their properties as shown in the image. After you finish the setup, set your animation timeline to 500 and press the play button in the Viewport. Allow the particles to flow up to the 430-450 frames.
2-现在在 x 粒子菜单中创建一个“ xpEmitter”,同时在 x 粒子/修改器/运动菜单中创建一个“ xpTurbulence”。将“ xpEmitter”子代设置为“ xpTurbulence”。更改它们的属性,如图所示。完成设置后,将动画时间轴设置为500,然后在 Viewport 按下播放按钮。让粒子流动到430-450帧。
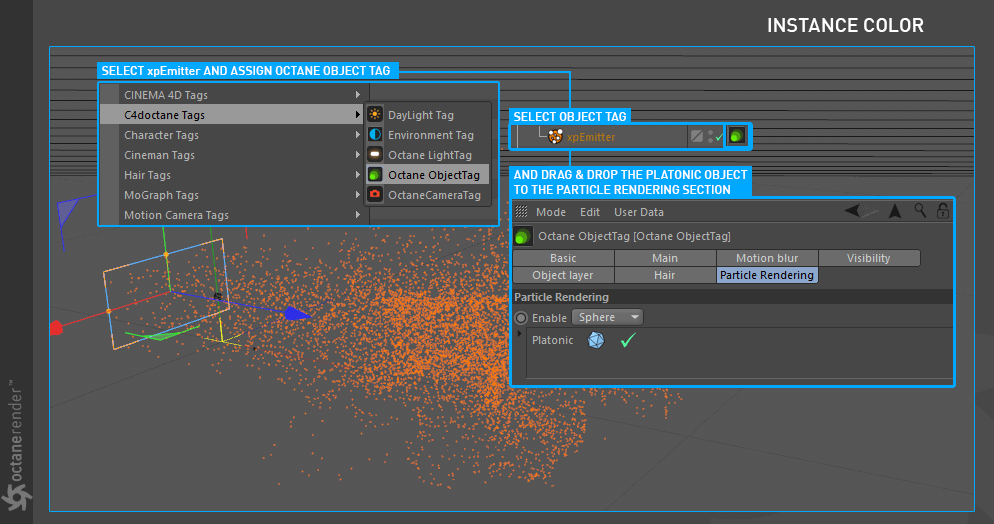
3- Now we need to identify the xpEmitter object as a particle system to Octane. We will use the “Octane Object Tag” for this. Right-click on the xpEmitter object and select “Octane Object Tag” from the pop-up menu. Then select the Object Tag and drag & drop the “Platonic” object to Particle Rendering Tab. Complete the setup as shown in the following image.
3-现在我们需要确定 xpEmitter 对象作为一个粒子系统辛烷。我们将使用“辛烷对象标签”为此。右键单击 xpEmitter 对象并从弹出菜单中选择“ Octane Object Tag”。然后选择对象标签和拖放的“柏拉图”对象粒子渲染标签。完成如下图所示的设置。
4- Next is the Material and Instance Color Setup. Create materials and Instance Colors as you did in previous tutorials. This time, Drag and drop the “xpEmitter” object in the “Color Source” section of the Instance Color settings. Enter the settings you see in the picture and complete the setup. After completing the setup, assign the material to the “Platonic” object.
4-下一步是材质和实例颜色设置。创建材质和实例颜色,正如您在前面的教程中所做的。这一次,将“ xpEmitter”对象拖放到 Instance Color 设置的“ Color Source”部分。输入您在图片中看到的设置并完成设置。完成设置后,将材料分配给“柏拉图”对象。

5- You should get a result similar to the following image. As you can see in the image, Platonic objects that we have defined as particles, created with Instance Color according to the gradient values. This time we used the Age parameter to adjust the appearance of the Instance Colors. Also, we set the Age attribute in the Emission Parameters section of the xpEmitter object. Here we have identified Instance Colors with these values.
5-你应该得到一个类似于下图的结果。正如你在图片中看到的,我们定义为粒子的柏拉图对象,根据梯度值用 Instance Color 创建。这次我们使用 Age 参数来调整实例颜色的外观。此外,我们还在 xpEmitter 对象的 Emission Parameters 部分中设置了 Age 属性。在这里,我们用这些值来标识实例颜色。

若有收获,就点个赞吧
0 人点赞
