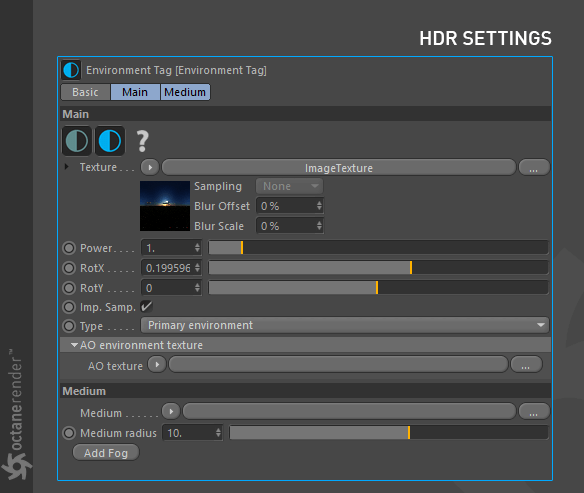
HDR/Texture Environment
The HDRI Environment uses HDRI files to provide a very realistic source of illumination. HDR stands for “high dynamic range” and refers to images that have far greater amounts of color and illumination ranges than standard 8 bits per component (bpc) images. HDR image files typically have a “.hdr” file extension.
TEXTURE ENVIRONMENT
The Texture environment will use any procedural or image texture or color node, such as an RGB or Gaussian spectrum node, to provide as “Texture Illumination”. The options for each of these objects are the same.

ASSIGN HDR/TEXTURE IMAGE
When you define texture or HDR environment from the Live Viewer, a default texture is created according to illumination type to the texture slot. When you select “Texture Environment”, an “RGB Spectrum” texture is assigned to the Texture Slot. Here you can give it a color, or you can use another image or procedural texture. When you select “HDR Environment”, an “Image Texture” and “Projection” node with a .hdr extension are automatically assigned to the texture slot. Here you can also define the HDR image you want in the textures slot. Once you have defined the HDR, you can access the “Image texture” settings using the thumbnail arrow next to the texture and change, as necessary. This is the same as the “Image Texture” setting we described earlier in “Using Textures”.
| Note Do not use the standard Cinema 4D file dialog to load an image, as doing so will place the resulting file into a Bitmap node — Image Texture nodes are required for HDR options. |
|---|

TRANSFORM/PROJECTION NODES ON HDR/TEXTURE ENVIRONMENT
You can access the “Transform” and “Projection” settings according to whether you define the texture or HDR image to “Image texture”. Adjust the size and projection of the image as needed. In such scenarios, you can set the HDR / Texture image with both “Transform” and “Projection”. These two properties are explained in the chapter “Using Textures“.
MAIN ENVIRONMENT SETTINGS
TEXTURE AND HDR ICONS
These icons are used to choose between to “HDR” or “Texture” illumination.
POWER
You can adjust the amount of lighting contribution to the scene from the HDR image. The value is completely dependent on the light values within the HDR image. The quality of HDR images can vary, so the Power adjustment can be used to help. When using HDR images, be sure to keep the gamma value set to 1.0.


ROT.X AND ROT.Y
Use this option to orient the HDR / Texture image using the “X” and “Y” coordinates of the map. Additionally, by accessing the node graph of the Environment tag, a projection node can be added to the HDR / Texture Projection port. Set the Projection type to “Spherical” and adjust the “R.X” and “R.Y” values. A more practical way is to select the “Sky Object” from the Object manager and use the Rotation tool from the viewport, or from the Coord. Tab with “R.H” and “R.P”.
IMPORTANCE SAMPLE
Enables quicker convergence (noise reduction) for HRDI images by applying importance to certain areas of the HDRI so as to sample rays that resolve to the important areas more often than unimportant areas.

TYPE
This option will allow a choice between “Primary environment” and “Visible Environment” for both “HDR/Texture” environments. Go to this section for details.
AO ENVIRONMENT TEXTURE
The AO texture allows you to specify an ambient occlusion texture which will then be used for the AO calculation instead of the environment. In order to use this feature, go to Kernel settings and select “GI_AMBIENT_OCCLUSION” from Directlight. In the following example, hard shadows with “Blue Tint”, which is caused by HDR Image, are reduced using the AO environment texture. Image textures and RGB Spectrum nodes can be used as the texture type. In the example RGB spectrum was selected and then gray-white was used.

HDR/TEXTURE MEDIUM SETTINGS
The HDR/Texture medium is used to give aerial density and fog to the HDR/Texture Environments. This is an actual Volume Medium effect, not a cheat. It interacts directly with any lighting in the scene. Mediums are explained in more detail in the “Volumetrics“ section.

