Working with Light Linking
Light linking and light exclude control the effects and appearance of lights on both scene and objects with a few mouse clicks.
| Earlier versions of OctaneRender® added special exclusion features such as “visible on specular or visible on diffuse”, but these features were working globally. Light Exclusion works both locally and globally. |
|---|
SETTING UP LIGHT EXCLUDE
To use Light Exclusion, first assign an “Octane Object Tag” to any object. To activate Light Exclusion for an object, select the Object layer tab in the Octane Object Tag, and set the “Use light pass mask” popup menu to “Enable”. The contribution of the Octane Daylight Sun, Environment and up to 8 scene lights can be controlled via check boxes in the Light Pass Mask section turndown. The “Light pass ID” needs to be set for every light you wish to exclude (or include, depending on the menu setting chosen), via the Octane Light Tag, Light settings tab. At the bottom of the tab is the Light pass ID edit box. To control lights via the ID, you must enter a value between 1 and 8. The scene below is included for you to follow along. Click here to download.
LOCAL WORKFLOW
SCENE PREP
In this scene, there are 2 octane lights (orange and cyan colors), 2 Dragon objects, HDR lighting and Octane Daylight.

SET LIGHT IDS
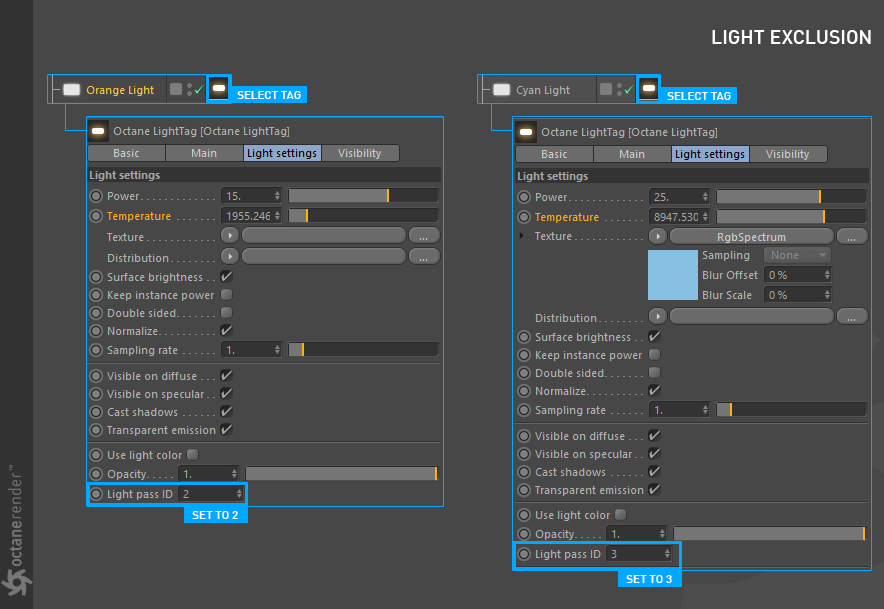
Set ID settings for the two lights by entering “2” and “3” (without the quotes) in the Light pass ID edit boxes, as shown below. This will allow us to exclude light from the dragons.

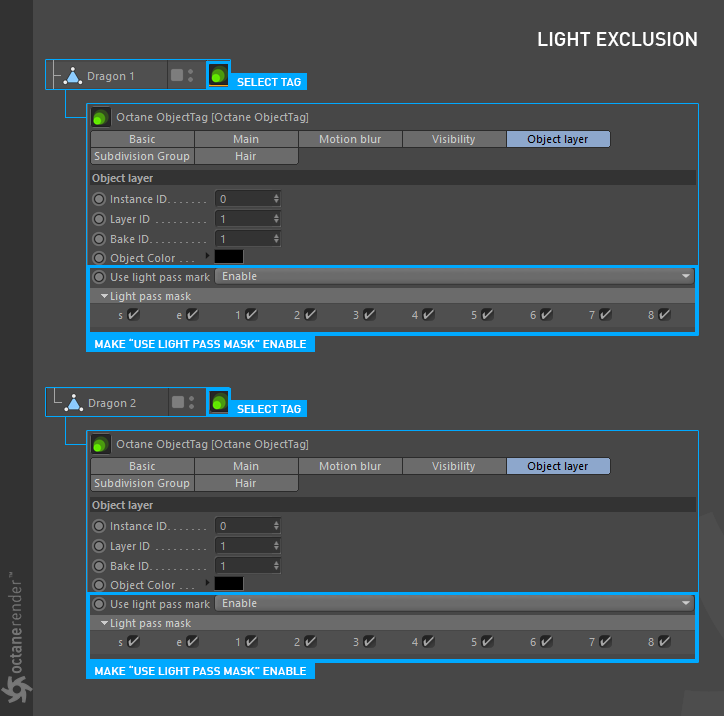
Make the Octane Object Tag settings for the dragon objects, as seen below. Select the “Octane Object Tag” for each dragon. Choose the Object layer tab and set the menu “Use Light Pass Mask” to Enable, as shown below.

Select “Octane ObjectTags” of the Dragon Objects and disable “2” in “Light Pass Mask” section. The image in your Live Viewer should match the picture below. The Dragon object on the right is no longer affected by Orange Light, because the contribution from the light has been excluded. As you can see, Cyan Light continues to illuminate our objects. If you deactivate 3, you will also exclude the Cyan light.

SET ORANGE LIGHT FOR “DRAGON 1” AND CYAN LIGHT FOR “DRAGON 2”
This time, set the orange light for the dragon 1 and set the cyan light for the dragon 2. The image below shows the result.

EXCLUDE BOTH LIGHTS FROM BOTH DRAGONS
If “2” and “3” are enabled from the object tag of the dragons, orange and cyan light will no longer illuminate these objects.

EXCLUDE ENVIRONMENT ILLUMINATION FROM DRAGON 2
The toggles for the “Sun” (Octane Sun object) and “Environment” (HDR and Octane Sky) are labeled “s” and “e”. You can exclude both of them for your objects. Select Dragon 2 object this time, disable “e”, “2” and “3” from the object tag / Light pass mask area, respectively. As you can see in the picture below, Dragon 2 is not affected by the environment lighting, nor is it affected by other lights (except daylight sun).

GLOBAL WORKFLOW
Light exclusion can also be managed globally in the scene. This is done through the Live Viewer > Settings > Kernels tab. In the Light section, set the Light IDs action menu will allow you to choose the desired behavior.
DISABLE CYAN LIGHT FROM BOTH DRAGONS & THE SCENE
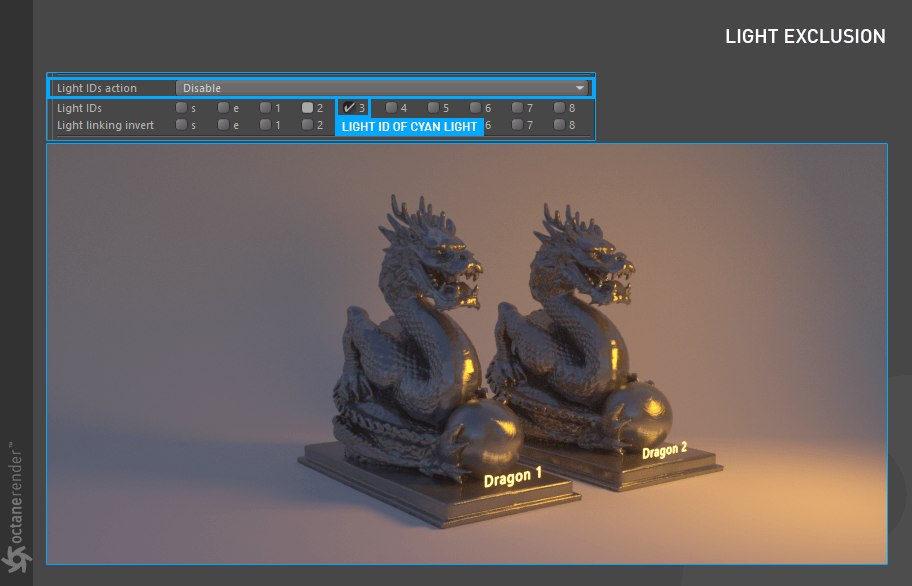
Go to the Live Viewer > Settings > Kernels tab and set the “Lights ID Action” option to Disable. Below that menu, the “Light IDs” are listed and can be enabled/disabled for any defined light or light with the Light ID in the scene, as in the local workflow. In the image below, when the “Cyan Light” from Light ID 3 is disabled, only the “Orange Light” and Environment will remain illuminated and illuminate objects.

Switch the behavior of the Light IDs Action from Disable to Enable; this time only the Cyan Light illuminate scene and the objects.
As with local exclusion, these lights can enabled or disabled, as can the Octane Daylight sun and HDRI environment objects in this manner.

