- Direct Lighting
- MAX. SAMPLES:
- GI MODE:
- SPECULAR DEPTH:
- GLOSSY DEPTH:
- DIFFUSE DEPTH:
- RAY EPSILON:
- FILTER SIZE:
- AO DISTANCE:
- ALPHA SHADOWS:
- NESTED DIELECTRICS
- IRRADIANCE MODE
- MAX SUBDIVISION LEVEL
- ALPHA CHANNEL:
- KEEP ENVIRONMENT:
- AI LIGHT, AI LIGHT UPDATE & AI LIGHT STRENGTH:
- AI LIGHT IDS ACTION, LIGHT IDS, LIGHT LINKING INVERT
- AI LIGHT STRENGTH
- LIGHT IDS ACTION
- LIGHT IDS
- LIGHT LINKING INVERT
- PATH TERM. POWER:
- COHERENT RATIO:
- STATIC NOISE:
- PARALLEL SAMPLES:
- MAX. TILE SAMPLES:
- MINIMIZE NET TRAFFIC:
- ADAPTIVE SAMPLING:
- NOISE THRESHOLD
- MIN. ADAPTIVE SAMPLES
- EXPECTED EXPOSURE
- GROUP PIXELS
- DEEP IMAGE
- DEEP RENDER PASSES
- MAX. DEPTH SAMPLES
- DEPTH TOLERANCE
- TOON SHADOW AMBIENT
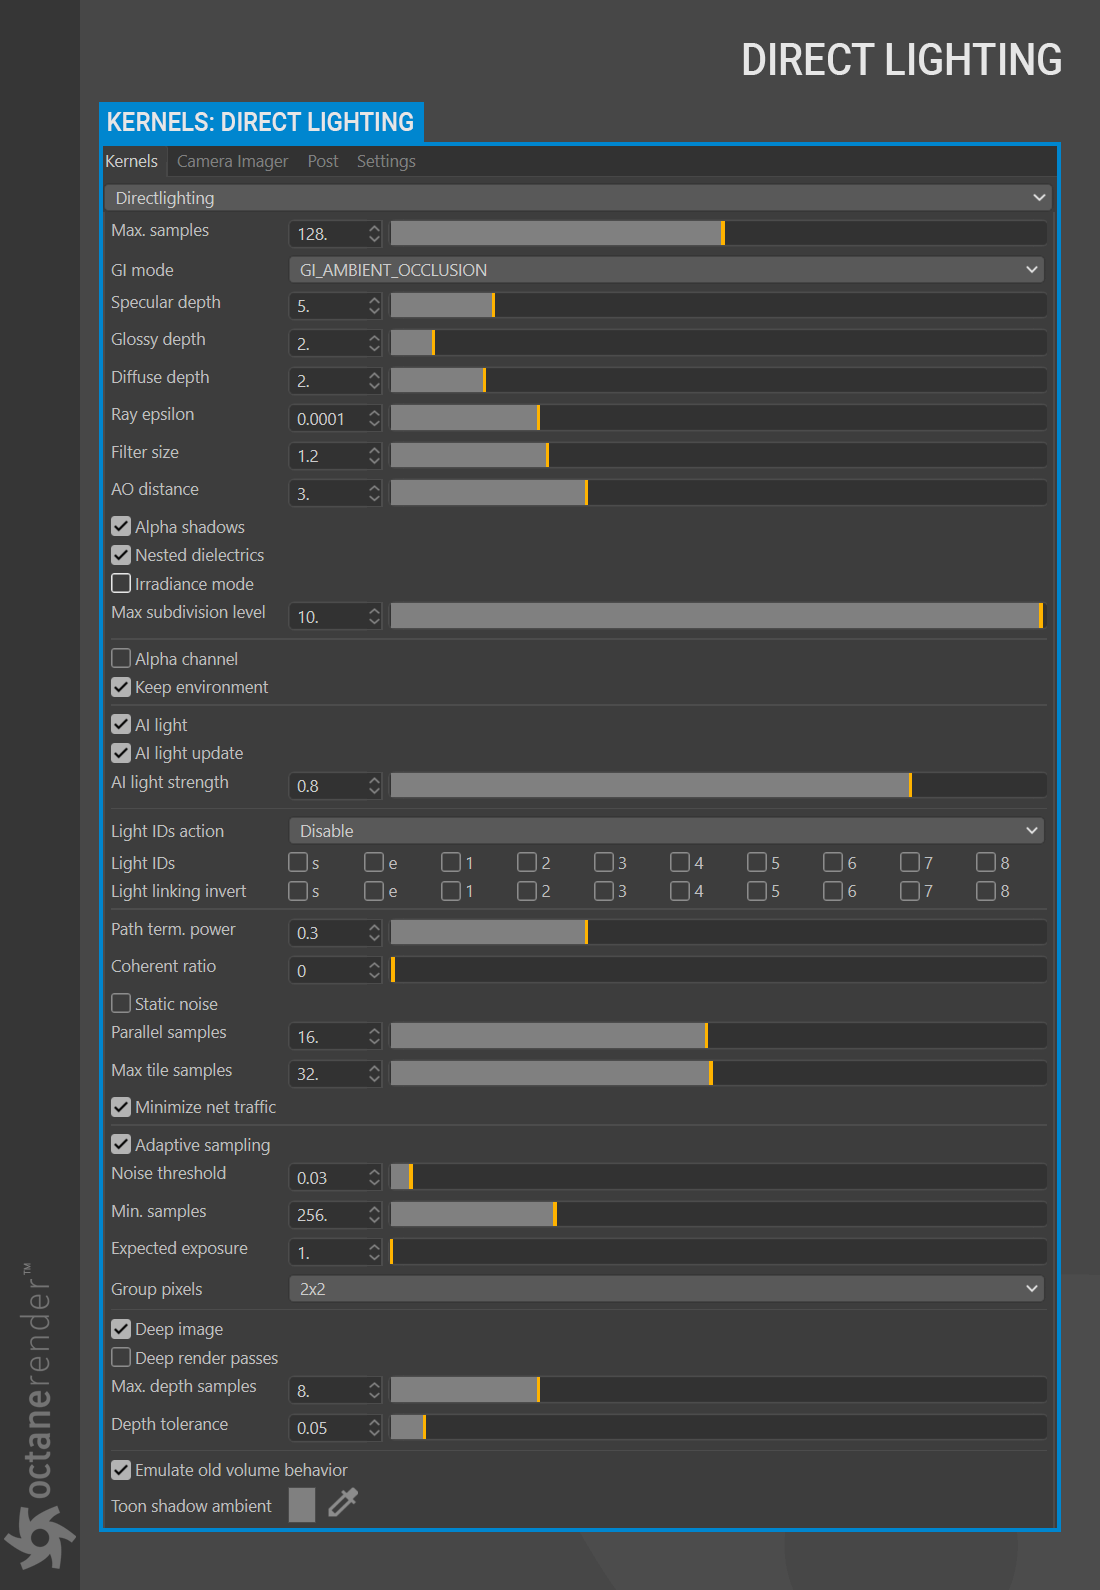
Direct Lighting
The Direct Lighting Kernel is generally used for faster preview rendering. It’s not unbiased and will not yield photorealistic results, however because of its speed it can be the ideal choice for rendering animation or stills depending on your purpose. The following illustration shows the Direct lighting settings. Some of these settings are shared with the other kernel types.
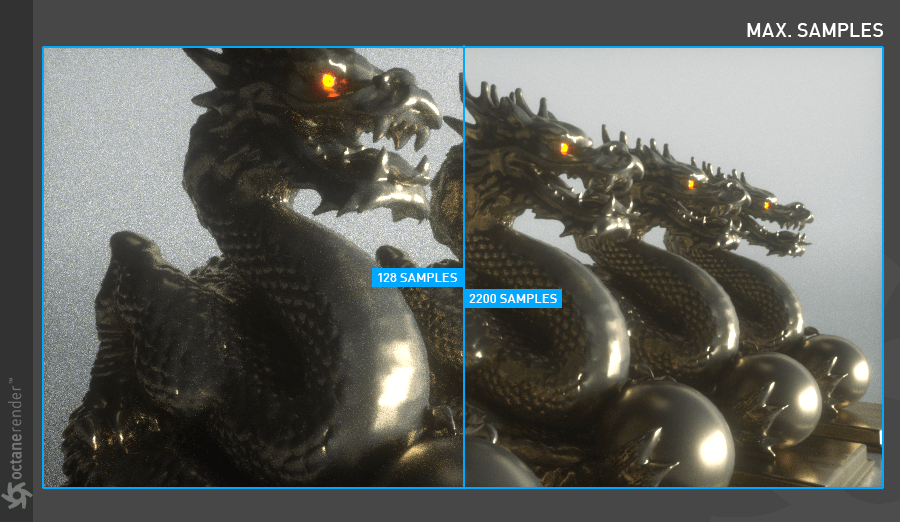
MAX. SAMPLES:
Sets the maximum number of samples per pixel before the rendering process stops. The higher the number of samples per pixel, the cleaner the render. There is no rule as to how many samples per pixel are required for a good render, it is subjective and may vary depending on the content and complexity of the scene being rendered. For example, since Direct lighting is a fast kernel, 500-1000 samples for static images and animations will suffice. If you have more than one direct and indirect light source in your scene and you are also using mesh light, you can increase a few hundred samples. All of this is highly scene and asset dependent, and, as a result, determining the best value will likely require a little experimentation.
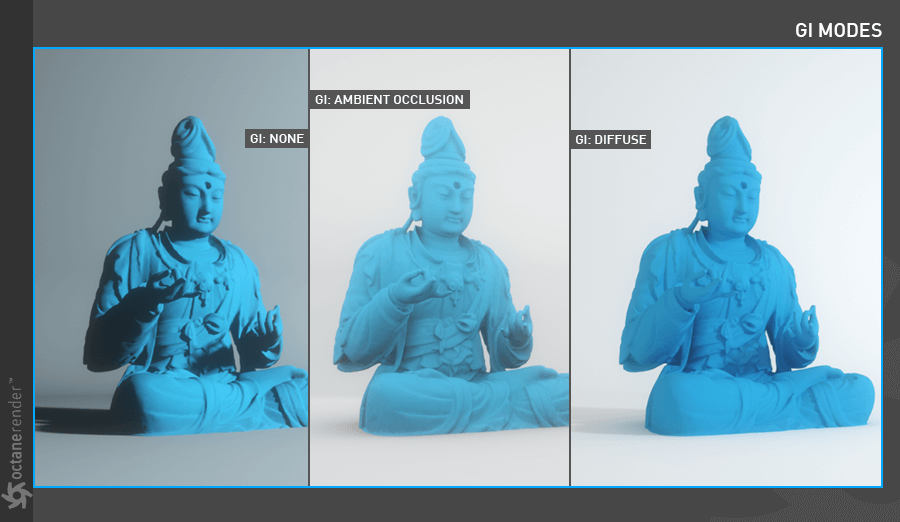
GI MODE:
From here you can choose the GI Mode for Direct lighting. This mode has three sub options:
GI_NONE
Only direct lighting from the sun or area lights is included. Shadowed areas receive no contribution and will be black.
GI_AMBIENT OCCLUSION
Standard ambient occlusion. This mode can often provide realistic images but offers no color bleeding.
GI_DIFFUSE
Provides GI quality that is in between Ambient Occlusion and Path tracing. In this mode, the indirect light sources also taken into account and affects the diffuse mode. This increases the level of realism of your render. While caustics do not appear in this mode, the level of realism level is often sufficient, with better results than Ambient Occlusion mode. It is a fast mode and can quickly produce a final render for both static images and animations.
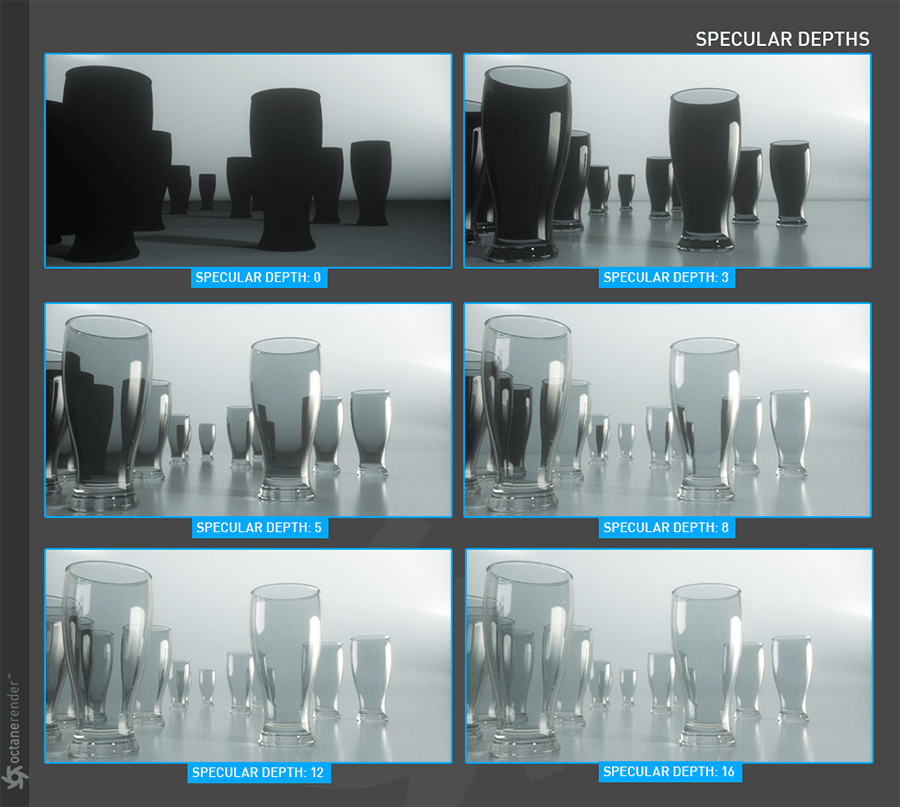
SPECULAR DEPTH:
Controls how many times a ray is refracted after hit the surface without losing its energy. A value of zero means that the ray does not hit the surface and cannot continue on the path (reflect or refract). If the value is greater than zero, the ray continues on its way through the surface and refracts until it loses its energy. Higher numbers mean higher render times but more color bleeding and more details in transparent materials. Low numbers can introduce artifacts or turn some refractions into pure black. You can see different specular depth results from the image below.
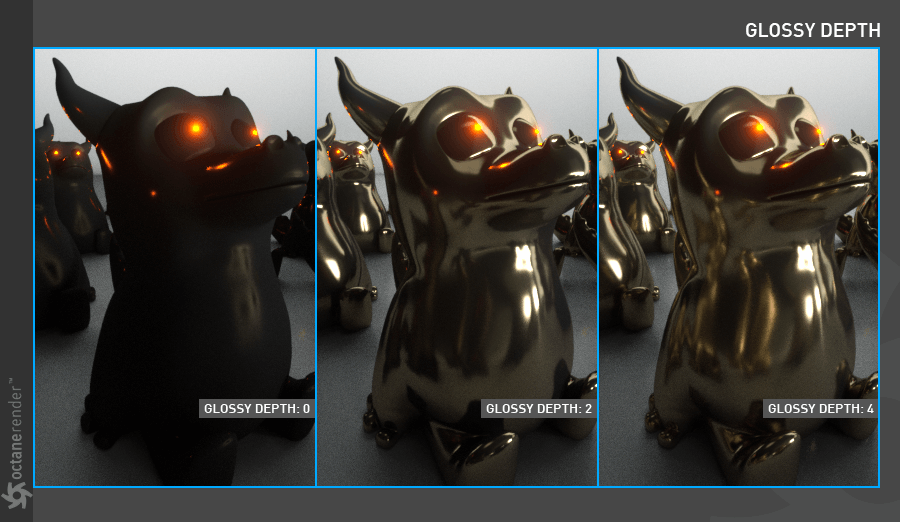
GLOSSY DEPTH:
Controls how many times a ray is reflected after hitting the surface. A value of zero means that the ray does not hit the surface and cannot continue on its path (reflect or refract). When the value is greater than zero, the ray hits the surface and continues to be the same as the angle of incidence, so the reflection occurs. Higher numbers mean higher render time. Low numbers (under 4) can introduce artifacts or turn some reflections into pure black. You can see different glossy depth results from the image below.
DIFFUSE DEPTH:
Gives the maximum number of diffuse reflections if GI Mode is set to Diffuse. A value of 3-5 is enough for the most scenarios.

RAY EPSILON:
Ray Epsilon is the distance between the geometry and the light ray when calculating ray intersections for lighting and shadowing. Larger values push rays away from the geometry surface. Lower values are more accurate but can cause artifacts on large or distant objects. Ray Epsilon is similar to ray tracing bias in other rendering engines. Adjust Ray Epsilon to reduce artifacts in large scale scenes. If your scene is built to 1:1 scale, adjusting this value is usually not necessary. See the image below.

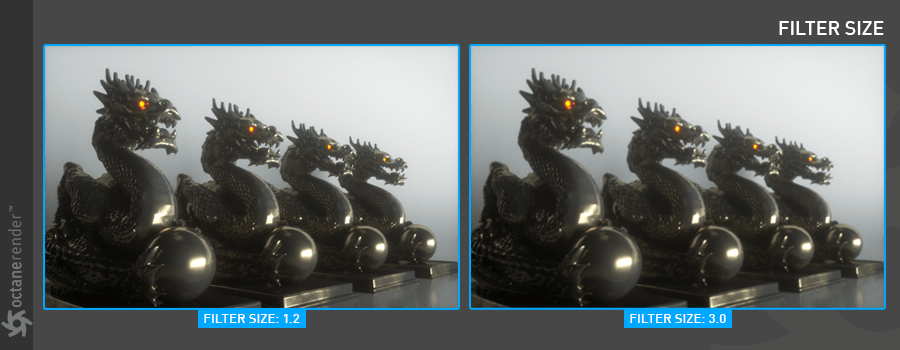
FILTER SIZE:
Sets the anti-aliasing filter size in terms of pixels. This can improve aliasing artifacts in the render. However, if the filter is set too high, the image can become blurry and less defined.
AO DISTANCE:
Controls the distance of the ambient occlusion shadowing spread. This setting should be adjusted in order to achieve realistic results depending on the scale of the objects in the scene. For example, a small value is more appropriate for small objects such as toys and larger values for an object such as a house.

ALPHA SHADOWS:
Allows any object with transparency (specular materials, materials with opacity settings, and alpha channels) to cast a shadow accordingly instead of behaving as a solid object. As you can see in the image below, we have a plane object in the scene, and we only put an image in the opacity channel with an alpha. Shadows look correct when Alpha Shadows is enabled.

NESTED DIELECTRICS
Enables/disables the use of the priority setting of specular materials for proper shading of nested transparent objects. The priority setting tells Octane which transparent objects using this setting should be shaded.
**
IRRADIANCE MODE
This setting works similar to clay mode, but is only applied to the first bounce, disables bump and makes samples that are blocked by back faces transparent. (This setting is required for baking in Unity).
MAX SUBDIVISION LEVEL
This value sets the maximum level of allowed subdivisions for objects that are using the Subdivision option of the Octane Object tag.
ALPHA CHANNEL:
This option removes the background (for example daylight or any sky background) and renders it as transparent (zero alpha). This can be useful if you want to composite the render over another image and does not want the background to be present. Note: to get clean edges in the alpha mask, make sure that the Default Environment color is set to black.

KEEP ENVIRONMENT:
This option is used in conjunction with the Alpha Channel setting. It allows the background to be rendered with zero alpha but it’s still visible in the final render. This allows even further flexibility in compositing software.

AI LIGHT, AI LIGHT UPDATE & AI LIGHT STRENGTH:
You can go to this link for detailed information.
AI LIGHT IDS ACTION, LIGHT IDS, LIGHT LINKING INVERT
You can go to this link for detailed information.
AI LIGHT STRENGTH
This option is used to adjust the strength for dynamic AI light update (Only available in Direct Lighting Kernel).
LIGHT IDS ACTION
Determines how assigned Light IDs are processed for the rendering. Choices are Enabled or Disabled.
LIGHT IDS
These toggles are used to select the specifically noted light IDs for processing in the render, as determined by the Light IDs Action setting. Light IDs, inclusion and exclusion are covered in this topic. Select IDs will be operated on as noted; lights without these specific IDs will be ignored from this process. The process of setting IDs for lights is discussed here.
LIGHT LINKING INVERT
This setting will invert the behaviors discussed above.
PATH TERM. POWER:
This parameter provides a system where users can tweak samples/second vs. convergence (how fast noise vanishes). Increasing this value will cause the kernels to keep paths shorter and spend less time on dark areas (which means they stay noisy longer) but may increase samples/second. Reducing this value will cause kernels to trace longer paths on average and spend more time on dark areas. In short, high values increases the render speed but may lead to higher noise in dark areas.
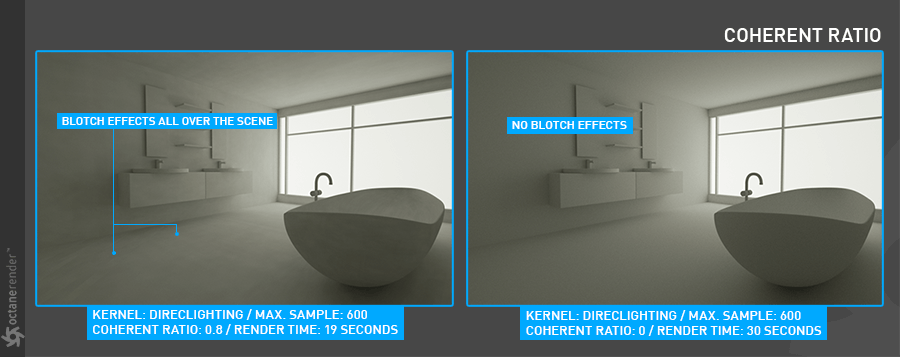
COHERENT RATIO:
When the coherent mode is turned on, the picture is quickly noise-free, but the negative side of the feature is that you see a flickering blotch effect in the animation output. It’s similar to the effect you used to see when you use Light Cache in other engines using older technology (out of date, since the unbiased render engines became available). Use this only to render test animations quickly — do not use it for Final Production.
STATIC NOISE:
This option keeps noise patterns static between rendered frames in a sequence when enabled. Note that the noise is fully static as long as the same GPU architecture is being used for rendering. Different GPU models will produce slightly different numerical errors which manifest as small differences in the noise pattern.
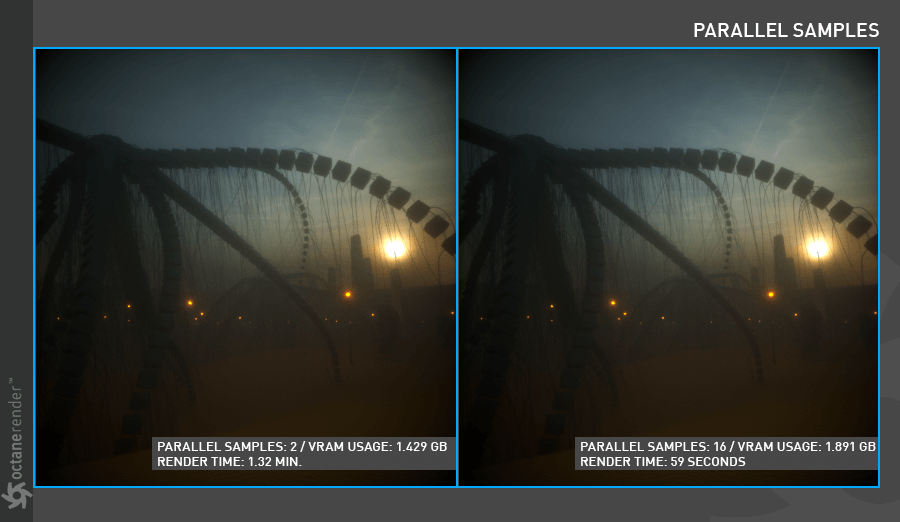
PARALLEL SAMPLES:
Controls how many samples are calculated in parallel. Smaller values require less memory to store the samples state but may cause the render to be a bit slower. High values require more memory but can reduce render time. The change in performance depends on the scene and the GPU architecture. As seen in the image below, more VRAM usage is shortening the render time. If enough VRAM is available, be sure to use this option.
MAX. TILE SAMPLES:
This controls the number of samples per pixel that Octane will render until it takes the result and stores it in the film buffer. A higher number means that results arrive less often at the film buffer but reduce the CPU overhead during rendering and as a consequence can improve performance as well.
MINIMIZE NET TRAFFIC:
Distributes only the same tile to the net render slaves until the max samples/pixel has been reached for that tile and only then will the next tile is distributed to slaves when enabled. Work done by local GPUs is not affected by this option. This way a slave can merge all its results into the same cached tile until the master switches to a different tile.
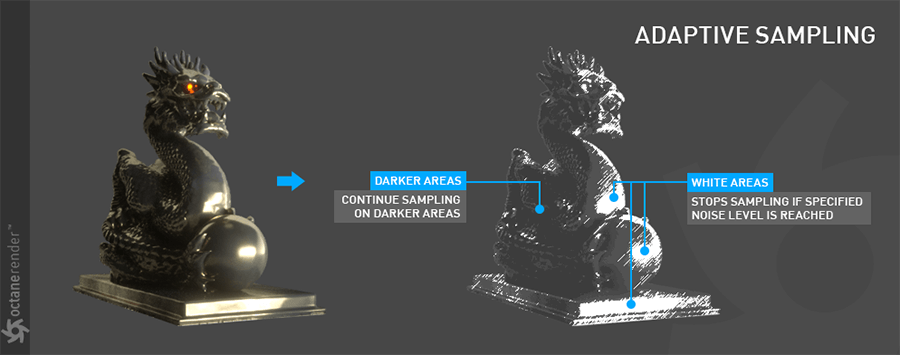
ADAPTIVE SAMPLING:
Enables adaptive sampling. Adaptive sampling is a method of sampling that determines if areas of a rendering require more sampling than other areas instead of sampling the entire rendering equally. In Octane, Adaptive Sampling disables sampling for pixels that have reached a specified noise level. With adaptive sampling, Octane is able to stop rendering on areas which no longer need to be rendered thus, freeing more GPU power to render pixels that still need to be rendered. This allows you to bump up the maximum samples quite high (even more than 30,000) and then rely on the adaptive sampling to figure out which pixels actually need that many samples and which do not.
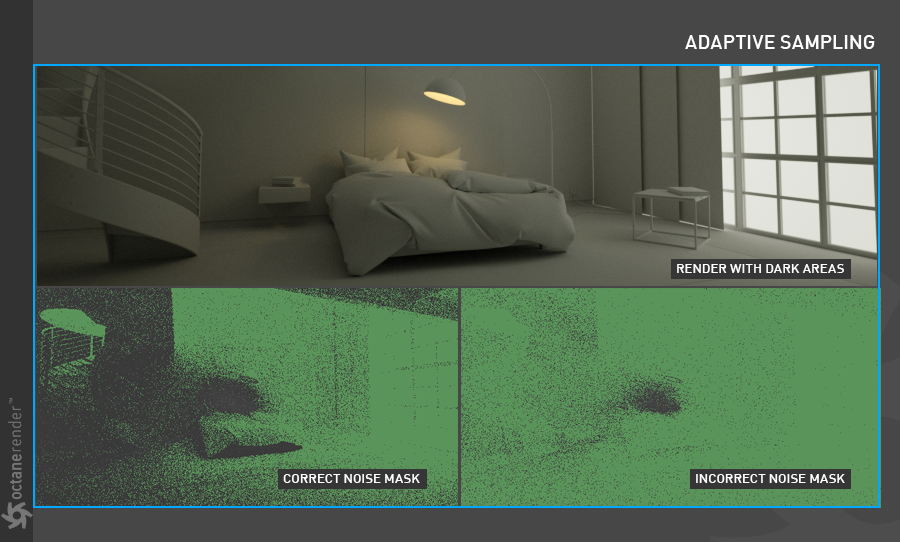
NOISE THRESHOLD
Specifies the smallest relative noise level. When the noise estimate of a pixel becomes less than this value, sampling will be switched off for this pixel. Good values are in the range of 0.01 - 0.03. The default value is 0.02, which will usually produce a clean result. Determining the best value for the Noise threshold is the most important part of the Adaptive Sampling process. The Noise Mask is the best tool to dial in the noise threshold settings. If there are dark places in your scene and all the areas are green, then the noise threshold needs to be adjusted. The following images show examples of correct and incorrect Noise masks.

MIN. ADAPTIVE SAMPLES
Specifies the minimum samples that must have been calculated before adaptive sampling kicks in. The noise estimate of a pixel is just an estimate with a fairly large initial error. The higher you set the noise threshold, the higher you should set min. samples to avoid artifacts.
EXPECTED EXPOSURE
The expected exposure should be approximately the same value as the exposure in the image or 0 to ignore these settings. The default value is 0. This parameter is used by Adaptive Sampling to determine the pixels that are bright and those that are dark - which depends on the exposure setting in the Octane Imager. If the value is not 0, Adaptive Sampling will tweak/reduce the noise estimate of very dark areas of the image. It also will also increase the minimum adaptive samples limit for very dark areas, because very dark areas tend to find paths to light sources irregularly resulting to an otherwise overly optimistic noise estimate.
GROUP PIXELS
Specifies the number of pixels that are handled together. Only if all pixels of a group have reached the noise level, sampling will stop for all of these pixels.
DEEP IMAGE
Enables deep image rendering. The Path Tracing and Direct Lighting kernels support deep image rendering.
DEEP RENDER PASSES
Includes render passes for deep image pixels.
MAX. DEPTH SAMPLES
Specifics an upper limit for the number of deep samples stored per pixel.
DEPTH TOLERANCE
Specifies a merge tolerance - i.e., when two samples have a relative depth difference within the depth tolerance, they merge. For a typical scene, the GPU renders thousands of samples per pixel. However, VRAM is limited, so it’s necessary to manage the number of samples stored with the Deep Render Passes and Max. Depth Samples parameters.
The maximum number of samples per deep pixel is 32, but we don’t throw away all of the samples. When we start rendering, we collect a number of seed samples, which is a multiple of Max. Depth Samples. With these seed samples, we calculate a deep bin distribution, which is a good set of bins characterizing the various depths of the pixel’s samples. There is an upper limit of 32 bins, and the bins are non-overlapping. When we render thousands of samples, each sample that overlaps with a bin is accumulated into that bin. Until this distribution is created, you can’t save the render result, and the Deep Image option in the Save Image drop down disabled.
TOON SHADOW AMBIENT
This is used for the setting default toon ambient light color.

若有收获,就点个赞吧
0 人点赞
