Live Viewer Commands
The OctaneRender® Live Viewer features several tools and options that are accessible from the icons below the Live Viewer menu section. These options are described below:
OctaneRender Live Viewer 提供了一些工具和选项,可以通过 Live Viewer 菜单下面的图标访问。这些备选方案说明如下:

1- SEND SCENE AND START NEW RENDER:
1-发送场景并开始新渲染:
Use this command to send the scene to Octane. This command collects the scene data each time and starts the render process from the beginning. Using this command will clear the GPU data and start over; use this command if Live Viewer no longer reacts to changes that you are making to your scene.
使用此命令将场景发送给辛烷。这个命令每次收集场景数据,并从头开始渲染过程。使用这个命令可以清除 GPU 数据并重新开始; 如果 Live Viewer 不再对你对场景所做的更改做出反应,可以使用这个命令。
2- RESTART NEW RENDER:
2-重新开始新渲染
This command will only reset the number of samples and re-render without clearing the GPU data.
这个命令将只重置样品的数量和重新渲染没有清除 GPU 的数据。
3- PAUSE RENDER:
3-暂停渲染:
This command allows you to pause the Render without clearing the GPU data. For example, if you have a heavy scene and you must do some scene operations (modeling, Mograph, etc.), use this command. It works as a toggle.
这个命令允许你暂停渲染,而不需要清除 GPU 数据。例如,如果你有一个沉重的场景,你必须做一些场景操作(模型,Mograph,等等) ,使用这个命令。它可以作为一个拨动装置。
4- STOP & RESET RENDER DATA:
4-STOP & RESET 渲染数据:
This command will completely reset the data on the GPU.
这个命令将完全重置 GPU 上的数据。
5- SETTINGS:
6- LOCK RESOLUTION:
6-LOCK 分辨率:
The render resolution in Live Viewer is locked according to your project resolution with this setting. This will present the image in Live Viewer in a 1:1 relationship to the pixels you will see in your final render, without any scaling. You can use this feature when framing the camera at your scene. When you activate this command, the numeric field next to Kernel Switcher in the Live Viewer menu bar also becomes active. Here you can increase/decrease the resolution presented (values less than 1 will decrease resolution).
动态查看器中的呈现分辨率根据您的项目分辨率用此设置锁定。这将以1:1的比例显示 Live Viewer 中的图像,与最终渲染中的像素之间的关系,而不需要任何缩放。你可以在拍摄现场的相机取景时使用这个功能。激活此命令时,Live Viewer 菜单栏中靠近 Kernel Switcher 的数字字段也会激活。这里您可以增加/减少显示的分辨率(值小于1将降低分辨率)。
7- CLAY MODES:
7- 黏土模式:
A toggle that will render your scene in grayscale without textures (the result looks like Clay). This is useful to check the overall light distribution in your scene. You can also use it to review Shadows and Ambient Occlusion.
一个触发器,可以在没有纹理的情况下用灰度渲染场景(结果看起来像粘土)。这是有用的检查整体光分布在你的场景。你也可以用它来检查阴影和环境遮挡。

8- RENDER REGION & FILM REGION:
8- 渲染区域和电影区域:
These commands are used to render just a portion of the scene in Live Viewer, allowing multiple adjustments to an object or material in your scene. Select Render Region from Live Viewer and see only that part of the scene, without waiting for the rest of the image to render. This is useful to dial in material settings without waiting for the full frame to render.
这些命令只用于在 Live Viewer 中渲染场景的一部分,允许对场景中的物体或材质进行多重调整。选择渲染区域从动态查看器,只看到场景的一部分,而不等待其余的图像渲染。这是有用的拨入材质设置没有等待完整的帧渲染。
You can then use this region to specify the render region in the Final render (this will be explained in detail in the Rendering section). In Film Region, only the area you select is rendered in Live Viewer. Other areas are rendered as black.
然后您可以使用这个区域来指定 Final render 中的渲染区域(这将在 Rendering 部分中详细解释)。在“电影区域”中,只有您选择的区域在“实时查看器”中呈现。其他区域显示为黑色。

9- PICK FOCUS:
- 选择焦点:
With this command you can select any region or object in Live Viewer as the Focus Center (also select with CTRL + MMB button). It works with the Thinlens section of the Camera Tag, and the “AutoFocus” setting in the Thinlens section needs to be disabled (explained in detail in the Octane Camera Tag topic).
使用这个命令,您可以选择 Live Viewer 中的任何区域或对象作为焦点中心(也可以使用 CTRL + MMB 按钮进行选择)。它与照相机标签的“薄镜头”部分一起工作,在“薄镜头”部分的“自动聚焦”设置需要被禁用(在“辛烷照相机标签”主题中详细解释)。

10- PICK MATERIAL:
10-选择材料:
This command allows you to directly pick any material in the scene just by clicking on the pixel in Live Viewer containing the desired material. This will speed up your material selection workflow, saving you time.
这个命令允许你直接选择场景中的任何材质,只需点击 Live Viewer 中包含所需材质的像素即可。这将加快你的材料选择工作流程,节省你的时间。
11- COLORSPACE SWITCHER:
11-色彩空间转换器:
You can choose the color space applied to the image displayed in Live Viewer with this menu. Pick between:
您可以使用此菜单选择应用于 Live Viewer 中显示的图像的颜色空间。选择:
- LDR/sRGB
- HDR/sRGB
- HDR/Linear sRGB
- ACES 2065-1
- ACES CG
- OCIO
See the Color Management and ACES topic for information on ACES and OCIO.
有关 ACES 和 OCIO 的信息,请参阅颜色管理和 ACES 主题。
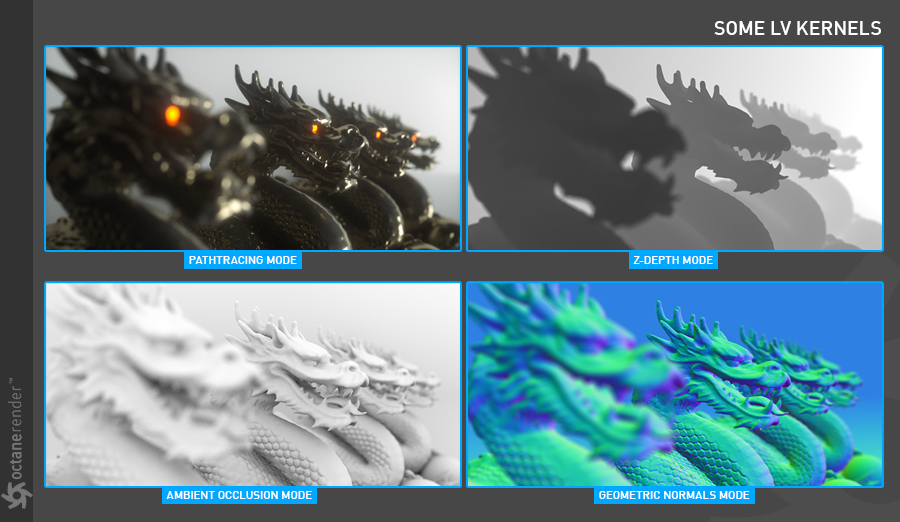
12- KERNEL SWITCHER:
12-内核转换器
Here you can see how the scene in Live Viewer looks in other kernel mode options. For example, you can get a brief overview of how the scene looks at Pathtracing or Z-Depth. You can see some kernel modes in the image below. We will also look at these Kernels in the Info Channel Section in Octane Settings.
SWITCHERHere 您可以看到 Live Viewer 中的场景在其他内核模式选项中的外观。例如,您可以简要了解场景在路径跟踪或 z 深度中的外观。您可以在下面的图片中看到一些内核模式。我们也会在辛烷值设置的信息通道部分看到这些内核。
13- ZOOM FACTOR:
13-缩放因素:
This item will display the zoom factor of the Live Viewer based upon click drag of the arrows next to the text display, mouse wheel/middle mouse action and/or direct text entry of the zoom factor desired. The Live Viewer can be zoomed in (larger values, making the image bigger) or out (smaller values, reducing the size of the image in the Live Viewer).
此项目将显示 Live Viewer 的缩放因子,基于单击文本显示旁边的箭头拖动、鼠标滚轮/鼠标中键操作和/或所需缩放因子的直接文本输入。Live Viewer 可以放大(更大的值,使图像更大)或者缩小(更小的值,减小 Live Viewer 中图像的大小)。

若有收获,就点个赞吧
0 人点赞
