Make Volume Lights
In this section examines how to make a volume light in OctaneRender® using three different methods. A good explanation of volumetrics can be found in the “Volumetrics“ section.
CREATE A SPOTLIGHT VOLUME WITH OCTANE VOLUME (REALISTIC)
This example will use an Octane Volume Object to create an accurate spotlight effect. It is the slowest option, but the most realistic of those offered here.
_
1- Open the provided scene from the “Making a Spotlight“ section. In this example, we will add a “Volume” to the spotlight. Go to the “Objects” menu in Live Viewer and select “Fog Volume”. Set the dimensions of this volume object from the viewport so that it covers the spotlight. Enlarge the volume object as needed with the scale tool. Be careful because it will scale uniformly because of the nature of the volume object (usually consuming too much GPU power and VRAM). Perform setup as you see in the image below.

2- Go to the medium tab and change the settings as you see in the image below.

3-Before running Live Viewer, go to the Octane settings and select Path Tracing as the render kernel. Apply the options you see below.

4- As you can see in the image, the spotlight interacts directly with the volume object, giving a realistic result. By using the “Fog Volume,” photons interact with the medium and scatter (or absorb) to give a foggy or hazy appearance.

CREATE A SPOTLIGHT VOLUME WITH TEXTURE/HDR ENVIRONMENT (REALISTIC)
This example will use a Texture/HDR Environment to create a realistic-looking volumetric spotlight.
_
1- This time we will create the same scene and spotlight setup using the environment. To do this, first create a “Texture Environment” from the Live Viewer and go to the main tab and set the options as you see in the image below.

2- Now go to the medium tab and make the settings you see in the image below.

3- You can set the Render kernel as the previous example. Depending on the scene, some settings may need to be changed. It is important to choose the kernel method as Path Tracing in every scene you use Medium. As you can see in the image, the spotlight interacts directly with the environment volume, giving a realistic result. If necessary, you can increase or decrease the power of the light.

CREATE A SPOTLIGHT VOLUME (NON-REALISTIC)
This example will use a cone object to create a volumetric spotlight effect. It is non-realistic, but faster, and may do the job.
_
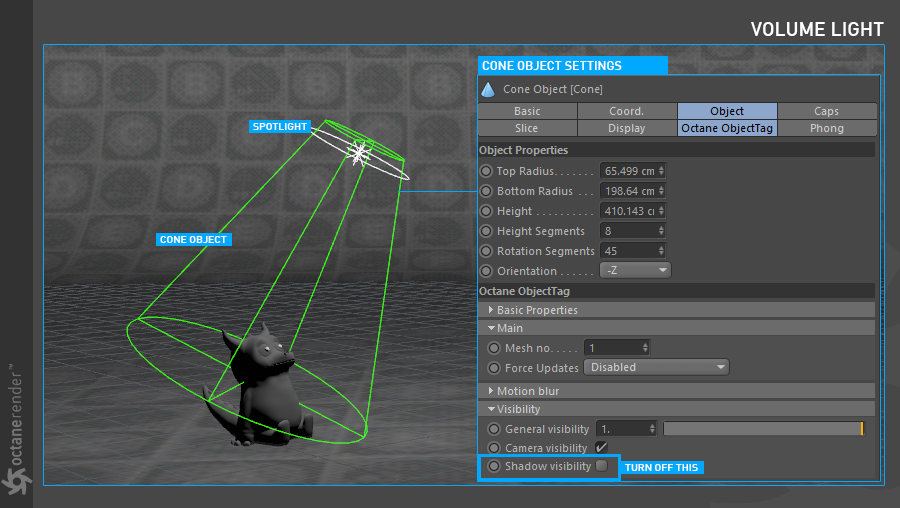
1- In the “Making a Spotlight“ section, open the spotlight scene we link to. This time we will give a volume effect to a cone object, not to the environment. First create a Cone object and position it where you want in your scene. Then right-click on this cone object from the object manager and select “octane object tag” by selecting C4D octane tags from the drop-down menu. Set the options as follows.
2- Now create the Octane Specular material and open the Material Attribute window with a double click. In this window, close all channels except Index, Medium, Fake shadows, Common and Editor. Go to Fake shadows and activate it. Make Index 1. Now go to the Medium settings and change them as shown below. After finishing the Medium settings, assign the material to the cone object.

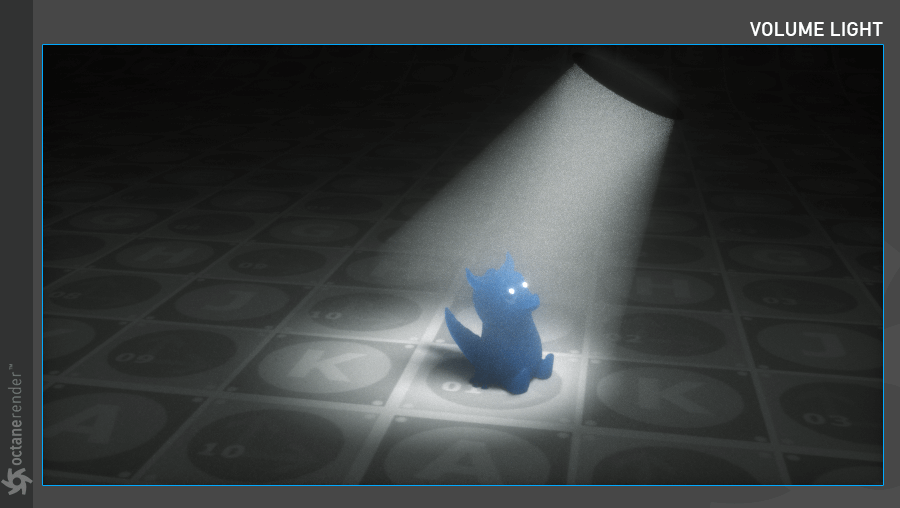
3- Run Live Viewer. As shown in the image, the volume medium assigned to the cone object is quite far from the previous realistic samples; especially the edge of the cone object is very sharp.

若有收获,就点个赞吧
0 人点赞
