Metallic Material
OctaneRender® Metallic materials are used to create physically-accurate metals (conductors). The Metallic Material is clearly distinguished from the Glossy material both in terms of specular and IOR. In the real world, the reflection properties of metals are very high; and it is determined according to the characteristics of the light reflected back, due to way that metals absorb certain wavelengths of light.
When light (electromagnetic radiation) hits the surface of a metal, it gets absorbed by electrons orbiting the metal atoms, and re-emitted as the electrons fall back to a more stable configuration. The electrons are free to move throughout the metal, which explains its high electrical and heat conductance. Certain wavelengths of the rays absorbed by the metal surfaces cause an energy exchange between the electrons. The configuration of these electrons differs according to the type of metal. Copper and gold are the only metals to show a certain color in visible light, which are due to their electron structures.
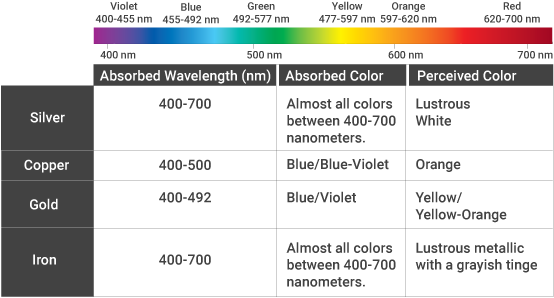
The energy difference between electrons in gold is about 400-492nm and this strong absorption cuts out the blue light from the reflection, creating gold’s yellow-orange color. Copper has also similar effect for its electron structure but with lower absorption energy (Blue/Blue-Violet), thus we see an orange color. Silver absorbs more or less all wavelengths of light, so as a result, we see bright white color. The table below shows the colors we see after absorbing certain wavelengths.

With complex IOR support and the proper values (available from sites such as refractiveindex.info), Octane will correctly present these colors without the need to set them by hand. This option is discussed in detail further into this topic, here. It is important to properly set the BRDF model (Beckmann, Ward or GGX) to attain realistic metals. These BRDF models use much more advanced Fresnel formulas than the default Octane BRDF and will create a much more realistic metallic render.
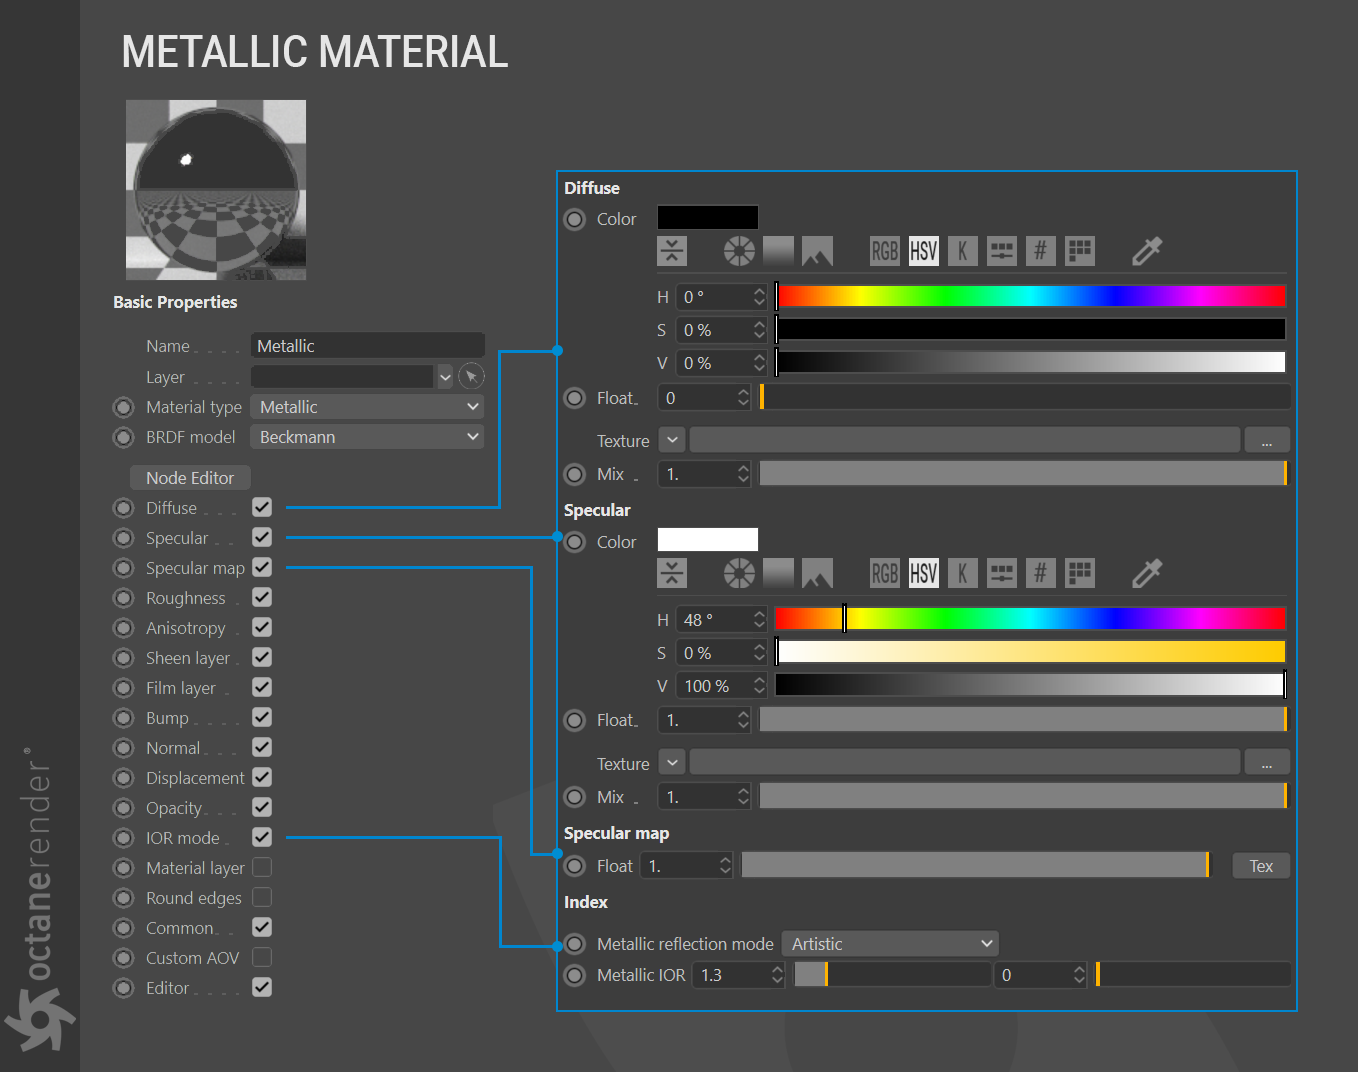
In the sections below, we will discuss the Diffuse, Specular, Specular map and Index parameters as they pertain to the Metallic material:

DIFFUSE
This parameter can accept any color or texture, and works in conjunction with the Specular map. If a color other than black or white is set in this parameter, the color will be visible only if the specular map option (discussed here) has a value of less than 1.0.
**
SPECULAR
Depending upon the IOR type assigned, the color and amount of reflection of the metallic material can be controlled with the Specular option. The reflection amount can be adjusted with the float value or set both the color and reflection amount with the HSV values. If using the HSV value, the amount of reflection can be adjusted with “V” parameter.

SPECULAR MAP
This parameter is used to mix the RGB and texture values of Diffuse and Specular. There are various ways to use it: if you want to input an RGB diffuse value to the metal material, you can use this parameter to see the diffuse color and also you can change the amount of reflection as mentioned above. The texture types you assign here can be grayscale / RGB or procedural. The following images show two different uses.


IOR MODE
This parameter controls the IOR settings of the metallic material. By default, Octane metals use the Schlick approximation for the Fresnel effect. For a more precise falloff, a complex IOR can be entered (expressed as the optical constants of n and k and referred to as n and k values from this point on). When a complex IOR is set up, the metallic color will get scaled so the brightness matches the Fresnel falloff for that IOR. We can say that the sum of the reflection is equal to the reflected part and the attenuation effect. The “n” value is the Index of Refraction value. The “k” is a phenomenon called absorption loss (or extinction coefficient) and indicates how much light is weaken after entering a surface. The “k” value you see here points to this. In fact, “k” indicates the amount of absorption loss when the electromagnetic wave propagates through the medium.
The IOR Mode user interface consists of the Metal Reflection Mode menu, and a selection of edit fields that change based upon the setting in the menu.
METALLIC REFLECTION MODE
This changes how the reflectivity is calculated according to three types:
- Artistic- IOR + Color- RGB IOR
ARTISTIC
You can only use Specular color in this mode. The values you will enter into the “Index of refraction” below have no impact. It is simple and ideal for non-realistic results.

IOR + COLOR
In this mode you can also use “n and k” IOR values as “Index of Refraction” along with the Specular color. “n” and “k” are actual index values. For these values go to refractiveindex and enter real IOR values according to material types you selected. Use the numeric field for “n” on the left and “k” on the right. As it’s color, you can still specify any color from the specular channel.

RGB IOR
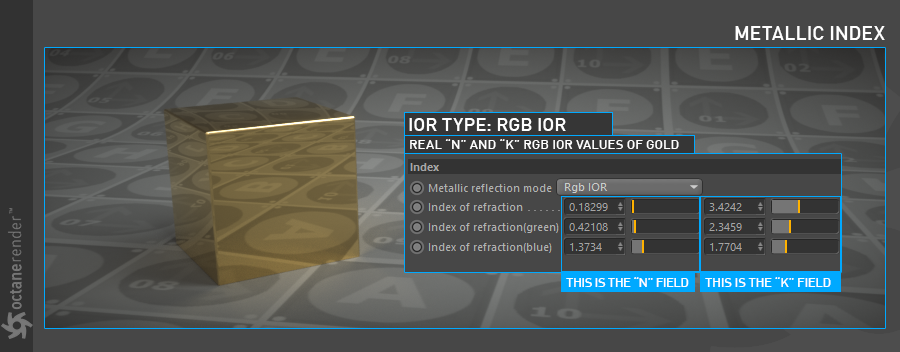
The most accurate IOR is RGB IOR. Using the wavelengths of the visible spectrum, separate n and k values are specified for each color channel (RGB). Specular color is disabled. The image below shows the wavelengths for the RGB channels: 650nm for red, 550nm for green and 450nm for blue.

For this example, go to refractiveindex and select “Gold” in the “selected data for 3D artist” section. Enter 0.65 (ie 650nm) for Red in the Wavelength section and use the values of “n” and “k” immediately below for the red light in the Octane Index (the first row). Do this in the other wavelengths and enter the values one by one in the respective locations. The result will be as you see in the image.


