Octane Render Settings
This section discusses the settings of OctaneRender® for creating final renders. Normally, final render settings produce the same result as Live Viewer. However, fine adjustments not available to the Live Viewer can be made here.
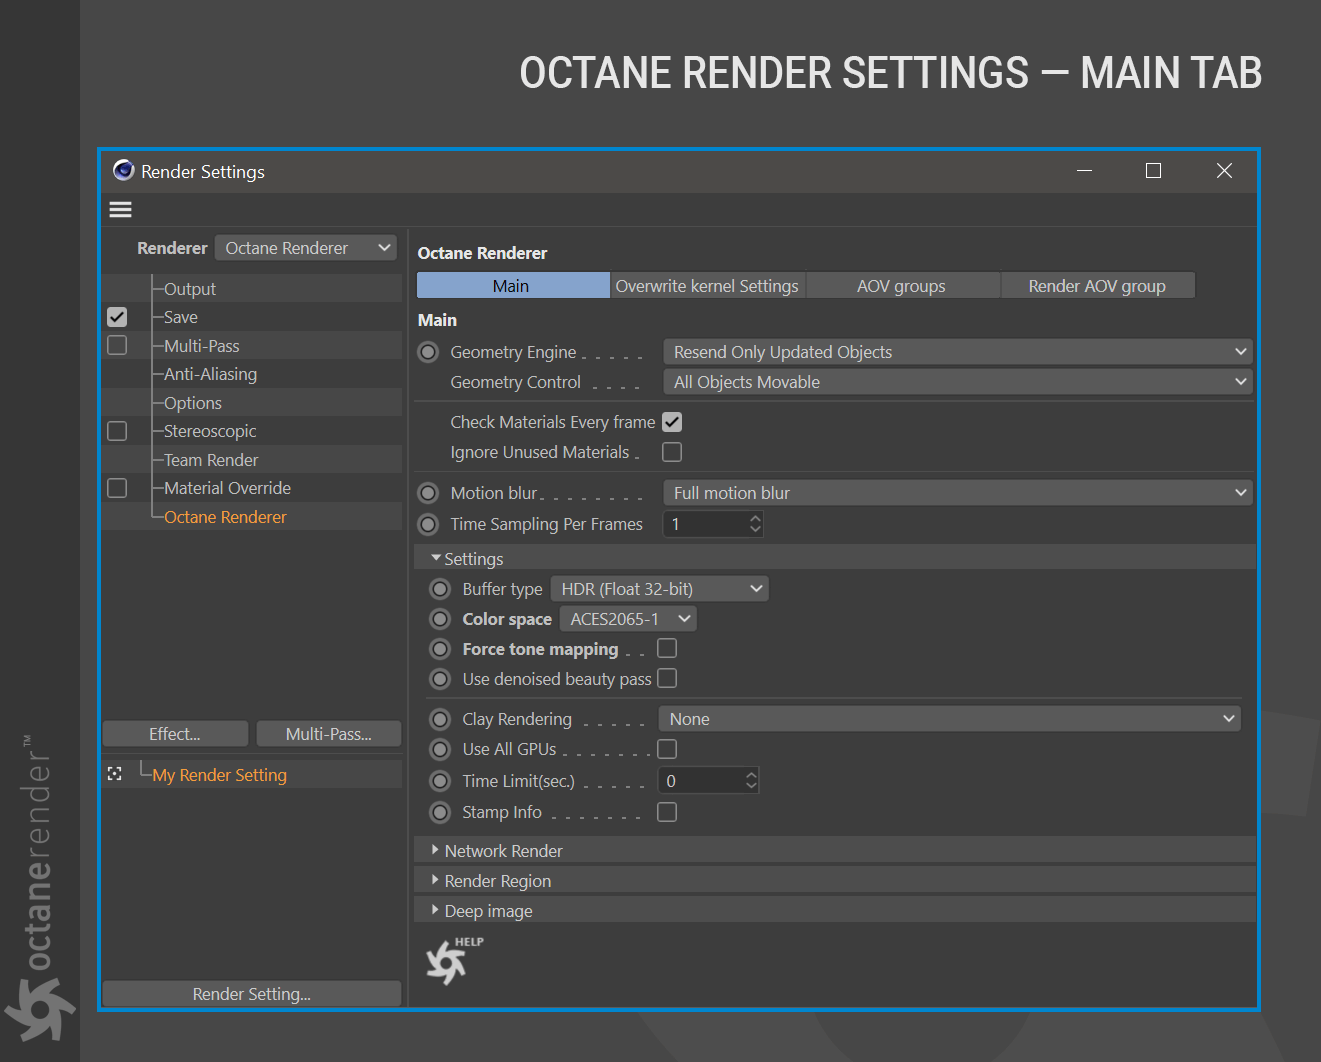
First, open the render settings window of Cinema 4D by selecting Render > Edit Render Settings… from the main menu or by pressing CTRL + B. Select “Octane Renderer” from the Renderer menu in the upper left corner. Here you will see three main tabs: Main, Overwrite Kernel Settings and Render Passes. There is a separate section for Render Passes, you can look at the relevant section for detailed information.

MAIN TAB SETTINGS
The Main tab settings panel contains the global controls for managing renders sent to Octane.
GEOMETRY ENGINE
Each time a render is initiated, Octane compiles and sends information to the GPU card(s) in the system or network render nodes. As scenes can get very complex, this process can end up taking some time. The two options for the Geometry Engine (discussed below) are here to help manage the way that Octane handles data. To better understand these options, read the this section about geometry checking in Octane.
Resend Only Updated Objects: This is the fastest method for single frame/animation rendering. On the first frame, all scene data will be sent to Octane Render. For subsequent frames, only the updated portions of the scene will be updated.
Resend All Scene Data (Deprecated): This is the slowest render data method. This method will reset all data and completely send the entire scene on every frame. In some cases, this method may help to resolve situations that do not update as they should. As this is an expensive method, do not choose this unless absolutely necessary.
GEOMETRY CONTROL
Geometry Control determines how scene object data is transferred to Octane:
Manual Assignment: Requires that animated, emissive, etc. objects are flagged by hand via the Octane Object Tag > Main tab > Force Update setting.
Auto Detect: Makes some pre-calculations before animation rendering begins. This method will try to find/assign the movable, emissive, etc. objects automatically. With this option, there is no need to use the Octane Object tag Force Updates setting. If Octane can’t finish the evaluating the scene within the time frame, all objects will be assumed to be movable.
All Objects Movable: This option will force all objects to be sent to the GPU for every frame. Heavy scenes may cause a crash after 10-15,000 object. Auto-Detect is recommended for heavy scenes instead.
**
CHECK MATERIALS EVERY FRAME
This option controls whether or not materials in the scene are checked for each frame. The default is ON.
IGNORE UNUSED MATERIALS
Unused materials are not checked. Defaults to OFF
MOTION BLUR
This option determines how motion blur is applied to objects in the scene. Motion blur must be properly enabled on every Octane Camera tag in the scene, described here.
Disabled: No motion blur will be rendered in the scene.
Camera Motion Blur: This option renders the motion blur effect of the camera object only.
Full Motion Blur: This option will render both camera and object motion blur for the scene.
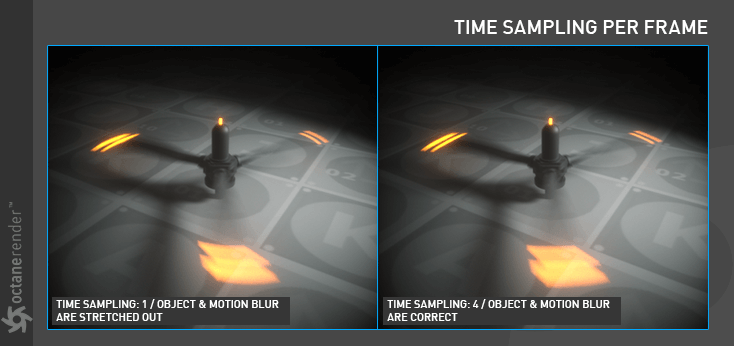
TIME SAMPLING PER FRAMES
This option will create sub-keyframes for motion blurred objects, effectively increasing the temporal resolution of the motion blur itself. This option is only necessary with spinning or rotating objects, such as wheels, rotor blades, and streak effects.

BUFFER TYPE
There are three different buffer types to choose from: HDR (Float 32-bit), HDR (Float 16-bit) and LDR(8-bit).
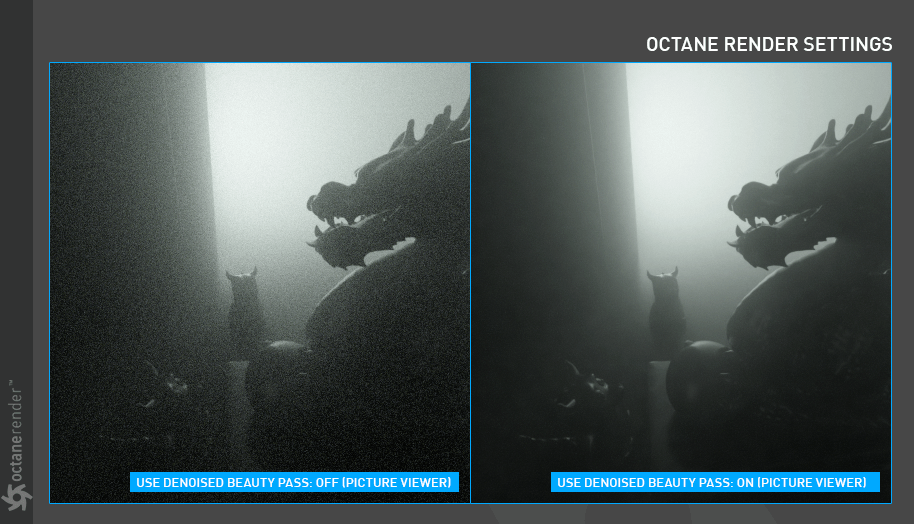
USE DENOISED BEAUTY PASS
This option will output a denoised beauty pass for the image, without the need to enable Denoiser Render Passes. 
CLAY RENDERING
Clay rendering will render the image in one of three different aspects:
- None — This option will render the scene normally (the default).
- Gray — This option will render the scene in gray values only.
- Color — This option will render the scene by object color only; no speculars or other additional parameters will appear in the render.
Be sure to set the value to “None” for final renders.
USE ALL GPUS
Should more than one GPU have been switched in Octane Live Viewer or Render Settings, this option will force them all to be used for rendering. It is also used for batch rendering on separate machines - to be sure that the scene will be rendered with full power on any network machine even if there is a different GPU set on each of them. Default is OFF.
TIME LIMIT (SEC.)
This option sets the maximum time (in seconds) to rendering for each frame. The default value of zero (0) seconds allows the frame to take as long as it needs to complete, as determined by the Max Samples setting.
STAMP INFO
The Stamp Info option will overlay rendering statistics on the render output (sample count; VRAM; duration; etc.). Do not forget to disable this option when executing the final render.
NETWORK RENDER
Network Render is explained in more detail here.
RENDER REGION
This option will render a defined portion of the frame. If the render region is defined in Live Viewer, press the “Get Last Region From Live Viewer” button to use that region, or set one numerically. The Render Region option in Live Viewer is discussed here.
OVERWRITE KERNEL SETTINGS TAB
The Overwrite Kernel Settings tab will allow the settings in Live Viewer to be ignored in favor of the settings in this tab, assuming the Overwrite Kernel Settings toggle is enabled (Default is OFF). Kernel Settings are discussed here.
RENDER AOV GROUP TAB
Render AOV groups are discussed in this section here.

