
相信大家都知道猴子捞月的故事,一只猴子抓住另一只猴子,这就是一个典型的链表,每只猴子都是一个节点。
链表的定义
链表是一种物理存储单元上非连续、非顺序的存储结构,数据元素的逻辑顺序是通过链表中的指针链接次序实现的。链表由一系列节点组成,节点可以在运行时动态生成。下面是一个简单的链表结构示意图: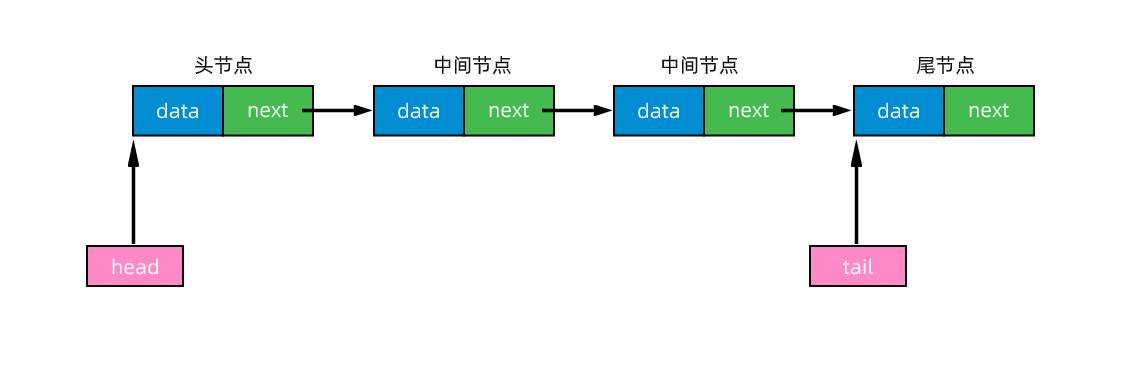
图一
1、节点
节点包含两部分,一部分是存储数据元素的数据域,一部分是存储指向下一个节点的指针域。上图蓝色的部分就是数据域,绿色部分就是指针域,它们一起共同构成一个节点。一个节点包含一个 data 属性,该属性表示要加入链表的元素的值;以及一个 next 属性,该属性是指向链表中下一个元素的指针。这个节点可以使用如下的方式定义和使用:
class Node {constructor(data, next) {this.data = data;this.next = next;}}const node1 = new Node(1);const node2 = new Node(2);const node3 = new Node(3);node1.next = node2;node2.next = node3;console.log(node1.data);console.log(node1.next.data);console.log(node1.next.next.data)
2、首尾节点
链表中的第一个节点是首节点,最后一个节点是尾结点
3、有头链表和无头链表
无头链表
无头链表是指第一个节点既有数据域,又有指针域,第一个节点既是首节点又是头结点,如 图一 就是一个简单的无头链表
有头链表
有头链表是指第一个节点只有指针域,而没有数据域,如下图:
实现链表
定义链表类
我们首先定义一个 LinkList 链表类:
import { defaultEquals } from './utils';class LinkList {constructor(equalsFn = defaultEquals) {this.count = 0; // 存储链表中的元素数量this.head = null; // 保存头节点 (注意:head 永远指向头节点)this.tail = null; // 保存尾节点this.equalsFn = equalsFn; // 链表内部的函数,用于比较链表中的元素是否相等}}
接下来,我们为链表定义一些链表的方法:
append(element) 向链表尾部添加一个新元素
insert(element, index) 向链表的特定位置插入一个新元素
getElementAt(index) 返回链表中特定位置的元素,若元素不存在,返回 undefined
remove(element) 从链表中移除一个元素
removeAt(index) 从链表的特定位置移除一个元素
removeHead() 移除首节点
removeTail() 移除尾结点
indexOf(element) 返回指定元素在链表中的索引,若没有该元素则返回 -1
head() 返回首节点
tail() 返回尾结点
size() 返回链表包含的元素个数,即返回链表的长度
isEmpty() 判断链表是否为空
clear() 清空链表
toString() 返回表示整个链表的字符串
下面,我们逐一实现这些方法:
append 向链表尾部添加一个新元素
向链表尾部添加一个元素时,可能有两种情景:
- 链表为空,添加的是第一个元素
链表不为空,向其追加元素
append(element) {const node = new Node(element);let current = null;// 链表为空,添加的是第一个元素if (this.head == null) {// 让 head 指向新创建的节点this.head = node;} else {// 链表不为空,向链表尾部追加元素// head 永远指向头节点current = this.head;// 从头节点开始,循环访问链表,找到最后一项(即尾节点),在尾节点后面追加新节点while(current.next !== null) {// 获得 尾节点current = current.next;}// 将尾节点的 next 指针指向新创建的节点current.next = node;}// 链表长度加 1this.count++;// 返回 true,表示添加节点成功return true;}
我们来分析一下这两种情景:
第一种情景:向空链表添加一个元素。当我们创建一个链表实例时,head 默认会指向 null。head 为 null,就是意味着是在向链表添加第一个元素,因此要做的就是让 head 指向这个新建的节点 node。
// 链表为空,添加的是第一个元素if (this.head === null) {// 让 head 指向新创建的节点this.head = node;}
第二种情景:向一个不为空的链表添加元素。要向链表的尾部添加一个元素,首先需要找到最后一个元素。我们只有第一个元素的引用,因此需要循环访问列表,直到找到最后一项。为此,我们需要一个指向链表中 current 项的变量。
在循环访问链表的过程中,当 current.next 为 undefined 或null 时,我们就只到已经到达链表尾部了。然后要做的就是让当前(也就是最后一个)元素 current 的 next 指针指向要添加到链表的新节点。
else {// 链表不为空,向链表尾部追加元素// head 永远指向头节点current = this.head;// 从头节点开始,循环访问链表,找到最后一项(即尾节点),在尾节点后面追加新节点while(current.next !== null) {// 获得 尾节点current = current.next;}// 将尾节点的 next 指针指向新创建的节点current.next = node;}
insert 向链表的特定位置插入一个新元素
insert 方法可以在链表的任意位置插入一个新元素。向链表中插入新元素时,我们需要考虑三种情景:
- 插入的位置不合法,元素插入失败
- 在链表的起点插入新元素
在链表的中间或尾部添加新元素
insert(element, index) {// 插入的位置合法,将元素插入到链表中if (index >= 0 && index <= this.count) {const node = new Node(element);// 在链表的第一个位置添加if (index === 0) {// current 变量是对链表中第一个元素的引用const current = this.head;// 将新添加的节点的 next 指针指向当前的第一个元素,也就是将当前的第一个元素变为是链表中的第二个元素node.next = current;// 将 head 指向 node,即链表的第一个元素是新添加的节点this.head = node;} else {// 在链表的中间或尾部添加新元素// 想要插入新节点的位置的前一个节点const previous = this.getElementAt(index - 1);// 想要插入新节点的位置的后一个节点const current = previous.next;// 在 previous 和 current 之间插入新节点// 将 新节点的 next 指针 指向 currentnode.next = current;// 将 前一个节点的 next 指针指向 新节点previous.next = node;}// 更新链表的长度this.count++;// 返回 true,表示元素插入成功return true}// 插入的位置不合法,返回 false,表示元素没有添加到链表中return false;}
下面,我们来分析一下这三种情景:
第一种情景:插入的位置不合法。由于我们是根据位置 (索引) 来插入元素,因此需要检查越界值,如果越界了,就返回 false,表示元素没有添加到链表中。
第二种情景:在链表的起点添加新元素。current 变量是对链表中当前第一个元素的引用,我们需要做的是把要插入元素的 next 指针指向 current ,也就是将链表中当前的第一个元素变成链表中的第二个元素;然后将 head 指向 node ,即此时链表的第一个元素是新添加的节点。
第三种情景:在链表中间或尾部添加一个元素。首先,我们需要迭代链表,找到目标位置。我们循环至 index - 1 的位置,也就是需要添加新节点位置的前一个位置。当我们循环至 index - 1 的位置时跳出循环,此时的 previous 就是对想要插入新元素的位置之前一个元素的引用,current 变量就是我们想要插入新元素的位置后面一个元素的引用。我们是要在 previous 和 current 之间添加新元素,因此,我们把 previous 的 next 指针指向新添加的元素 node,取代 current,然后将新添加节点的 next 指针指向 current,这样就完成了向链表中添加新元素。
getElementAt 返回链表中特定位置的元素
getElementAt 方法返回链表中特定位置的元素,若元素不存在,返回 undefined。
getElementAt(index) {// 传入的位置合法,迭代链表查找目标位置的元素if (index >= 0 && index <= this.count) {// 从链表的第一个元素开始迭代链表let node = this.head;for (let i = 0; i < index && node !== null; i++) {// 迭代整个链表直到目标 index,结束循环时,此时的node元素是目标index的前一个元素// 因此需要使用 node.next 来获取目标index 的元素node = node.next;}return node;}// 传入的位置是不合法的位置,即在链表中找不到该位置的节点,返回 undefinedreturn undefined;}
代码分析:
我们首先会对传入的 index 参数做合法性检查,如果传入的位置时不合法的参数,我们会返回 undefined,因为这个位置在链表中不存在。
然后从链表的第一个节点开始,迭代整个链表直到目标index,当结束循环时,node 就是我们要查找的目标节点。
remove 从链表中移除元素
remove 方法根据元素的值从链表中移除元素
remove(element) {const index = this.indexOf(element);return this.removeAt(index);}
removeAt 从链表的特定位置移除元素
removeAt 方法从链表的特定位置移除一个元素。从链表的特定位置移除元素时,和向链表中插入新元素一样,我们也需要考虑三种情景:
- 移除的位置不合法,元素移除失败
- 移除链表的第一个元素
- 移除链表的最后一个或者中间某个元素
下面,我们来分析一下这三种情景:removeAt(index) {if (index >=0 && index < this.count) {// current 变量是对链表第一个元素(即首节点)的引用let current = this.head;// 移除的是链表中的第一个元素if (index === 0) {// 将头节点指向链表的第二个元素即可this.head = current.next;} else {// previous 变量时对要移除节点的前一个节点的引用const previous = this.getElementAt(index);// current 变量是对要移除节点的引用current = previous.next;previous.next = current.next}this.count--;// 返回移除节点的数据域,即要移除的元素return current.data;}// 传入的index 参数不是有效位置,返回 undefined,即没有从链表中移除元素return undefined;}
第一种情景:移除的位置不合法。由于 removeAt 方法是根据 index 移除链表中的元素,因此我们首先需要对 index 进行有效性检查。从 0(包括 0 )到链表的长度(count - 1)都是有效的位置。如果 index 不是有效的位置,就返回 undefined,即没有从链表中移除元素
第二种情景:移除链表的第一个元素。如果移除的是链表的第一个元素,我们只要将 head 指向链表的第二个元素即可,这样第一个元素自然就被移除了。
// current 变量是对链表第一个元素(即头节点)的引用let current = this.head;// 移除的是链表中的第一个元素if (index === 0) {// 将头节点指向链表的第二个元素即可this.head = current.next;}
第三种情景:移除链表的最后一个或者中间某个元素。如果我们要移除的是链表的最后一个元素或者是中间的某个元素,我们需要迭代链表,直到到达目标位置。其中 current 变量是对所循环链表的当前节点的引用,previous 变量是对当前节点的前一个节点的引用。
在迭代到目标位置之后,current 变量就是我们要移除的节点。我们要移除当前的节点,要做的事情就是将 previous.next 和 current.next 连接起来。这样,当前节点就会被丢弃在计算机内存中,等待被垃圾收集器清除。
迭代查找目标位置的逻辑我们都统一封装在了 getElementAt 方法了,因此我们可以调用 getElementAt 方法来获得要移除节点的前一个节点。
else {// previous 变量时对要移除节点的前一个节点的引用const previous = this.getElementAt(index);// current 变量是对要移除节点的引用current = previous.next;previous.next = current.next}
removeHead() 移除首节点
readmoveHead 方法移除的是链表的第一个元素,即首节点。
要移除首节点,我们要做的事情就是将 head 指向链表中的第二个节点,这样首节点就被丢弃在了计算机内存中,等待着垃圾收集器清除。
removeHead() {//链表为空,返回 undefined,表示没有移除节点if (this.head == null) {return undefined;}// current 变量是对首节点的引用const current = this.head;// 移除首节点,就是将 head 指向第二个节点this.head = current.next;this.count--;return current.data;}
removeTail() 移除尾结点
removeTail() {if (this.head == null) {return undefined;}const previous = this.getElementAt(this.size() - 1);const current = previous.next;previous.next = current.next;this.count--;return current.data;}
indexOf 返回指定元素在链表中的索引
indexOf 方法接收一个元素的值,如果在链表中找到了它,就返回该元素的位置,否则就返回 -1,表示在链表中没有找到该元素。
indexOf(element) {// current 变量是对链表第一个元素(即首节点)的引用let current = this.head;// 迭代链表,从 head (索引 0) 开始,直到链表长度(count 变量)为止for(let i = 0; i < this.size() && current !== null; i++) {// 比较当前节点的元素与目标元素是否相等,若相等,当前节点就是我们要找的节点,返回当前节点的位置if (this.equalsFn(element, current.data)) {return i;}// 不是我们要找的节点,继续迭代下一个链表节点current = current.next;}// 链表为空,或者迭代到链表尾部,没有找到目标元素,返回 -1return -1;}
代码分析:
从链表中查找某个节点的位置,就需要对链表进行迭代。我们从 head(索引 0)开始,一直到链表长度(count 变量)为止,也就是迭代到链表的尾部。
在每次迭代时,我们都会验证 current 节点的元素和目标元素是否相等,如果相等,当前位置的元素就是我们要找的元素,返回该元素的位置。如果不是我们要找的元素,则继续迭代下一个节点。
如果链表为空,或者我们迭代到了链表的尾部,都没有找到我们想要的元素,则返回 -1。
head() 返回首节点
head() {return this.head}
tail() 返回尾结点
tail() {if (this.head == null) {return undefined;}return this.getElementAt(this.size());}
size 返回链表的节点个数
size 方法返回链表的节点个数,即返回链表的长度。LinkList 是我们自己构建的类,链表的长度是我们使用 count 变量来控制的,因此返回链表的长度,就是返回 count 变量。
size() {return this.count;}
isEmpty 判断链表是否为空
isEmpty 方法判断链表是否为空。如果链表中没有元素,isEmpty 方法就返回 true,否则返回 false。
isEmpty() {return this.size() === 0;}
clear 清空链表
clear() {// 将 head 置为 null,即可将链表清空this.head = null;this.count = 0;}
toString 返回表示整个链表的字符串
toString 方法将 LinkList 对象转换成一个字符串,然后返回链表内容的字符串。
toString() {// 链表为空,返回空字符串if (this.head == null) {return '';}let objString = `${this.head.data}`;let current = this.head.next;// 迭代链表,将将元素值添加到字符串上for(let i = 1; i < this.size() && current != null; i++) {objString = `${objString}, ${current.data}`;current = current.next;}return objString;}
代码分析:
首先,如果链表为空,我们就返回一个空字符串;
如果链表不为空,我们首先用链表第一个元素的值来初始化方法返回的字符串objString。然后迭代链表的所有其它元素,将元素值添加到字符串 objString 上;
当迭代完链表后,返回链表内容的字符串。
完整代码
function defaultEquals(a, b) {return a === b;}class Node {constructor(data) {this.data = data;this.next = null;}}class LinkList {constructor(equalsFn = defaultEquals) {this.equalsFn = equalsFn;this.count = 0;this.head = null;}append(element) {const node = new Node(element);let current = null;if (this.head == null) {this.head = node;} else {current = this.head;while(current.next != null) {current = current.next;}current.next = node;}this.count++;}insert(element, index) {if (index >= 0 && index <= this.count) {const node = new Node(element);if (index === 0) {const current = this.head;node.next = current;this.head = node;} else {const previous = this.getElementAt(index);node.next = previous.next;previous.next = node;}this.count++;return true;}return false;}getElementAt(index) {if (index >= 0 && index <= this.count) {let node = this.head;for (let i = 0; i < index && node != null; i++) {node = node.next;}return node;}return undefined;}remove(element) {const index = this.indexOf(element);return this.removeAt(index)}removeAt(index) {if (index >= 0 && index < this.count) {let current = this.head;if (index === 0) {this.head = current.next;} else {const previous = this.getElementAt(index);current = previous.next;previous.next = current.next;}this.count--;return current.data;}return undefined;}removeHead() {if (this.head == null) {return undefined;}const current = this.head;this.head = current.next;return current.data;}removeTail() {if (this.head == null) {return undefined;}const previous = this.getElementAt(this.size() -1) {const current = previous.next;previous.next = current.next;return current.data}}indexOf(element) {let current = this.head;for (let i = 0; i < this.size() && current != null; i++) {if (this.equalsFn(element, current.data)) {return i;}current = current.next;}return -1;}head() {return this.head;}tail() {if (this.head == null) {return undefined}return this.getElementAt(this.size() - 1)}size() {return this.count;}isEmpty() {return this.size() === 0;}clear() {this.head = null;this.count = 0;}toString() {if (this.head == null) {return '';}let objString = `${this.head.data}`;let current = this.head.next;for (let i = 1; i < this.size() && current != null; i++) {objString = `${objString}, ${current.data}`;current = current.next}return objString;}}
链表的应用
基于链表实现栈
在数据结构与算法学习之栈一文中,我们分别基于Object对象和数组实现了栈,现在,我们基于链表来实现栈。
class Stack {constructor() {this.items = new LinkList();}// 添加元素到栈顶push(element) {return this.items.append(element);}// 从栈顶移除元素pop() {return this.items.removeTail();}// 查看栈顶元素peek() {return this.items.tail();}// 检查栈是否为空isEmpty() {return this.items.isEmpty();}// 清空栈clear() {this.items.clear()}// 返回栈里的元素个数size() {return this.items.size();}}
基于链表实现队列
在数据结构与算法学习之队列一文中,我们分别基于Object对象和数组实现了队列,现在,我们基于链表来实现队列。
class Queue {constructor() {this.items = new LinkList();}// 入队列enqueue(element) {return this.items.append(element);}// 出队列dequeue() {return this.items.removeHead();}// 返回队首head() {return this.items.head();}// 返回队尾tail() {return this.items.tail();}// 判断队列是否为空isEmpty() {return this.items.isEmpty();}// 清空队列clear() {this.items.clear();}// 队列长度size() {return this.items.size()}// 打印队列print() {return this.items.toString()}}
翻转链表
迭代方式翻转链表
**
思路分析:
我们再考虑算法时,大多数情况是考虑边界情况会让问题变得简单,但边界情况往往不具备普适性,因此,我们也要尝试考虑中间的情况。
现在我们假设链表中间的某个节点为 currentNode,它的前一个节点为 prevNode,下一个节点为 nextNode。我们现在把思路聚焦到这个 currentNode 节点上,只考虑在这一个节点上翻转,将 currentNode 节点的 next 指针指向 prevNode:
currentNode.next = prevNode;
只需要这简单的一个步骤就可以完成 currentNode 节点的翻转,对于头节点来说,它没有上一个节点,让 prevNode = null,表示它的上一个节点是一个空节点。
在遍历的过程中,每完成一个节点的翻转,都让 currentNode = nextNode,找到下一个需要翻转的节点,同时,prevNode 和 nextNode 也跟随 currentNode 一起向后滑动。
// 迭代翻转链表const reverse_linkList_iterable = (head) => {if (!head) {return null;}let prevNode = null;let currentNode = head;while(currentNode) {const nextNode = currentNode.next; // 下一个节点currentNode.next = prevNode; // 将当前节点的 next 指针指向 prevNode,完成对当前节点进行翻转prevNode = currentNode; // prevNode 向后滑动currentNode = nextNode; // currentNode 向后滑动}// 最后要将 prevNode 返回,当循环结束时,prevNode 指向翻转前链表的最后一个节点return prevNode}
const Node = function(data){this.data = data;this.next = null;}const node1 = new Node(1);const node2 = new Node(2);const node3 = new Node(3);const node4 = new Node(4);const node5 = new Node(5);node1.next = node2;node2.next = node3;node3.next = node4;node4.next = node5;function print(node) {var curr_node = node;while(curr_node){console.log(curr_node.data);curr_node = curr_node.next;}};print(reverse_iter(node1));
递归方式翻转链表
递归的思想,精髓之处在于甩锅,你做不到的事情,让别人去做,等别人做完了,你在别人的基础上继续做。
甩锅一共分为四步:
- 明确函数的功能,既然是先让别人去做,那你得清楚地告诉他做什么。函数 reverse_linkList_Recursion(head) 完成的功能,是从 head 开始翻转链表,函数的返回值是翻转后的头节点。
正式甩锅,进行递归调用,就翻转链表而言,甩锅的方法如下:
const newHead = reverse_linkList_Recursion(head.next);
原本是翻转以 head 开头的链表,可是你不会啊,那就先让别人从 head.next 开始翻转链表,等他翻转完,得 到的 newHead 就是翻转后的头节点
根据别人的结果,计算自己的结果。第二步中,已经完成了从 head.next 开始翻转链表,现在,只需要把 head 连接到新链表上就可以了。新链表的尾结点是 head.next,执行 head.next.next = head,这样,head 就成了新链表的尾结点
// 递归翻转链表function reverse_linkList_Recursion(head) {// head 为 null 时,即链表为空链表,直接返回 nullif (!head) {return null;}// 从下一个节点开始进行翻转const newHead = reverse_linkList_Recursion(head.next);// 把当前节点连接到新链表上head.next.next = head;head.next = null;return newHead;}
找到递归终止的条件。函数最终要返回新链表的头结点,而新链表的头节点正是旧链表的尾结点,所以,遇到尾节点时,直接返回尾节点,这就是递归终止的条件。
// 递归翻转链表function reverse_linkList_Recursion(head) {// head 为 null 时,即链表为空链表,直接返回 nullif (!head) {return null}// 旧链表的尾结点,结束递归if (head.next == null) {return head;}// 从下一个节点开始进行翻转const newHead = reverse_linkList_Recursion(head.next);// 把当前节点连接到新链表上head.next.next = head;head.next = null;return newHead;}
```javascript const Node = function(data){ this.data = data; this.next = null; }
const node1 = new Node(1); const node2 = new Node(2); const node3 = new Node(3); const node4 = new Node(4); const node5 = new Node(5);
node1.next = node2; node2.next = node3; node3.next = node4; node4.next = node5;
function print(node) { var curr_node = node; while(curr_node){ console.log(curr_node.data); curr_node = curr_node.next; } };
print(reverse_linkList_Recursion(node1));
<a name="kLCZz"></a>### 从尾到头打印链表当我们拿到一个链表时,我们得到的是头节点,只有头节点以后的节点被打印了,才能打印头节点,这不正是一个可以甩锅的事情么。函数的功能,就是从 head 开始反向打印链表,但是现在不知道如何反向打印,于是甩锅,先从 head.next 开始反向打印,等这部分打印完了,再打印 head 节点。```javascriptfunction reverse_print_linkList(head) {if (head == null) {return} else {reverse_print_linkList(head.next)console.log(head.data)}}
const Node = function(data){this.data = data;this.next = null;}const node1 = new Node(1);const node2 = new Node(2);const node3 = new Node(3);const node4 = new Node(4);const node5 = new Node(5);node1.next = node2;node2.next = node3;node3.next = node4;node4.next = node5;reverse_print_linkList(node1)

若有收获,就点个赞吧
0 人点赞
