在数据存储到数据库之前验证数据格式的一个聪明的方法是使用 Mongoose 提供的validation功能。
我们可以为模式中的每个字段定义特定的验证规则:
const noteSchema = new mongoose.Schema({content: {type: String,minLength: 5,required: true},date: {type: Date,required: true},important: Boolean,})
minLength 和 required 验证器是内置的
添加错误处理
-- snip --app.post('/api/notes', (request, response, next) => {const body = request.bodyif (!body.content) {return response.status(400).json({error: 'content missing'})}const note = new Note({content: body.content,important: body.important || false,date: new Date(),})note.save().then(savedNote => {response.json(savedNote)}).catch(error => next(error))})-- snip --const errorHandler = (error, request, response, next) => {console.log(error.message)if (error.name === 'CastError' && error.kind === 'ObjectId') {return response.status(400).send({ error: 'malformatted id' })} else if (error.name === 'ValidationError') {return response.status(400).json({ error: error.message })}next(error)}-- snip --
Promise chaining
许多的路由处理程序会将响应数据通过隐式地调用 toJSON 方法,将 response.json 数据格式转换成正确的格式。
我们可以用promise链显式地写出来
app.post('/api/notes', (request, response, next) => {// ...note.save().then(savedNote => savedNote.toJSON()).then(savedAndFormattedNote => {response.json(savedAndFormattedNote)}).catch(error => next(error))})
Deploying the database backend to production
将数据库后端部署到生产坏境
我们在文件 .env中定义了用于开发的环境变量。 但是在生产环境中定义数据库 URL 的环境变量应该使用 heroku config:set 命令来设置 Heroku。
heroku config:set MONGODB_URI='mongodb+srv://fullstack:密码@cluster0-ostce.mongodb.net/note-app?retryWrites=true'
如果报错:UNABLE_TO_VERIFY_LEAF_SIGNATURE: unable to verify the first certificate
给命令终端设置代理即可
Exercises 3.19.-3.21.
验证唯一性
Mongoose没有内置验证唯一性的验证器,可以使用mongoose-unique-validator
安装
yarn add mongoose-unique-validator# 或者npm install mongoose-unique-validator
使用
var mongoose = require('mongoose');var uniqueValidator = require('mongoose-unique-validator');// Define your schema as normal.var userSchema = mongoose.Schema({username: { type: String, required: true, unique: true },email: { type: String, index: true, unique: true, required: true },password: { type: String, required: true, minLength: 8}});// Apply the uniqueValidator plugin to userSchema.userSchema.plugin(uniqueValidator);
ValidationError 错误处理
const errorHandler = (error, request, response, next) => {console.log(error.message)if (error.name === 'CastError' && error.kind === 'ObjectId') {return response.status(400).send({ error: 'malformatted id' })} else if (error.name === 'ValidationError') {return response.status(400).send({ error: error.message })}next(error)}
在前端获取错误信息
如果不知道,就要用console.dir(error)把错误信息打出来查看结构
personService.create(newObject).then(response => {-- snip --}).catch(error => console.log(error.response.data.error))
Mongoose的upate默认是不开启验证的,要开启验证需添加如下参数
- runValidators: true,
- context: ‘query’ ```javascript const opts = { new: true, runValidators: true, context: ‘query’ }
Person.findByIdAndUpdate(request.params.id, person, opts) .then(updatedPerson => { response.json(updatedPerson) }) .catch(error => next(error))
<a name="XSd8I"></a>### Lint通常,lint 或 linter 是检测和标记编程语言中的错误,包括文本错误的一种工具。 lint-like 这个术语有时用于标记可疑的语言使用情况。 类似 lint 的工具通常对源代码执行静态分析。<br />在 JavaScript 的世界里,目前主要的静态分析工具(又名“ linting”)是[ESlint](https://eslint.org/)<br />在后端项目中,将ESlint安装为开发依赖```bashnpm install eslint --save-dev# 或者yarn add eslint --dev
使用命令初始化eslint默认配置
node_modules/.bin/eslint --init
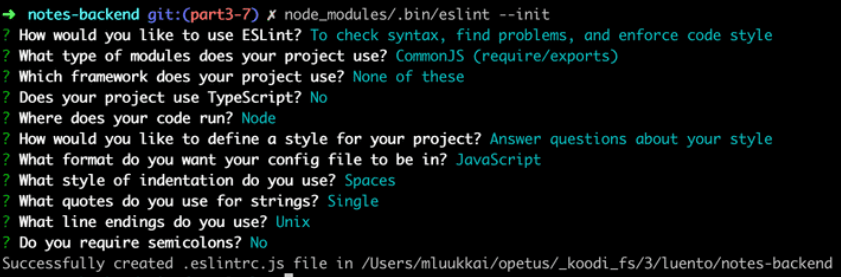
项目根目录会生成一个.eslintrc.js文件
module.exports = {'env': {'browser': true,'commonjs': true,'es2021': true},'extends': 'eslint:recommended','parserOptions': {'ecmaVersion': 12},'rules': {'indent': ['error',4],'linebreak-style': ['error','unix'],'quotes': ['error','single'],'semi': ['error','never']}}
将缩进改为2个空格
'indent': ['error',2],
通过Eslint检查一个文件,如index.js
node_modules/.bin/eslint index.js
创建一个单独的npm脚本命令, 检查当面目录所有文件
{// ..."scripts": {// ..."lint": "eslint ."},// ...}
创建.eslintignore文件,将build添加进去,检查时忽略build文件夹
执行命令 npm run lint 或 yarn lint 检查代码
安装插件ESLint, 它会连续执行代码检查命令,并在vscode中用红线将错误标示出来
继续在 .eslintrc.js添加规则
{// ...'rules': {// ...'eqeqeq': 'error','no-trailing-spaces': 'error','object-curly-spacing': ['error', 'always'],'arrow-spacing': ['error', { 'before': true, 'after': true }],'no-console': 0},}
修改配置后,用命令行执行lint,验证配置是否正确

若有收获,就点个赞吧
0 人点赞
