同时打开我们的后端服务和Notes项目,发现获取不到数据,这是因为违反了同源策略
(两个 URL 具有相同的协议,域和端口,则称它们是“同源”的)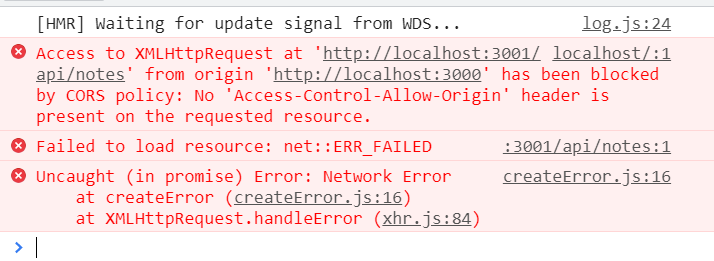
Same origin policy and CORS
CORS(cross-origin resource sharing) 跨源资源共享
我们可以通过使用 Node 的cors 中间件来允许来自其他源的请求。
安装
npm install cors
使用cors中间件,并允许所有来源的请求
const cors = require('cors')app.use(cors())
Application to the Internet
将应用迁移到https://www.Heroku.com
官方文档
向项目的根目录添加一个名为 Procfile的文件(没有后缀名),告诉 Heroku 如何启动应用。
web: npm start
更改index.js中端口定义
const PORT = process.env.PORT || 3001
注册Heroku账号
下载并安装Heroku CLI
进入项目根目录
git init 创建你的本地仓库
把node_module和.env写进.gitignore文件
git add/commit 提交
登录heroku(注意要加-i, 不然会报错ip address mismatch)
heroku login -i
登录会把SSH公钥上传到Heroku, 否则无法git push
创建Heroku App
heroku create
push 到Heroku
git push heroku master
如果要push到github, 则在github创建仓库, origin代表仓库名,可以自定义,-u代表默认推送
git remote add origin 仓库地址git push -u origin master
应用现在已经部署了,确保至少一个 app 的实例正在运行
heroku ps:scale web=1
现在,可以用heroku create时产生的URL 访问 app. 有一个便捷的方法, 你可以像这样打开web站点
heroku open
查看日志
heroku logs -t
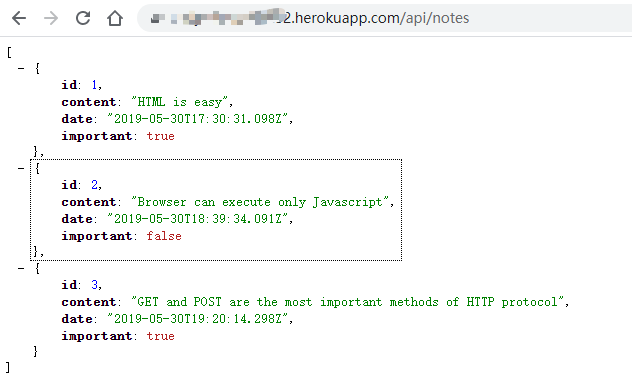
现在将notes项目中的baseUrl改成heroku上的地址也能正常工作
Frontend production build
运行下列命令,将前端项目打包,会生成一个build目录
yarn build#或者npm run build
Serving static files from the backend
部署前端的一个选择是将生产构建( build 目录)复制到后端仓库的根目录,并配置后端以显示前端的 main page (文件 build/index.html)作为其主页。
将build目录复制到notes-backend根目录
cp -r build ../notes-backend
为了让 express 显示 static content、 页面 index.html 和它用来fetch的 JavaScript 等等,我们需要一个来自 express 的内置中间件,称为static。
在后端index.js中添加如下内容
app.use(express.static('build'))
git add/commit/push heroku master 将更改提交并推送到heroku远程仓库
此时heroku open就可以看到显示前端页面了
yarn dev运行本地的后端服务,也可以在http://localhost:3001/看到前端页面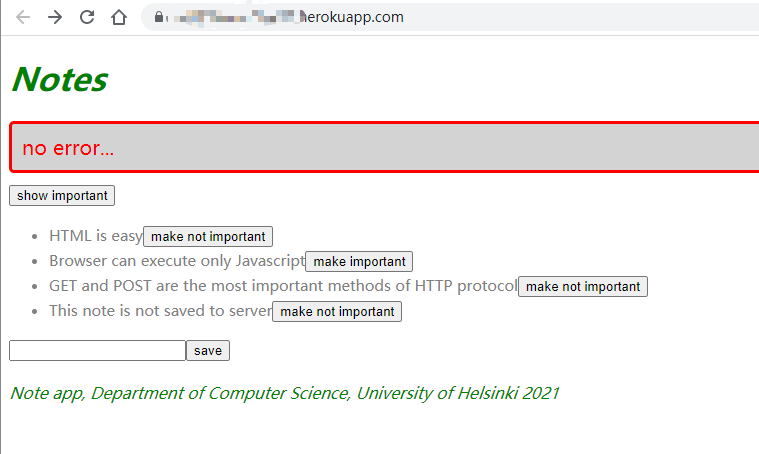
因为此时前端和后端都在同一个地址,可以将baseUrl改为相对地址
const baseUrl = '/api/notes'
重新打包
rm -rf buildyarn build
将build目录重新复制到后端根目录,重新提交
如果出现下列报错,重新打开一个bash终端即可
Streamlining deploying of the frontend
流程化前端部署
在后端package.json的scripts中添加下列代码, 相对路径根据实际情况修改:
{"scripts": {//..."build:ui": "rm -rf build && cd ../part2-notes/ && npm run build --prod && cp -r build ../notes-backend","deploy": "git push heroku main","deploy:full": "npm run build:ui && git add . && git commit -m uibuild && git push && npm run deploy","logs:prod": "heroku logs --tail"}}
这样在后端通过npm run或者yarn 运行指令,就可以完成前端和后端的自动打包和部署了
如果只用yarn, 则把命令里的npm run都改成yarn
—prod 代表production
Proxy
前端项目的baseUrl改成相对地址后,yarn start运行无法正常工作了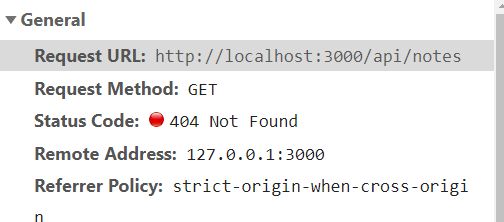
在package.json中添加proxy, 重启应用就可以正常工作了
{"dependencies": {// ...},"scripts": {// ...},"proxy": "http://localhost:3001"}
exercise 3.9 - 3.11
如果不能安装heroku cli, 可以使用命令
npx heroku-cli

若有收获,就点个赞吧
0 人点赞
