Remotes
clone
使用git clone将本地的my-git-repo复制成marys-repo
cd /path/to/my-git-repocd ..git clone my-git-repo marys-repocd marys-repo
配置本地仓库, 让别人知道写代码的是谁(git log时能看到author)
git config user.name "Mary"git config user.email mary.example@rypress.com
查看本地仓库配置 **cat .git/config**
查看全局配置 **cat ~/.gitconfig**
Just as branches are anabstraction for the working directory, the staged snapshot, and a commit history, a repository is an abstraction for branches.
在marys-repo执行命令git remote查看远程仓库, 可以看到有个origin
加上-v (verbose)参数可以查看详情
可以看到marys-repo的远程仓库就是my-git-repo
这是因为marys-repo是git clone得来的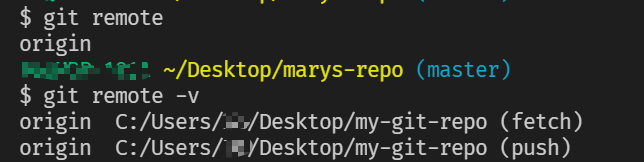
注意: marys-repo和my-git-repo是两个相互独立的库
回到my-git-repo
git remote查看不到远程仓库**git remote add mary ../marys-repo** 将marys-repo添加为远程仓库git remote add <remote-name> <remote-path>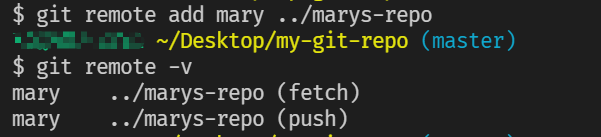
现在2个库都互为远程仓库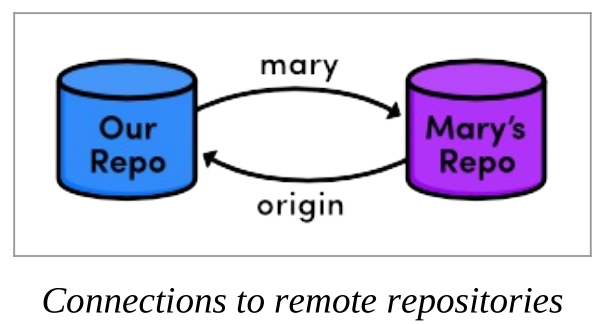
fetch
使用**git branch -r** 查看远程分支(remote branches)**git fetch mary** Download remote branch information, but do not merge anything.
This will go to the “fetch” location shown in git remote -v and download all of the branches it finds there into our repository. 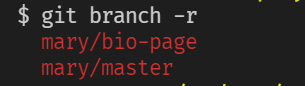
远程分支仅仅是拷贝到我们仓库的副本,所以不是实时更新的,每次都要手动fetch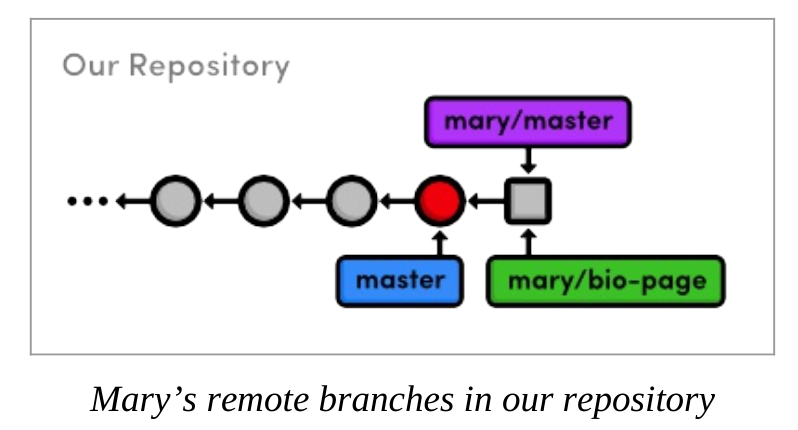
Check Out a Remote Branch
git checkout mary/master 切换到mary的分支查看她做了什么更改, 此时是处于detached HEAD状态git log master..mary/master --statgit log mary/master..master --stat 查看两个分支的异同
Merge Mary’s Changes
git checkout mastergit merge mary/master 将mary的分支合并到我们的分支
此时mary的commit变成了我们master分支的一部分
Push a Dummy Branch
fetching imports remote branches, while pushing exports local branches to another repositorygit branch dummygit push mary dummy
创建dummy分支,把它push给远程仓库mary
在marys-repo查看分支 git branch, 可以看到dummy分支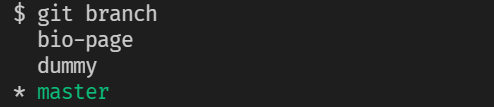
给别人的仓库push分支会制造混乱, 如果那个分支不存在,就会凭空多出一个分支, 所以永远不要这么做! you should never push into another developer’s repository.
Push a New Tag
git push分支的时候不会把分支上的tag带过去, 需要手动pushgit tag -a v2.0 -m "An even stabler version of the website"git push mary master
git push mary v2.0手动push tag
The remotes listed in git remote are merely bookmarks for a full path to anotherrepository.
That said, it’s important to note that remotes are for people, whereas branches are for topics.
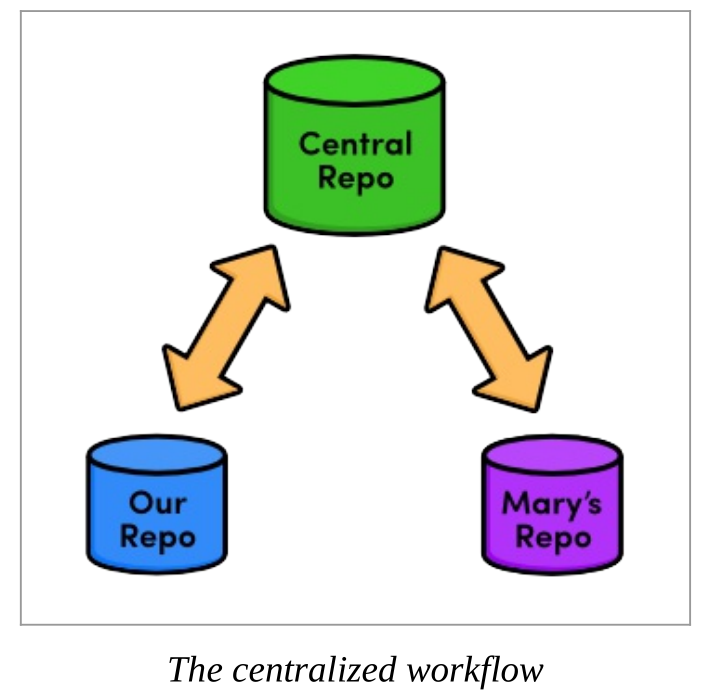
Centralized Workflows
Create a Bare Repository (Central)
cd /path/to/my-git-repocd ..**git init --bare central-repo.git**
该命令生成了一个.git文件夹, 内容和其他仓库的.git文件夹里的一样
—bare 告诉Git我们不要working directory
A central repository is only supposed to act as a storage facility—not a development environment.
Update Remotes (Mary and You)
将central-repo.git分别添加到Mary和我的远程仓库cd marys-repogit remote rm origin 移除仓库git remote add origin ../central-repo.git
cd ../my-git-repogit remote add origin ../central-repo.gitgit remote rm mary
Push the Master Branch (You)
目前的中心仓库是空的,将我们的master分支push到中心仓库cd my-git-repogit push origin mastergit log
会发现中心仓库已经拥有了master分支的所有commits
Add News Update (You)
在my-git-repo创建新的分支, 做一些修改, 提交
git checkout -b news-itemgit add news-3.html index.htmlgit statusgit commit -m "Add 3rd news item"
Publish the News Item (You)
如果是一个人开发, Publish意思是将分支和master分支合并
在Centralized Workflow, publish意思是先合并到master, 再push到中心库
git checkout mastergit merge news-itemgit branch -d news-itemgit push origin master
Update CSS Styles (Mary)
Mary生成了一个新的分支, 做了2次commit
在push到中心库前, 用git rebase将2个commit合并成了一个commit
千万不要在推送到中心库之后再rebase, 一定要在之前做
Never, ever rebase commits that have been pushed to a shared repository.
If you need to change a public commit, use the **git revert** command
而且也不要将其他分支push到中心库,因为其他人不知道那是什么,出发你们约定好了开发这个分支
Publish CSS Changes (Mary)
git checkout mastergit merge css-editsgit branch -d css-editsgit push origin master
Pull in Changes (Mary)
git fetch origin 先更新本地的远程仓库git log master..origin/mastergit log origin/master..master 查看差异
可以理解为mary的master分支和远程的master分支分叉了
使用git rebase将mary的master与origin/master合并, 使mary的最新commit在最前面git rebase origin/mastergit push origin master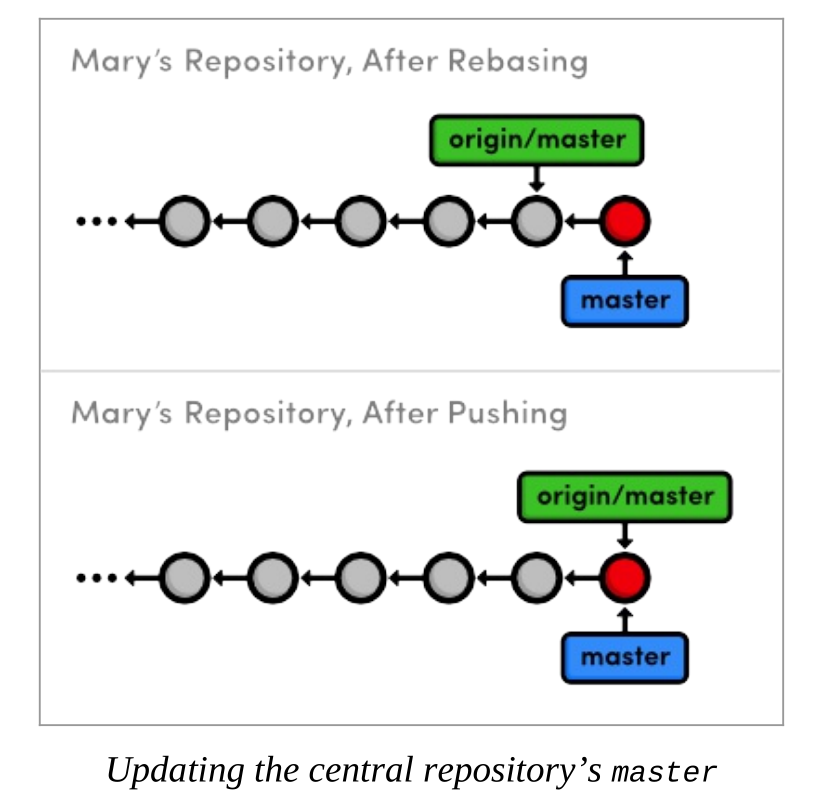
Pull in Changes (You)
最后回到自己的仓库,从central repo获取mary的更新
cd ../my-git-repogit fetch origingit log master..origin/master --statgit log origin/master..master --statgit merge origin/master
Distributed Workflows
centralized workflows的缺点是任何人都可以push snapshots到中心库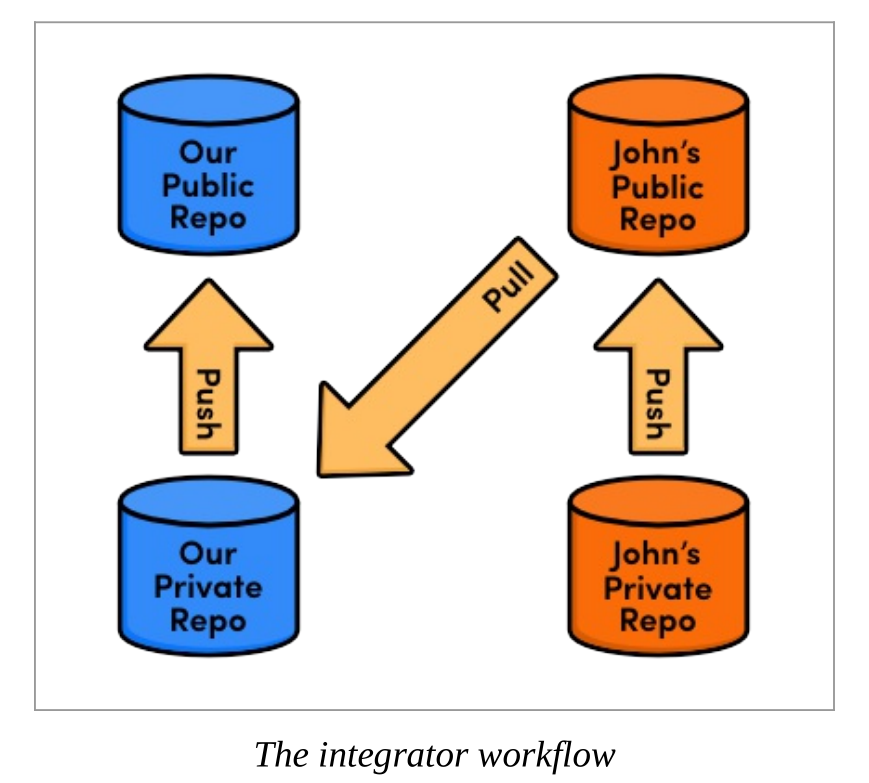
Bitbucket
https://bitbucket.org/
在Bitbucket注册一个账号
注册的邮箱要和本地的git config —global的一致
在Bitbucket上新建一个public repo
这就相当于 git init --bare
注意: 什么都不要勾,不要选yes,只要一个空库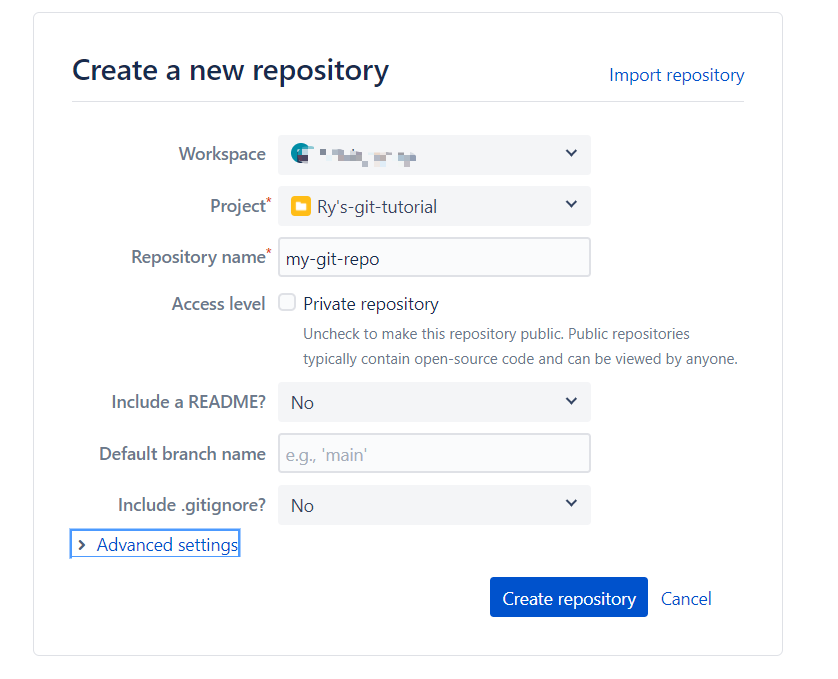
Push to the Public Repository (You)
cd /path/to/my-git-repogit remote rm origingit remote add origin https://<username>@bitbucket.org/<username>/my-git-repo.gitgit push origin master
这里是用https方式添加的远程仓库, push时要输密码,可以改用SSH方式
Clone the Repository (John)
John想要帮助我们修改项目
先将远程仓库克隆到本地 ( GitHub或Bitbucket可以先Fork )**git clone http://bitbucket.org/<username>/my-git-repo.git johns-repo** 注意克隆时可以重命名
**cd johns-repo**
设置用户信息git config user.name "John"
git config user.email john.example@rypress.com
Add the Pink Page (John)
git add pink.html index.htmlgit statusgit commit -m "Add pink page"
Publish the Pink Page (John)
John需要把他贡献的代码推送到我们的公共仓库
但事实上他也无法直接推送, 因为https要密码, SSH需要密钥
Instead, he’ll create his own Bitbucket repository that we can pull contributions from.
John在Bitbucket创建了一个仓库, 把pink page分支推送上去
git remote add john-public https://<username>@bitbucket.org/<username>/johns-repo.gitgit push john-public pink-page
现在john只需要告诉我们他的仓库的链接( GitHub或Bitbucket可以直接pull request )
http://bitbucket.org/<username>/johns-repo.git
是http协议的, 允许任何人fetch, 但不可以push
View John’s Contributions (You)
cd ../my-git-repogit remote add john http://bitbucket.org/<username>/johns-repo.gitgit fetch johngit branch -rgit log master..john/pink-page --statgit checkout john/pink-page
Never blindly merge content from a third-party contributor.
Integrate John’s Contributions (You)
如果赞同john的更改,将他的代码合并到master
git checkout mastergit merge john/pink-page
Publish John’s Contributions (You)
将合并后的代码推送到public repogit push origin master
Update Mary’s Repository (Mary)
注意, Mary添加的也是http协议的公开地址
cd ../marys-repogit remote rm origingit remote add origin http://bitbucket.org/<username>/my-git-repo.gitgit checkout mastergit fetch origingit rebase origin/master
Update John’s Repository (John)
John不该用本地的pink-page分支合并到master, 而应该用public repo里发布的代码
所以要先fetch, 再合并
cd ../johns-repogit checkout mastergit fetch origingit rebase origin/master
Patch Workflows
之前的工作流都是建立在分支基础上的
我们也可以使用commit级别的工作流
it’s also possible to communicate directly on the commit level using a patch.
A patch file represents a single set of changes (i.e., a commit) that can be applied to any branch,
in any order.
Change the Pink Page (Mary)
git checkout -b pink-page 创建一个分支, 并做一些修改git commit -a -m "Change pink to a manly color" 提交修改
Create a Patch (Mary)
**git format-patch master**
这个命令的意思是为所有在当前分支,但是不在master分支的commit创建patch
执行命令后, 生成了一个.patch文件, 内容就像是一封邮件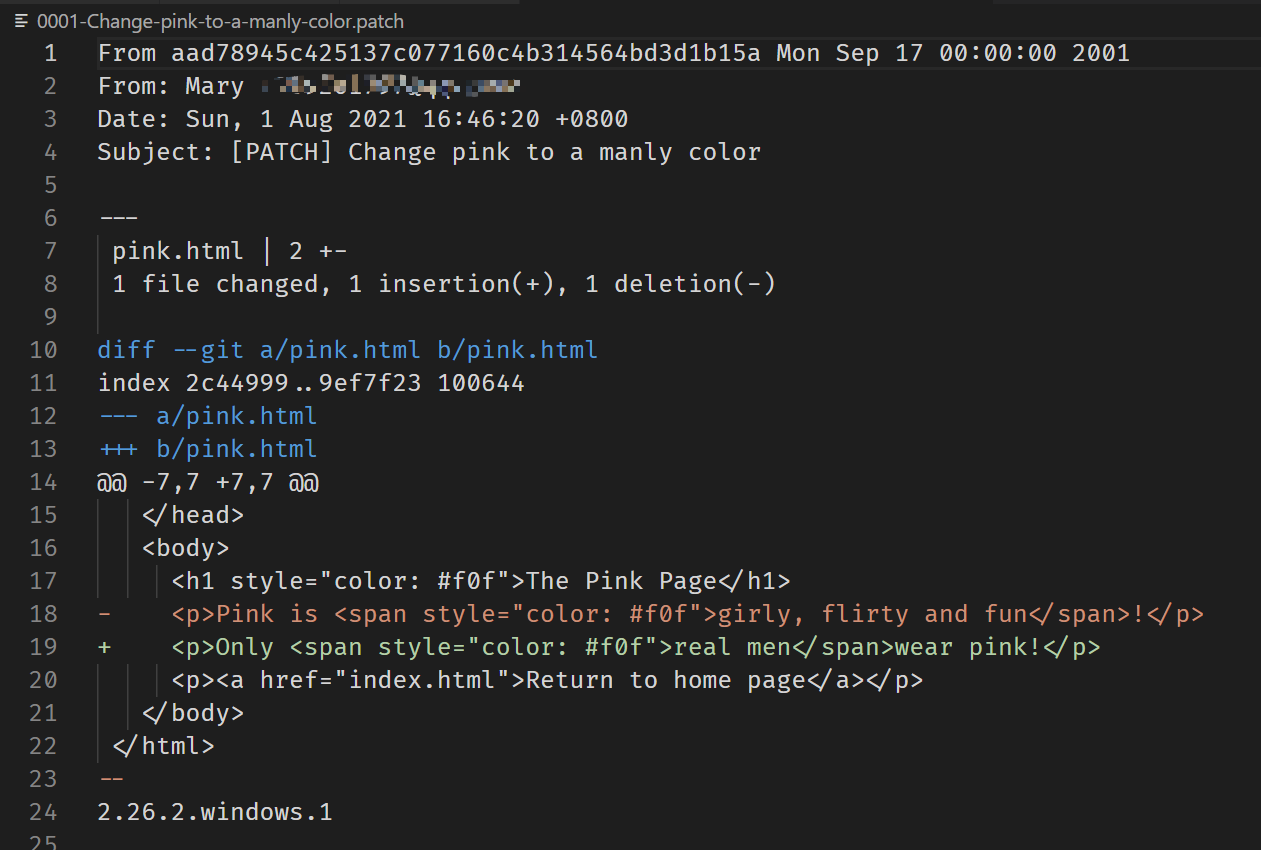
一个patch是一个完整的commit, 有几个commit就会生成几个patch文件
Mail the Patches (Mary)
Mary需要把生成的patch文件,通过邮件等方式发送给项目管理员
项目管理员把这些patch文件放到项目中
Apply the Patches (You)
我们把mary的patch文件放在my-git-repo中
使用git am命令将patch文件生成commit
cd ../my-git-repogit checkout -b patch-integrationgit am < 0001-Change-pink-to-a-manly-color.patchgit log master..HEAD --statgit am < 0002-Add-a-pink-block-of-color.patchgit log master..HEAD --stat
Integrate the Patches (You)
git checkout mastergit merge patch-integrationgit branch -d patch-integrationgit clean -fgit push origin master
Update Mary’s Repository (Mary)
应当始终用“official” repository 来更新本地master, 因为官方库可能还整合了其他人的代码
cd ../marys-repogit checkout mastergit fetch origingit rebase origin/mastergit branch -D pink-pagegit clean -f

As a programmer, you’re most likely to use patches when you want to fix a bug in someone
else’s project. After fixing it, you can send them a patch of the resulting commit. For this kind of
one-time-fix, it’s much more convenient for you to generate a patch than to set up a public Git
repository.

若有收获,就点个赞吧
0 人点赞
