一元函数线性插值

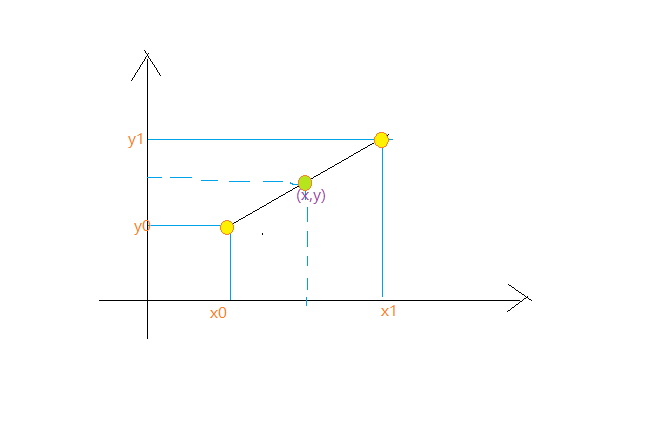
一元函数。现已知
,现要求我们估计位于
区间的自变量
对应的函数值,这一过程即为插值。线性插值即是利用线性函数来拟合
区间的函数:
图像双线性插值
插值公式
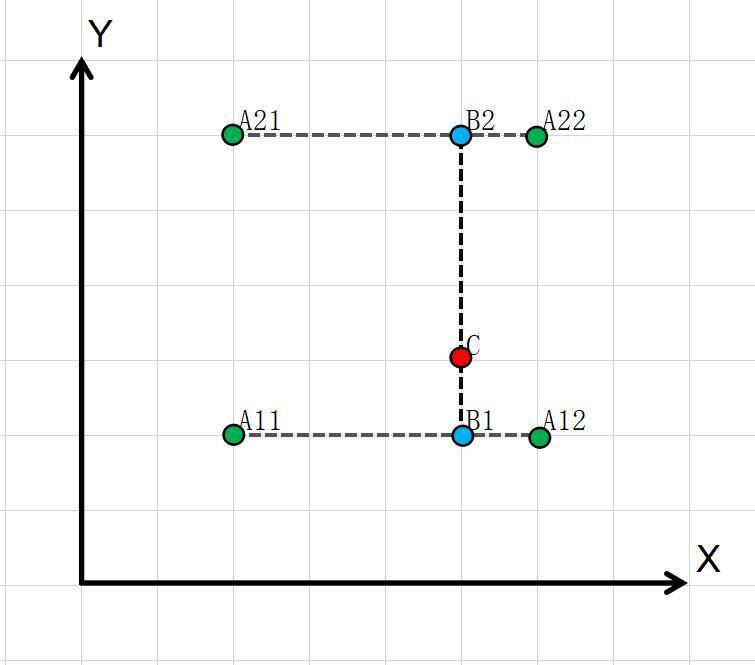
线性插值进行扩展之后用于二元函数被称为双线性插值。其过程:首先在维度进行插值,此时固定
值;然后利用的到的拟合值在
维度进行插值,此时固定
值。其过程如下所示。

其公式如下:
注:其中
记:
则上式公式化为:
图像映射
图像放大或缩小过程中的需要用到插值,在用插值之前首先需要确定目标图像中的像素点在原图像中的坐标对应值。如果我们考虑原点对齐,那么设某图像缩放比例为,那么目标图像中位于
处的像素点映射回原图像的坐标为
,可能
不是整数,此时该处的像素值即利用插值获取。获取了原图像中
处的像素值,即是确定了目标图像中
处的像素值。
事实上,通常情况,我们并非采用原点对齐,因为它不能利用到原图像右侧和下侧的像素进行插值。所以比较合理的对齐方式是中心对齐,其公式如下:(要特别注意边界条件)
python代码实现
import cv2import numpy as npdef BilinearInterpolation(srcImg, dstHeight, dstWidth):'''description:Coordinate correspondence:(Notice the boundary conditions)srcX=dstX* (srcWidth/dstWidth)+0.5*(srcWidth/dstWidth-1)srcY=dstY* (srcHeight/dstHeight)+0.5*(srcHeight/dstHeight-1)(0 <= srcX <= srcWidth - 1, 0 <= srcY <= srcHeight - 1)Interpolation formula:f(i+u,j+v) = (1-u)(1-v)f(i,j) + (1-u)vf(i,j+1) + u(1-v)f(i+1,j) + uvf(i+1,j+1)(u,v < 1; j+1 < srcHeight, i+1 < srcWidth)param:srcImg: numpydstHeight: intdstWidth: intreturn:dstImg: numpy'''# shape[0]: rows shape[1]: colssrcWidth = srcImg.shape[1]srcHeight = srcImg.shape[0]dstImg = np.zeros((dstHeight, dstWidth), dtype=np.uint8)# Traverse the interpolationfor dstX in range(dstWidth):srcX = min(max((dstX + 0.5) * (srcWidth/dstWidth) - 0.5, 0), srcWidth - 2)i, u = int(srcX), srcX - int(srcX)for dstY in range(dstHeight):srcY = min(max((dstY + 0.5) * (srcHeight/dstHeight) - 0.5, 0), srcHeight - 2)j, v = int(srcY), srcY - int(srcY)dstImg[dstX, dstY] = np.uint8((1-u)*(1-v)*srcImg[i, j] + (1-u)*v*srcImg[i,j+1] + u*(1-v)*srcImg[i+1,j] + u*v*srcImg[i+1,j+1])return dstImgimg_path = "Fig2.19(a).jpg"image = cv2.imread(img_path, cv2.IMREAD_GRAYSCALE)dstImg = BilinearInterpolation(image, 256, 256)# print(dstImg.shape)# cv2.imshow("show", dstImg)# cv2.waitKey(0)cv2.imwrite("shrinked.jpg", dstImg)dst2Img = BilinearInterpolation(dstImg, 1024, 1024)# print(dst2Img.shape)# cv2.imshow("show", dst2Img)# cv2.waitKey(0)cv2.imwrite("zoomed.jpg", dst2Img)

