论文原文: V2V-PoseNet: Voxel-to-Voxel Prediction Network for Accurate 3D Hand and Human Pose Estimation from a Single Depth Map 论文翻译:链接
Abstract
作者认为目前(当然是18年之前)主流的基于深度图进行人体手势或者姿态三维估计的方法将深度图看做一张2D的图像来处理是不恰当的。
将深度图看做2D图像进行处理,那么是否就可以采用目前非常普遍的基于RGB的2D人体姿态估计的方法呢?=> 是的。这些处理方法事实上是通用的。(按照这种方式来的话,基本上和AlphaPose或者OpenPose差不多了,都是从单张图像来预测关节点。)
将深度图看做2D图像第一个不足之处是:2D深度图中存在透视畸变;第二个不足是直接从2D图像回归3D坐标是一种高度非线性的映射,这导致学习过程中的困难。
如何理解这两个不足。透视失真?直接由深度图回归3D坐标直观来看是非常简单的任务啊:2D深度图的图像坐标可以很容易得到三维空间对应的
,其值与深度也即是
对应。所以2D深度图本身就包括了3D坐标的相关信息?
为了解决这些缺点,我们首先将3D手和人体姿势估计问题从单个深度图转换为体素到体素预测,该预测使用3D体素网格并估计每个体素是每个关键点的可能性。
CNN是一种非常强大的判别模型:学到的是条件概率(输出每种分类的概率);除了判别方法之外还有生成模型:学到的是联合分布(产生多个模型,然后对模型输出进行对比)。
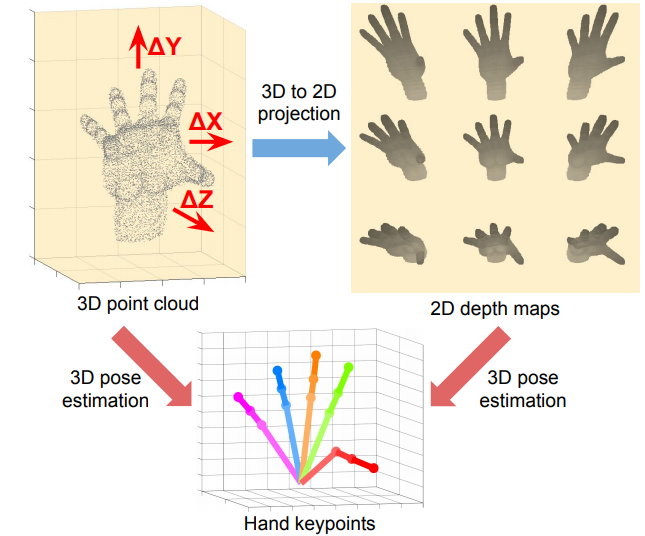
文章提到的透视失真可视化。3D点云与3D姿态具有一一对应的关系,但是2D深度图与姿态具有一对多的对应关系。
1 Introduction
To cope with these limitations, we propose the voxelto-voxel prediction network for pose estimation (V2VPoseNet). In contrast to most of the previous methods, the V2V-PoseNet takes a voxelized grid as input and estimates the per-voxel likelihood for each keypoint as shown in Figure 2.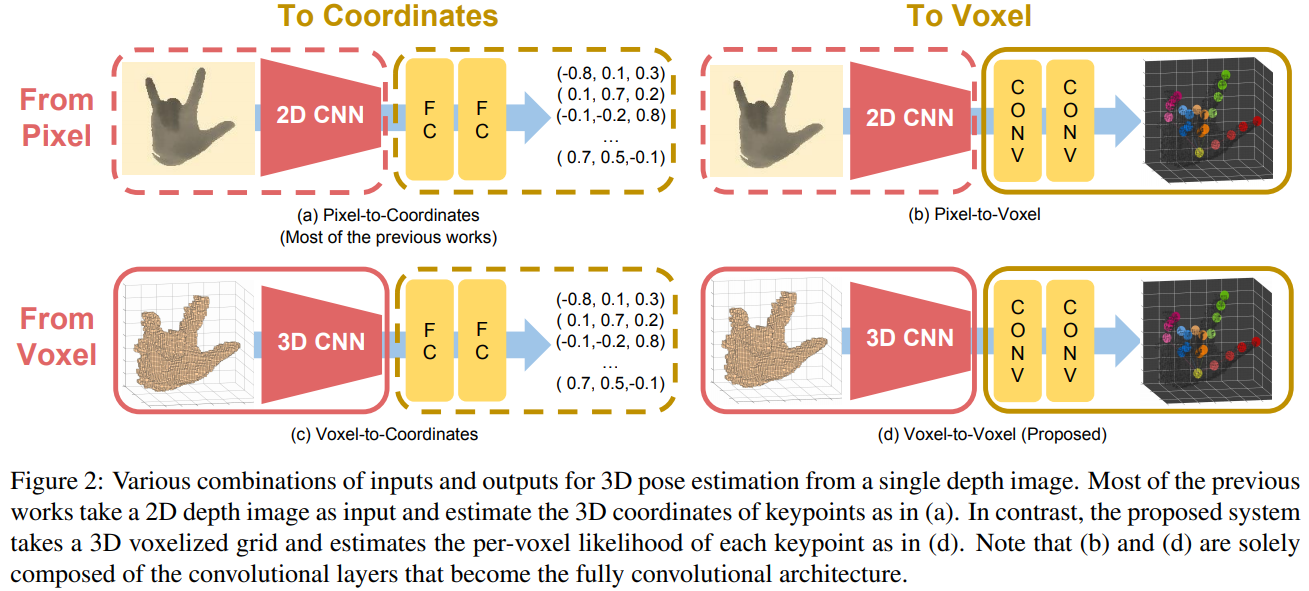
Note that (b) and (d) are solely composed of the convolutional layers that become the fully convolutional architecture.
首先:由于体素本身就是三维空间里面的基础单元,所以以体素作为输入的话,那么就没有所谓的3D到2D的失真;然后在回归是也是直接3D到3D的映射。(作者的意思就是按照这种方式组织的数据就适合于关节点估计任务,降低学习的难度。当然这个过程中并没有增加信息量)
We perform a thorough experiment to demonstrate the usefulness of the proposed volumetric representation of input and output in 3D hand and human pose estimation from a single depth map. The performance of the four combinations of input (i.e., 2D depth map and voxelized grid) and output (i.e., 3D coordinates and per-voxel likelihood) types are compared.
不采用回归关节点的方法,而是采用分类,将体素进行分类(类似Kinetic的随机森林方法)。回归的话,模型就包括更强大的预测能力;分类的话,可能最终找到的关节点更加准确?
Our contributions can be summarized as follows.
- 首次将从单个深度图估计3D姿态的问题转变为体素到体素的预测
- 我们通过比较每种输入类型(即2D深度图和体素网格)和输出类型(即3D坐标和每体素可能性)的性能,凭经验验证了体积输入和输出表示的有用性
- 我们使用几乎所有现有的3D姿势估计数据集进行大量实验,包括三个3D手和一个3D人体姿势估计数据集。我们表明,与最先进的方法相比,所提出的方法产生了更为精确的结果。所提出的方法也首先在HANDS 2017基于帧的3D手姿势估计挑战中获得了冠军
2 Related works
Depth-based 3D hand pose estimation.
手姿势估计方法可以分为生成方法,判别方法和混合方法。
Generative methods assume a pre-defined hand model and fit it to the input depth image by minimizing hand-crafted cost functions. Discriminative methods directly localize hand joints from an input depth map. (之前的随机森林,CNN等都是判别方法)Hybrid methods are proposed to combine the generative and discriminative approach.Depth-based 3D human pose estimation.
Depth-based 3D human pose estimation methods also rely on generative and discriminative models. The generative models estimate the pose by finding the correspondences between the pre-defined body model and the input 3D point cloud. Conventional discriminative methods are mostly based on random forests.Volumetric representation using depth information.
体积表示超越了现有的手工制作的基于描述符的三维形状分类和检索方法。他们将每个体素表示为二进制随机变量,并使用卷积深度置信网络来学习每个体素的概率分布。Our work follows the strategy from [26](也就是VoxNet)VoxNet非常有名,被引用量达到了1644!!!
Input and output representation in 3D pose estimation.
主流方式是图2(a),从2D的深度图回归出3维关键点;然后也包括从RGB出发的方式以及从体素出发的方式。本文采用的就是从体素到体素的一种预测方式。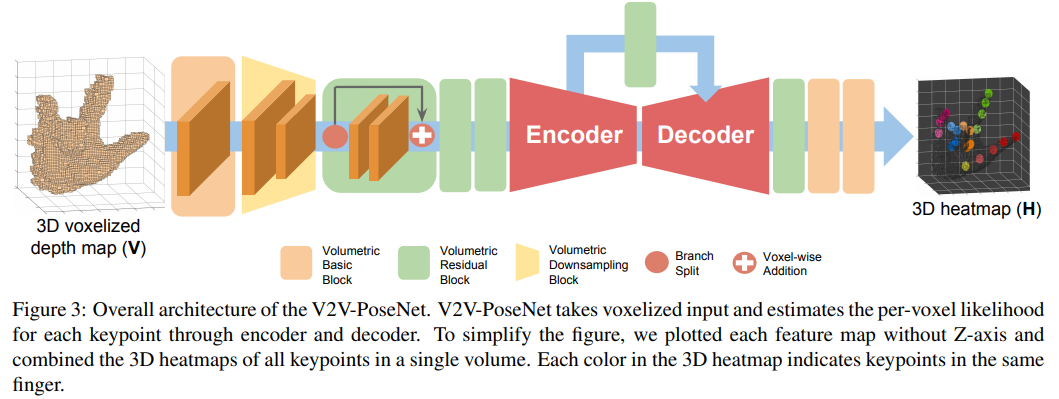
3 Overview of the proposed model
First, we convert 2D depth images to 3D volumetric forms by reprojecting the points in the 3D space and discretizing the continuous space. After voxelizing the 2D depth image, the V2V-PoseNet takes the 3D voxelized data as an input and estimates the per-voxel likelihood for each keypoint. The position of the highest likelihood response for each keypoint is identified and warped to the real world coordinate, which becomes the final result of our model.
方法由两个部分组成:1. 从深度图获取体素结构;2. 以体素作为输入,通过3D CNN进行处理,从而获取最终的关键点估计。
4 Refining target object localization
To localize keypoints, such as hand or human body joints, a cubic box that contains the hand or human body in 3D space is a prerequisite. This cubic box is usually placed around the reference point, which is obtained using groundtruth joint position or the center-of-mass after simple depth thresholding around the hand region. However, utilizing the ground-truth joint position is infeasible in real-world applications. Also, in general, using the center-of-mass calculated by simple depth thresholding does not guarantee that the object is correctly contained in the acquired cubic box due to the error in the center-of-mass calculations in cluttered scenes.
翻译一下,这就是说我们需要首先从深度图中获取人体(相对于RGB中的人体检测) 为了达到这个提取人体:前面的方法有利用ground-truth以及质心的方式(当然这只是估计)。但是,通常情况下ground-truth是没有的,并且采取质心的方式可能比较大的误差(尤其是人周围有其它物体的时候)。 有的方法是先进行人体分割,提取出人体之后再进行关节点的提取。
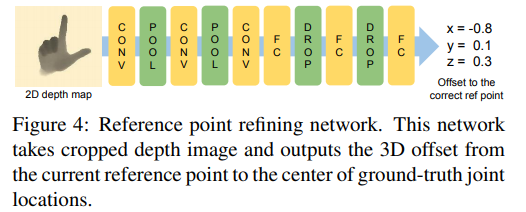
解决办法:参考Oberweger等人的方法,训练一个2D CNN来获取一个比较精确的参考点。网络以深度图为输入,通过对手(或者人)周围区域进行简单的深度阈值计算,我们可以得到一个参考点。网络输出为3D偏移量(计算的参考点与ground-truth中心点之间的偏移)所以就可以通过将之前计算出来的参考点与输出的偏移量相加从而得到更加精确的参考点。
Oberweger等人的文章,简称DeepPrior++,也是一篇引用量比较高的文章
5 Generating input of the proposed system
To voxelize the 2D depth map, we first reproject each pixel of the depth map to the 3D space. After reprojecting all depth pixels, the 3D space is discretized based on the pre-defined voxel size. Then, the target object is extracted by drawing the cubic box around the reference point obtained in Section 4. We set the voxel value of the network’s input as 1 if the voxel is occupied by any depth point and 0 otherwise.
深度图首先需要转为3维体素,并且转换之前首先要获取手或者人体的目标位置。
6 V2V-PoseNet
6.1 Building block design
We use four kinds of building blocks in designing the V2V-PoseNet. The first one is the volumetric basic block that consists of a volumetric convolution, volumetric batch normalization, and the activation function (i.e., ReLU). (volumetric basic block 主要构成网络的最首以及最尾的部分)The second one is the volumetric residual block extended from the 2D residual block of option B. The third one is the volumetric downsampling block that is identical to a volumetric max pooling layer. The last one is the volumetric upsampling block, which consists of a volumetric deconvolution layer, volumetric batch normalization layer, and the activation function. The kernel size of the residual blocks is and that of the downsampling and upsampling layers is
with stride 2.
四种模块:基本结构,残差结构,下采样以及上采样
6.2 Network design
漏斗结构的3D CNN。As the Figure 3 shows, the network starts from the volumetric basic block and the volumetric downsampling block. After downsampling the feature map, three consecutive residual blocks extract useful local features. The output of the residual blocks goes through the encoder and decoder described in Figures 5 and 6, respectively.
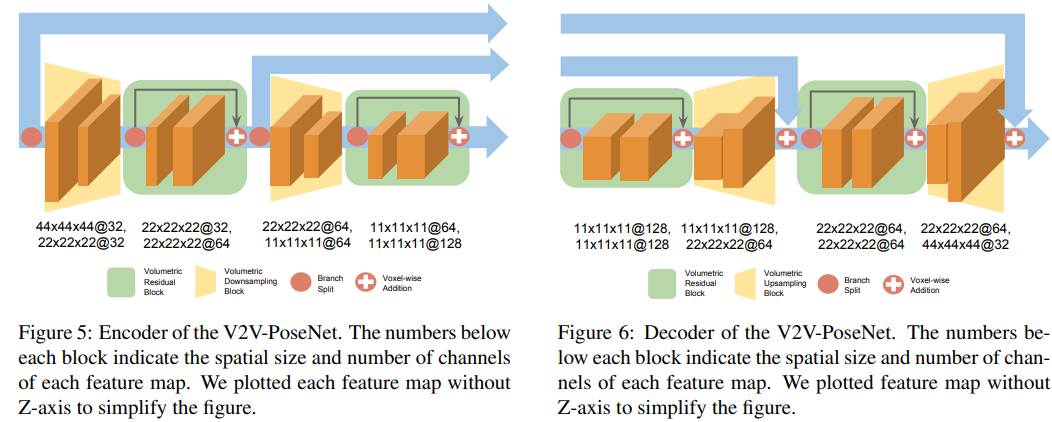
对于编码器:通过downsample模块降低特征图的size,通过残差结构增加了channel数(It is empirically confirmed that this increase in the number of channels helps improve the performance in our experiments. )
对于解码器:不断上采样,并在此过程中减少channel数(The enlargement of the volumetric size in the decoder helps the network to densely localize keypoints because it reduces the stride between voxels in the feature map.)
采用的非常经典的结构。图像分割,关节点提取(转为heatmap问题)基本上都采用这种先下采样,然后再上采样的结构。下采样的目的,降低计算量;上采样是为了复原分辨率(当然只会用于那种需要恢复分辨率的任务)。对于CNN网络来说,对结果影响最大的是:感受野以及网络的深度(所有在网络设计是一定要重点考虑这两个问题,并且下采样会降低分辨率,要选在合适的地方进行下采样)。
The encoder and decoder are connected with the voxel-wise addition for each scale so that the decoder can upsample the feature map more stably. After passing the input through the encoder and decoder, the network predicts the per-voxel likelihood for each keypoint through two volumetric basic blocks and one
volumetric convolutional layer.
卷积是有信息聚合的作用的,它主要用于信息维度(channels)的变换。
6.3 Network training
To supervise the per-voxel likelihood for each keypoint, we generate 3D heatmap, wherein the mean of Gaussian peak is positioned at the ground-truth joint location as follows:
where is the ground-truth 3D heatmap of
th keypoint,
is the ground-truth voxel coordinate of
th keypoint, and
is the standard deviation of the Gaussian peak.
Also, we adopt the mean square error as a loss function as follows:

where and
are the ground-truth and estimated heatmaps for nth keypoint, respectively, and N denotes the number of keypoints.
最终产生的是heatmap类型的ground-truth
7 Implementation details
The proposed V2V-PoseNet is trained in an end-to-end manner from scratch. All weights are initialized from the zero-mean Gaussian distribution with . Gradient vectors are calculated from the loss function and the weights are updated by the RMSProp with a mini-batch size of 8. The learning rate is set to
. The size of the input to the proposed system is
. We perform data augmentation including rotation (
degrees in
space), scaling (
in 3D space), and translation (
voxels in 3D space). Our model is implemented by Torch7 and the NVIDIA Titan X GPU is used for training and testing. We trained our model for 10 epochs.
8 Experiment
8.1 Datasets
省略手部姿态估计的数据集。
人体姿态估计的数据集:ITOP,每个人包括15个关节点。
For 3D human pose estimation, we used mean average precision (mAP) that is defined as the detected ratio of all human body joints based on 10 cm rule following.
8.2 计算复杂度
如果采用ITOP数据集进行训练,需要3小时;……
从代码进行分析
V2V代码
- 世界坐标系与像素的关系包括一个线性转换关系,其转换参数涉及到相机参数;
- 需要参考图像坐标系和世界坐标系的转换相关的内容:链接
- 然后相机坐标系以透镜为原点,图像坐标系以左上角为原点
- 非常庆幸的是RealSense参数可以被获取!!!亦可赛艇
- 包括
(当然还有其他失真参数),其中前两者表示的是放缩比例,后两者表示相机坐标系到图像坐标系的平移,近似有:
;参考的ITOP数据集里面就是采用的近似值。并且只考虑了
- RealSense参数为:
(常量)
- ITOP图像的分辨率为:高240,宽360 => 360 240;RealSense分辨率为640480(分辨率对应需要解决,应该会存在domain shift问题,很好解决:
取为1/2即可)
- 包括
- 深度图,表示的就是(px, py, wz),将其转为相机坐标系只需要转换px,py即可(所以相机都是如此)
- 需要center参考点,用于生成体素
- 首先,深度图转为三维相机坐标系下的点points;(相当于将深度图的坐标和值进行组合)
- 提前计算好的中心参考点;(中心参考点即是cubic的中心,也即是包围手或者人体目标的正方体的中心坐标;对cubic外的点会被剔除)
- 利用中心参考点以及深度图在相机坐标系下的点产生体素;
- 产生体素过程中引入了数据增强(Test应该不需要的啊)
- 在训练过程中引入了数据增强(放缩、选择以及平移)
- 体素话的过程中,所有的目标点都被规范化到
(提取目标点采用mask即可;规划化到
的原因:和网络输出的热力图大小对应起来,从而实现坐标的对齐;恢复到真实坐标需要借助refpoint)
- center refpoint不仅仅在生成体素有用,在将输出结果转换到真实的相机坐标系下的点时也能够作为参考
- 体素化就相当于将三维空间中存在的点置为1,不存在的点置为0(在这过程中和离散坐标系对应起来;这个对应关系是存在误差的,代码中对这种误差处理方式是对连续坐标取整从而将连续的对应到离散的)
最终回归问题是回归热力图
直接以已知的center points为标签,搭建简单网络进行尝试
- 数据集里面的refpoint基本都是居中的,并且深度都是在3m左右,所以并不适合直接回归
对体素的进一步理解
点:通常展现形式为其中
表示点数,数组内部存的数据是坐标信息
体素:展现形式为其中
分别表示体素空间的宽、长、高,数组内部存的数据是
表示在该位置是否有点
可以看到,就是同一数据的不同表现形式。但是体素从空间形式来看更为直观,包括了非常直观的空间信息。点存储的方式,无法直观表现空间位置关系。
