原文地址:Efficient Object Localization Using Convolutional Networks 作者名称:Jonathan Tompson, Ross Goroshin, Arjun Jain, Yann LeCun, Christoph Bregler 参考博客:Efficient Object Localization Using Convolutional Networks 论文解读
关键词:多分辨率融合,级联网络,heatmap回归,Pooling造成精度损失
Traditional ConvNet architectures include pooling and sub-sampling layers which reduce computational requirements, introduce invariance and prevent over-training. These benefits of pooling come at the cost of reduced localization accuracy.
pooling层能为网络增强一些“局部不变性”、“旋转不变性”之类的能力,也能降低参数等种种优点的同时对于回归heatmap的任务却会带来location的精度损失。因此提出了一种新的结构,用于弥补pooling的负效应,“position refinement”。这种结构有点像RCNN的二级结构。(???引入不变性这一点貌似不是那么直观)
本文作者提出的方法与其上一篇文章是比较相似的,同样是回归heatmap。首先利用一个ConvNet回归一个较为粗糙的结果,然后在采用特定的方法使得结果更加精确。(到此时为止,貌似并没有那么强调end-to-end的模型训练)
相关工作
作者对DeepPose的看法:In contrast to our work, they formulate the problem as a direct (continuous) regression to joint location rather than a discrete heat-map output. However, their method performs poorly in the high-precision region and we believe that this is because the mapping from input RGB image to  location adds unnecessary learning complexity which weakens generalization.
For example, direct regression does not deal gracefully with multi-modal outputs (where a valid joint is present in two spatial locations,关键点可能比较大,占据多个位置). Since the network is forced to produce a single output for a given regression input, the network does not have enough degrees of freedom in the output representation to afford small errors which we believe leads to over-training (since small outliers - due to for instance the presence of a valid body part - will contribute to a large error in XY).
Coarse Heat-Map Regression Model
网络架构与之前那篇文章基本是差不多的,采用多尺度3级高斯金字塔(下图只展示了两级)、具有overlap的滑动窗口检测器,如下图所示: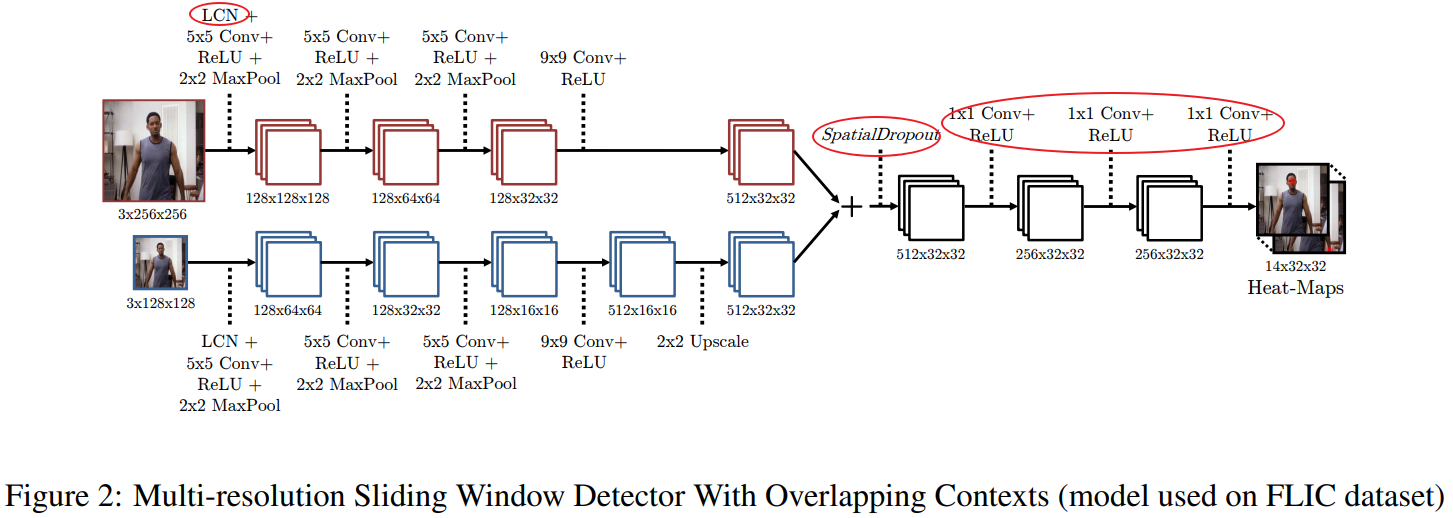
- 对于LCN的溯源,可能要参考更加早期的文献了;
- 文中
卷积扮演了全连接层的作用(全卷积网络);
- 在
convolution layer generally increased training time but did not prevent over-training. Since our network is fully convolutional and natural images exhibit strong spatial correlation, the feature map activations are also strongly correlated, and in this setting standard dropout fails.
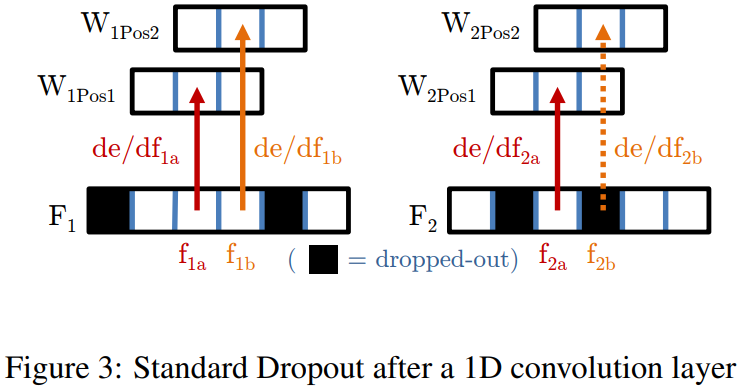
作者对于标准的Dropout进行了分析,如上图所示。上图表示的是一个反向传播的过程,从feature map向参数进行传播(Pos1,Pos2是因为CNN中的参数共享)我们看 ,由于
,由于 被drop掉了,所以对于
 中参数的更新在图中就不会受到的影响。由于图像中的相邻区域往往是相似的,那么往往满足
 ,当drop掉之后相当于降低了学习率,这会增加训练的时间。但是由于图像相邻像素之间的相关性,这种方式并不能增强保留特征的独立性。理解这句话,可以参考下面对dropout的描述:
dropout是一种防止模型过拟合的技术,这项技术也很简单,但是很实用。它的基本思想是在训练的时候随机的dropout(丢弃)一些神经元的激活,这样可以让模型更鲁棒,因为它不会太依赖某些局部的特征(因为局部特征有可能被丢弃)
由于图像局部区域的高度相似性,忽略掉其中一部分往往仍旧会保留下局部区域内的绝大多数特征。也就是说并不会增强特征的独立性。
为了增强这种独立性,也即是使得网络结果不会过度依赖于局部特征。作者提出了SpatialDropout,其原理如下图所示: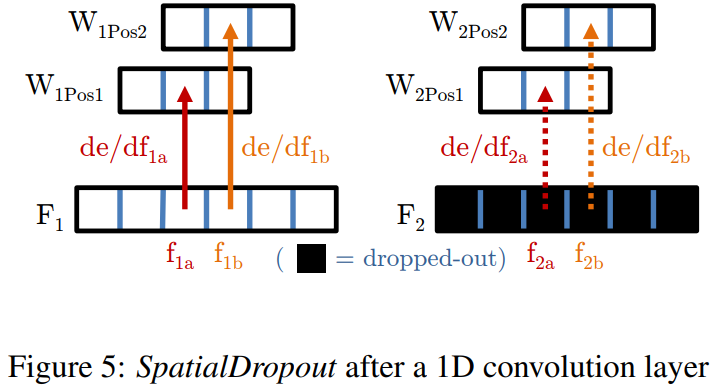
也就是说作者从channel角度进行drop,这使得局部区域要么全为0,要么全为1;解决了前面所说的问题。 We have found this modified dropout implementation improves performance, especially on the FLIC dataset, where the training set size is small.
Training and Data Augmentation
The target is a 2D _Gaussian of constant variance ( pixels) centered at the ground-truth
  joint location. 损失函数为_MSE函数。
图像随机旋转 ,放缩
,放缩 ,翻转概率
,翻转概率
对于图像中多人的问题,可以参考:链接,此处略
Fine Heat-Map Regression Model
In essence, the goal of this work is to recover the spatial accuracy lost due to pooling of the model before by using an additional ConvNet to refine the localization result of the coarse heat-map.
However, unlike a standard cascade of models, as in the work of Toshev et al, we reuse existing convolution features. This not only reduces the number of trainable parameters in the cascade, but also acts as a regularizer for the coarse heat-map model since the coarse and fine models are trained jointly.
Model Architecture
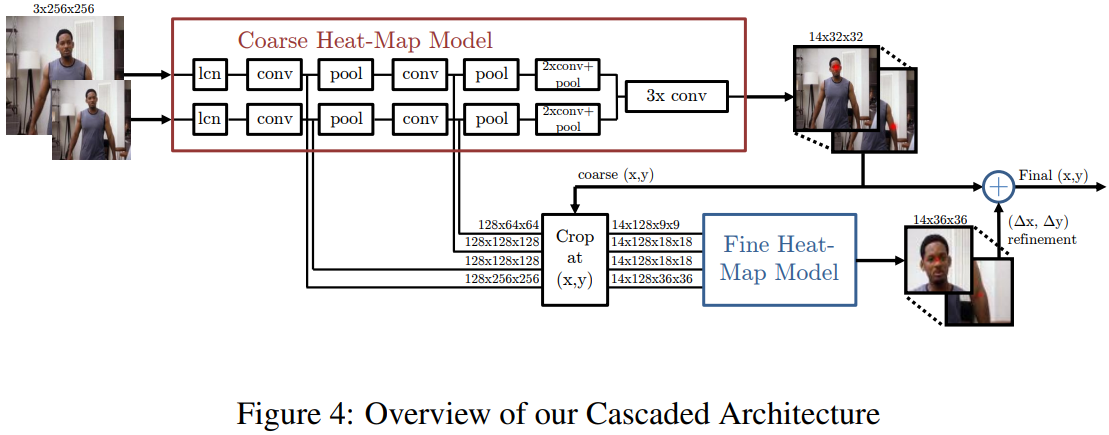
注意看它的这个Crop模块的输入来自哪里:直接从不同的 feature map 进行提取;与作者上一篇文章进行对比可以发现这种方式是更加高效的!
网络分为两个部分,前一个部分进行粗略坐标的回归;后一个部分进行精调坐标的求解。(更精确坐标求解,类似于作者的前一篇文章,从粗略位置处进行图像块的切割,从而确保输入网络数据的高分辨率)
Joint inference from an input image is as follows: we forward-propagate (FPROP) through the coarse heat-map model then infer all joint
offset within the cropped sub-window. Finally, we add the position refinement to the coarse location to produce a final
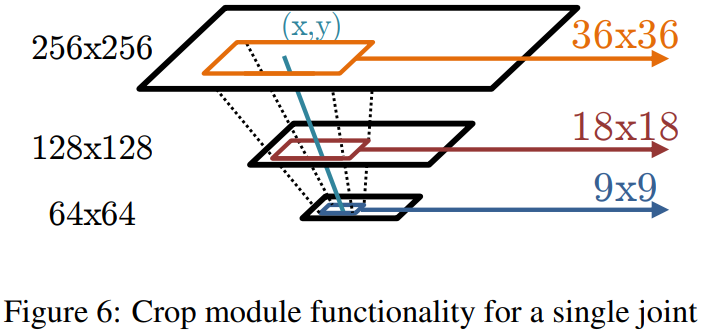
上图展示了作者Crop的方式,针对不同分辨率的 feature map 作者采用不同大小的裁剪框(这个关系对应到原图像大致上是对应于相同的区域的)
Note that back-propagation (BPROP) through this module from output feature to input feature is trivial; output gradients from the cropped image are simply added to the output gradients of the convolution stages in the coarse heat-map model at the sampled pixel locations.(根据参考博客,这一段话的意思指的的,当模型用于 end-to-end 训练时,需要如何处理梯度。后面需要查一下,对于这种图片切割梯度反传是如何进行的,这里是直接相加)作者在实际模型训练时,是分开训练的。
坐标精细化的模型是孪生网络,也就是很多个相同的网络并行(网络结果产生完全一样)设计成这样的目的还是在于:图像切割后,使得每个关节点都需要进行坐标偏移的提取,而且都是采用同一个网络。多个网络的话,可以提升处理的速度。
The fine heat-map model is a Siamese network of 7 instances (14 for the MPII dataset), where the weights and biases of each module are shared
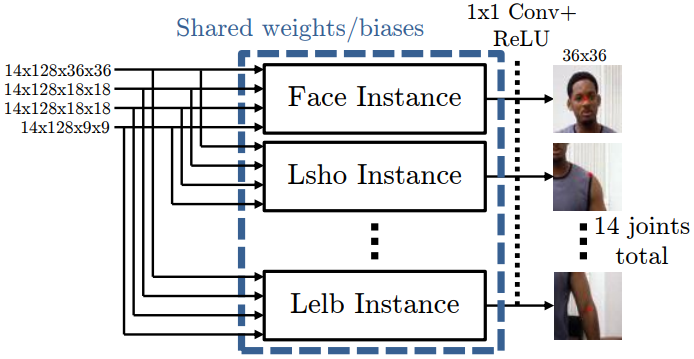
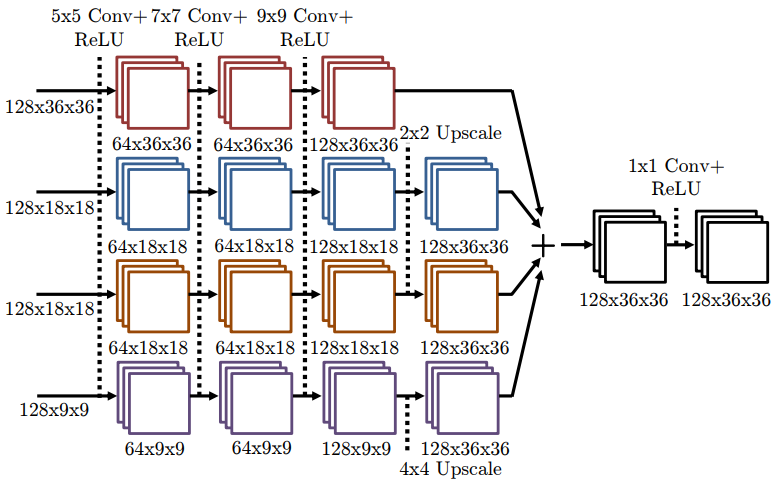
上图展示了 fine heat-map model 的架构,对于前一部分参数是共享的(作者的意思是为了防止over-trainning),其后面的卷积参数是独立的,为了获取不同的关节点坐标。每个网络都有四个分支,包括了不同分辨率的信息(类似于多尺度信息融合),最后所有支被调整到相同分辨率进行融合,产生最后的结果。
At the output of each of the 7 sub-networks we then perform a 1x1 Convolution, with no weight sharing to output a detailed-resolution heat-map for each joint. The purpose of this last layer is to perform the final detection for each joint.
It should be noted that this cascaded architecture can be extended further as is possible to have multiple cascade levels each with less and less pooling. However, in practice we have found that a single layer provides sufficient accuracy, and in particular within the level of label noise on the FLIC dataset.
上面这段话的意思我认为是,后面精细的结构可以进一步延伸,拓展。也就是说,后面的级联结构在前一级的feature map 基础上进一步进行裁剪,从而产生更小的 feature map,以此进一步求精坐标点。(这里的类似有点像DeepPose的方式,级联进行优化;值得注意的是,前面的图像剪切的方式也与DeepPose是类似的)
Joint Training
作者首先进行Coarse Heat-Map Regression模型的训练,训练好之后固定其参数,然后训练Fine Heat-Map Regression模型。最后分别训练好之后在进行联合训练得到最终的模型。
Ideally, a more direct optimization function would attempt to measure the argmax _of both heat-maps and therefore directly minimize the final (x, y)_ prediction. However, since the _argmax _function is not differentiable we instead reformulate the problem as a regression to a set of target heat-maps and minimize the distance to those heat-maps.(后面论文中有提到)
实验结果
作者在FLIC上采用PCK测量标准进行评测,在MPII数据集上采用PCKh标准进行评测。
作者发现Pooling层用得越多,那么获得的模型准确率有所下降: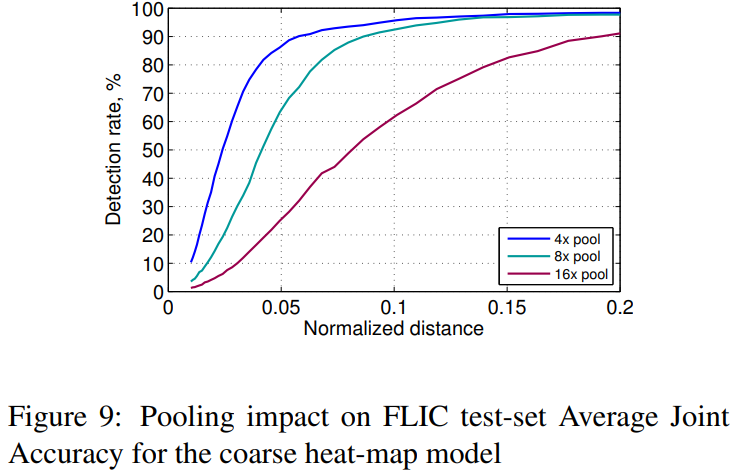
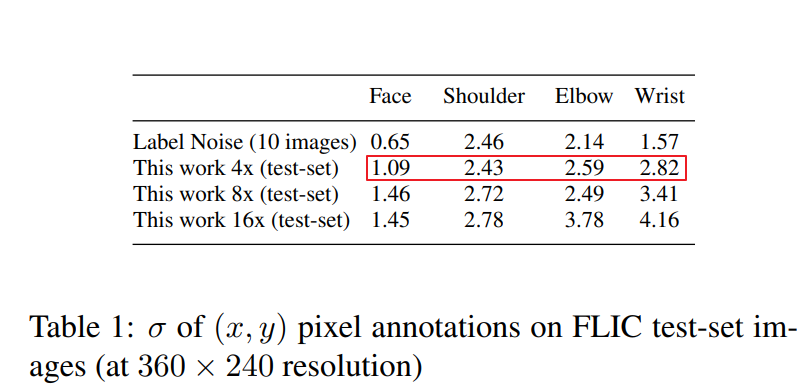
考虑到人为为图像标注关节点位置会存在偏差(因为人去标注肯定会引入误差的,不同人标注,同一个人不同时间标注等往往得到的标注结果都不同),作者找了一些实验者进行了实验,然后统计了标注时引入的方差 (作者只统计了
 方向的分量),其结果如上表所示。
貌似这个偏差

作者呢,利用 Coarse Heat Map 模型(作者说用了 的 Pooling 操作,貌似好像上面表显示的是
 的Pooling),统计了其产生的误差(误差在
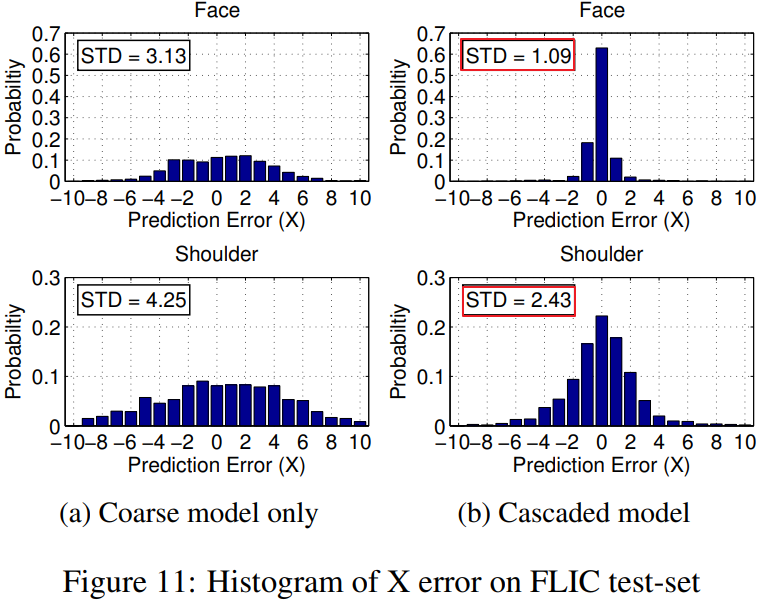
 的输入图像分辨率基础上统计的),统计的直方图结果如上图所示。(也就是说,事实上人标注的结果本身是有误差的,网络是会对这个误差进行学习的。标签的准确率决定了模型准确率的上限)
The histogram of the coarse heat-map model pixel error (in the x dimension) on the FLIC test-set when using an 8x internal pooling is shown in Figure 11a (for the face and shoulder joints).
可以看到非常类似正态分布,在 Cascaded Model 上尤其明显,并且 Cascaded Model 的方差与前面统计的 label noise 是近似的。
在方差统计时,去除了
的离群点(Fig 11)
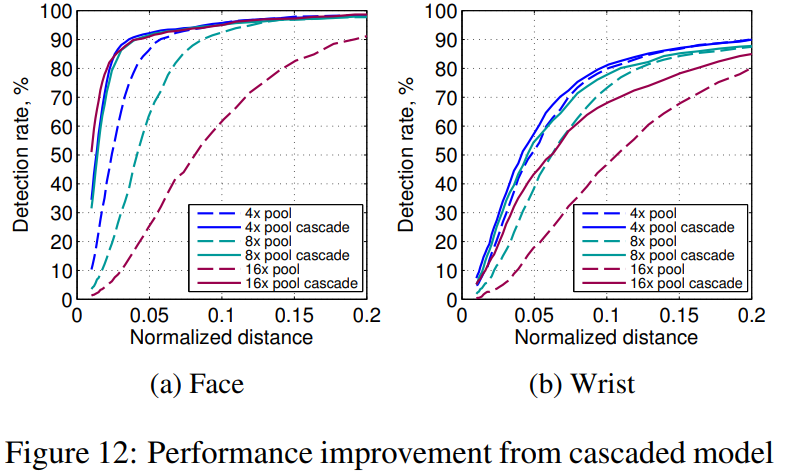
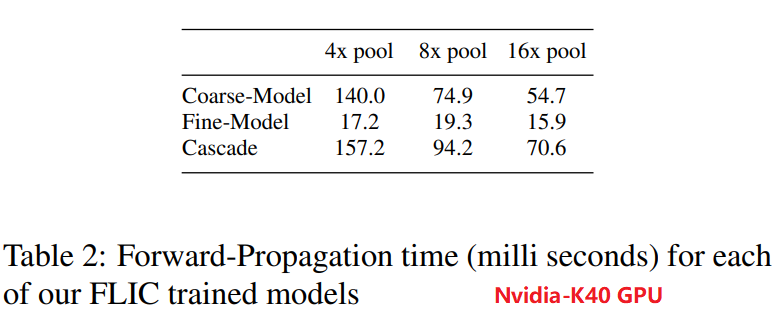
图12显示,采用级联的模型,对关节点的检测准确率有很大的提升。表2显示,Coarse-Model的推理占的时间占主要部分,并且Pooling越多,那么计算量越小,从而推理时间越短。
对于手腕的检测,作者认为:Our empirical experiments suggest that wrist detection (as one of the hardest to detect joints) requires learning features with a large amount of spatial context.(意思就是说,手腕的正确检测需要更为高的空间分辨率,那么采用过多的 Pooling 则会很降低准确率)作者解释的原因:This is because the wrist joint undergoes larger amounts of skeletal deformation than the shoulder or face, and typically has high input variability due to clothing and wrist accessories. Therefore, with limited convolution sizes and sampling context in the fine heat-map regression network, the cascaded network does not improve wrist accuracy beyond the coarse approximation.
最后作者搭建了一个类似于 DeepPose 的典型级联网络来和本文的从中间级的 feature map 进行切割特征的方法进行对比。对比的时候为了公平性(控制变量),对典型的级联网络引入了更多的卷积从而使得参数总量相等。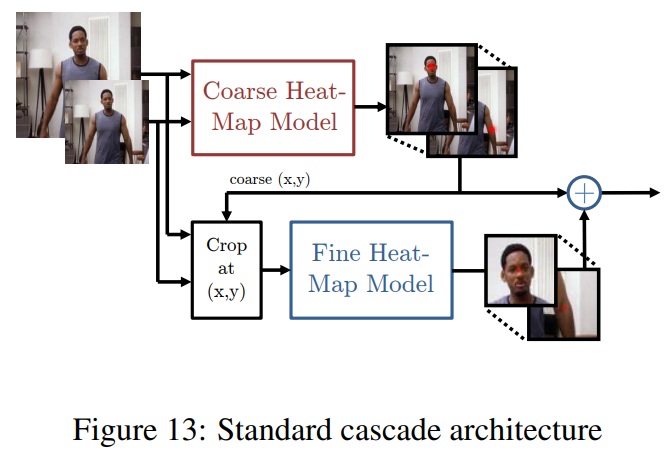
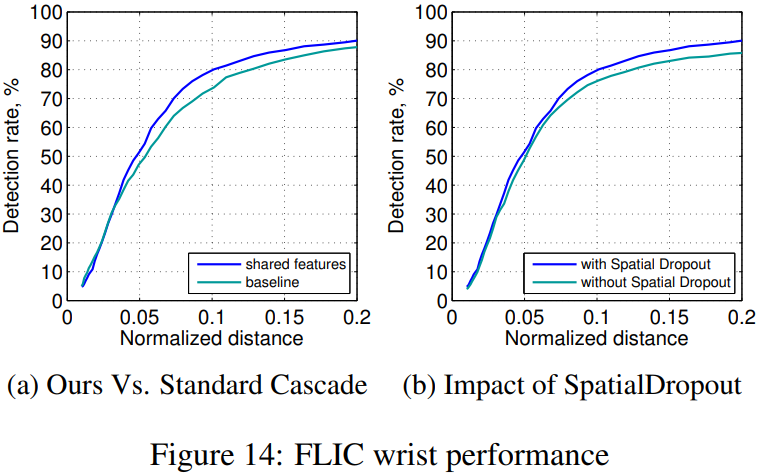
在FLIC和MPII两个公开数据集上,作者方法的表现如下图所示: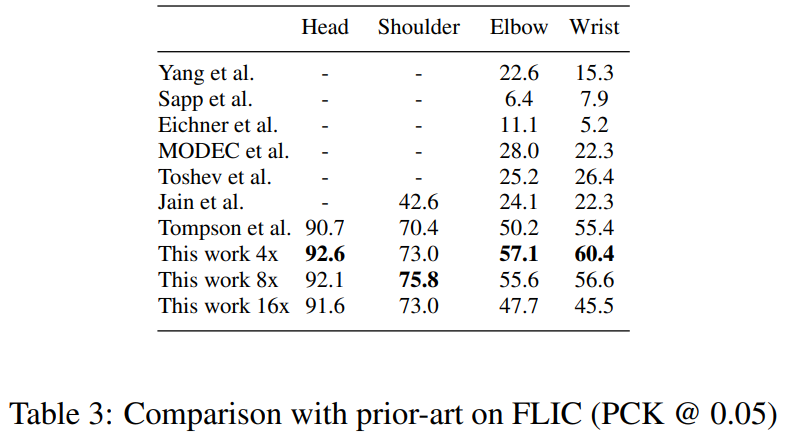
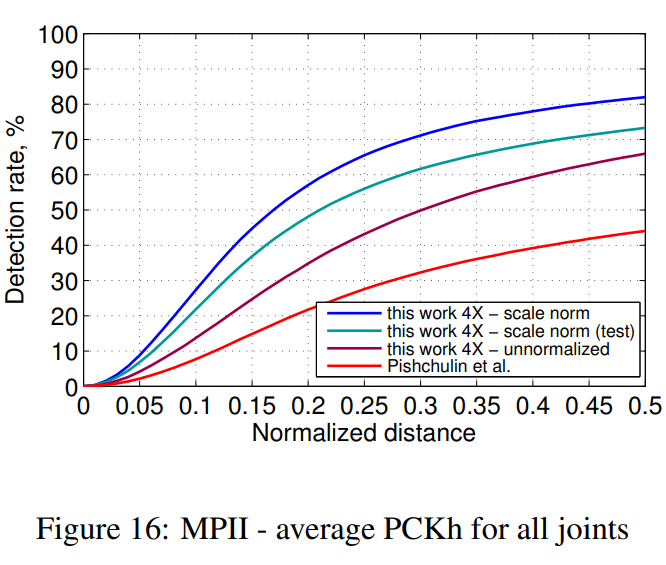
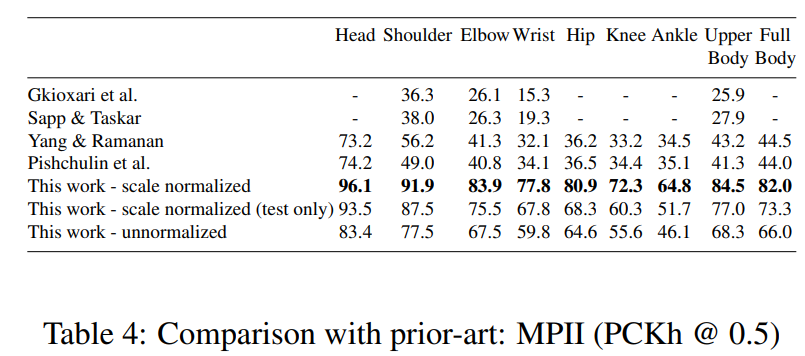
norm和unnormalized的意思:Since the MPII dataset provides the subject scale at testtime, in standard evaluation practice the query image is scale normalized so that the average person height is constant, thus making the detection task easier.
人物尺度归一化就是确保输入网络的图中人的大小都是一样的。不进行归一化的话,可能输入网络的人尺度存在差异,需要网络自己去学习这种尺度差异特征。(这里具体表达的含义有点没有明白)
我理解的大概意思就是:MPII中因为提供了人体的尺寸,对于输入到关节点检测网络中的图像可以按照这种尺寸进行检测放缩(应该还包括一个裁剪的过程,在使得图中包括人的同时,使得图片大小是一样大的),从而使得图中人的大小是相同的。那么这种尺度规范化的图像,是能够提升检测网络的性能的(在上面的表中可以看到,这种操作对网络最终取得的效果提升了很多个点)但是呢,这种方法需要对人体目标首先进行检测,人体目标检测过程中包括检测,NMS等操作非常耗时,不利于实时操作。所以可以退一步,训练关节点检测网络,直接让它去适应这种尺度变换,但是可以看到其效果会降很多。(也就是,首先进行人体检测之后能够使得结果更漂亮)

若有收获,就点个赞吧
0 人点赞
