原文链接:BlendMask: Top-Down Meets Bottom-Up for Instance Segmentation 开源代码:https://github.com/aim-uofa/AdelaiDet/ 博客参考:深度学习炼丹·麓山传—BlendMask
基于CNN的图像分割基础概念
当然BlendMask事实上是实例分割,与语义分割有一定的差异,而图像分割通常指的就是语义分割。
反卷积
反卷积是一个上采样的过程,其目的是使得 feature map 的分辨率变大。反卷积的实现可以利用双线性插值,也可以利用转置卷积(事实上转置卷积核反卷积是不同的概念)。转置卷积能够实现关键在于卷积的内部实现。在卷积计算中,通常将都是现将其转为矩阵乘法, ,其中的
,其中的 为卷积核变换的矩阵,
 是输入数据化为的列向量,
 是输出列向量。

上面右图表示的是,卷积核变换的矩阵。显然有 。如果转置呢?则可以实现:
 ,从而实现图像的放大,其过程类似下图(下图中的卷积核需要旋转才能与上面的矩阵对应)
多尺度与感受野
多尺度实现方式:1、通过特征图;2、采用多尺度输入图像。
图像分割往往需要大的感受野,大的感受野可以采用:1、大的卷积核,但是这样会增加计算量;2、空洞卷积(膨胀卷积),它在增大卷积感受野的同时,不会引入多余的计算量。
CRF
CRF即是条件随机场,其目的是解决“CNN局部感受野”以及分割边缘定位精度低的问题。
FPN
FPN(feature pyramid networks),是一种融合多尺度信息的网络范例。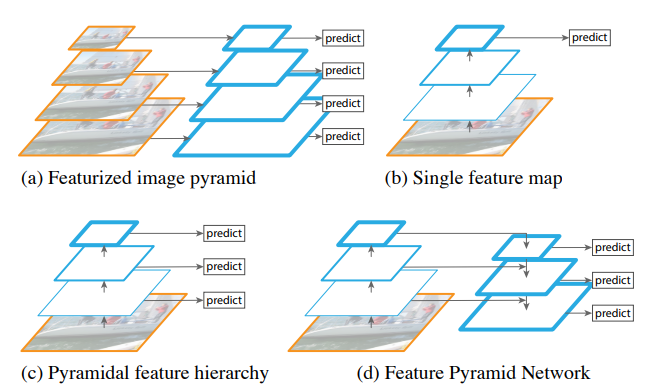
图像抠图及融合
Top Down方法
以Deep Mask为例,其通过滑动窗口的方法,在每个空间区域上都预测一个mask proposal(dense instance masks)(The representation of mask is encoded into a one-dimensional vector at each spatial location)。虽然结构简单,但它在训练中有一些障碍,阻止它取得优异的表现:
- mask与特征的联系(局部一致性)丢失了,如DeepMask中使用全连接网络去提取mask;
- 特征的提取表示是冗余的, 如DeepMask对每个前景特征都会去提取一次mask;
-
Bottom Up方法
由于Top Down方法的不足,很多研究采用自底向上的方式。这类方法,产生密集的逐像素的嵌入式特征,并对其进行分组(采用聚类以及图论的方法,视具体的特征而言)。通过逐像素的预测,能够很好地保留局部一致性和位置信息。但是此类方法的不足之处在于:
对密集分割的质量要求很高,会导致非最优的分割;
- 泛化能力较差,无法应对类别多的复杂场景;
- 后处理方法繁琐;
BlendMask论文阅读注释
借鉴 FCIS 和 YOLACT 的思路结合了Top Down 和 Bottom Up方法。前两种方式,他们预测实例级信息(比如边框位置),并分别使用裁剪(FCIS)和加权求和(YOLACT)将其与逐像素预测结合起来。作者认为:这些过于简化的组合设计可能不能良好地平衡高层和底层的信息的表征能力。(these overly simplified assembling designs may not provide a good balance for the representation power of top- and bottom-level features)什么又是逐像素预测呢?
高层的特征能够提供更多的全局信息(有更大的感受野),底层的特征能够提供更为细节的局部信息。如何有效地结合两种特征是本文的关注点。
本文主要贡献:
- 提出了proposal-based的instance mask合并方法,blender,在COCO上对比YOLACT和FCIS的合并方法分别提升了1.9和1.3mAP
- 基于FCOS提出简洁的算法网络BlendMask
- BlendMask的推理时间不会像二阶检测器一样随着预测数量的增加而增加
- BlendMask的准确率和速度比Mask R-CNN要好,且mask mAP比最好的全卷积实例分割网络Tensor-Mask要高1.1
- 由于bottom模块能同时分割多种物体,BlendMask可直接用于全景分割
- Mask R-CNN的mask输出固定为
 ,BlendMask的mask输出像素可以很大,且不受FPN的限制
 - BlendMask通用且灵活,只要一些小修改,就可以用于其它instance-level识别任务中,例如关键点检测
相关工作
Anchor-free object detection
在目标检测中去除anchor被证实是可行的,这能够简化目标检测的pipeline,并且其与基于 anchor 的网络RetinaNet 相比,对于边框预测具有更高的 AP。One possible reason responsible for the improvement is that without the restrictions of predefined anchor shapes, targets are freely matched to prediction features according to their effective receptive field。
其意义有两方面:First, it is important to map target sizes with proper pyramid levels to fit the effective receptive field for the features(targets的size要和感受野相匹配). Second, removing anchors enables us to assign heavier duties to the top-level instance prediction module without introducing overall computation overhead(顶层特征包括全局信息,没有anchors需要充分利用顶层特征).包含anchors的方法如果想要得到形状和姿态信息,就需要更大的计算量。
Detect-then-segment instance segmentation
主流的实例分割方式都采用了双阶段方法。首先检测物体,再在每个候选框中预测前景掩码。该方式比较成功,因为它有一个对齐操作 RoIAlign,它给第二阶段的 RoI heads 提供了局部一致性,而在所有单阶段方法中没有 RoI heads。但是,双阶段方法中有两个问题:1、在多实例的复杂场景中,双阶段方法的推理时间与实例个数成正比;2、RoI 特征和掩码结果的分辨率有限。FCIS 和 YOLACT 对其进行了改进。(FCIS 和 YOLACT具体做法尚未了结)
Refining coarse masks with lower-level features
BlendMask合并较低级别的细粒度信息和顶级的粗实例信息。这个想法类似于MaskLab和实例掩码投影(IMP),它们将掩码预测与较低层次的骨干特征连接起来。值得注意的是,本文的粗糙 mask 更像是一个注意力图。
Introduction 介绍了实例分割的目前比较好的方法,并通过不断指出问题的方式引出与本文紧密相关的内容,最后简单介绍了本文的贡献。Related Work 介绍了与本文紧密相关的几项研究,以及本文网络的特点。
FCOS目标检测
BlendMask是典型的先做目标检测再做实例分割的文章,它做目标检测完全照搬的FCOS的方法,然后在检测出来的proposal的基础上做实例分割。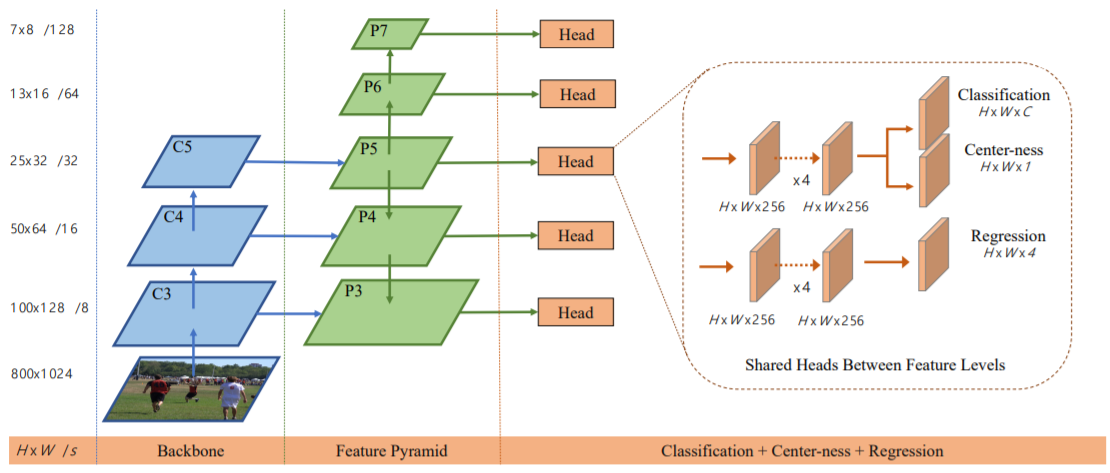
内容来源 先说说FCOS是怎么做目标检测的,上图中,C3~C5、P5~P3是普通的FPN的结构,P6是P5经过步长为2的卷积得到的,P7是P6经过步长为2的卷积得到的,这样就得到了P3~P7;这5个feature map共享一个检测头Head,Head有两个分支,上面一个分支对feature map的每个pixel做分类,下面一个分支对feature map的每个pixel做回归。(这个和yolo算法很类似,但是yolo是将分类和回归融合在一起的) 那有人就要问了,对每个pixel做回归,那不是一个pixel就一个bbox(bounding box)吗?最后产生一堆bbox,那怎么处理嘛?诶,我们这时候就要借助分类的分支了,打个比方,如果对应pixel的分类置信度连0.1都不到,那它就啥也不是,bbox也就不要了;同时呢,分类分支还有一个Center-ness,它预测一个pixel与bbox中心的偏差,如果偏的太远,损失就会较大,这进一步约束了bbox的个数。
BlendMask
BlendMask consists of a detector network and a mask branch. The mask branch has three parts, a bottom module to predict the score maps, a top layer to predict the instance attentions, and a blender(混合器) module to merge the scores with attentions. The whole network is illustrated below: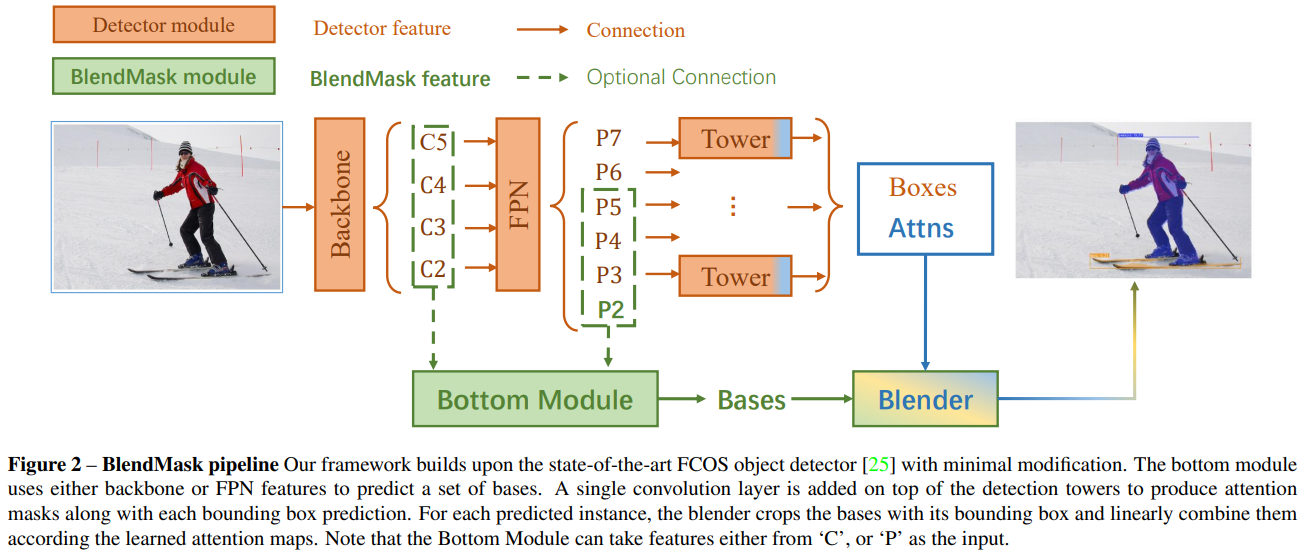
Bottom module
A bottom module predicting score maps which is called bases,  (是整个图的
  个 masks). has a shape of
  , where
  is batch size, is the number of bases(每个channel产生一个base,一共 个 channel),
  is the input size and
  is the score map output stride. DeepLabV3+‘s decoder(其结构如下图所示) is used as the decoder in their experiments. The input for the bottom module could be backbone features like conventional semantic segmentation networks, or the feature pyramids like YOLACT and Panoptic FPN.
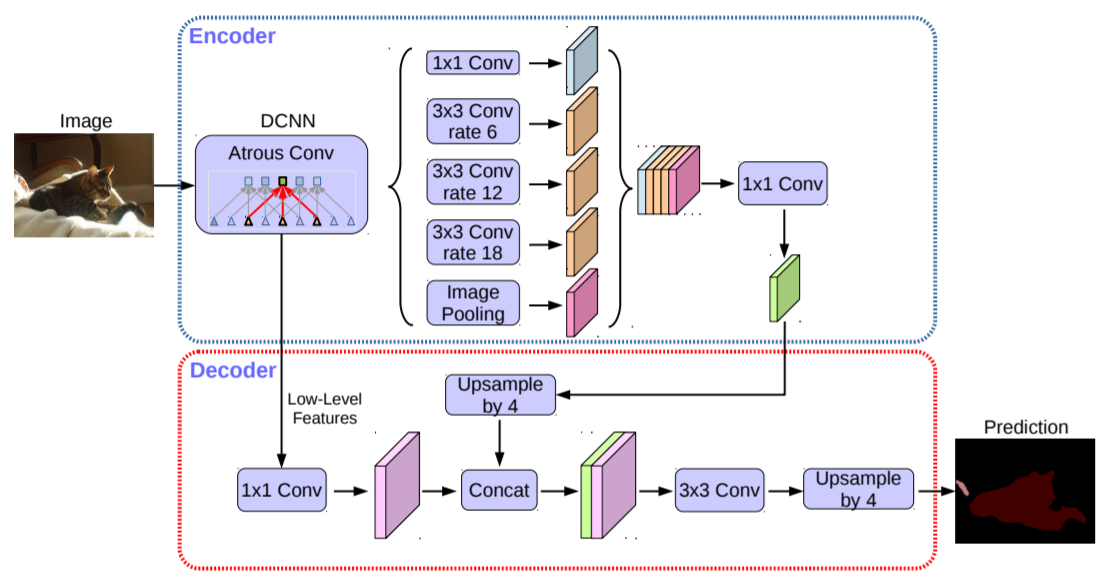
score maps干啥的?score maps 就是整张图的 masks。
Top layer
They also append a single convolution layer on each of the detection towers to predict top-level attentions  . Unlike the mask coefficients(系数) in YOLACT, which for each pyramid with resolution
  takes the shape of
  . The is a tensor at each location with shape
  , where
  is the attention resolution(即对应的base的每个像素点的权重值,包含的粒度更细).
  is typically smaller than the mask predictions in top-down methods since we only ask for a rough estimate. We predict it with a convolution with
  output channels. Before sending them into the next module, we first apply FCOS post-process to select the top D box predictions
  and corresponding attentions
在bottom module中产生了 K 个 base(不考虑 batch size)其实就是 K 个 mask,不同的 mask 可能各有所长,当他们组合在一起,就会得到一个比较完美的 mask。在 BlendMask 网络结构图中,Boxes 是目标检测(利用 FCOS)得到的检测框,即 bounding box proposal,记为 P,P 经过一个卷积操作(卷积输出 channel 为 K · M · M)得到 A。
Blender module
It is the key part of BlendMask. It combines position-sensitive bases according to the attentions to generate the final prediction. We discuss this module in detail in the next section.
Blender module
The inputs of the blender module are bottom-level bases , the selected top-level attentions and bounding box proposals  .
.
First they use RoIPooler in Mask R-CNN to crop bases with each proposal  and then resize the region to a fixed size
  feature map
  :
:
RoI: Region of Interest. 在目标检测中 region proposal 与之意思相同,都是产生的目标可能存在的位置的矩形框(绝大多数是矩形框)。RoIPool 和 RoIAlign都是为了将 proposal resize 到fixed size。
More specifically, they use sampling ratio 1 for RoIAlign, i.e. one bin for each sampling point. During training, they simply use ground truth boxes as the proposals. During inference, we use FCOS prediction results.
their attention size  is smaller than
  . They interpolate(插值)
  from
from  to , into the shapes of
  .
.
- 我们先来看A怎么处理,前面说了 A 是 P 经过一个卷积得到的,这个卷积的输出通道数是 k·M·M,k 和 M 都是超参数,那么 A 的通道数是 k·M·M,大小和 proposal 一样,即(K·M·M, H’, W’)
- 做个RoIAlign操作,只保留一个bin,就变成了(k·M·M, 1, 1)
- 然后把这个 tensor 做个 reshape,就变成了 (k, M, M)
- 再把它做个 resize,用最邻近或者双线性插值变成 (k, R, R)
- 最后对 k 维做个 softmax,也就是把每个pixel上的 k 个值分别拿出来做 softmax,这样就得到了一个 (k, R, R) 的 tensor,并且每个 pixel 上的 k 个值和为1。
Then  is normalize with softmax function along the dimension to make it a set of score maps
  .(相当于有 K 张 feature map,那么对K 个 feature map 上的同一个位置的数据进行softmax)
Then we apply element-wise product between each entity , of the regions and scores  , and sum along the dimension to get our mask logit
  :
:

上图展示的是 条件下得到 Bases 和 Attns 可视化结果。
论文中的超参数:
- R, the bottom-level RoI resolution,
- M, the top-level prediction resolution,
- K, the number of bases,
- bottom module input features, it can either be features from the backbone or the FPN,
- sampling method for bottom bases, nearest-neighbour or bilinear pooling,
- interpolation method for top-level attentions, nearest neighbour or bilinear upsampling.
They represent their models with abbreviation(缩写) R_K_M. For example, 28_4_4 represents bottom-level region resolution of 28 × 28, 4 number of bases and 4 × 4 top-level instance attentions. By default, we use backbone features C3 and C5 to keep aligned with DeepLabv3+. Nearest neighbour interpolation is used in top-level interpolation, for a fair comparison with FCIS. Bilinear sampling is used in the bottom level, consistent with RoIAlign.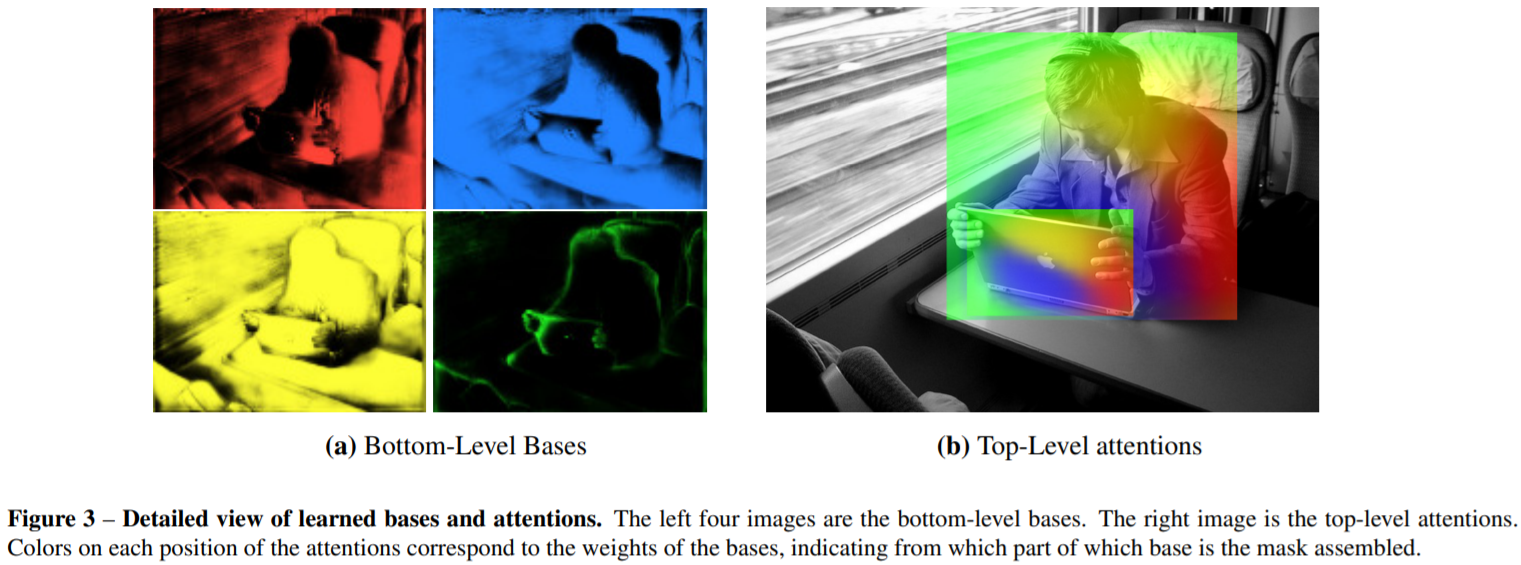
Semantics encoded in learned bases and attentions
By examining the generated bases and attentions on val2017, they observe this pattern. On its bases, BlendMask encodes two types of local information, 1) whether the pixel is on an object (semantic masks), 2) whether the pixel is on certain part of the object (position-sensitive features)__.
观察上图, The first two bases (red and blue) detects points on the upper-right and bottom-left parts of the objects. The third (yellow) base activates on points more likely to be on an object. The fourth (green) base only activates on the borders of objects. Position-sensitive features help us separate overlapping instances, which enables BlendMask to represent all instances more efficiently than YOLACT. The positive semantic mask makes our final prediction smoother than FCIS and the negative one can further suppress out-of-instance activations.
Experiments
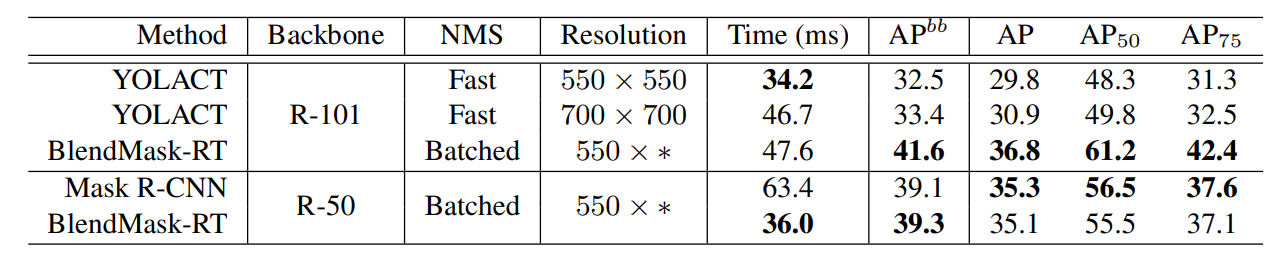
和其它方法的对比: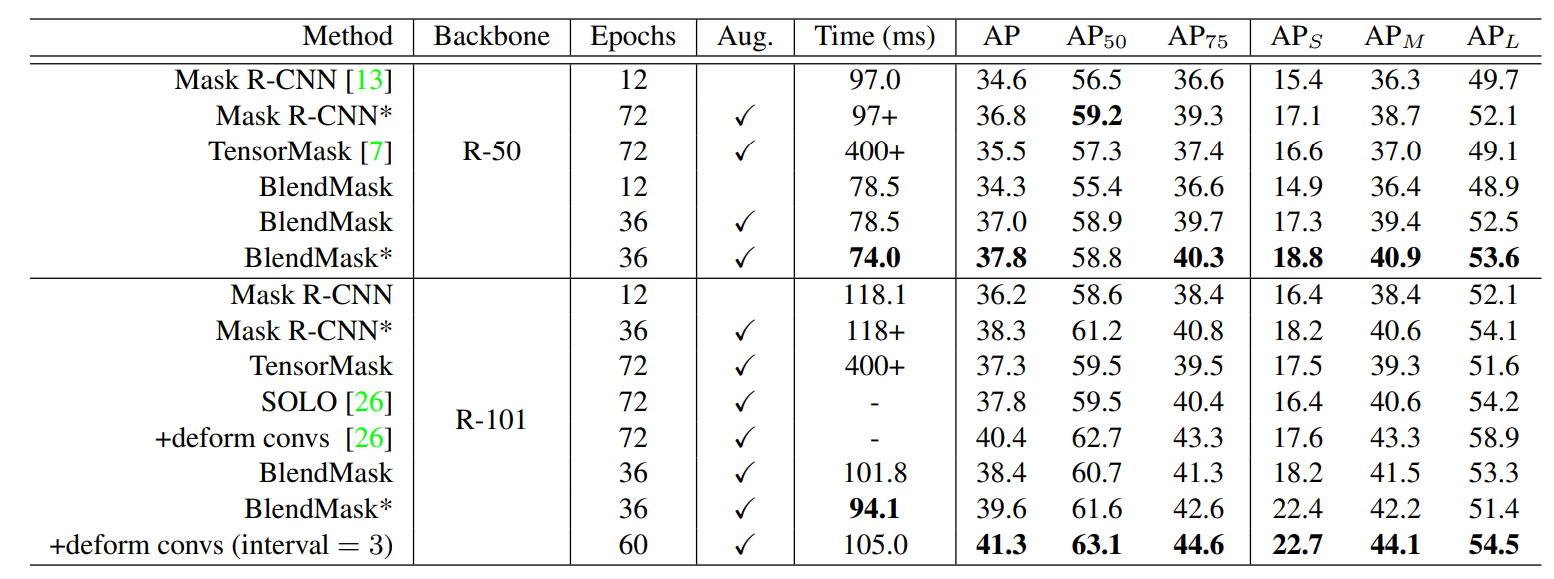


若有收获,就点个赞吧
0 人点赞
