Java SpringBoot
在项目开发中,接口与接口之间、前后端之间的数据传输都使用 JSON 格式。
1、fastjson使用
阿里巴巴的 fastjson是目前应用最广泛的JSON解析框架。这里也使用fastjson。
1.1 引入依赖
<dependency><groupId>com.alibaba</groupId><artifactId>fastjson</artifactId><version>1.2.35</version></dependency>
2、统一封装返回数据
在web项目中,接口返回数据一般要包含状态码、信息、数据等,例如下面的接口示例:
import com.alibaba.fastjson.JSONObject;import org.springframework.web.bind.annotation.RequestMapping;import org.springframework.web.bind.annotation.RequestMethod;import org.springframework.web.bind.annotation.RestController;@RestController@RequestMapping(value = "/test", method = RequestMethod.GET)public class TestController {@RequestMapping("/json")public JSONObject test() {JSONObject result = new JSONObject();try {// 业务逻辑代码result.put("code", 0);result.put("msg", "操作成功!");result.put("data", "测试数据");} catch (Exception e) {result.put("code", 500);result.put("msg", "系统异常,请联系管理员!");}return result;}}
这样的话,每个接口都这样处理,非常麻烦,需要一种更优雅的实现方式。
2.1 定义统一的JSON结构
统一的 JSON 结构中属性包括数据、状态码、提示信息,其他项可以自己根据需要添加。一般来说,应该有默认的返回结构,也应该有用户指定的返回结构。由于返回数据类型无法确定,需要使用泛型,代码如下:
public class ResponseInfo<T> {/*** 状态码*/protected String code;/*** 响应信息*/protected String msg;/*** 返回数据*/private T data;/*** 若没有数据返回,默认状态码为 0,提示信息为“操作成功!”*/public ResponseInfo() {this.code = 0;this.msg = "操作成功!";}/*** 若没有数据返回,可以人为指定状态码和提示信息* @param code* @param msg*/public ResponseInfo(String code, String msg) {this.code = code;this.msg = msg;}/*** 有数据返回时,状态码为 0,默认提示信息为“操作成功!”* @param data*/public ResponseInfo(T data) {this.data = data;this.code = 0;this.msg = "操作成功!";}/*** 有数据返回,状态码为 0,人为指定提示信息* @param data* @param msg*/public ResponseInfo(T data, String msg) {this.data = data;this.code = 0;this.msg = msg;}// 省略 get 和 set 方法}
2.2 使用统一的JSON结构
封装了统一的返回数据结构后,在接口中就可以直接使用了。如下:
import com.example.demo.model.ResponseInfo;import org.springframework.web.bind.annotation.RequestMapping;import org.springframework.web.bind.annotation.RequestMethod;import org.springframework.web.bind.annotation.RestController;@RestController@RequestMapping(value = "/test", method = RequestMethod.GET)public class TestController {@RequestMapping("/json")public ResponseInfo test() {try {// 模拟异常业务代码int num = 1 / 0;return new ResponseInfo("测试数据");} catch (Exception e) {return new ResponseInfo(500, "系统异常,请联系管理员!");}}}
如上,接口的返回数据处理便优雅了许多。针对上面接口做个测试,启动项目,通过浏览器访问:localhost:8096/test/json,得到响应结果:
{"code":500,"msg":"系统异常,请联系管理员!","data":null}
3、全局异常处理
3.1 系统定义异常处理
新建一个 ExceptionHandlerAdvice 全局异常处理类,然后加上 @RestControllerAdvice 注解即可拦截项目中抛出的异常,如下代码中包含了几个异常处理,如参数格式异常、参数缺失、系统异常等,见下例:
@RestControllerAdvice@Slf4jpublic class ExceptionHandlerAdvice {// 参数格式异常处理@ExceptionHandler({IllegalArgumentException.class})@ResponseStatus(HttpStatus.BAD_REQUEST)public ResponseInfo badRequestException(IllegalArgumentException exception) {log.error("参数格式不合法:" + e.getMessage());return new ResponseInfo(HttpStatus.BAD_REQUEST.value() + "", "参数格式不符!");}// 权限不足异常处理@ExceptionHandler({AccessDeniedException.class})@ResponseStatus(HttpStatus.FORBIDDEN)public ResponseInfo badRequestException(AccessDeniedException exception) {return new ResponseInfo(HttpStatus.FORBIDDEN.value() + "", exception.getMessage());}// 参数缺失异常处理@ExceptionHandler({MissingServletRequestParameterException.class})@ResponseStatus(HttpStatus.BAD_REQUEST)public ResponseInfo badRequestException(Exception exception) {return new ResponseInfo(HttpStatus.BAD_REQUEST.value() + "", "缺少必填参数!");}// 空指针异常@ExceptionHandler(NullPointerException.class)@ResponseStatus(value = HttpStatus.INTERNAL_SERVER_ERROR)public ResponseInfo handleTypeMismatchException(NullPointerException ex) {log.error("空指针异常,{}", ex.getMessage());return new JsonResult("500", "空指针异常");}@ExceptionHandler(Exception.class)@ResponseStatus(value = HttpStatus.INTERNAL_SERVER_ERROR)public JsonResult handleUnexpectedServer(Exception ex) {log.error("系统异常:", ex);return new JsonResult("500", "系统发生异常,请联系管理员");}// 系统异常处理@ExceptionHandler(Throwable.class)@ResponseStatus(HttpStatus.INTERNAL_SERVER_ERROR)public ResponseInfo exception(Throwable throwable) {log.error("系统异常", throwable);return new ResponseInfo(HttpStatus.INTERNAL_SERVER_ERROR.value() + "系统异常,请联系管理员!");}}
@RestControllerAdvice注解包含了@Component注解,说明在 Spring Boot 启动时,也会把该类作为组件交给 Spring 来管理。@RestControllerAdvice注解包含了@ResponseBody注解,为了异常处理完之后给调用方输出一个 JSON 格式的封装数据。@RestControllerAdvice注解还有个basePackages属性,该属性用来拦截哪个包中的异常信息,一般不指定这个属性,拦截项目工程中的所有异常。- 在方法上通过
@ExceptionHandler注解来指定具体的异常,然后在方法中处理该异常信息,最后将结果通过统一的 JSON 结构体返回给调用者。 - 但在项目中,一般都会比较详细地去拦截一些常见异常,拦截
Exception虽然可以一劳永逸,但是不利于去排查或者定位问题。实际项目中,可以把拦截 Exception 异常写在GlobalExceptionHandler最下面,如果都没有找到,最后再拦截一下Exception异常,保证输出信息友好。
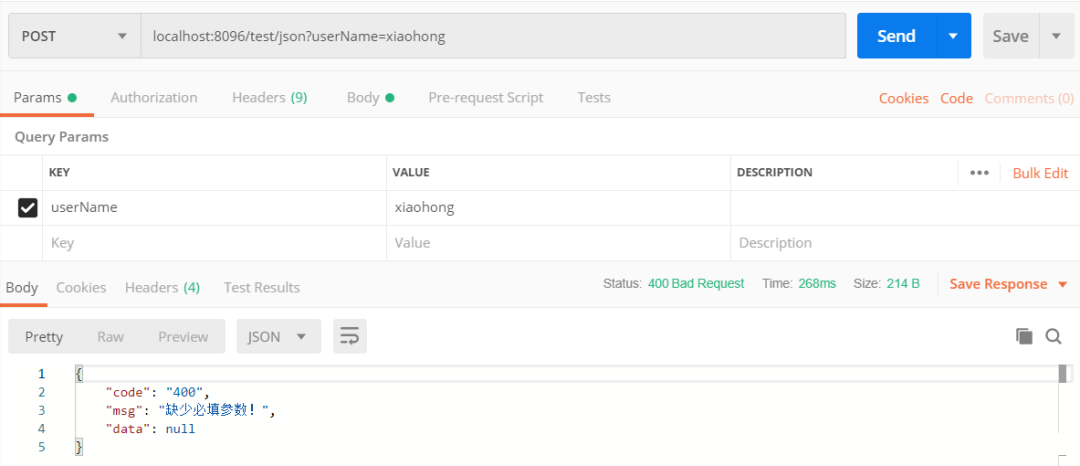
下面通过一个接口来进行测试:
@RestController@RequestMapping(value = "/test", method = RequestMethod.POST)public class TestController {@RequestMapping("/json")public ResponseInfo test(@RequestParam String userName, @RequestParam String password) {try {String data = "登录用户:" + userName + ",密码:" + password;return new ResponseInfo("0", "操作成功!", data);} catch (Exception e) {return new ResponseInfo("500", "系统异常,请联系管理员!");}}}
接口调用,password这项故意空缺:

