1、通道(Channel)的原理与获取
A.通道(Channel)
用于源节点与目标节点的连接。在Java NIO中负责缓冲区中的数据传输,
Channel本身不存储数据,因此需要配合缓冲区进行传输
B.通道的主要实现类
java.nio.channels.Channel接口:
| 实现类 | IO | |
|---|---|---|
| FileChannel | 本地IO | |
| SocketChannel | TCP | 网络IO |
| ServerSocketChannel | ||
| DatagramChannel | UDP |
C.获取通道的方式
①、Java针对支持通道的类提供了getChannel()方法
本地IO
FileInputStream/FileOutputStream
RandomAccessFile
网络IO:
Socket
ServerSocket
DatagramSocket
②、在jdk7中的NIO.2针对各个通道提供了静态方法open()
③、在jdk7中的NIO.2的File工具类的newByteChannel()
D.案例
①、利用通道完成文件的复制-非直接缓冲区方式
// 利用通道完成文件的复制-非直接缓冲区public static void copyFileByChannel() {FileInputStream fileInputStream = null;FileOutputStream fileOutputStream = null;FileChannel fileInputStreamChannel = null;FileChannel fileOutputStreamChannel = null;try {fileInputStream = new FileInputStream("1.jpg");fileOutputStream = new FileOutputStream("2.jpg");// 1、获取通道fileInputStreamChannel = fileInputStream.getChannel();fileOutputStreamChannel = fileOutputStream.getChannel();// 2、分配指定大小的缓冲区ByteBuffer byteBuffer = ByteBuffer.allocate(1024);// 3、将通道中的数据存入缓冲区中while (fileInputStreamChannel.read(byteBuffer) != -1) {// 切换读数据模式byteBuffer.flip();// 4、将缓冲区中的数据写入通道中fileOutputStreamChannel.write(byteBuffer);// 清空缓冲区byteBuffer.clear();}} catch (IOException e) {e.printStackTrace();} finally {if (fileOutputStreamChannel != null) {try {fileOutputStreamChannel.close();} catch (IOException e) {e.printStackTrace();}}if (fileInputStreamChannel != null) {try {fileInputStreamChannel.close();} catch (IOException e) {e.printStackTrace();}}if (fileOutputStream != null) {try {fileOutputStream.close();} catch (IOException e) {e.printStackTrace();}}if (fileInputStream != null) {try {fileInputStream.close();} catch (IOException e) {e.printStackTrace();}}}}
②、利用通道完成文件的复制-直接缓冲区的方式(内存映射文件)
// 使用直接缓冲区完成文件的复制(内存映射文件)public static void copyFileByMappedByteBuffer() throws IOException {long start = System.currentTimeMillis();FileChannel inChannel = FileChannel.open(Paths.get("1.jpg"), StandardOpenOption.READ);FileChannel outChannel = FileChannel.open(Paths.get("3.jpg"), StandardOpenOption.WRITE, StandardOpenOption.READ, StandardOpenOption.CREATE_NEW);// 内存映射文件MappedByteBuffer inMappedBuf = inChannel.map(FileChannel.MapMode.READ_ONLY, 0, inChannel.size());MappedByteBuffer outMappedBuf = outChannel.map(FileChannel.MapMode.READ_WRITE, 0, inChannel.size());// 直接对缓冲区进行数据的读写操作byte[] bytes = new byte[inMappedBuf.limit()];inMappedBuf.get(bytes);outMappedBuf.put(bytes);inChannel.close();outChannel.close();long end = System.currentTimeMillis();System.out.println("直接缓冲区总耗费时间为:" + (end - start));}
2、通道的数据传输与内存映射
A.通道之间的数据传输
transferFrom()transferTo()// 通道之间的数据传输(直接缓冲区)public static void channelDataTrans() throws IOException {long start = System.currentTimeMillis();FileChannel inChannel = FileChannel.open(Paths.get("1.jpg"), StandardOpenOption.READ);FileChannel outChannel = FileChannel.open(Paths.get("4.jpg"), StandardOpenOption.WRITE, StandardOpenOption.READ, StandardOpenOption.CREATE_NEW);// inChannel.transferTo(0, inChannel.size(), outChannel);outChannel.transferFrom(inChannel, 0, inChannel.size());inChannel.close();outChannel.close();long end = System.currentTimeMillis();System.out.println("直接缓冲区方式-通道数据传输数据复制文件-总耗费时间为:" + (end - start));}
3、分散读取与聚集写入
分散(Scatter)与聚集(Gather)
分散读取(Scattering Reads):将通道中的数据分散到多个缓冲区中
聚集写入(Gathering Writes):将多个缓冲区中的数据聚集到通道中
A.分散读取(Scattering Reads)
分散读取(Scattering Reads)是指从Channel中读取的数据“分散”到多个Buffer中。并且是按照缓冲区的顺序,从Channel中读取的数据依次将Buffer填满。

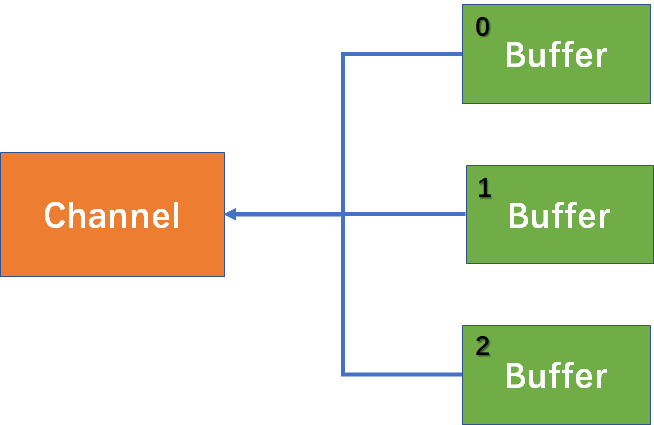
B.聚集写入(Gathering Writes)
聚散写入(Gathering Writes)是指将多个Buffer中的数据“聚集”到Channel,按照缓冲区的顺序,写入position和limit之间的数据到Channel
C.案例
/*** 分散读取和聚集写入** @author Fcant 下午 21:31:30 2020/2/14/0014*/public static void scatterAndGather() throws IOException {RandomAccessFile randomAccessFile = new RandomAccessFile("1.txt", "rw");// 1.获取通道FileChannel fileChannel = randomAccessFile.getChannel();// 2.分配指定大小的缓冲区ByteBuffer byteBuffer = ByteBuffer.allocate(100);ByteBuffer byteBuffer1 = ByteBuffer.allocate(1024);// 3.分散读取ByteBuffer[] buffers = {byteBuffer, byteBuffer1};fileChannel.read(buffers);for (ByteBuffer buffer : buffers) {buffer.flip();}System.out.println(new String(buffers[0].array(), 0, buffers[0].limit()));System.out.println("------------------");System.out.println(new String(buffers[1].array(), 0, buffers[1].limit()));// 4.聚集写入RandomAccessFile accessFile = new RandomAccessFile("2.txt", "rw");FileChannel accessFileChannel = accessFile.getChannel();accessFileChannel.write(buffers);}
4、字符集Charset-编码与解码
编码:字符串 -> 字节数组
解码:字节数组 -> 字符串 ```java /**
- 编码以及解码示例 *
@author Fcant 下午 21:03:45 2020/2/16/0016 */ public static void charSetEncodeDeCode() throws CharacterCodingException { Charset charset = Charset.forName(“GBK”); // 获取编码器 CharsetEncoder charsetEncoder = charset.newEncoder(); // 获取解码器 CharsetDecoder charsetDecoder = charset.newDecoder(); CharBuffer charBuffer = CharBuffer.allocate(1024); charBuffer.put(“樊乘乘”); charBuffer.flip(); // 编码 ByteBuffer byteBuffer = charsetEncoder.encode(charBuffer); for (int i = 1; i < 7; i++) {
System.out.println(byteBuffer.get());
} // 解码 byteBuffer.flip(); CharBuffer decode = charsetDecoder.decode(byteBuffer); System.out.println(decode.toString());
System.out.println(“————————-以UTF-8编码格式进行解码————————“); Charset charsetUTF8 = Charset.forName(“UTF-8”); byteBuffer.flip(); CharBuffer charBufferUTF8 = charsetUTF8.decode(byteBuffer); System.out.println(charBufferUTF8.toString()); }
/**
- 字符集 *
- @author Fcant 下午 20:32:16 2020/2/15/0015
*/
public static void aboutCharSet() {
Map
} } ```System.out.println(stringCharsetEntry.getKey() + "=" + stringCharsetEntry.getValue());

若有收获,就点个赞吧
0 人点赞
