1、Volatile关键字与内存可见性
volatile关键字:当多个线程操作数据时,可以保证内存中的数据的可见性,相较于synchronize是一种较为轻量级的同步策略。
注意:
- 1.
volatile不具备“互斥性” -
A.主存的变量数据在其他线程缓存中不可见的代码演示案例
```java /**
- TestVolatile
- encoding:UTF-8 *
- volatile关键字 *
@author Fcant 下午 12:49:36 2020/2/24/0024 */ public class TestVolatile { public static void main(String[] args) {
ThreadFh fh = new ThreadFh();new Thread(fh).start();while (true) {if (fh.isFlag()) {System.out.println("-----------------");break;}}
} }
class ThreadFh implements Runnable { private boolean flag = false;
public boolean isFlag() {return flag;}public void setFlag(boolean flag) {this.flag = flag;}@Overridepublic void run() {try {Thread.sleep(200);} catch (InterruptedException e) {e.printStackTrace();}flag = true;System.out.println("flag=" + isFlag());}
}
<a name="KHIbU"></a>### B.使用同步锁进行内存变量的刷新-同步锁容易造成多个线程访问的阻塞```java/*** TestVolatile* <p>* encoding:UTF-8** volatile关键字** @author Fcant 下午 12:49:36 2020/2/24/0024*/public class TestVolatile {public static void main(String[] args) {ThreadFh fh = new ThreadFh();new Thread(fh).start();while (true) {synchronized (fh) {if (fh.isFlag()) {System.out.println("-----------------");break;}}}}}class ThreadFh implements Runnable {private boolean flag = false;public boolean isFlag() {return flag;}public void setFlag(boolean flag) {this.flag = flag;}@Overridepublic void run() {try {Thread.sleep(200);} catch (InterruptedException e) {e.printStackTrace();}flag = true;System.out.println("flag=" + isFlag());}}
C.使用Volatile关键字解决主存变量不可见性的问题
/*** TestVolatile* <p>* encoding:UTF-8** volatile关键字:当多个线程操作数据时,可以保证内存中的数据的可见性* 相较于synchronize是一种较为轻量级的同步策略* 注意:* 1.volatile 不具备“互斥性”* 2.volatile 不能保证变量的“原子性”** @author Fcant 下午 12:49:36 2020/2/24/0024*/public class TestVolatile {public static void main(String[] args) {ThreadFh fh = new ThreadFh();new Thread(fh).start();while (true) {if (fh.isFlag()) {System.out.println("-----------------");break;}}}}class ThreadFh implements Runnable {private volatile boolean flag = false;public boolean isFlag() {return flag;}public void setFlag(boolean flag) {this.flag = flag;}@Overridepublic void run() {try {Thread.sleep(200);} catch (InterruptedException e) {e.printStackTrace();}flag = true;System.out.println("flag=" + isFlag());}}
2、原子变量-CAS算法
A.以i++演示原子性问题
/*** TestAtmoic* <p>* encoding:UTF-8** 一、i++的原子性问题:i++的操作实际上分为三个步骤“读-改-写”* int i = 10;* i = i++; // 10* int temp = i;* i = i + 1;* i = temp;** 二、原子变量:JDK1.5后,java.util.concurrent.atomic 包下提供了常用的原子变量* 1.Volatile保证内存可见性* 2.CAS(Compare-And-Swap)算法保证数据的原子性* 内存值 V* 预估值 A* 更新值 B* 当且仅当V == A时,V = B,否则,将不作任何操作** @author Fcant 下午 17:34:21 2020/2/24/0024*/public class TestAtomic {public static void main(String[] args) {AtomicFh atomicFh = new AtomicFh();for (int i = 0; i < 10; i++) {new Thread(atomicFh).start();}}}class AtomicFh implements Runnable {private volatile int serialNumber = 0;public int getSerialNumber() {return serialNumber++;}@Overridepublic void run() {try {Thread.sleep(200);} catch (InterruptedException e) {e.printStackTrace();}System.out.println(Thread.currentThread().getName() + " : " + getSerialNumber());}}
B.使用java.util.concurrent.atomic提供的原子类解决原子性问题
import java.util.concurrent.atomic.AtomicInteger;/*** TestAtmoic* <p>* encoding:UTF-8** 一、i++的原子性问题:i++的操作实际上分为三个步骤“读-改-写”* int i = 10;* i = i++; // 10* int temp = i;* i = i + 1;* i = temp;** 二、原子变量:JDK1.5后,java.util.concurrent.atomic 包下提供了常用的原子变量* 1.Volatile保证内存可见性* 2.CAS(Compare-And-Swap)算法保证数据的原子性* 内存值 V* 预估值 A* 更新值 B* 当且仅当V == A时,V = B,否则,将不作任何操作** @author Fcant 下午 17:34:21 2020/2/24/0024*/public class TestAtomic {public static void main(String[] args) {AtomicFh atomicFh = new AtomicFh();for (int i = 0; i < 10; i++) {new Thread(atomicFh).start();}}}class AtomicFh implements Runnable {// private volatile int serialNumber = 0;private AtomicInteger serialNumber = new AtomicInteger();public int getSerialNumber() {return serialNumber.getAndIncrement();}@Overridepublic void run() {try {Thread.sleep(200);} catch (InterruptedException e) {e.printStackTrace();}System.out.println(Thread.currentThread().getName() + " : " + getSerialNumber());}}
C.CAS算法
CAS(Compare-And-Swap)是一种硬件对并发的支持,针对多处理器操作而设计的处理器中的一种特殊指令,用于管理对共享数据的并发访问。
CAS是一种无锁的非阻塞算法的实现。
CAS包含了3个操作数:
- 需要读写的内存值V
- 进行比较的值A
- 拟写入的新值B
当且仅当V的值等于A时,CAS通过原子方式用新值B来更新V的值,否则不会执行任何操作。
/*** TestCompareAndSwap* <p>* encoding:UTF-8** @author Fcant 下午 18:09:34 2020/2/24/0024*/public class TestCompareAndSwap {public static void main(String[] args) {final CompareAndSwap cas = new CompareAndSwap();for(int i=1 ;i < 10;i++){new Thread(new Runnable() {@Overridepublic void run() {int expectedValue = cas.getValue();boolean compareAndSet = cas.compareAndSet(expectedValue, (int) Math.random() * 101);System.out.println(compareAndSet);}});}}}class CompareAndSwap {private int value;// 获取内存值public synchronized int getValue() {return value;}// 比较public synchronized int compareAndSwap(int expectedValue, int newValue) {int oldValue = value;if (oldValue == expectedValue) {oldValue = newValue;}return oldValue;}// 设置public synchronized boolean compareAndSet(int ecpectedValue, int newValue) {return ecpectedValue == compareAndSwap(ecpectedValue, newValue);}}
3、ConcurrentHashMap锁分段机制
Java5.0在java.util.concurrent包中提供了多种并发容器类来改进同步容器的性能。ConcurrentHashMap同步容器类是Java5增加的一个线程安全的哈希表。对与多线程的操作,介于HashMap与Hashtable之间。内部采用“锁分段”机制替代Hashtable的独占锁。进而提高性能。
此包还提供了设计用于多线程上下文中的Collection实现:ConcurrentHashMap、ConcurrentSkipListMap、ConcurrentSkipListSet、CopyOnWriteArrayList和CopyOnWriteArraySet。
当期望许多线程访问一个给定的collection时,ConcurrentHashMap通常优于同步的HashMap,ConcurrentSkipListMap通常优于同步的TreeMap。
当期望的读数和遍历远远大于列表的更新数时,CopyOnWriteArrayList优于同步的ArrayList。
A.使用ArrayList时出现并发修改异常
import java.util.ArrayList;import java.util.Collections;import java.util.Iterator;import java.util.List;/*** TestCopyOnWriteArray* <p>* encoding:UTF-8** CopyOnWriteArrayList/CopyOnWriteArraySet:“写入并复制”** @author Fcant 下午 18:47:27 2020/2/24/0024*/public class TestCopyOnWriteArray {public static void main(String[] args) {HelloThread helloThread = new HelloThread();for (int i = 0; i < 10; i++) {new Thread(helloThread).start();}}}class HelloThread implements Runnable {private static List<String> list = Collections.synchronizedList(new ArrayList<>());static {list.add("AA");list.add("BB");list.add("CC");}@Overridepublic void run() {Iterator<String> iterator = list.iterator();while (iterator.hasNext()) {System.out.println(iterator.next());list.add("DD");}}}
B.使用CopyOnWriteArrayList解决并发修改异常
CopyOnWriteArrayList在写入时会复制一个新的链表
注意:添加操作多时,效率低,因为每次添加时都会进行复制。并发迭代操作时可以选择
import java.util.Iterator;import java.util.concurrent.CopyOnWriteArrayList;/*** TestCopyOnWriteArray* <p>* encoding:UTF-8** CopyOnWriteArrayList/CopyOnWriteArraySet:“写入并复制”* 注意:添加操作多时,效率低,因为每次添加时都会进行复制。并发迭代操作时可以选择** @author Fcant 下午 18:47:27 2020/2/24/0024*/public class TestCopyOnWriteArray {public static void main(String[] args) {HelloThread helloThread = new HelloThread();for (int i = 0; i < 10; i++) {new Thread(helloThread).start();}}}class HelloThread implements Runnable {// private static List<String> list = Collections.synchronizedList(new ArrayList<>());private static CopyOnWriteArrayList<String> list = new CopyOnWriteArrayList<>();static {list.add("AA");list.add("BB");list.add("CC");}@Overridepublic void run() {Iterator<String> iterator = list.iterator();while (iterator.hasNext()) {System.out.println(iterator.next());list.add("DD");}}}
4、CountDownLatch闭锁
Java5在java.util.concurrent包中提供了多种并发容器类来改进同步容器的性能。CountDownLatch一个同步辅助类,在完成一组正在其他线程中执行的操作之前,它允许一个或多个线程一直等待。
闭锁可以延迟线程的进度直到其到达终止状态,闭锁可以用来确保某些活动直到其他活动都完成才继续执行:
- 确保某个计算在其需要的所有资源都被初始化之后才继续执行;
- 确保某个服务在其依赖的所有其他服务都已经启动之后才启动;
- 等待直到某个操作所有参与者都准备就绪再继续执行。
A.未进行闭锁的操作案例
```java import java.util.concurrent.CountDownLatch;
/**
- TestCountDownLatch
- encoding:UTF-8 *
- CountDownLatch:闭锁,在完成某些运算时,只有其他所有线程的运算全部完成,当前运算才继续执行 *
@author Fcant 下午 19:24:36 2020/2/24/0024 */ public class TestCountDownLatch { public static void main(String[] args) {
final CountDownLatch countDownLatch = new CountDownLatch(5);LatchFh fh = new LatchFh(countDownLatch);long start = System.currentTimeMillis();for (int i = 0; i < 10; i++) {new Thread(fh).start();}long end = System.currentTimeMillis();System.out.println("耗时为:" + (end - start));
} }
class LatchFh implements Runnable {
private CountDownLatch countDownLatch;public LatchFh(CountDownLatch countDownLatch) {this.countDownLatch = countDownLatch;}@Overridepublic void run() {for (int i = 0; i < 50000; i++) {if (i % 2 == 0) {System.out.println(i);}}}
}
<a name="NVj4g"></a>### B.案例修改为闭锁方式```javaimport java.util.concurrent.CountDownLatch;/*** TestCountDownLatch* <p>* encoding:UTF-8** CountDownLatch:闭锁,在完成某些运算时,只有其他所有线程的运算全部完成,当前运算才继续执行** @author Fcant 下午 19:24:36 2020/2/24/0024*/public class TestCountDownLatch {public static void main(String[] args) {final CountDownLatch countDownLatch = new CountDownLatch(5);LatchFh fh = new LatchFh(countDownLatch);long start = System.currentTimeMillis();for (int i = 0; i < 5; i++) {new Thread(fh).start();}try {countDownLatch.await();} catch (InterruptedException e) {e.printStackTrace();}long end = System.currentTimeMillis();System.out.println("耗时为:" + (end - start));}}class LatchFh implements Runnable {private CountDownLatch countDownLatch;public LatchFh(CountDownLatch countDownLatch) {this.countDownLatch = countDownLatch;}@Overridepublic void run() {synchronized (this) {try {for (int i = 0; i < 50000; i++) {if (i % 2 == 0) {System.out.println(i);}}}finally {countDownLatch.countDown();}}}}
5、实现Callable接口
- 一、创建执行线程的方式三:实现
Callable接口。相较于实现Runnable接口的方式,Callable方法可以有返回值,并且可以抛出异常 - 二、执行
Callable方式,需要FutureTask实现类的支持,用于接收运算结果。FutureTask是Future接口的实现类 ```java import java.util.concurrent.Callable; import java.util.concurrent.ExecutionException; import java.util.concurrent.FutureTask;
/**
- TestCallable
- encoding:UTF-8 *
- 一、创建执行线程的方式三:实现Callable接口。相较于实现Runnable接口的方式,Callable方法可以有返回值,并且可以抛出异常
- 二、执行Callable方式,需要FutureTask实现类的支持,用于接收运算结果。FutureTask是Future接口的实现类 *
@author Fcant 下午 21:17:28 2020/2/24/0024 */ public class TestCallable { public static void main(String[] args) {
ThreadFc fc = new ThreadFc();// 1.执行Callable方式,需要FutureTask实现类的支持,用于接收运算结果FutureTask<Integer> futureTask = new FutureTask<>(fc);new Thread(futureTask).start();// 2.接收线程运算后的结果try {// FutureTask可用于闭锁System.out.println(futureTask.get());} catch (InterruptedException e) {e.printStackTrace();} catch (ExecutionException e) {e.printStackTrace();}
} }
class ThreadFc implements Callable
<a name="BNKOc"></a>## 6、`Lock`同步锁<a name="fwGhi"></a>### A.多线程访问共享变量异常代码演示```java/*** TestLock* <p>* encoding:UTF-8** 一、用于解决多线程安全问题的方式* synchronized:隐式锁* 1.同步代码块* 2.同步方法** jdk1.5以后:* 3.同步锁Lock* 注意:同步锁是一个显示锁,需要通过lock()上锁,必须通过unlock()方法进行释放锁** @author Fcant 上午 10:02:19 2020/2/25/0025*/public class TestLock {public static void main(String[] args) {Ticket ticket = new Ticket();new Thread(ticket, "1号窗口").start();new Thread(ticket, "2号窗口").start();new Thread(ticket, "3号窗口").start();}}class Ticket implements Runnable {private int tick = 100;@Overridepublic void run() {while (true) {if (tick > 0) {try {Thread.sleep(200);} catch (InterruptedException e) {e.printStackTrace();}System.out.println(Thread.currentThread().getName() + "完成售票,余票为:" + --tick);}}}}
B.使用Lock同步锁解决多线程访问共享变量的问题
import java.util.concurrent.locks.Lock;import java.util.concurrent.locks.ReentrantLock;/*** TestLock* <p>* encoding:UTF-8** 一、用于解决多线程安全问题的方式* synchronized:隐式锁* 1.同步代码块* 2.同步方法** jdk1.5以后:* 3.同步锁Lock* 注意:同步锁是一个显示锁,需要通过lock()上锁,必须通过unlock()方法进行释放锁** @author Fcant 上午 10:02:19 2020/2/25/0025*/public class TestLock {public static void main(String[] args) {Ticket ticket = new Ticket();new Thread(ticket, "1号窗口").start();new Thread(ticket, "2号窗口").start();new Thread(ticket, "3号窗口").start();}}class Ticket implements Runnable {private int tick = 100;private Lock lock = new ReentrantLock();@Overridepublic void run() {while (true) {lock.lock();try {if (tick > 0) {try {Thread.sleep(200);} catch (InterruptedException e) {e.printStackTrace();}System.out.println(Thread.currentThread().getName() + "完成售票,余票为:" + --tick);}}finally {lock.unlock();}}}}
C.通过Lock实现等待唤醒机制,生产者与消费者模式
①、没有等待唤醒机制的无限消费案例演示
/*** TestProductorAndConsumer* <p>* encoding:UTF-8** @author Fcant 上午 10:46:52 2020/2/25/0025*/public class TestProductAndConsumer {public static void main(String[] args) {Clerk clerk = new Clerk();Product product = new Product(clerk);Consumer consumer = new Consumer(clerk);new Thread(product, "生产者A").start();new Thread(consumer, "消费者B").start();}}// 店员class Clerk{private int product = 0;// 进货public synchronized void get() {if (product >= 10) {System.out.println("仓库已满,无法进货!");} else {System.out.println(Thread.currentThread().getName() + " : " + ++product);}}// 卖货public synchronized void sale() {if (product <= 0) {System.out.println("缺货中···");} else {System.out.println(Thread.currentThread().getName() + " : " + --product);}}}// 生产者class Product implements Runnable{private Clerk clerk;public Product(Clerk clerk) {this.clerk = clerk;}@Overridepublic void run() {for (int i = 0; i < 20; i++) {clerk.get();}}}// 消费者class Consumer implements Runnable{private Clerk clerk;public Consumer(Clerk clerk) {this.clerk = clerk;}@Overridepublic void run() {for (int i = 0; i < 20; i++) {clerk.sale();}}}
②、使用等待唤醒机制解决无限消费
/*** TestProductorAndConsumer* <p>* encoding:UTF-8** @author Fcant 上午 10:46:52 2020/2/25/0025*/public class TestProductAndConsumer {public static void main(String[] args) {Clerk clerk = new Clerk();Product product = new Product(clerk);Consumer consumer = new Consumer(clerk);new Thread(product, "生产者A").start();new Thread(consumer, "消费者B").start();}}// 店员class Clerk{private int product = 0;// 进货public synchronized void get() {if (product >= 10) {System.out.println("仓库已满,无法进货!");try {this.wait();} catch (InterruptedException e) {e.printStackTrace();}} else {System.out.println(Thread.currentThread().getName() + " : " + ++product);this.notifyAll();}}// 卖货public synchronized void sale() {if (product <= 0) {try {this.wait();} catch (InterruptedException e) {e.printStackTrace();}System.out.println("缺货中···");} else {System.out.println(Thread.currentThread().getName() + " : " + --product);this.notifyAll();}}}// 生产者class Product implements Runnable{private Clerk clerk;public Product(Clerk clerk) {this.clerk = clerk;}@Overridepublic void run() {for (int i = 0; i < 20; i++) {clerk.get();}}}// 消费者class Consumer implements Runnable{private Clerk clerk;public Consumer(Clerk clerk) {this.clerk = clerk;}@Overridepublic void run() {for (int i = 0; i < 20; i++) {clerk.sale();}}}
③、为了避免虚假唤醒问题,应该总是使用在循环中
/*** TestProductorAndConsumer* <p>* encoding:UTF-8** @author Fcant 上午 10:46:52 2020/2/25/0025*/public class TestProductAndConsumer {public static void main(String[] args) {Clerk clerk = new Clerk();Product product = new Product(clerk);Consumer consumer = new Consumer(clerk);new Thread(product, "生产者A").start();new Thread(consumer, "消费者B").start();new Thread(product, "生产者C").start();new Thread(consumer, "消费者D").start();}}// 店员class Clerk{private int product = 0;// 进货public synchronized void get() {while (product >= 1) {System.out.println("仓库已满,无法进货!");try {this.wait();} catch (InterruptedException e) {e.printStackTrace();}}System.out.println(Thread.currentThread().getName() + " : " + ++product);this.notifyAll();}// 卖货public synchronized void sale() {while (product <= 0) {try {this.wait();} catch (InterruptedException e) {e.printStackTrace();}System.out.println("缺货中···");}System.out.println(Thread.currentThread().getName() + " : " + --product);this.notifyAll();}}// 生产者class Product implements Runnable{private Clerk clerk;public Product(Clerk clerk) {this.clerk = clerk;}@Overridepublic void run() {for (int i = 0; i < 20; i++) {try {Thread.sleep(200);} catch (InterruptedException e) {e.printStackTrace();}clerk.get();}}}// 消费者class Consumer implements Runnable{private Clerk clerk;public Consumer(Clerk clerk) {this.clerk = clerk;}@Overridepublic void run() {for (int i = 0; i < 20; i++) {clerk.sale();}}}
7、Condition控制线程通信
Condition接口描述了可能会与锁有关联的条件变量。这些变量在用法上与使用Object.wait访问的隐式监视器类似,但提供了更强大的功能。需要特别指出的是,单个Lock可能与多个Condition对象关联。为了避免兼容性问题,Condition方法的名称与对应Object版本中的不同。
在Condition对象中,与wait、notify和notifyAll方法对应的分别是await、signal、和signalAll。Condition实例实质上被绑定到一个锁上。要为特定Lock实例获得Condition实例,请使用其newCondition()方法
使用Lock和Condition实现生产者和消费者案例
import java.util.concurrent.locks.Condition;import java.util.concurrent.locks.Lock;import java.util.concurrent.locks.ReentrantLock;/*** TestProductorAndConsumer* <p>* encoding:UTF-8** @author Fcant 上午 10:46:52 2020/2/25/0025*/public class TestProductAndConsumerByLock {public static void main(String[] args) {Clerk clerk = new Clerk();Product product = new Product(clerk);Consumer consumer = new Consumer(clerk);new Thread(product, "生产者A").start();new Thread(consumer, "消费者B").start();new Thread(product, "生产者C").start();new Thread(consumer, "消费者D").start();}}// 店员class Clerk{private int product = 0;private Lock lock = new ReentrantLock();private Condition condition = lock.newCondition();// 进货public void get() {lock.lock();try {while (product >= 1) {System.out.println("仓库已满,无法进货!");condition.signal();}System.out.println(Thread.currentThread().getName() + " : " + ++product);this.notifyAll();}finally {condition.signalAll();}}// 卖货public synchronized void sale() {lock.lock();try {while (product <= 0) {condition.signal();System.out.println("缺货中···");}System.out.println(Thread.currentThread().getName() + " : " + --product);condition.signalAll();}finally {lock.unlock();}}}// 生产者class Product implements Runnable{private Clerk clerk;public Product(Clerk clerk) {this.clerk = clerk;}@Overridepublic void run() {for (int i = 0; i < 20; i++) {try {Thread.sleep(200);} catch (InterruptedException e) {e.printStackTrace();}clerk.get();}}}// 消费者class Consumer implements Runnable{private Clerk clerk;public Consumer(Clerk clerk) {this.clerk = clerk;}@Overridepublic void run() {for (int i = 0; i < 20; i++) {clerk.sale();}}}
8、线程按序交替
import java.util.concurrent.locks.Condition;import java.util.concurrent.locks.Lock;import java.util.concurrent.locks.ReentrantLock;/*** TestSortThread* <p>* encoding:UTF-8** 编写一个程序,开启3个线程,这三个线程的ID分别为A、B、C,每个线程将自己的ID在屏幕上打印10遍,要求输出的结果必须按顺序显示* 如:ABCABCABC···依次递归** @author Fcant 下午 13:52:37 2020/2/25/0025*/public class TestSortThread {public static void main(String[] args) {Alternate alternate = new Alternate();new Thread(new Runnable() {@Overridepublic void run() {for (int i = 0; i <= 20; i++) {alternate.loopA(i);}}}, "A").start();new Thread(new Runnable() {@Overridepublic void run() {for (int i = 0; i <= 20; i++) {alternate.loopB(i);}}}, "B").start();new Thread(new Runnable() {@Overridepublic void run() {for (int i = 0; i <= 20; i++) {alternate.loopC(i);}System.out.println("------------------------");}}, "C").start();}}class Alternate {private int num = 1;private Lock lock = new ReentrantLock();private Condition condition1 = lock.newCondition();private Condition condition2 = lock.newCondition();private Condition condition3 = lock.newCondition();public void loopA(int totalLoop) {lock.lock();try {if (num != 1) {condition1.await();}for (int i = 0; i < 5; i++) {System.out.println(Thread.currentThread().getName() + "-" + i + "-" + totalLoop);}num = 2;condition2.signal();} catch (Exception e) {e.printStackTrace();}finally {lock.unlock();}}public void loopB(int totalLoop) {lock.lock();try {if (num != 2) {condition2.await();}for (int i = 0; i < 15; i++) {System.out.println(Thread.currentThread().getName() + "-" + i + "-" + totalLoop);}num = 3;condition3.signal();} catch (Exception e) {e.printStackTrace();}finally {lock.unlock();}}public void loopC(int totalLoop) {lock.lock();try {if (num != 3) {condition3.await();}for (int i = 0; i < 20; i++) {System.out.println(Thread.currentThread().getName() + "-" + i + "-" + totalLoop);}num = 1;condition1.signal();} catch (Exception e) {e.printStackTrace();}finally {lock.unlock();}}}
9、ReadWriteLock读写锁
import java.util.concurrent.locks.ReadWriteLock;import java.util.concurrent.locks.ReentrantReadWriteLock;/*** TestReadWriteLock* <p>* encoding:UTF-8** 1.ReadWriteLock:读写锁* 写写/读写 需要“互斥”* 读读 不需要互斥** @author Fcant 下午 14:53:31 2020/2/25/0025*/public class TestReadWriteLock {public static void main(String[] args) {ReadWriteLockFh readWriteLockFh = new ReadWriteLockFh();new Thread(new Runnable() {@Overridepublic void run() {readWriteLockFh.set((int) (Math.random() * 101));}}, "Write").start();for (int i = 0; i < 1000; i++) {new Thread(new Runnable() {@Overridepublic void run() {readWriteLockFh.get();}}, "Read").start();}}}class ReadWriteLockFh {private int num = 0;private ReadWriteLock readWriteLock = new ReentrantReadWriteLock();// 读public void get() {readWriteLock.readLock().lock();try {System.out.println(Thread.currentThread().getName() + " : " + num);}finally {readWriteLock.readLock().unlock();}}// 写public void set(int num) {readWriteLock.writeLock().lock();try {System.out.println(Thread.currentThread().getName());this.num = num;}finally {readWriteLock.writeLock().unlock();}}}
10、线程八锁
线程八锁的关键:
①非静态方法的锁默认为this,静态方法的锁为对应的Class实例
②某一时刻内,只能有一个线程持有锁,无论几个方法
/*** TestThread8Monitor* <p>* encoding:UTF-8** 题目:判断打印的one或two* 1.两个普通同步方法,两个线程,标准打印 // one two* 2.新增Thread.sleep() 给 getOne()方法 // one two* 3.新增普通方法getThree() // three one two* 4.两个普通同步方法,两个Number对象 // two one* 5.修改getOne()为静态同步方法 // one two* 6.修改两个方法均为静态同步方法,一个Number对象 // one two* 7.一个静态同步方法,一个非静态同步方法,两个Number对象 // two one* 8.两个静态同步方法,两个Number对象 // one two** 线程八锁的关键:* ①非静态方法的锁默认为this,静态方法的锁为对应的Class实例* ②某一时刻内,只能有一个线程持有锁,无论几个方法** @author Fcant 下午 15:11:22 2020/2/25/0025*/public class TestThread8Monitor {public static void main(String[] args) {Number number = new Number();Number num = new Number();new Thread(new Runnable() {@Overridepublic void run() {number.getOne();}}).start();new Thread(new Runnable() {@Overridepublic void run() {num.getTwo();}}).start();new Thread(new Runnable() {@Overridepublic void run() {number.getThree();}}).start();}}class Number {public synchronized void getOne() {try {Thread.sleep(3000);} catch (InterruptedException e) {e.printStackTrace();}System.out.println("ONE");}public synchronized void getTwo() {System.out.println("TWO");}public synchronized void getThree() {System.out.println("Three");}}
11、线程池
A.线程池
提供了一个线程队列,队列中保存着所有等待状态的线程。避免了创建与销毁额外开销,提高了响应速率
B.线程池体系结构
java.util.concurrent.Ececutor: 负责线程的使用与调度的根接口
|—ExecutorService 子接口:线程池的主要接口
|—ThreadPoolExecutor 线程池的实现类
|—ScheduledExecutorService 子接口:负责线程的调度
|—ScheduledThreadPoolExecutor:继承ThreadPoolExecutor,实现ScheduledExecutorService
C.工具类:Executors
ExecutorService newFixedThreadPool() : 创建固定大小的线程池。ExecutorService newCachedThreadPool() : 缓存线程池,线程池的数量不固定,可以根据需求自动的更改数量。ExecutorService newSingleThreadExecutor() : 创建单个线程池,线程池中只有一个线程。ScheduledExecutorService newScheduledThreadPool() : 创建固定大小的线程,可以延迟或定时的执行任务。
D.线程池的使用
import java.util.ArrayList;import java.util.List;import java.util.concurrent.*;/*** TestThreadPool* <p>* encoding:UTF-8** 一、线程池* 提供了一个线程队列,队列中保存着所有等待状态的线程。避免了创建与销毁额外开销,提高了响应速率** 二、线程池体系结构* java.util.concurrent.Ececutor: 负责线程的使用与调度的根接口* |--ExecutorService 子接口:线程池的主要接口* |--ThreadPoolExecutor 线程池的实现类* |--ScheduledExecutorService 子接口:负责线程的调度* |--ScheduledThreadPoolExecutor:继承ThreadPoolExecutor,实现ScheduledExecutorService** 三、工具类:Executors* ExecutorService newFixedThreadPool() : 创建固定大小的线程池。* ExecutorService newCachedThreadPool() : 缓存线程池,线程池的数量不固定,可以根据需求自动的更改数量。* ExecutorService newSingleThreadExecutor() : 创建单个线程池,线程池中只有一个线程。* ScheduledExecutorService newScheduledThreadPool() : 创建固定大小的线程,可以延迟或定时的执行任务。** @author Fcant 下午 16:03:54 2020/2/25/0025*/public class TestThreadPool {public static void main(String[] args) throws ExecutionException, InterruptedException {ThreadPoolFc fc = new ThreadPoolFc();// 1.创建线程池ExecutorService executorService = Executors.newFixedThreadPool(5);// 2.为线程池分配任务/*for (int i = 0; i < 10; i++) {executorService.submit(fc);}*/List<Future<Integer>> list = new ArrayList<>();for (int j = 0; j < 10; j++) {Future<Integer> future = executorService.submit(new Callable<Integer>() {@Overridepublic Integer call() throws Exception {int sum = 0;for (int i = 0; i < 100; i++) {sum += i;}return sum;}});list.add(future);}// 3.关闭线程池executorService.shutdown();for (Future<Integer> integerFuture : list) {System.out.println(integerFuture.get());}// new Thread(fc).start();// new Thread(fc).start();}}class ThreadPoolFc implements Runnable {@Overridepublic void run() {for (int i = 0; i < 100; i++) {System.out.println(Thread.currentThread().getName() + " : " + i);}}}
12、线程调度
import java.util.Random;import java.util.concurrent.*;/*** TestSchuledThreadPool* <p>* encoding:UTF-8** * 一、线程池* * 提供了一个线程队列,队列中保存着所有等待状态的线程。避免了创建与销毁额外开销,提高了响应速率* ** * 二、线程池体系结构* * java.util.concurrent.Ececutor: 负责线程的使用与调度的根接口* * |--ExecutorService 子接口:线程池的主要接口* * |--ThreadPoolExecutor 线程池的实现类* * |--ScheduledExecutorService 子接口:负责线程的调度* * |--ScheduledThreadPoolExecutor:继承ThreadPoolExecutor,实现ScheduledExecutorService* ** * 三、工具类:Executors* * ExecutorService newFixedThreadPool() : 创建固定大小的线程池。* * ExecutorService newCachedThreadPool() : 缓存线程池,线程池的数量不固定,可以根据需求自动的更改数量。* * ExecutorService newSingleThreadExecutor() : 创建单个线程池,线程池中只有一个线程。* * ScheduledExecutorService newScheduledThreadPool() : 创建固定大小的线程,可以延迟或定时的执行任务。** @author Fcant 下午 16:58:29 2020/2/25/0025*/public class TestScheduledThreadPool {public static void main(String[] args) throws ExecutionException, InterruptedException {ScheduledExecutorService scheduledExecutorService = Executors.newScheduledThreadPool(5);for (int i = 0; i < 10; i++) {ScheduledFuture<Integer> future = scheduledExecutorService.schedule(new Callable<Integer>() {@Overridepublic Integer call() throws Exception {int num = new Random().nextInt(100);System.out.println(Thread.currentThread().getName() + ":" + num);return num;}}, 3, TimeUnit.SECONDS);System.out.println(future.get());}scheduledExecutorService.shutdown();}}
13、ForkJoinPool分支/合并框架 工作窃取
Fork/Join框架:就是在必要情况下,将一个大任务,进行拆分(fork)成若干个小任务(拆到不可再拆时),再将一个个的小任务运算的结果进行join汇总。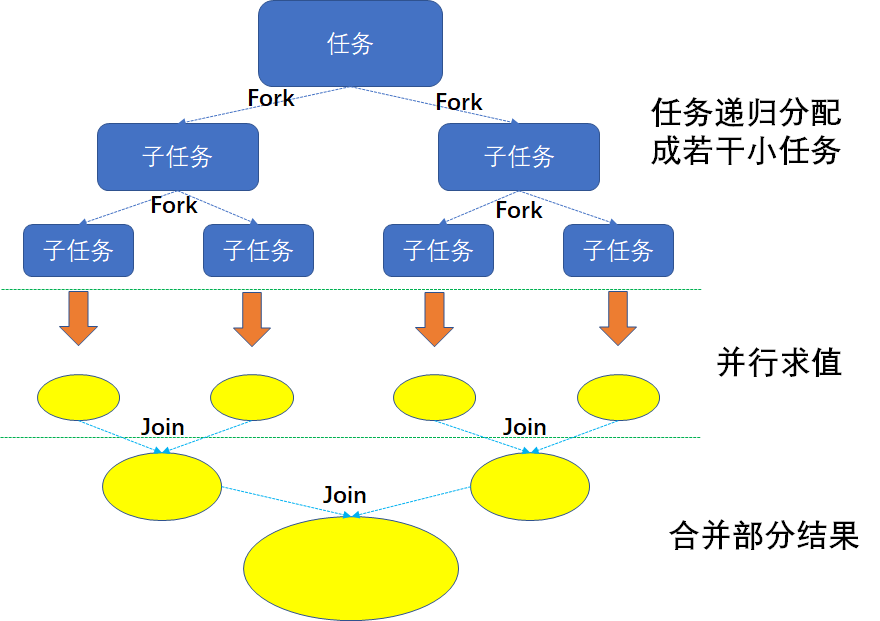
Fork/Join框架与传统线程池的区别
采用“工作窃取”模式(work-stealing):
当执行新的任务时它可以将其拆分分成更小的任务执行,并将小任务加到线程队列中,然后再从一个随机线程的队列中偷一个并把它放在自己的队列中。
相对于一般的线程池实现,fork/join框架的优势体现在对其中包含的任务的处理方式上,在一般的线程池中,如果一个线程正在执行的任务由于某些原因无法继续运行,那么该线程会处于等待状态,而在fork/join框架实现中,如果某个子问题由于等待另外一个子问题的完成而无法继续运行,那么处理该子问题的线程会主动寻找其他尚未运行的子问题来执行,这种方式减少了线程的等待时间,提高了性能。
public class ForkJoinCalculate extends RecursiveTask<Long> {public static final long serialVersionUID = 134656970987L;private Long start;private Long end;public ForkJoinCalculate(Long start, Long end) {this.start = start;this.end = end;}public static final long THRESHOLD = 10000;@Overrideprotected Long compute() {long length = end - start;if (length <= THRESHOLD) {long sum = 0;for (long i = start; i <= end; i++) {sum += i;}return sum;} else {long middle = (start + end) / 2;ForkJoinCalculate left = new ForkJoinCalculate(start, middle);// 拆分子任务,同时压入线程队列left.fork();ForkJoinCalculate right = new ForkJoinCalculate(middle + 1, end);right.fork();return left.join() + right.join();}}}
public class ForkJoinTest {// Fork/Join操作@Testpublic void forkJoinTest() {Instant start = Instant.now();ForkJoinPool pool = new ForkJoinPool();ForkJoinCalculate task = new ForkJoinCalculate(0L, 10000000L);Long sum = pool.invoke(task);System.out.println(sum);Instant end = Instant.now();System.out.println("耗费时间为:" + Duration.between(start, end).toMillis() + "毫秒");}// 常规行程操作@Testpublic void threadTest() {Instant start = Instant.now();Long sum = 0L;for(long i=0 ;i < 10000000L;i++){sum += i;}System.out.println(sum);Instant end = Instant.now();System.out.println("耗费时间为:" + Duration.between(start, end).toMillis() + "毫秒");}// Java8并行流的操作@Testpublic void parallelTest() {Instant start = Instant.now();LongStream.rangeClosed(0, 100000000L).parallel().reduce(0, Long::sum);Instant end = Instant.now();System.out.println("耗时为:" + Duration.between(start, end).toMillis() + "毫秒");}}

若有收获,就点个赞吧
0 人点赞
