前端基础建设与架构 - 前百度资深前端开发工程师 - 拉勾教育
之前我们提到过,一个顺畅的基建流程离不开 npm scripts。npm scripts 将工程化的各个环节串联起来,相信任何一个现代化的项目都有自己的 npm scripts 设计。那么作为架构师或资深开发者,我们如何设计并实现项目配套的 npm scripts 呢?关于 npm scripts 我们如何进行封装抽象,做到复用或基建统一呢?
这一讲,我们就围绕如何使用 npm scripts,打造一体化的构建和部署流程展开。
npm scripts 原理介绍
这一部分,我们将对 npm scripts 是什么,以及其核心原理进行讲解。
npm scripts 是什么
我们先来系统地了解一下 npm scripts。Node.js 在设计 npm 之初,允许开发者在 package.json 文件中,通过 scripts 字段来自定义项目的脚本。比如我们可以在 package.json 中这样使用:
{"scripts": {"build": "node build.js","dev": "node dev.js","test": "node test.js",}}
对应上述代码,我们在项目中可以使用命令行执行相关的脚本:
$ npm run build$ npm run dev$ npm run test
其中build.js、dev.js、test.js三个 Node.js 模块分别对应上面三个命令行执行命令。这样的设计,可以方便我们统计和集中维护项目工程化或基建相关的所有脚本 / 命令,也可以利用 npm 很多辅助功能,例如下面几个功能。
- 使用 npm 钩子,比如
pre、post,对应命令npm run build的钩子命令就是:prebuild和postbuild。 - 开发者使用
npm run build时,会默认自动先执行npm run prebuild再执行npm run build,最后执行npm run postbuild,对此我们可以自定义:
{"scripts": {"prebuild": "node prebuild.js","build": "node build.js","postbuild": "node postbuild.js",}}
- 使用 npm 提供的
process.env.npm_lifecycle_event等环境变量。通过process.env.npm_lifecycle_event,可以在相关 npm scripts 脚本中获得当前运行的脚本名称。 - 使用 npm 提供的
npm_package_能力,获取 package.json 中的相关字段,比如下面代码:
console.log(process.env.npm_package_name)console.log(process.env.npm_package_version)
更多 npm 为 npm scripts 提供的 “黑魔法”,我们不再一一列举了。你可以前往 https://docs.npmjs.com/ 进行了解。
npm scripts 原理
其实,npm scripts 原理比较简单。我们依靠npm run xxx来执行一个 npm scripts,那么核心奥秘就在于npm run了。npm run会自动创建一个 Shell(实际使用的 Shell 会根据系统平台而不同,类 UNIX 系统里,如 macOS 或 Linux 中指代的是 /bin/sh, 在 Windows 中使用的是 cmd.exe),我们的 npm scripts 脚本就在这个新创建的 Shell 中被运行。这样一来,我们可以得出几个关键结论:
- 只要是 Shell 可以运行的命令,都可以作为 npm scripts 脚本;
- npm 脚本的退出码,也自然遵守 Shell 脚本规则;
- 如果我们的系统里安装了 Python,可以将 Python 脚本作为 npm scripts;
- npm scripts 脚本可以使用 Shell 通配符等常规能力。
比如这样的代码:
{"scripts": {"lint": "eslint **/*.js",}}
*表示任意文件名,**表示任意一层子目录,在执行npm run lint后,就可以对当前目录下,任意一层子目录的 js 文件进行 lint 审查。
另外,请你思考:npm run创建出来的 Shell 有什么特别之处呢?
我们知道,node_modules/.bin子目录中的所有脚本都可以直接以脚本名的形式调用,而不必写出完整路径,比如下面代码:
{"scripts": {"build": "webpack",}}
在 package.json 中直接写webpack即可,而不需要写成:
{"scripts": {"build": "./node_modules/.bin/webpack",}}
的形式。这是为什么呢?
实际上,npm run创建出来的 Shell 需要将当前目录的node_modules/.bin子目录加入PATH 变量中,在 npm scripts 执行完成后,再将 PATH 变量恢复。
npm scripts 使用技巧
这里我们简单讲解两个常见场景,以此介绍 npm scripts 的关键使用技巧。
传递参数
任何命令脚本,都需要进行参数传递。在 npm scripts 中,可以使用--标记参数。比如下面代码:
$ webpack --profile --json > stats.json
另外一种传参的方式是通过 package.json,比如下面代码:
{"scripts": {"build": "webpack --profile --json > stats.json",}}
串行 / 并行执行脚本
在一个项目中,任意 npm scripts 可能彼此之间都有会依赖关系,我们可以通过&&符号来串行执行脚本。比如下面代码:
$ npm run pre.js && npm run post.js
如果需要并行执行,可以使用&符号,如下代码:
npm run scriptA.js & npm run scriptB.js
这两种串行 / 并行执行方式其实是 Bash 的能力,社区里也封装了很多串行 / 并行执行脚本的公共包供开发者选用,比如:npm-run-all 就是一个常用的例子。
最后的提醒
最后,特别强调两点注意事项。
首先,npm scripts 可以和 git-hooks 相结合,为项目提供更顺畅、自然的能力。比如 pre-commit、husky、lint-staged 这类工具,支持 Git Hooks 各种种类,在必要的 git 操作节点,执行我们的 npm scripts。
同时需要注意的是,我们编写的 npm scripts 应该考虑不同操作系统上兼容性的问题,因为 npm scripts 理论上在任何系统都应该 just work。社区为我们提供了很多跨平台的方案,比如 un-script-os 允许我们针对不同平台进行不同的定制化脚本,如下代码:
{"scripts": {"test": "run-script-os","test:win32": "echo 'del whatever you want in Windows 32/64'","test:darwin:linux": "echo 'You can combine OS tags and rm all the things!'","test:default": "echo 'This will run on any platform that does not have its own script'"},}
再比如,更加常见的https://www.npmjs.com/package/cross-env,可以为我们自动在不同的平台设置环境变量。
好了,接下来我们从一个实例出发,打造一个 lucas-scripts,实践操作 npm scripts,同时丰富我们的工程化经验。
打造一个 lucas-scripts
lucas-scripts 其实是我设想的一个 npm scripts 插件集合,通过 Monorepo 风格的项目,借助 npm 抽象 “自己常用的”npm scripts 脚本,以在多个项目中达到复用的目的。
其设计思想其实源于 Kent C.Dodds(https://kentcdodds.com/blog)的:Tools without config 思想。事实上,在 PayPal 公司内部,有一个 paypal-scripts(未开源),借助 paypal-scripts 的设计思路,就有了 lucas-scripts。我们先从设计思想上分析,不管是 paypal-scripts 还是 lucas-scripts,它们主要解决了哪类问题。
谈到前端开发,各种工具配置着实令人头大,而对于一个企业级团队来说,维护统一的企业级工具配置或设计,对工程效率的提升至关重要。这些工具包括但不限于:
- 测试工具及方案
- Client 端打包工具及方案
- Linting 工具及方案
- Babel 工具及方案
等等,这些工具及方案的背后往往是烦琐的配置,同时,这些配置的设计却至关重要。比如我们的 Webpack 可以工作,但是它的配置设计却经常经不起推敲;Linters 经常过时,跟不上语言的发展,使得我们的构建流程无比脆弱而容易中断。
在此背景下,lucas-scripts 负责维护和掌管工程基建中的种种工具及方案,同时它的使命不仅仅是 Bootstrap 一个项目,而是长期维护基建方案,可以随时升级,随时插拔。
这很类似我们熟悉的 create-react-app,create-react-app 可以帮助 React 开发者迅速启动一个项目,它以黑盒的方式维护了 Webpack 构建以及 Jest 测试、Eslint 等能力。开发者只需要使用 react-scripts 就能够满足构建和测试等需求,开发者只需要关心业务开发。lucas-scripts 的理念相同:开发者只需要使用 lucas-scripts,就可以使用开箱即用的各类型 npm scripts 插件,npm scripts 插件提供基础工具的配置和方案设计。
但需要注意的是,create-react-app 官方并不允许开发者自定义这些工具的配置及方案设计,而我们的 lucas-scripts 理应实现更灵活的配置能力。如何做到开发者自定义配置的能力呢?设计上,我们支持开发者在项目中添加.babelrc或在项目的 package.json 中添加相应的 babel 配置项,lucas-scripts 在运行时读取这些信息,并采用开发者自定义的配置即可。
比如,我们支持项目中 package.json 配置:
{"babel": {"presets": ["lucas-scripts/babel"],"plugins": ["glamorous-displayname"]}}
上述代码可以做到使用 lucas-scripts 定义的 Babel 预设,同时支持开发者使用名为 glamorous-displayname 的 Babel 插件。
下面,我们就以 lucas-scripts 中封装的 Babel 配置进行详细讲解。
在使用 lucas-scripts 的 Babel 方案时,我们提供了默认的一套 Babel 设计方案,具体代码如下:
const browserslist = require('browserslist')const semver = require('semver')const {ifDep,ifAnyDep,ifTypescript,parseEnv,appDirectory,pkg,} = require('../utils')const {BABEL_ENV, NODE_ENV, BUILD_FORMAT} = process.envconst isTest = (BABEL_ENV || NODE_ENV) === 'test'const isPreact = parseEnv('BUILD_PREACT', false)const isRollup = parseEnv('BUILD_ROLLUP', false)const isUMD = BUILD_FORMAT === 'umd'const isCJS = BUILD_FORMAT === 'cjs'const isWebpack = parseEnv('BUILD_WEBPACK', false)const isMinify = parseEnv('BUILD_MINIFY', false)const treeshake = parseEnv('BUILD_TREESHAKE', isRollup || isWebpack)const alias = parseEnv('BUILD_ALIAS', isPreact ? {react: 'preact'} : null)const hasBabelRuntimeDep = Boolean(pkg.dependencies && pkg.dependencies['@babel/runtime'],)const RUNTIME_HELPERS_WARN ='You should add @babel/runtime as dependency to your package. It will allow reusing "babel helpers" from node_modules rather than bundling their copies into your files.'if (!treeshake && !hasBabelRuntimeDep && !isTest) {throw new Error(RUNTIME_HELPERS_WARN)} else if (treeshake && !isUMD && !hasBabelRuntimeDep) {console.warn(RUNTIME_HELPERS_WARN)}const browsersConfig = browserslist.loadConfig({path: appDirectory}) || ['ie 10','ios 7',]const envTargets = isTest? {node: 'current'}: isWebpack || isRollup? {browsers: browsersConfig}: {node: getNodeVersion(pkg)}const envOptions = {modules: false, loose: true, targets: envTargets}module.exports = () => ({presets: [[require.resolve('@babel/preset-env'), envOptions],ifAnyDep(['react', 'preact'],[require.resolve('@babel/preset-react'),{pragma: isPreact ? ifDep('react', 'React.h', 'h') : undefined},],),ifTypescript([require.resolve('@babel/preset-typescript')]),].filter(Boolean),plugins: [[require.resolve('@babel/plugin-transform-runtime'),{useESModules: treeshake && !isCJS},],require.resolve('babel-plugin-macros'),alias? [require.resolve('babel-plugin-module-resolver'),{root: ['./src'], alias},]: null,isUMD? require.resolve('babel-plugin-transform-inline-environment-variables'): null,[require.resolve('@babel/plugin-proposal-class-properties'), {loose: true}],isMinify? require.resolve('babel-plugin-minify-dead-code-elimination'): null,treeshake? null: require.resolve('@babel/plugin-transform-modules-commonjs'),].filter(Boolean),})function getNodeVersion({engines: {node: nodeVersion = '10.13'} = {}}) {const oldestVersion = semver.validRange(nodeVersion).replace(/[>=<|]/g, ' ').split(' ').filter(Boolean).sort(semver.compare)[0]if (!oldestVersion) {throw new Error(`Unable to determine the oldest version in the range in your package.json at engines.node: "${nodeVersion}". Please attempt to make it less ambiguous.`,)}return oldestVersion}
通过上面代码,我们将 Babel 方案强制使用了一些最佳实践,比如使用了特定 loose、moudles 设置的 @babel/preset-env 配置项,使用了 @babel/plugin-transform-runtime,使用了 @babel/plugin-proposal-class-properties,各种原理我们已经在 07 讲《梳理混乱的 Babel,不再被编译报错困扰》中有所涉及。
了解了 Babel 的设计方案,我们在使用 lucas-scripts 时是如何调用设计方案并执行 Babel 编译的呢?我们看看相关逻辑源码,如下:
const path = require('path')const {DEFAULT_EXTENSIONS} = require('@babel/core')const spawn = require('cross-spawn')const yargsParser = require('yargs-parser')const rimraf = require('rimraf')const glob = require('glob')const {hasPkgProp,fromRoot,resolveBin,hasFile,hasTypescript,generateTypeDefs,} = require('../../utils')let args = process.argv.slice(2)const here = p => path.join(__dirname, p)const parsedArgs = yargsParser(args)const useBuiltinConfig =!args.includes('--presets') &&!hasFile('.babelrc') &&!hasFile('.babelrc.js') &&!hasFile('babel.config.js') &&!hasPkgProp('babel')const config = useBuiltinConfig? ['--presets', here('../../config/babelrc.js')]: []const extensions =args.includes('--extensions') || args.includes('--x')? []: ['--extensions', [...DEFAULT_EXTENSIONS, '.ts', '.tsx']]const builtInIgnore = '**/__tests__/**,**/__mocks__/**'const ignore = args.includes('--ignore') ? [] : ['--ignore', builtInIgnore]const copyFiles = args.includes('--no-copy-files') ? [] : ['--copy-files']const useSpecifiedOutDir = args.includes('--out-dir')const builtInOutDir = 'dist'const outDir = useSpecifiedOutDir ? [] : ['--out-dir', builtInOutDir]const noTypeDefinitions = args.includes('--no-ts-defs')if (!useSpecifiedOutDir && !args.includes('--no-clean')) {rimraf.sync(fromRoot('dist'))} else {args = args.filter(a => a !== '--no-clean')}if (noTypeDefinitions) {args = args.filter(a => a !== '--no-ts-defs')}function go() {let result = spawn.sync(resolveBin('@babel/cli', {executable: 'babel'}),[...outDir,...copyFiles,...ignore,...extensions,...config,'src',].concat(args),{stdio: 'inherit'},)if (result.status !== 0) return result.statusconst pathToOutDir = fromRoot(parsedArgs.outDir || builtInOutDir)if (hasTypescript && !noTypeDefinitions) {console.log('Generating TypeScript definitions')result = generateTypeDefs(pathToOutDir)console.log('TypeScript definitions generated')if (result.status !== 0) return result.status}const ignoredPatterns = (parsedArgs.ignore || builtInIgnore).split(',').map(pattern => path.join(pathToOutDir, pattern))const ignoredFiles = ignoredPatterns.reduce((all, pattern) => [...all, ...glob.sync(pattern)],[],)ignoredFiles.forEach(ignoredFile => {rimraf.sync(ignoredFile)})return result.status}process.exit(go())
通过上面代码,我们就可以将 lucas-script 的 Babel 方案融会贯通了。
整体设计思路我 fork 了 https://github.com/kentcdodds/kcd-scripts,并进行部分优化和改动,你可以在https://github.com/HOUCe/kcd-scripts中进一步学习。
总结
这一讲我们先介绍了 npm scripts 的重要性,接着分析了 npm scripts 的原理;后半部分,从实践出发,分析了 lucas-scripts 的设计理念,以此进一步巩固 npm scripts 相关知识。
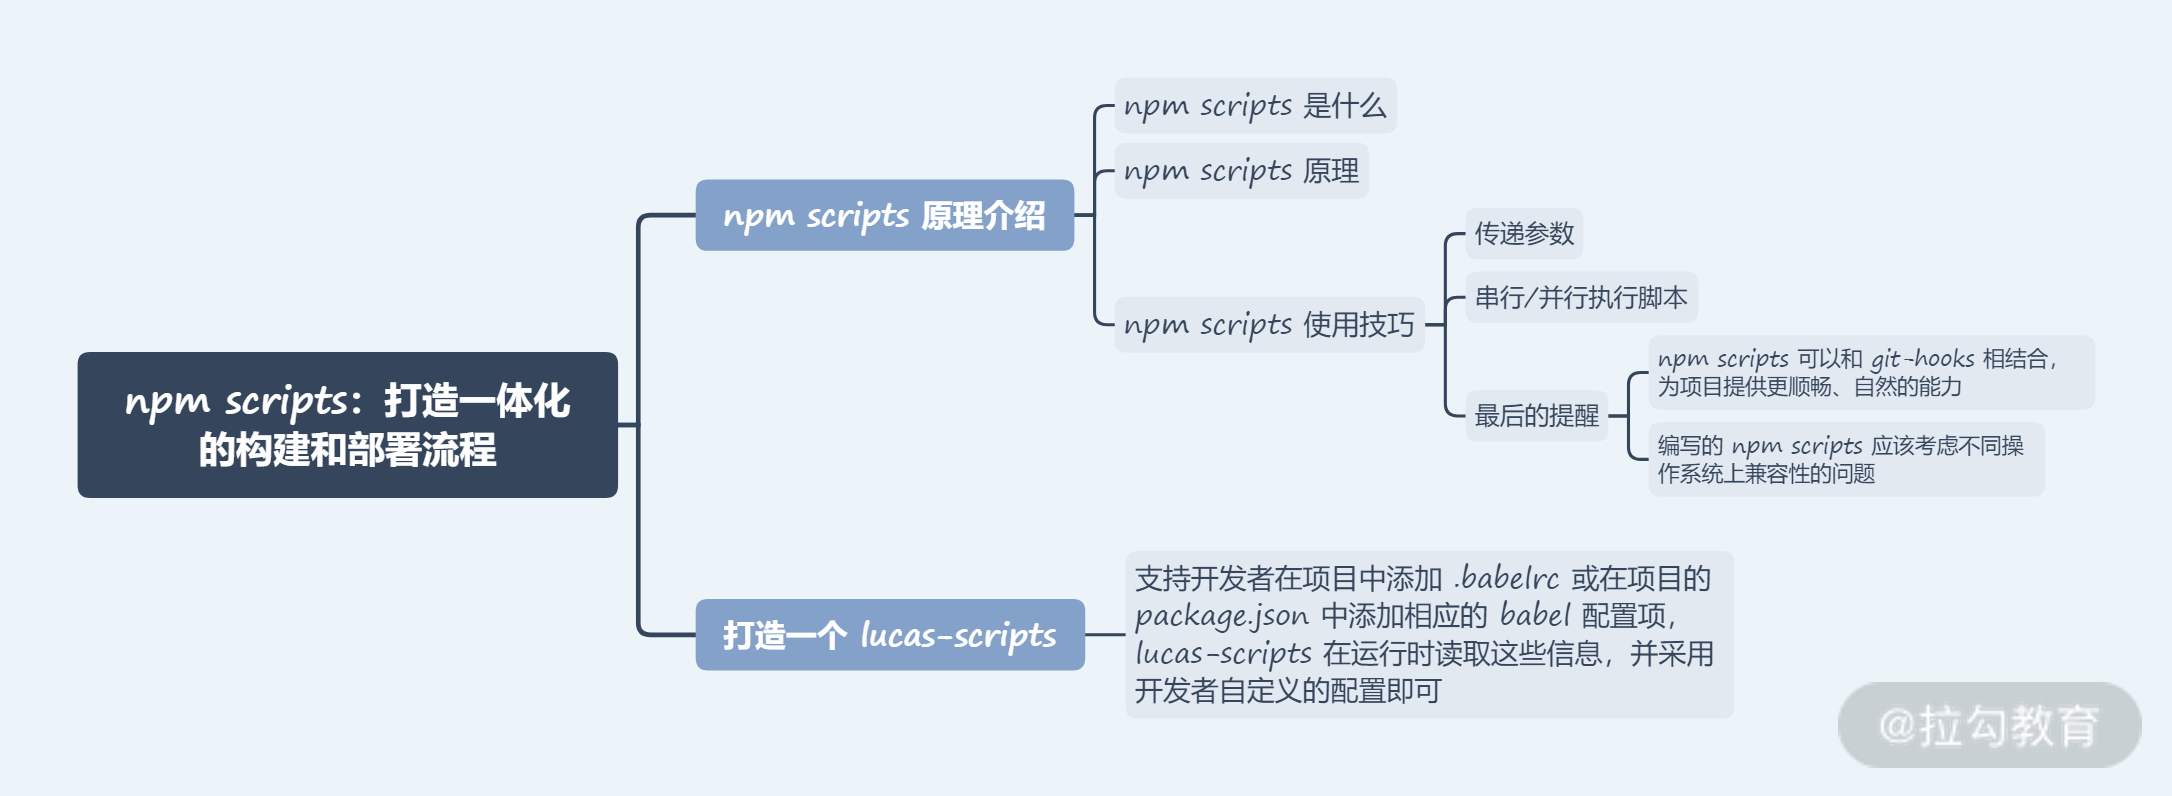
本讲内容总结如下:

说到底,npm scripts 就是一个 Shell,我们以前端开发者所熟悉的 Node.js 来实现 npm scripts,当然这还不够。事实上,npm scripts 的背后是对一整套工程化体系的理解,比如我们需要通过 npm scripts 来抽象 Babel 方案、抽象 Rollup 方案等。相信通过这一讲的学习,你会有所收获。
下一讲,我们将深入工程化体系的一个重点细节——自动化代码检查,并反过来使用 lucas-scripts 再实现一套智能的代码 Lint 脚本,请你继续学习。

