Vue.js 3.0 允许我们在编写组件的时候添加一个 setup 启动函数,它是 Composition API 逻辑组织的入口,本节课我们就来分析一下这个函数。
我们先通过一段代码认识它,在这里编写一个 button 组件:
<template><button @click="increment">Count is: {{ state.count }}, double is: {{ state.double }}</button></template><script>import { reactive, computed } from 'vue'export default {setup() {const state = reactive({count: 0,double: computed(() => state.count * 2)})function increment() {state.count++}return {state,increment}}}</script>
可以看到,这段代码和 Vue.js 2.x 组件的写法相比,多了一个 setup 启动函数,另外组件中也没有定义 props、data、computed 这些 options。
在 setup 函数内部,定义了一个响应式对象 state,它是通过 reactive API 创建的。state 对象有 count 和 double 两个属性,其中 count 对应一个数字属性的值;而 double 通过 computed API 创建,对应一个计算属性的值。reactive API 和 computed API 不是我们关注的重点,在后续响应式章节我会详细介绍。
这里需要注意的是,模板中引用到的变量 state 和 increment 包含在 setup 函数的返回对象中,那么它们是如何建立联系的呢?
我们先来回想一下 Vue.js 2.x 编写组件的时候,会在 props、data、methods、computed 等 options 中定义一些变量。在组件初始化阶段,Vue.js 内部会处理这些 options,即把定义的变量添加到了组件实例上。等模板编译成 render 函数的时候,内部通过 with(this){} 的语法去访问在组件实例中的变量。
那么到了 Vue.js 3.0,既支持组件定义 setup 函数,而且在模板 render 的时候,又可以访问到 setup 函数返回的值,这是如何实现的?我们来一探究竟。
创建和设置组件实例
首先,我们来回顾一下组件的渲染流程:创建 vnode 、渲染 vnode 和生成 DOM。

其中渲染 vnode 的过程主要就是在挂载组件:
const mountComponent = (initialVNode, container, anchor, parentComponent, parentSuspense, isSVG, optimized) => {const instance = (initialVNode.component = createComponentInstance(initialVNode, parentComponent, parentSuspense))setupComponent(instance)setupRenderEffect(instance, initialVNode, container, anchor, parentSuspense, isSVG, optimized)}
可以看到,这段挂载组件的代码主要做了三件事情:创建组件实例、设置组件实例和设置并运行带副作用的渲染函数。前两个流程就跟我们今天提到的问题息息相关,所以这一节课我们将重点分析它们。
先看创建组件实例的流程,我们要关注 createComponentInstance 方法的实现:
function createComponentInstance (vnode, parent, suspense) {const appContext = (parent ? parent.appContext : vnode.appContext) || emptyAppContext;const instance = {uid: uid++,vnode,parent,appContext,type: vnode.type,root: null,next: null,subTree: null,update: null,render: null,proxy: null,withProxy: null,effects: null,provides: parent ? parent.provides : Object.create(appContext.provides),accessCache: null,renderCache: [],ctx: EMPTY_OBJ,data: EMPTY_OBJ,props: EMPTY_OBJ,attrs: EMPTY_OBJ,slots: EMPTY_OBJ,refs: EMPTY_OBJ,setupState: EMPTY_OBJ,setupContext: null,components: Object.create(appContext.components),directives: Object.create(appContext.directives),suspense,asyncDep: null,asyncResolved: false,isMounted: false,isUnmounted: false,isDeactivated: false,bc: null,c: null,bm: null,m: null,bu: null,u: null,um: null,bum: null,da: null,a: null,rtg: null,rtc: null,ec: null,emit: null}instance.ctx = { _: instance }instance.root = parent ? parent.root : instanceinstance.emit = emit.bind(null, instance)return instance}
从上述代码中可以看到,组件实例 instance 上定义了很多属性,你千万不要被这茫茫多的属性吓到,因为其中一些属性是为了实现某个场景或者某个功能所定义的,你只需要通过我在代码中的注释大概知道它们是做什么的即可。
Vue.js 2.x 使用 new Vue 来初始化一个组件的实例,到了 Vue.js 3.0,我们直接通过创建对象去创建组件的实例。这两种方式并无本质的区别,都是引用一个对象,在整个组件的生命周期中去维护组件的状态数据和上下文环境。
创建好 instance 实例后,接下来就是设置它的一些属性。目前已完成了组件的上下文、根组件指针以及派发事件方法的设置。我们在后面会继续分析更多 instance 实例属性的设置逻辑。
接着是组件实例的设置流程,对 setup 函数的处理就在这里完成,我们来看一下 setupComponent 方法的实现:
function setupComponent (instance, isSSR = false) {const { props, children, shapeFlag } = instance.vnodeconst isStateful = shapeFlag & 4initProps(instance, props, isStateful, isSSR)initSlots(instance, children)const setupResult = isStateful? setupStatefulComponent(instance, isSSR): undefinedreturn setupResult}
可以看到,我们从组件 vnode 中获取了 props、children、shapeFlag 等属性,然后分别对 props 和插槽进行初始化,这两部分逻辑在后续的章节再详细分析。根据 shapeFlag 的值,我们可以判断这是不是一个有状态组件,如果是则要进一步去设置有状态组件的实例。
接下来我们要关注到 setupStatefulComponent 函数,它主要做了三件事:创建渲染上下文代理、判断处理 setup 函数和完成组件实例设置。它代码如下所示:
function setupStatefulComponent (instance, isSSR) {const Component = instance.typeinstance.accessCache = {}instance.proxy = new Proxy(instance.ctx, PublicInstanceProxyHandlers)const { setup } = Componentif (setup) {const setupContext = (instance.setupContext =setup.length > 1 ? createSetupContext(instance) : null)const setupResult = callWithErrorHandling(setup, instance, 0 , [instance.props, setupContext])handleSetupResult(instance, setupResult)}else {finishComponentSetup(instance)}}
创建渲染上下文代理
首先是创建渲染上下文代理的流程,它主要对 instance.ctx 做了代理。在分析实现前,我们需要思考一个问题,这里为什么需要代理呢?
其实在 Vue.js 2.x 中,也有类似的数据代理逻辑,比如 props 求值后的数据,实际上存储在 this._props 上,而 data 中定义的数据存储在 this._data 上。举个例子:
<template><p>{{ msg }}</p></template><script>export default {data() {msg: 1}}</script>
在初始化组件的时候,data 中定义的 msg 在组件内部是存储在 this._data 上的,而模板渲染的时候访问 this.msg,实际上访问的是 this._data.msg,这是因为 Vue.js 2.x 在初始化 data 的时候,做了一层 proxy 代理。
到了 Vue.js 3.0,为了方便维护,我们把组件中不同状态的数据存储到不同的属性中,比如存储到 setupState、ctx、data、props 中。我们在执行组件渲染函数的时候,为了方便用户使用,会直接访问渲染上下文 instance.ctx 中的属性,所以我们也要做一层 proxy,对渲染上下文 instance.ctx 属性的访问和修改,代理到对 setupState、ctx、data、props 中的数据的访问和修改。
明确了代理的需求后,我们接下来就要分析 proxy 的几个方法: get、set 和 has。
当我们访问 instance.ctx 渲染上下文中的属性时,就会进入 get 函数。我们来看一下它的实现:
const PublicInstanceProxyHandlers = {get ({ _: instance }, key) {const { ctx, setupState, data, props, accessCache, type, appContext } = instanceif (key[0] !== '$') {const n = accessCache[key]if (n !== undefined) {switch (n) {case 0:return setupState[key]case 1 :return data[key]case 3 :return ctx[key]case 2:return props[key]}}else if (setupState !== EMPTY_OBJ && hasOwn(setupState, key)) {accessCache[key] = 0return setupState[key]}else if (data !== EMPTY_OBJ && hasOwn(data, key)) {accessCache[key] = 1return data[key]}else if (type.props &&hasOwn(normalizePropsOptions(type.props)[0], key)) {accessCache[key] = 2return props[key]}else if (ctx !== EMPTY_OBJ && hasOwn(ctx, key)) {accessCache[key] = 3return ctx[key]}else {accessCache[key] = 4}}const publicGetter = publicPropertiesMap[key]let cssModule, globalPropertiesif (publicGetter) {return publicGetter(instance)}else if ((cssModule = type.__cssModules) &&(cssModule = cssModule[key])) {return cssModule}else if (ctx !== EMPTY_OBJ && hasOwn(ctx, key)) {accessCache[key] = 3return ctx[key]}else if (((globalProperties = appContext.config.globalProperties),hasOwn(globalProperties, key))) {return globalProperties[key]}else if ((process.env.NODE_ENV !== 'production') &¤tRenderingInstance && key.indexOf('__v') !== 0) {if (data !== EMPTY_OBJ && key[0] === '$' && hasOwn(data, key)) {warn(`Property ${JSON.stringify(key)} must be accessed via $data because it starts with a reserved ` +`character and is not proxied on the render context.`)}else {warn(`Property ${JSON.stringify(key)} was accessed during render ` +`but is not defined on instance.`)}}}}
可以看到,函数首先判断 key 不以 $ 开头的情况,这部分数据可能是 setupState、data、props、ctx 中的一种,其中 data、props 我们已经很熟悉了;setupState 就是 setup 函数返回的数据,稍后我们会详细说;ctx 包括了计算属性、组件方法和用户自定义的一些数据。
如果 key 不以 $ 开头,那么就依次判断 setupState、data、props、ctx 中是否包含这个 key,如果包含就返回对应值。注意这个判断顺序很重要,在 key 相同时它会决定数据获取的优先级,举个例子:
<template><p>{{msg}}</p></template><script>import { ref } from 'vue'export default {data() {return {msg: 'msg from data'}},setup() {const msg = ref('msg from setup')return {msg}}}</script>
我们在 data 和 setup 中都定义了 msg 变量,但最终输出到界面上的是 “msg from setup”,这是因为 setupState 的判断优先级要高于 data。
再回到 get 函数中,我们可以看到这里定义了 accessCache 作为渲染代理的属性访问缓存,它具体是干什么的呢?组件在渲染时会经常访问数据进而触发 get 函数,这其中最昂贵的部分就是多次调用 hasOwn 去判断 key 在不在某个类型的数据中,但是在普通对象上执行简单的属性访问相对要快得多。所以在第一次获取 key 对应的数据后,我们利用 accessCache[key] 去缓存数据,下一次再次根据 key 查找数据,我们就可以直接通过 accessCache[key] 获取对应的值,就不需要依次调用 hasOwn 去判断了。这也是一个性能优化的小技巧。
如果 key 以 $ 开头,那么接下来又会有一系列的判断,首先判断是不是 Vue.js 内部公开的 $xxx 属性或方法(比如 $parent);然后判断是不是 vue-loader 编译注入的 css 模块内部的 key;接着判断是不是用户自定义以 $ 开头的 key;最后判断是不是全局属性。如果都不满足,就剩两种情况了,即在非生产环境下就会报两种类型的警告,第一种是在 data 中定义的数据以 $ 开头的警告,因为 $ 是保留字符,不会做代理;第二种是在模板中使用的变量没有定义的警告。
接下来是 set 代理过程,当我们修改 instance.ctx 渲染上下文中的属性的时候,就会进入 set 函数。我们来看一下 set 函数的实现:
const PublicInstanceProxyHandlers = {set ({ _: instance }, key, value) {const { data, setupState, ctx } = instanceif (setupState !== EMPTY_OBJ && hasOwn(setupState, key)) {setupState[key] = value}else if (data !== EMPTY_OBJ && hasOwn(data, key)) {data[key] = value}else if (key in instance.props) {(process.env.NODE_ENV !== 'production') &&warn(`Attempting to mutate prop "${key}". Props are readonly.`, instance)return false}if (key[0] === '$' && key.slice(1) in instance) {(process.env.NODE_ENV !== 'production') &&warn(`Attempting to mutate public property "${key}". ` +`Properties starting with $ are reserved and readonly.`, instance)return false}else {ctx[key] = value}return true}}
结合代码来看,函数主要做的事情就是对渲染上下文 instance.ctx 中的属性赋值,它实际上是代理到对应的数据类型中去完成赋值操作的。这里仍然要注意顺序问题,和 get 一样,优先判断 setupState,然后是 data,接着是 props。
我们对之前的例子做点修改,添加一个方法:
<template><p>{{ msg }}</p><button @click="random">Random msg</button></template><script>import { ref } from 'vue'export default {data() {return {msg: 'msg from data'}},setup() {const msg = ref('msg from setup')return {msg}},methods: {random() {this.msg = Math.random()}}}</script>
我们点击按钮会执行 random 函数,这里的 this 指向的就是 instance.ctx,我们修改 this.msg 会触发 set 函数,所以最终修改的是 setupState 中的 msg 对应的值。
注意,如果我们直接对 props 中的数据赋值,在非生产环境中会收到一条警告,这是因为直接修改 props 不符合数据单向流动的设计思想;如果对 Vue.js 内部以 $ 开头的保留属性赋值,同样也会收到一条警告。
如果是用户自定义的数据,比如在 created 生命周期内定义的数据,它仅用于组件上下文的共享,如下所示:
export default {created() {this.userMsg = 'msg from user'}}
当执行 this.userMsg 赋值的时候,会触发 set 函数,最终 userMsg 会被保留到 ctx 中。
最后是 has 代理过程,当我们判断属性是否存在于 instance.ctx 渲染上下文中时,就会进入 has 函数,这个在平时项目中用的比较少,同样来举个例子,当执行 created 钩子函数中的’msg’ in this 时,就会触发 has 函数。
export default {created () {console.log('msg' in this)}}
下面我们来看一下 has 函数的实现:
const PublicInstanceProxyHandlers = {has({ _: { data, setupState, accessCache, ctx, type, appContext } }, key) {return (accessCache[key] !== undefined ||(data !== EMPTY_OBJ && hasOwn(data, key)) ||(setupState !== EMPTY_OBJ && hasOwn(setupState, key)) ||(type.props && hasOwn(normalizePropsOptions(type.props)[0], key)) ||hasOwn(ctx, key) ||hasOwn(publicPropertiesMap, key) ||hasOwn(appContext.config.globalProperties, key))}}
这个函数的实现很简单,依次判断 key 是否存在于 accessCache、data、setupState、props 、用户数据、公开属性以及全局属性中,然后返回结果。
至此,我们就搞清楚了创建上下文代理的过程,让我们回到 setupStatefulComponent 函数中,接下来分析第二个流程——判断处理 setup 函数。
判断处理 setup 函数
我们看一下整个逻辑涉及的代码:
const { setup } = Componentif (setup) {const setupContext = (instance.setupContext =setup.length > 1 ? createSetupContext(instance) : null)const setupResult = callWithErrorHandling(setup, instance, 0 , [instance.props, setupContext])handleSetupResult(instance, setupResult)}
如果我们在组件中定义了 setup 函数,接下来就是处理 setup 函数的流程,主要是三个步骤:创建 setup 函数上下文、执行 setup 函数并获取结果和处理 setup 函数的执行结果。接下来我们就逐个来分析。
首先判断 setup 函数的参数长度,如果大于 1,则创建 setupContext 上下文。
const setupContext = (instance.setupContext =setup.length > 1 ? createSetupContext(instance) : null)
举个例子,我们有个 HelloWorld 子组件,如下:
<template><p>{{ msg }}</p><button @click="onClick">Toggle</button></template><script>export default {props: {msg: String},setup (props, { emit }) {function onClick () {emit('toggle')}return {onClick}}}</script>
我们在父组件引用这个组件:
<template><HelloWorld @toggle="toggle" :msg="msg"></HelloWorld></template><script>import { ref } from 'vue'import HelloWorld from "./components/HelloWorld";export default {components: { HelloWorld },setup () {const msg = ref('Hello World')function toggle () {msg.value = msg.value === 'Hello World' ? 'Hello Vue' : 'Hello World'}return {toggle,msg}}}</script>
可以看到,HelloWorld 子组件的 setup 函数接收两个参数,第一个参数 props 对应父组件传入的 props 数据,第二个参数 emit 是一个对象,实际上就是 setupContext。
下面我们来看一下用 createSetupContext 函数来创建 setupContext:
function createSetupContext (instance) {return {attrs: instance.attrs,slots: instance.slots,emit: instance.emit}}
这里返回了一个对象,包括 attrs、slots 和 emit 三个属性。setupContext 让我们在 setup 函数内部可以获取到组件的属性、插槽以及派发事件的方法 emit。
可以预见的是,这个 setupContext 对应的就是 setup 函数第二个参数,我们接下来看一下 setup 函数具体是如何执行的。
我们通过下面这行代码来执行 setup 函数并获取结果:
const setupResult = callWithErrorHandling(setup, instance, 0 , [instance.props, setupContext])
我们具体来看一下 callWithErrorHandling 函数的实现:
function callWithErrorHandling (fn, instance, type, args) {let restry {res = args ? fn(...args) : fn()}catch (err) {handleError(err, instance, type)}return res}
可以看到,它其实就是对 fn 做的一层包装,内部还是执行了 fn,并在有参数的时候传入参数,所以 setup 的第一个参数是 instance.props,第二个参数是 setupContext。函数执行过程中如果有 JavaScript 执行错误就会捕获错误,并执行 handleError 函数来处理。
执行 setup 函数并拿到了返回的结果,那么接下来就要用 handleSetupResult 函数来处理结果。
handleSetupResult(instance, setupResult)
我们详细看一下 handleSetupResult 函数的实现:
function handleSetupResult(instance, setupResult) {if (isFunction(setupResult)) {instance.render = setupResult}else if (isObject(setupResult)) {instance.setupState = reactive(setupResult)}finishComponentSetup(instance)}
可以看到,当 setupResult 是一个对象的时候,我们把它变成了响应式并赋值给 instance.setupState,这样在模板渲染的时候,依据前面的代理规则,instance.ctx 就可以从 instance.setupState 上获取到对应的数据,这就在 setup 函数与模板渲染间建立了联系。
另外 setup 不仅仅支持返回一个对象,也可以返回一个函数作为组件的渲染函数。我们可以改写前面的示例,来看一下这时的情况:
<script>import { h } from 'vue'export default {props: {msg: String},setup (props, { emit }) {function onClick () {emit('toggle')}return (ctx) => {return [h('p', null, ctx.msg),h('button', { onClick: onClick }, 'Toggle')]}}}</script>
这里,我们删除了 HelloWorld 子组件的 template 部分,并把 setup 函数的返回结果改成了函数,也就是说它会作为组件的渲染函数,一切运行正常。
在 handleSetupResult 的最后,会执行 finishComponentSetup 函数完成组件实例的设置,其实这个函数和 setup 函数的执行结果已经没什么关系了,提取到外面放在 handleSetupResult 函数后面执行更合理一些。
另外当组件没有定义的 setup 的时候,也会执行 finishComponentSetup 函数去完成组件实例的设置。
完成组件实例设置
接下来我们来看一下 finishComponentSetup 函数的实现:
function finishComponentSetup (instance) {const Component = instance.typeif (!instance.render) {if (compile && Component.template && !Component.render) {Component.render = compile(Component.template, {isCustomElement: instance.appContext.config.isCustomElement || NO})Component.render._rc = true}if ((process.env.NODE_ENV !== 'production') && !Component.render) {if (!compile && Component.template) {warn(`Component provided template option but ` +`runtime compilation is not supported in this build of Vue.` +(` Configure your bundler to alias "vue" to "vue/dist/vue.esm-bundler.js".`) )}else {warn(`Component is missing template or render function.`)}}instance.render = (Component.render || NOOP)if (instance.render._rc) {instance.withProxy = new Proxy(instance.ctx, RuntimeCompiledPublicInstanceProxyHandlers)}}{currentInstance = instanceapplyOptions(instance, Component)currentInstance = null}}
函数主要做了两件事情:标准化模板或者渲染函数和兼容 Options API。接下来我们详细分析这两个流程。
标准化模板或者渲染函数
在分析这个过程之前,我们需要了解一些背景知识。组件最终通过运行 render 函数生成子树 vnode,但是我们很少直接去编写 render 函数,通常会使用两种方式开发组件。
第一种是使用 SFC(Single File Components)单文件的开发方式来开发组件,即通过编写组件的 template 模板去描述一个组件的 DOM 结构。我们知道 .vue 类型的文件无法在 Web 端直接加载,因此在 webpack 的编译阶段,它会通过 vue-loader 编译生成组件相关的 JavaScript 和 CSS,并把 template 部分转换成 render 函数添加到组件对象的属性中。
另外一种开发方式是不借助 webpack 编译,直接引入 Vue.js,开箱即用,我们直接在组件对象 template 属性中编写组件的模板,然后在运行阶段编译生成 render 函数,这种方式通常用于有一定历史包袱的古老项目。
因此 Vue.js 在 Web 端有两个版本:runtime-only 和 runtime-compiled。我们更推荐用 runtime-only 版本的 Vue.js,因为相对而言它体积更小,而且在运行时不用编译,不仅耗时更少而且性能更优秀。遇到一些不得已的情况比如上述提到的古老项目,我们也可以选择 runtime-compiled 版本。
runtime-only 和 runtime-compiled 的主要区别在于是否注册了这个 compile 方法。
在 Vue.js 3.0 中,compile 方法是通过外部注册的:
let compile;function registerRuntimeCompiler(_compile) {compile = _compile;}
回到标准化模板或者渲染函数逻辑,我们先看 instance.render 是否存在,如果不存在则开始标准化流程,这里主要需要处理以下三种情况。
- compile 和组件 template 属性存在,render 方法不存在的情况。此时, runtime-compiled 版本会在 JavaScript 运行时进行模板编译,生成 render 函数。
- compile 和 render 方法不存在,组件 template 属性存在的情况。此时由于没有 compile,这里用的是 runtime-only 的版本,因此要报一个警告来告诉用户,想要运行时编译得使用 runtime-compiled 版本的 Vue.js。
- 组件既没有写 render 函数,也没有写 template 模板,此时要报一个警告,告诉用户组件缺少了 render 函数或者 template 模板。
处理完以上情况后,就要把组件的 render 函数赋值给 instance.render。到了组件渲染的时候,就可以运行 instance.render 函数生成组件的子树 vnode 了。
另外对于使用 with 块运行时编译的渲染函数,渲染上下文的代理是 RuntimeCompiledPublicInstanceProxyHandlers,它是在之前渲染上下文代理 PublicInstanceProxyHandlers 的基础上进行的扩展,主要对 has 函数的实现做了优化:
const RuntimeCompiledPublicInstanceProxyHandlers = {...PublicInstanceProxyHandlers,get(target, key) {if (key === Symbol.unscopables) {return}return PublicInstanceProxyHandlers.get(target, key, target)},has(_, key) {const has = key[0] !== '_' && !isGloballyWhitelisted(key)if ((process.env.NODE_ENV !== 'production') && !has && PublicInstanceProxyHandlers.has(_, key)) {warn(`Property ${JSON.stringify(key)} should not start with _ which is a reserved prefix for Vue internals.`)}return has}}
这里如果 key 以 _ 开头,或者 key 在全局变量的白名单内,则 has 为 false,此时则直接命中警告,不用再进行之前那一系列的判断了。
了解完标准化模板或者渲染函数流程,我们来看完成组件实例设置的最后一个流程——兼容 Vue.js 2.x 的 Options API。
Options API:兼容 Vue.js 2.x
我们知道 Vue.js 2.x 是通过组件对象的方式去描述一个组件,之前我们也说过,Vue.js 3.0 仍然支持 Vue.js 2.x Options API 的写法,这主要就是通过 applyOptions 方法实现的。
function applyOptions(instance, options, deferredData = [], deferredWatch = [], asMixin = false) {const {mixins, extends: extendsOptions,props: propsOptions, data: dataOptions, computed: computedOptions, methods, watch: watchOptions, provide: provideOptions, inject: injectOptions,components, directives,beforeMount, mounted, beforeUpdate, updated, activated, deactivated, beforeUnmount, unmounted, renderTracked, renderTriggered, errorCaptured } = options;const publicThis = instance.proxy;const ctx = instance.ctx;}
由于 applyOptions 的代码特别长,所以这里我用注释列出了它主要做的事情,感兴趣的同学可以去翻阅它的源码。
总结
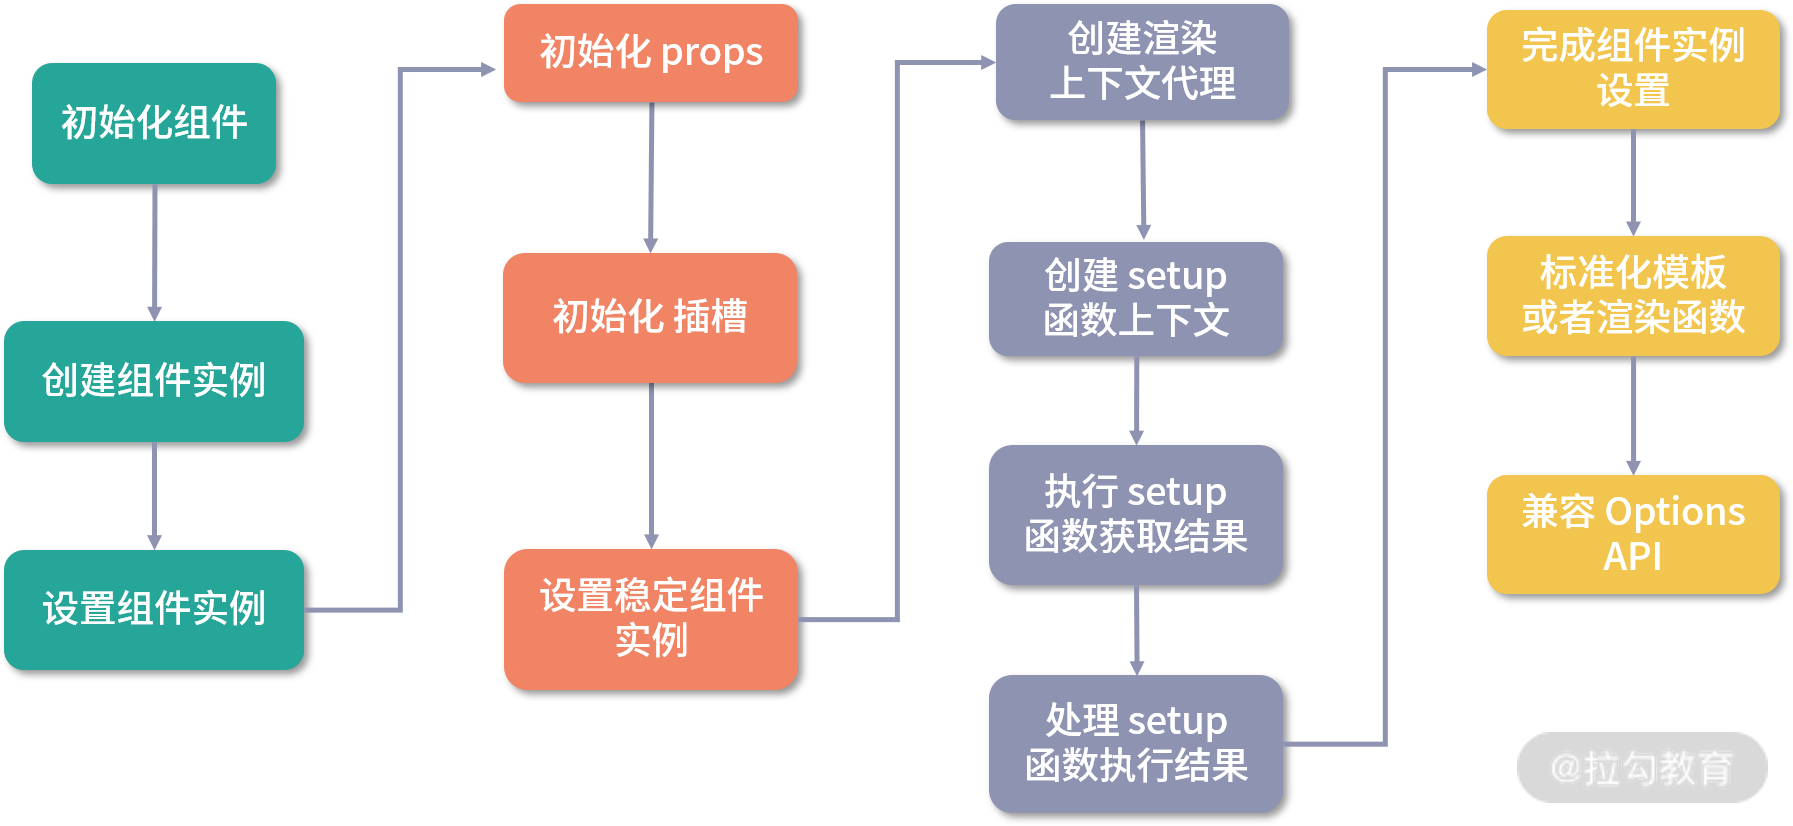
这节课我们主要分析了组件的初始化流程,主要包括创建组件实例和设置组件实例。通过进一步细节的深入,我们也了解了渲染上下文的代理过程;了解了 Composition API 中的 setup 启动函数执行的时机,以及如何建立 setup 返回结果和模板渲染之间的联系;了解了组件定义的模板或者渲染函数的标准化过程;了解了如何兼容 Vue.js 2.x 的 Options API。
我们通过一张图再直观感受一下 Vue.js 3.0 组件的初始化流程:
最后,给你留一道思考题目,在执行 setup 函数并获取结果的时候,我们使用 callWithErrorHandling 把 setup 包装了一层,它有哪些好处?欢迎你在留言区与我分享。
本节课的相关代码在源代码中的位置如下:
packages/runtime-core/src/renderer.ts
packages/runtime-core/src/component.ts
packages/runtime-core/src/componentProxy.ts
packages/runtime-core/src/errorHandling.ts

若有收获,就点个赞吧
0 人点赞
