前端基础建设与架构 - 前百度资深前端开发工程师 - 拉勾教育
通过上一讲的内容,相信你已经了解了现代化构建流程和处理内容。这一讲,我将结合 Webpack 为主的成熟方案现阶段的 “不足”,从源码实现角度带你分析 Vite 的设计哲学,同时为“解析 Webpack 源码,实现自己的构建工具” 一讲内容打下基础,循序渐进,最终你将能够开发一个自己的构建工具。
Vite 的 “横空出世”
Vite 是由 Vue 作者尤雨溪开发的 Web 开发工具,尤雨溪在微博上推广时对 Vite 做了简短介绍:
Vite,一个基于浏览器原生 ES imports 的开发服务器。利用浏览器去解析 imports,在服务器端按需编译返回,完全跳过了打包这个概念,服务器随起随用。同时不仅有 Vue 文件支持,还搞定了热更新,而且热更新的速度不会随着模块增多而变慢。针对生产环境则可以把同一份代码用 Rollup 打包。虽然现在还比较粗糙,但这个方向我觉得是有潜力的,做得好可以彻底解决改一行代码等半天热更新的问题。
从这段话中我们能够提炼一些关键点:
- Vite 基于 ESM,因此实现了快速启动和即时模块热更新能力;
- Vite 在服务端实现了按需编译。
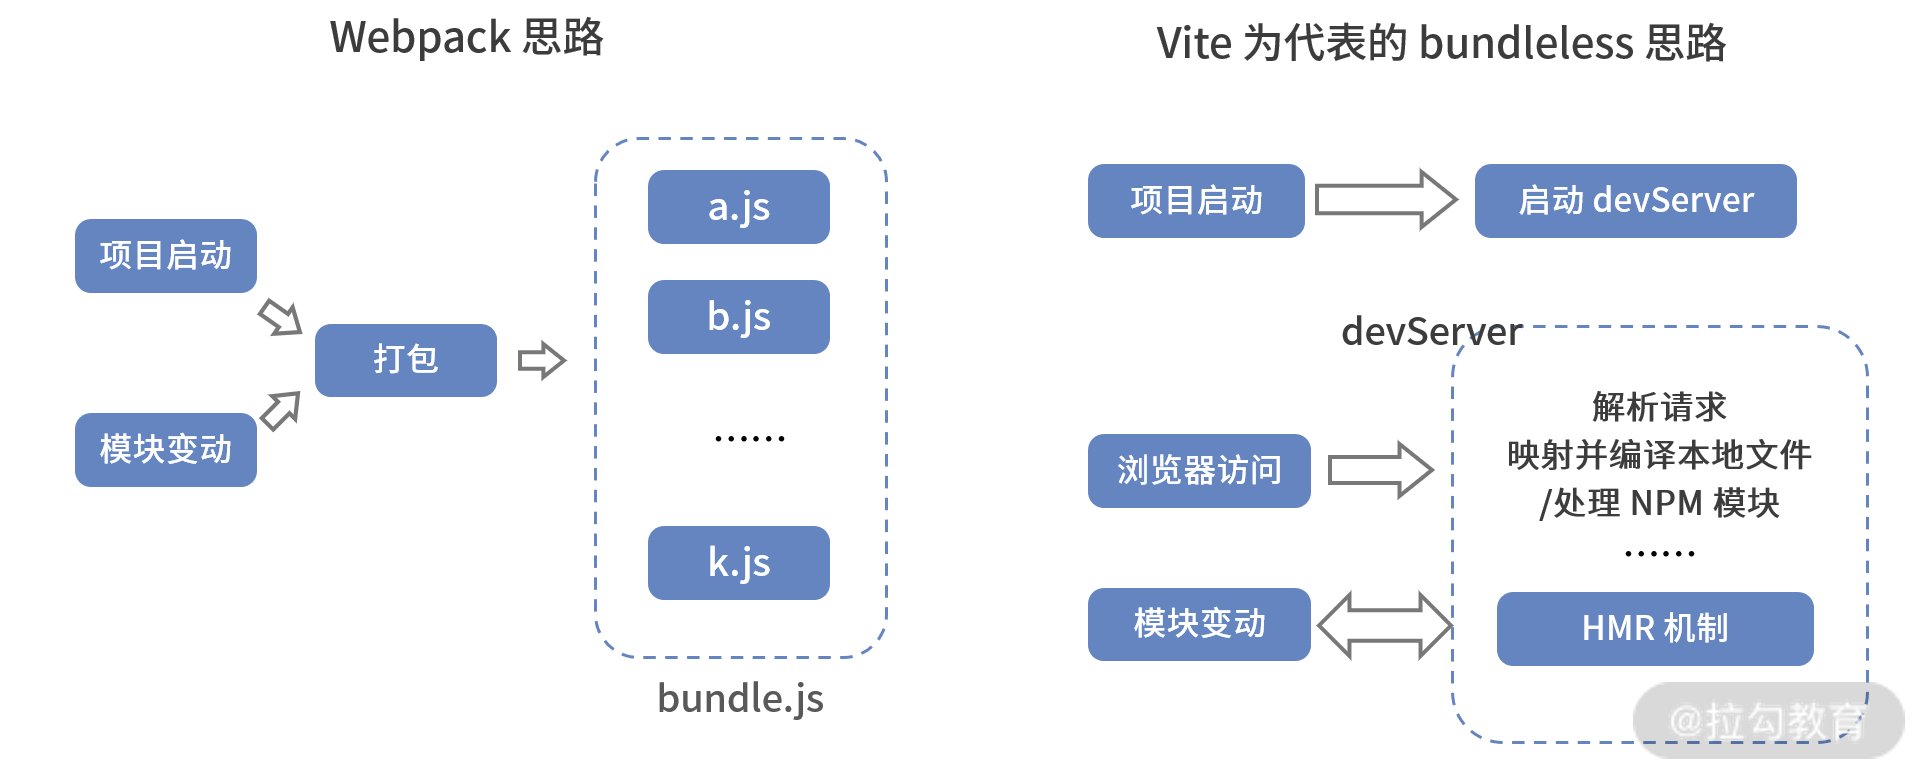
经验丰富的开发者通过上述介绍,似乎就能给出 Vite 的基本流程,甚至可以说得更直白一些:Vite 在开发环境下并没有打包和构建过程。
开发者在代码中写到的 ESM 导入语法会直接发送给服务器,而服务器也直接将 ESM 模块内容运行处理后,下发给浏览器。接着,现代浏览器通过解析 script module,对每一个 import 到的模块进行 HTTP 请求,服务器继续对这些 HTTP 请求进行处理并响应。
Vite 实现原理解读
Vite 思想比较容易理解,实现起来也并不复杂。接下来,我们就对 Vite 源码进行分析,帮助你更好地体会它的设计哲学和实现技巧。
首先,我们打造一个学习环境,创建一个基于 Vite 的应用,并启动:
npm init vite-app vite-appcd vite-appnpm installnpm run dev
得到以下目录结构和页面内容:

其中浏览器请求:http://localhost:3000/,得到的内容即是我们应用项目中的 index.html 内容。
在项目 packaga.json 中,我们看到:
"scripts": {"dev": "vite",},
找到 Vite 源码中,命令行实现部分:
if (!options.command || options.command === 'serve') {runServe(options)} else if (options.command === 'build') {runBuild(options)} else if (options.command === 'optimize') {runOptimize(options)} else {console.error(chalk.red(`unknown command: ${options.command}`))process.exit(1)}
上面代码,根据不同的命令行命令,执行不同的入口函数。
在开发模式下,Vite 通过 runServe 方法,启动了一个 koaServer,来实现对浏览器请求的响应,runServer 实现如下:
const server = require('./server').createServer(options)
createServer 方法实现,我们可以精简为以下内容:
export function createServer(config: ServerConfig): Server {const {root = process.cwd(),configureServer = [],resolvers = [],alias = {},transforms = [],vueCustomBlockTransforms = {},optimizeDeps = {},enableEsbuild = true} = configconst app = new Koa<State, Context>()const server = resolveServer(config, app.callback())const resolver = createResolver(root, resolvers, alias)const context: ServerPluginContext = {root,app,server,resolver,config,port: config.port || 3000}app.use((ctx, next) => {Object.assign(ctx, context)ctx.read = cachedRead.bind(null, ctx)return next()})const resolvedPlugins = []resolvedPlugins.forEach((m) => m && m(context))const listen = server.listen.bind(server)server.listen = (async (port: number, ...args: any[]) => {if (optimizeDeps.auto !== false) {await require('../optimizer').optimizeDeps(config)}const listener = listen(port, ...args)context.port = server.address().portreturn listener}) as anyreturn server}
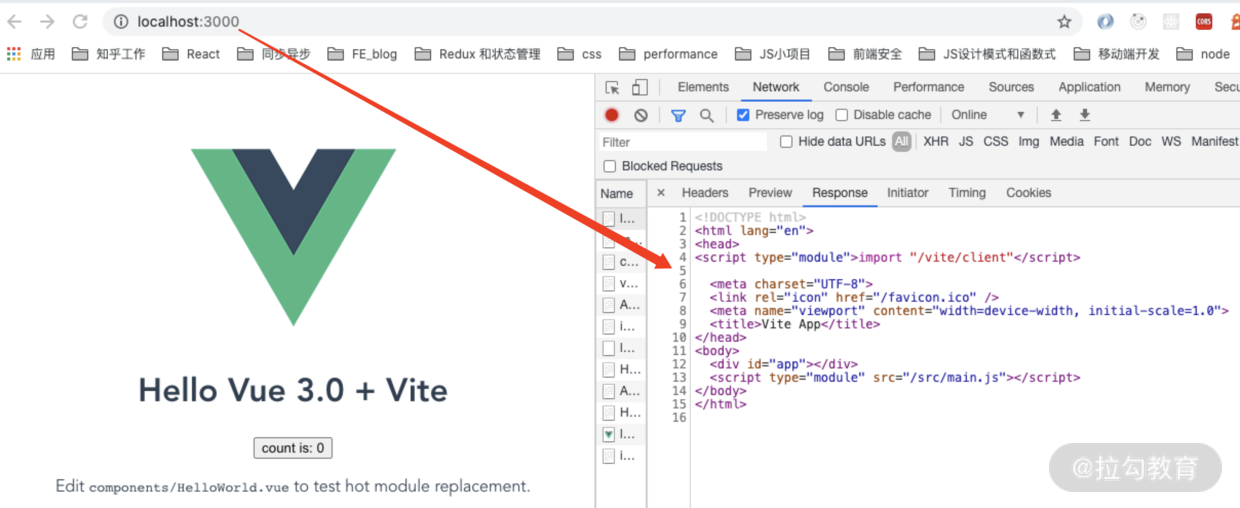
浏览器在访问http://localhost:3000/后,得到了主体为:
<body><di v id="app"></div><script type="module" src="/src/main.js"></script></body>
的内容。
依据 ESM 规范在浏览器 script 标签中的实现,对于<script type="module" src="./bar.js"></script>内容:当出现 script 标签 type 属性为 module 时,浏览器将会请求模块相应内容。
另一种 ESM 规范在浏览器 script 标签中的实现为:
<script type="module">import { bar } from './bar.js‘</script>
浏览器会发起 HTTP 请求,请求 HTTP Server 托管的 bar.js。
我们可以看到,经过 Vite Server 处理 http://localhost:3000/src/main.js 请求后,最终返回了:
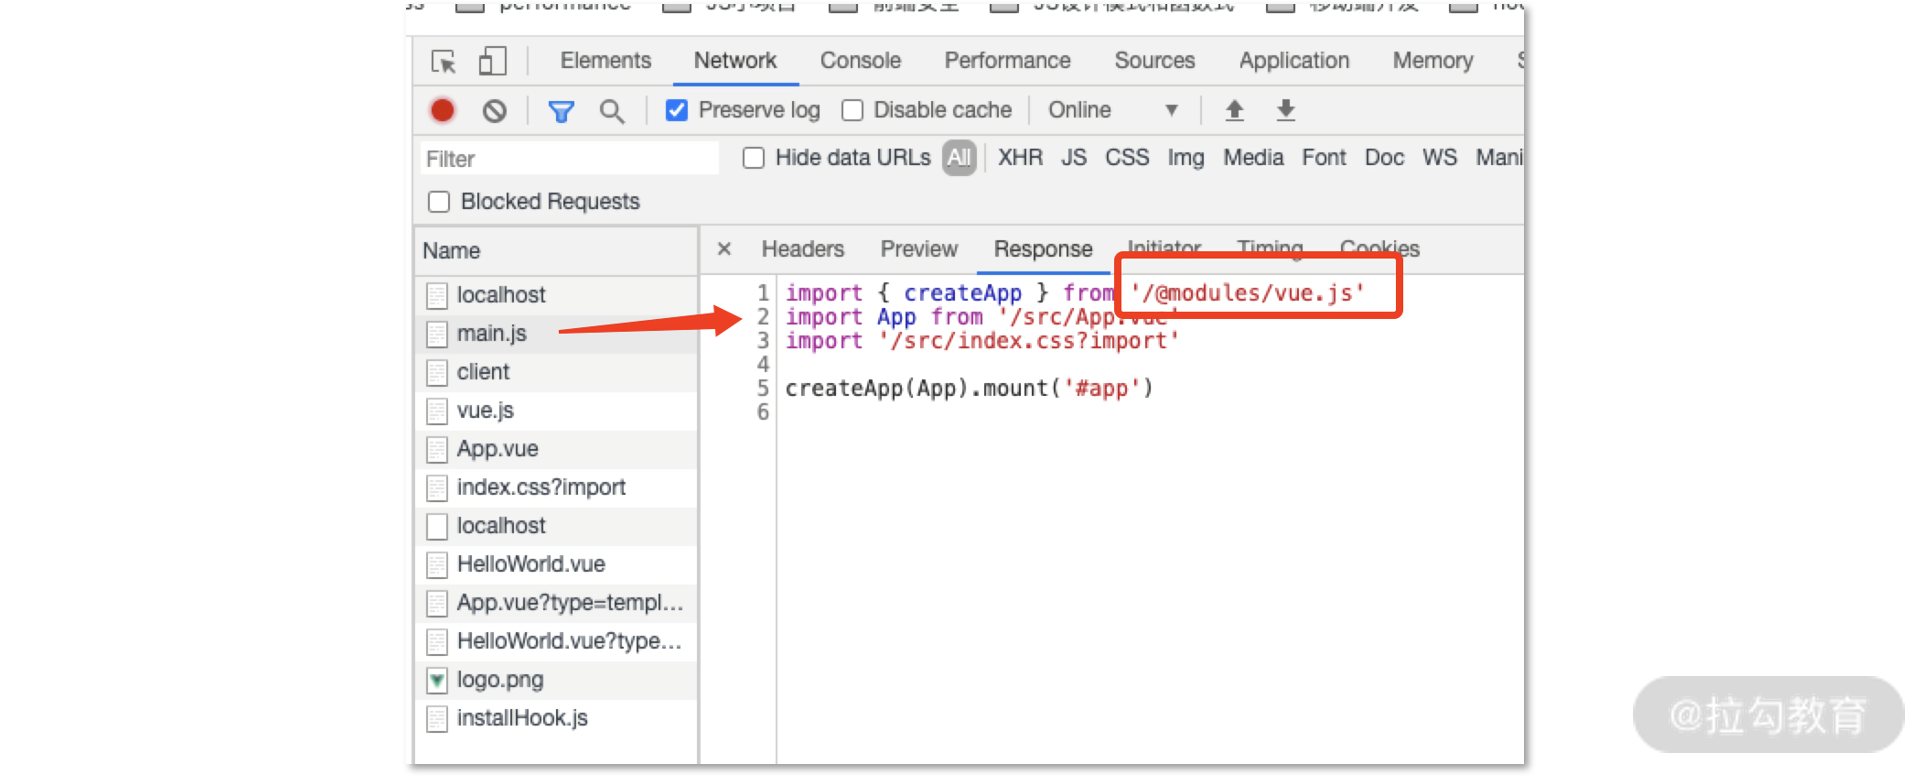
返回内容和我们项目中的 ./src/main.js 略有差别:
import { createApp } from 'vue'import App from './App.vue'import './index.css'
现在变为:
import { createApp } from '/@modules/vue.js'import App from '/src/App.vue'import '/src/index.css?import'
这里我们拆成两部分来看。
其中import {createApp} from 'vue'改为import {createApp} from '/@modules/vue.js',原因很明显:import 对应的路径只支持 “/“”./“或者”../“ 开头的内容,直接使用模块名 import,会立即报错。
所以在 Vite Server 处理请求时,通过 serverPluginModuleRewrite 这个中间件来给 import from ‘A’ 的 A 添加 /@module/ 前缀为 from ‘/@modules/A’,源码部分对应:
const resolvedPlugins = [moduleRewritePlugin,]resolvedPlugins.forEach((m) => m && m(context))
而 moduleRewritePlugin 插件的实现也并不困难,主要通过 rewriteImports 方法,来执行 resolveImport 方法,并进行改写。这里已经添加了相关源码链接,我们不再一一展开,你可以在课后进一步学习。
整个过程和调用链路较长,我对 Vite 处理 import 方法做一个简单总结:
- 在 koa 中间件里获取请求 path 对应的 body 内容;
- 通过 es-module-lexer 解析资源 AST,并拿到 import 的内容;
- 如果判断 import 的资源是绝对路径,即可认为该资源为 npm 模块,并返回处理后的资源路径。比如上述代码中,vue → /@modules/vue。
对于形如:import App from './App.vue'和import './index.css'的处理,与上述情况类似:
- 在 koa 中间件里获取请求 path 对应的 body 内容;
- 通过 es-module-lexer 解析资源 AST,并拿到 import 的内容;
- 如果判断 import 的资源是相对路径,即可认为该资源为项目应用中资源,并返回处理后的资源路径。比如上述代码中,./App.vue → /src/App.vue。
接下来浏览器根据 main.js 的内容,分别请求:
/@modules/vue.js/src/App.vue/src/index.css?import
对于 /@module/ 类请求较为容易,我们只需要完成下面三步:
- 在 koa 中间件里获取请求 path 对应的 body 内容;
- 判断路径是否以 /@module/ 开头,如果是,取出包名(这里为 vue.js);
- 去 node_modules 文件中找到对应的 npm 库,并返回内容。
上述步骤在 Vite 中使用 serverPluginModuleResolve 中间件实现,点击这里可以访问对应源码。
接着,就是对 /src/App.vue 类请求进行处理,这就涉及 Vite 服务器的编译能力了。
我们先看结果,对比项目中的 App.vue,浏览器请求得到的结果显然出现了大变样:
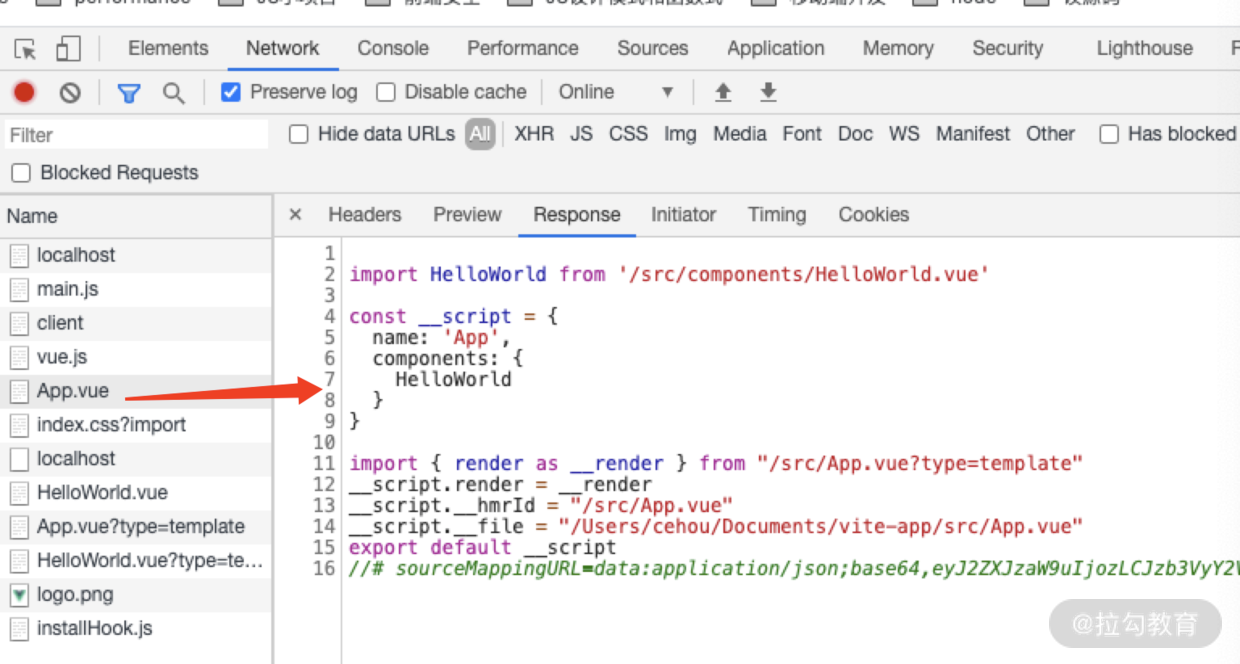
实际上,App.vue 这样的单文件组件对应 script、style 和 template,在经过 Vite Server 处理时,服务端对 script、style 和 template 三部分分别处理,对应中间件为 serverPluginVue。这个中间件的实现很简单,即对 .vue 文件请求进行处理,通过 parseSFC 方法解析单文件组件,并通过 compileSFCMain 方法将单文件组件拆分为形如上图内容,对应中间件关键内容可在源码 vuePlugin 中找到。源码中,涉及 parseSFC 具体所做的事情,是调用 @vue/compiler-sfc 进行单文件组件解析。精简为我自己的逻辑,帮助你理解:
if (!query.type) {ctx.body = `const __script = ${descriptor.script.content.replace('export default ', '')}${descriptor.styles.length ? `import "${url}?type=style"` : ''}import { render as __render } from "${url}?type=template"__script.render = __render;export default __script;`;}
总而言之,每一个 .vue 单文件组件都被拆分成多个请求。比如对应上面场景,浏览器接收到 App.vue 对应的实际内容后,发出 HelloWorld.vue 以及 App.vue?type=template 的请求(通过 type 这个 query 来表示是 template 还是 style)。koa server 进行分别处理并返回,这些请求依然分别被上面提到的 serverPluginVue 中间件处理:对于 template 的请求,服务使用 @vue/compiler-dom 进行编译 template 并返回内容。
精简为我自己的逻辑,帮助你理解:
if (query.type === 'template') {const template = descriptor.template;const render = require('@vue/compiler-dom').compile(template.content, {mode: 'module',}).code;ctx.type = 'application/javascript';ctx.body = render;}
对于上面提到的 http://localhost:3000/src/index.css?import 请求稍微特殊,需通过 serverPluginVue 来实现解析:
if (query.type === 'style') {const index = Number(query.index)const styleBlock = descriptor.styles[index]if (styleBlock.src) {filePath = await resolveSrcImport(root, styleBlock, ctx, resolver)}const id = hash_sum(publicPath)const result = await compileSFCStyle(root,styleBlock,index,filePath,publicPath,config)ctx.type = 'js'ctx.body = codegenCss(`${id}-${index}`, result.code, result.modules)return etagCacheCheck(ctx)}
调用 serverPluginCss 中间件的 codegenCss 方法:
export function codegenCss(id: string,css: string,modules?: Record<string, string>): string {let code =`import { updateStyle } from "${clientPublicPath}"\n` +`const css = ${JSON.stringify(css)}\n` +`updateStyle(${JSON.stringify(id)}, css)\n`if (modules) {code += dataToEsm(modules, { namedExports: true })} else {code += `export default css`}return code}
该方法会在浏览器中执行 updateStyle 方法,源码如下:
const supportsConstructedSheet = (() => {try {new CSSStyleSheet()return true} catch (e) {}return false})()export function updateStyle(id: string, content: string) {let style = sheetsMap.get(id)if (supportsConstructedSheet && !content.includes('@import')) {if (style && !(style instanceof CSSStyleSheet)) {removeStyle(id)style = undefined}if (!style) {style = new CSSStyleSheet()style.replaceSync(content)document.adoptedStyleSheets = [...document.adoptedStyleSheets, style]} else {style.replaceSync(content)}} else {if (style && !(style instanceof HTMLStyleElement)) {removeStyle(id)style = undefined}if (!style) {style = document.createElement('style')style.setAttribute('type', 'text/css')style.innerHTML = contentdocument.head.appendChild(style)} else {style.innerHTML = content}}sheetsMap.set(id, style)}
最终完成在浏览器中插入样式。
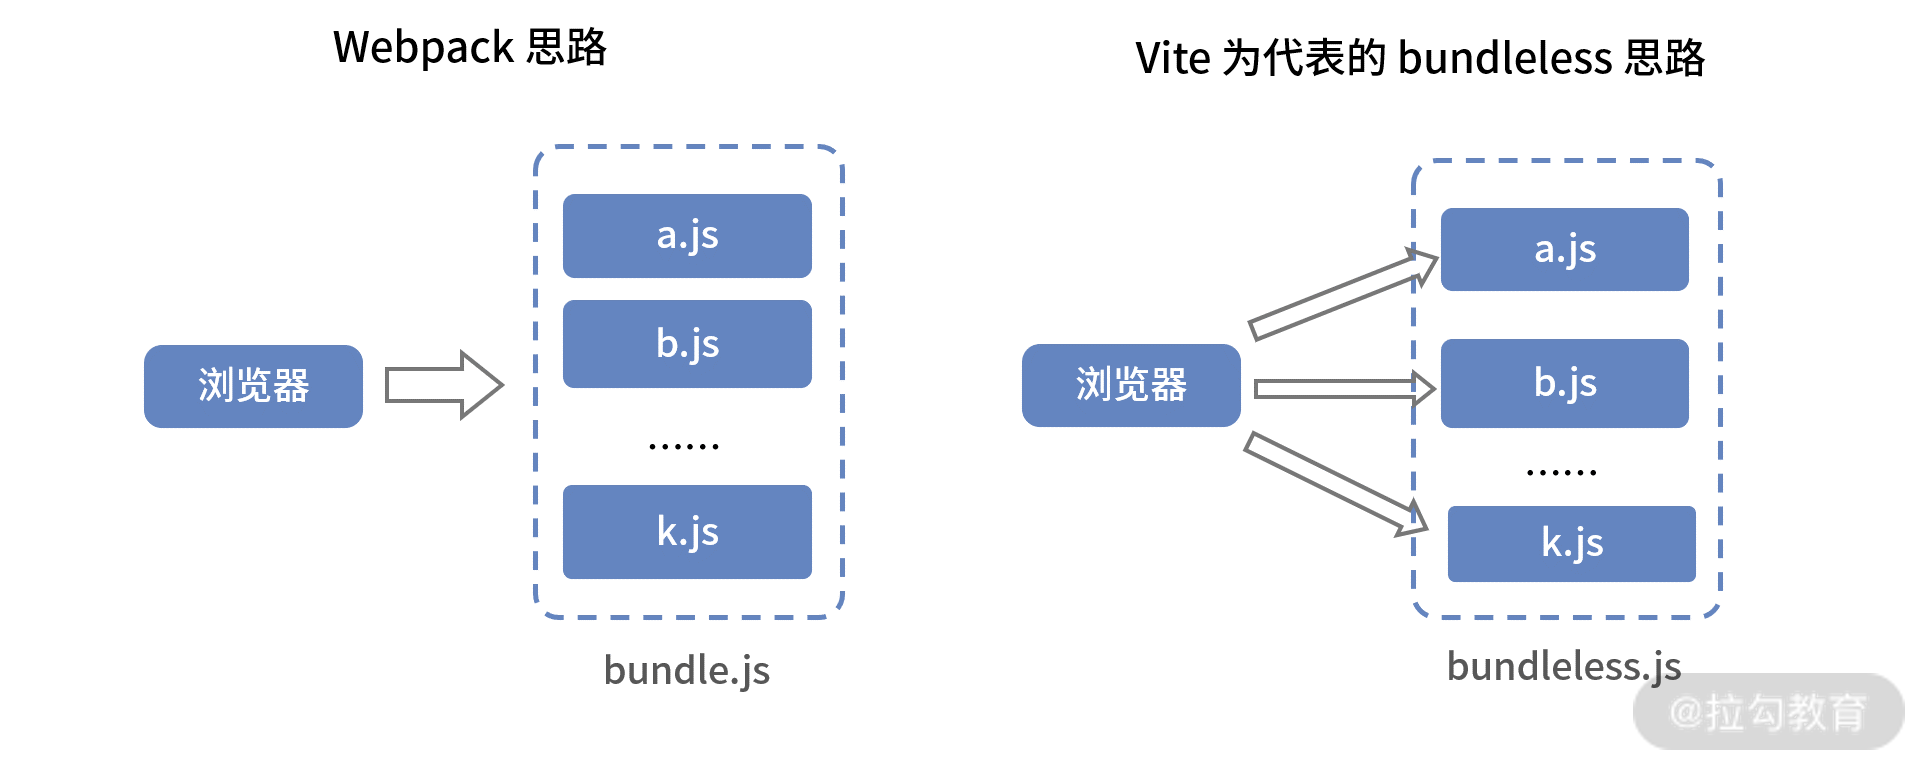
至此,我们解析并列举了较多源码内容。以上内容需要你跟着思路,一步步梳理,我也强烈建议你打开 Vite 源码自己动手剖析。如果看到这里你仍然也有些 “云里雾里”,不要心急,结合我下面这个图示,再次进行阅读,相信会更有收获。
Vite 这种 bundleless 方案的运行原理图:
接下来我们再做一些更细节的总结。
Vite 利用浏览器原生支持 ESM 这一特性,省略了对模块的打包,也就不需要生成 bundle,因此初次启动更快,HMR 特性友好。
Vite 开发模式下,通过启动 koa 服务器,在服务端完成模块的改写(比如单文件的解析编译等)和请求处理,实现真正的按需编译。
Vite Server 所有逻辑基本都依赖中间件实现。这些中间件,拦截请求之后,完成了如下内容:
- 处理 ESM 语法,比如将业务代码中的 import 第三方依赖路径转为浏览器可识别的依赖路径;
- 对 .ts、.vue 等文件进行即时编译;
- 对 Sass/Less 的需要预编译的模块进行编译;
- 和浏览器端建立 socket 连接,实现 HMR。
Vite HMR 实现原理
Vite 的打包命令使用了 Rollup 进行,这里并没有什么特别之处,我们不再展开讲解。而 Vite 的 HMR 特性,主要是围绕着:
- 通过 watcher 监听文件改动
- 通过 server 端编译资源,并推送新模块内容给浏览器
- 浏览器收到新的模块内容,执行框架层面的 rerender/reload
三步进行。
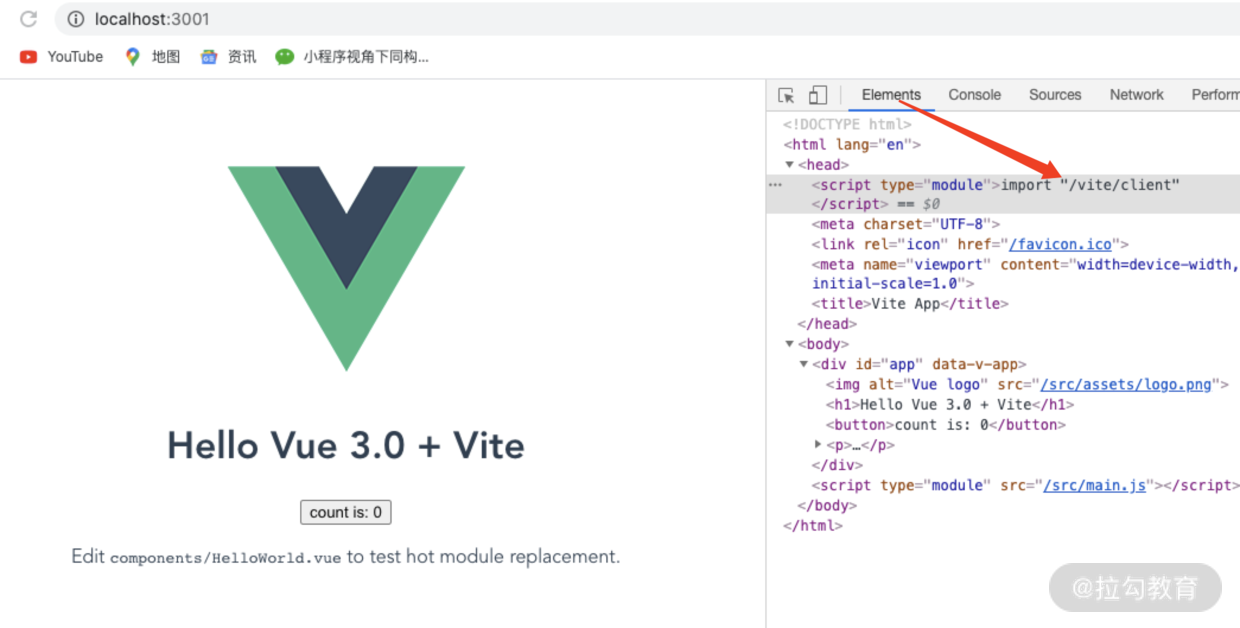
当浏览器请求 HTML 页面时,服务端通过 serverPluginHtml 插件向 HTML 内容注入一段脚本。如下图所示,我们可以看到, index.html 中就有一段引入 /vite/client 代码,进行 WebSocket 的注册和监听。
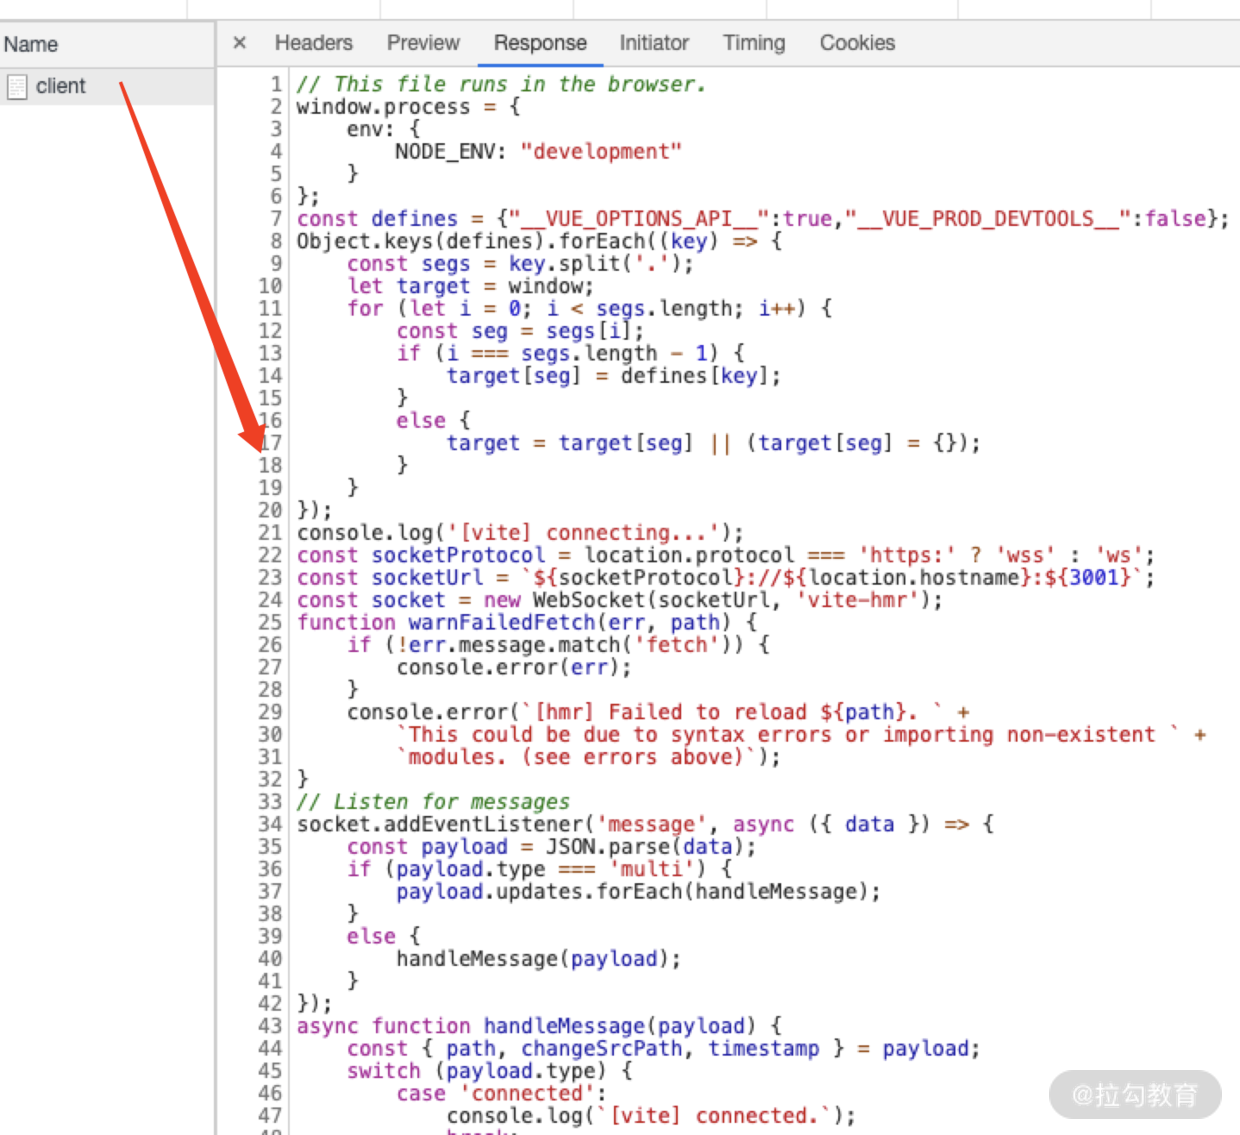
对于 /vite/client 请求的处理,服务端由 serverPluginClient 插件进行处理:
export const clientPlugin: ServerPlugin = ({ app, config }) => {const clientCode = fs.readFileSync(clientFilePath, 'utf-8').replace(`__MODE__`, JSON.stringify(config.mode || 'development')).replace(`__DEFINES__`,JSON.stringify({...defaultDefines,...config.define}))app.use(async (ctx, next) => {if (ctx.path === clientPublicPath) {ctx.type = 'js'ctx.status = 200ctx.body = clientCode.replace(`__PORT__`, ctx.port.toString())} else {if (ctx.path === legacyPublicPath) {console.error(chalk.red(`[vite] client import path has changed from "/vite/hmr" to "/vite/client". ` +`please update your code accordingly.`))}return next()}})}
返回的 /vite/src/client/client.js 代码在浏览器端主要通过 WebSocket 监听了一些更新的类型(vue 组件更新 / vue template 更新 / vue style 更新 / css 更新 / css 移除 / js 更新 / 页面 roload),分别进行处理。
在服务端,通过 chokidar 创建了一个监听文件改动的 watcher 来监听文件改动:
const watcher = chokidar.watch(root, {ignored: [/node_modules/, /\.git/],awaitWriteFinish: {stabilityThreshold: 100,pollInterval: 10}}) as HMRWatcher
并通过 serverPluginHmr 发布变动,通知浏览器。
更多源码不再一一贴出。这里我总结了一张流程图供你参考:
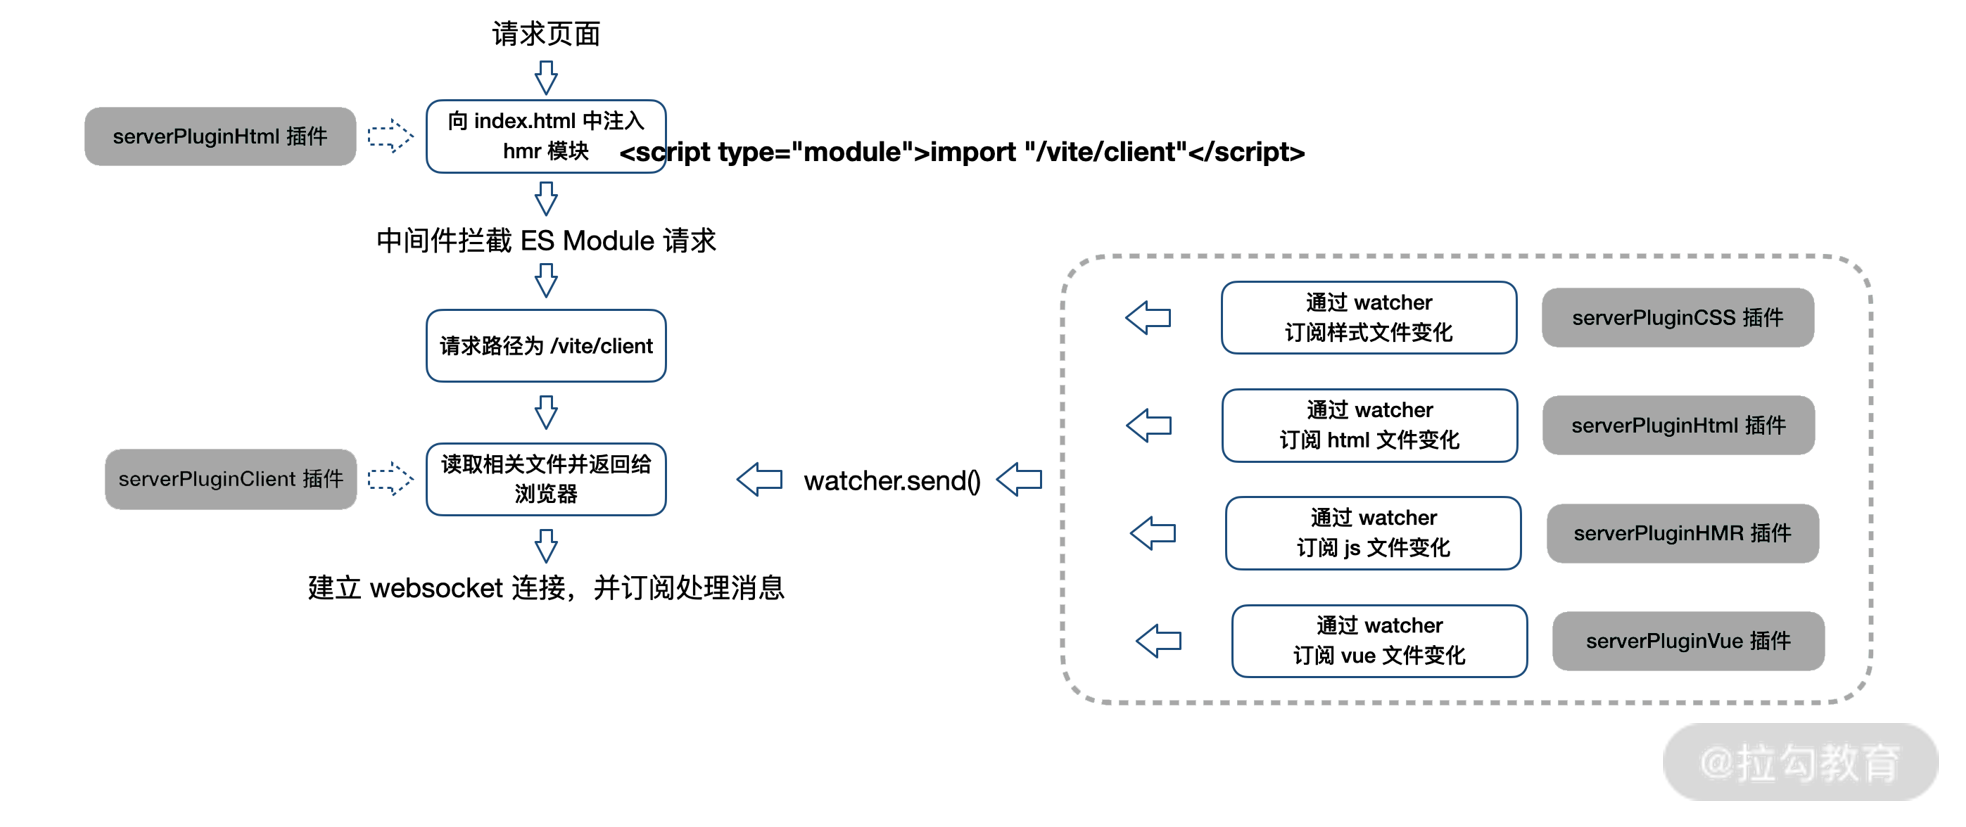
Vite 实现 HMR 流程图
总结
这一讲我们聚焦 Vite 实现,分析了如何利用 ESM,构建一个 bundleless 风格的现代化开发工程方案。源码内容较多,也涉及一定工程化架构设计内容,但 Vite 实现流程清晰,易读性高,是源码阅读类很好的资源。
事实上,Vite 依赖优化的灵感来自 Snowpack,这类 bundleless 工具也代表着一种新趋势、新方向。我认为,技术功底是很重要的一方面,而技术敏感度的培养也非常关键。希望与你共勉!
到此,新编译工具理念——Vite 我们就介绍到这里。接下来我们将进入代码降级编译环节的学习,我们下一讲再见。

若有收获,就点个赞吧
0 人点赞
