title: Word embeddings in 2020
subtitle: 当前单词嵌入方法的简要概述:从Word2vec到Transformers
date: 2020-08-10
author: NSX
catalog: true
tags:
- 技术
Word embeddings in 2020
转载自 https://colab.research.google.com/drive/1N7HELWImK9xCYheyozVP3C_McbiRo1nb
本文对每个词嵌入方法都有一个(非常)简短的描述,进一步研究的链接以及Python中的代码示例。所有代码都打包为Google Colab Notebook。
根据Wikipedia的说法,单词嵌入是自然语言处理(NLP)中一组语言建模和功能学习技术的总称,其中词汇表中的单词或短语被映射为实数向量。
One-hot or CountVectorizing
将单词转换为向量的最基本方法是计算每个文档中每个单词的出现次数。这种方法称为计数向量化或独热编码。
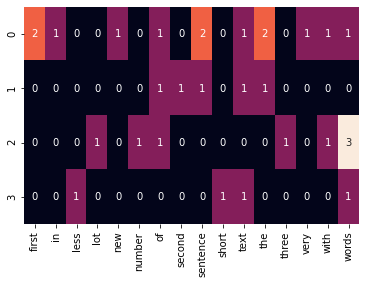
此方法的主要原理是收集一组文档(它们可以是单词,句子,段落甚至文章),并计算每个文档中每个单词的出现次数。严格来说,结果矩阵的列是单词,行是文档。
from sklearn.feature_extraction.text import CountVectorizer# create CountVectorizer objectvectorizer = CountVectorizer()corpus = ['Text of the very first new sentence with the first words in sentence.','Text of the second sentence.','Number three with lot of words words words.','Short text, less words.',]# learn the vocabulary and store CountVectorizer sparse matrix in term_frequenciesterm_frequencies = vectorizer.fit_transform(corpus)vocab = vectorizer.get_feature_names()# convert sparse matrix to numpy arrayterm_frequencies = term_frequencies.toarray()# visualize term frequenciesimport seaborn as snssns.heatmap(term_frequencies, annot=True, cbar = False, xticklabels = vocab);
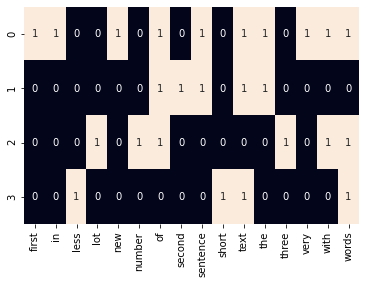
计数向量化的另一种方法是,如果在文档中找到单词(无论频率如何),则放置1;如果在文档中找不到单词,则放置0。在这种情况下,我们得到了真正的“独热”编码。
one_hot_vectorizer = CountVectorizer(binary=True)one_hot = one_hot_vectorizer.fit_transform(corpus).toarray()sns.heatmap(one_hot, annot=True, cbar = False, xticklabels = vocab)
TF-IDF编码
对于大量的文档集,“ a”,“ the”,“ is”等词经常出现,但它们携带的信息不多。使用 one-hot 编码方法无法决定这些单词的重要性。解决此问题的方法之一是停用词过滤(stopwords filtering),但是此解决方案是离散的,不灵活。
TF-IDF(term frequency — inverse document frequency)可以更好地解决此问题。TF-IDF降低了常用单词的权重,增加了仅在当前文档中出现的稀有单词的权重。TF-IDF公式如下所示:
%3Dtf(term%2C%20document)%20%5Ccdot%20idf(term)%0A#card=math&code=tfidf%28term%2C%20document%29%3Dtf%28term%2C%20document%29%20%5Ccdot%20idf%28term%29%0A)
TF是通过单词在文档中出现的次数除以文档中单词的总数计算得到:
%3D%5Cfrac%7Bn%7Bi%7D%7D%7B%5Csum%7Bk%3D1%7D%5E%7BW%7D%20n%7Bk%7D%7D%0A#card=math&code=tf%28term%2C%20document%29%3D%5Cfrac%7Bn%7Bi%7D%7D%7B%5Csum%7Bk%3D1%7D%5E%7BW%7D%20n%7Bk%7D%7D%0A)
IDF(反向文档频率),其解释方式与反向文档数量相同,其中N是文档数量,#card=math&code=n%28t%29)是包含当前单词
的文档数量。
%3D%5Clog%20%5Cfrac%7BN%7D%7Bn%7Bt%7D%7D%0A#card=math&code=idf%28term%29%3D%5Clog%20%5Cfrac%7BN%7D%7Bn%7Bt%7D%7D%0A)
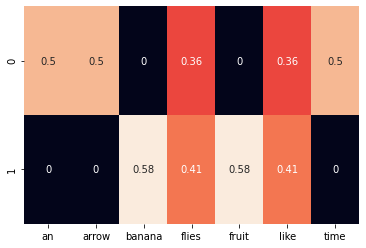
from sklearn.feature_extraction.text import TfidfVectorizerimport seaborn as snscorpus = ['Time flies like an arrow.','Fruit flies like a banana.']vocab = ['an', 'arrow', 'banana', 'flies', 'fruit', 'like', 'time']tfidf_vectorizer = TfidfVectorizer()tfidf = tfidf_vectorizer.fit_transform(corpus).toarray()sns.heatmap(tfidf, annot=True, cbar = False, xticklabels = vocab)
Word2Vec 和 GloVe
词嵌入的最常用模型是word2vec和GloVe,它们都是基于分布假设的无监督方法(在相同上下文中出现的词往往具有相似的含义)。
Word2Vec单词嵌入是单词的矢量表示,输入大量文本作为输入(例如Wikipedia,科学,新闻,文章等)时,并由无监督模型进行学习。单词的这些表示形式捕获了单词之间的语义相似性。Word2Vec单词嵌入以如下方式学习,即意思相近的单词(例如“ king”和“ queen”)的向量之间的距离比含义完全不同的单词(例如“ king”和“ carpet”)的距离更近 。
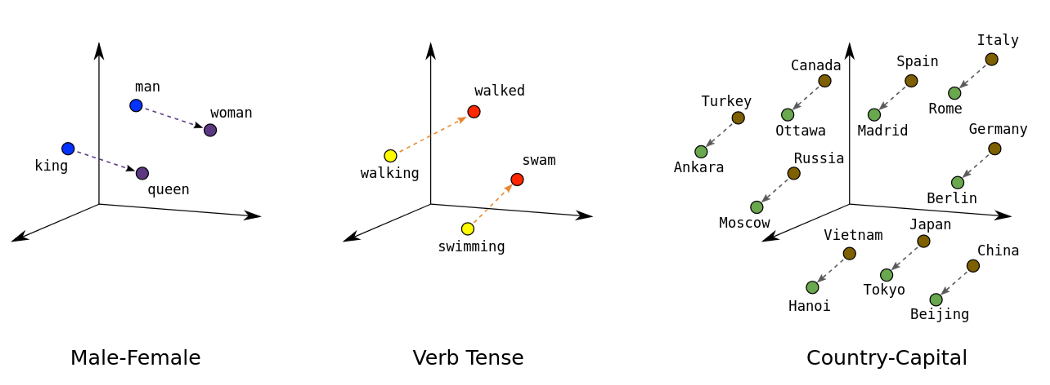
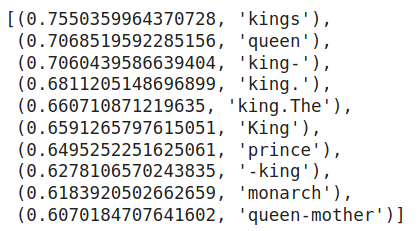
Word2Vec向量甚至允许对向量进行一些数学运算。例如,在此操作中,我们为每个单词使用word2vec向量:
# Download Google Word2Vec embeddings https://code.google.com/archive/p/word2vec/!wget https://s3.amazonaws.com/dl4j-distribution/GoogleNews-vectors-negative300.bin.gz!gunzip GoogleNews-vectors-negative300.bin# Try Word2Vec with Gensimimport gensim# Load pretrained vectors from Googlemodel = gensim.models.KeyedVectors.load_word2vec_format('GoogleNews-vectors-negative300.bin', binary=True)king = model['king']# king - man + woman = queenprint(model.most_similar(positive=['woman', 'king'], negative=['man']))print(model.similarity('woman', 'man'))
另一个词嵌入方法是Glove(“Global Vectors”)。它是一种基于单词-上下文矩阵的矩阵分解技术。它首先构造一个由(单词x上下文)共现信息组成的大型矩阵,即,对于每个“单词”(行),您需要计算在一个大型语料库中,该单词在某个“上下文”(列)中出现的频率。然后,将此矩阵分解为低维(单词x特征)矩阵,其中每行现在存储每个单词的矢量表示。通常,这是通过最小化“reconstruction loss”来完成的。这种损失试图找到可以解释高维数据中大部分变化的低维表示形式。
# Try Glove word embeddings with Spacy!python3 -m spacy download en_core_web_lgimport spacy# Load the spacy model that you have installedimport en_core_web_lgnlp = en_core_web_lg.load()# process a sentence using the modeldoc = nlp("man king stands on the carpet and sees woman queen")
找到King和Queen 之间的相似之处(值越高越好)。
doc[1].similarity(doc[9])# 0.72526103
Find similarity between King and carpet.
doc[1].similarity(doc[5])# 0.20431946
Check if king — man + woman = queen. We will multiply vectors for ‘man’ and ‘woman’ by two, because subtracting one vector for ‘man’ and adding the vector for ‘woman’ will do little to the original vector for “king”, likely because those “man” and “woman” are related themselves.
v = doc[1].vector - (doc[0].vector*2) + (doc[8].vector*2)from scipy.spatial import distanceimport numpy as np# Format the vocabulary for use in the distance functionvectors = [token.vector for token in doc]vectors = np.array(vectors)# Find the closest word belowclosest_index = distance.cdist(np.expand_dims(v, axis = 0), vectors, metric = 'cosine').argmin()output_word = doc[closest_index].textprint(output_word)# queen
快速文字
FastText是word2vec的扩展,由Tomas Mikolov团队开发(他于2013年创建了word2vec框架)
与原始word2vec向量相比,FastText的主要改进是包含了字符n-gram,它可以为未出现在训练数据中的单词(“词汇外”单词)计算单词表示形式。
!pip install Cython --install-option="--no-cython-compile"!pip install fasttext# download pre-trained language word vectors from one of 157 languges https://fasttext.cc/docs/en/crawl-vectors.html# it will take some time, about 5 minutesimport fasttextimport fasttext.utilfasttext.util.download_model('en', if_exists='ignore') # Englishft = fasttext.load_model('cc.en.300.bin')
为“king”一词创建嵌入
ft.get_word_vector('king')
为“king”一词获取最相似的词
ft.get_nearest_neighbors('king')
测试模型为未知单词创建向量的能力
ft.get_nearest_neighbors('king-warrior')
ELMo (Embeddings from Language Models)
与传统的单词嵌入(例如word2vec和GLoVe)不同,分配给token或单词的ELMo矢量取决于当前上下文,实际上是包含该单词的整个句子的函数。因此,同一单词在不同上下文中可以具有不同的单词向量。而且,ELMo表示完全基于字符,因此它们不限于任何预定义的词汇表。
来自官方网站的说明:
ELMo is a deep contextualized word representation that models both (1) complex characteristics of the word use (e.g., syntax and semantics), and (2) how these uses vary across linguistic contexts (i.e., to model polysemy). These word vectors are learned functions of the internal states of a deep bidirectional language model (biLM), which is pre-trained on a large text corpus. They can be easily added to existing models and significantly improve the state of the art across a broad range of challenging NLP problems, including question answering, textual entailment and sentiment analysis.
# use tensorflow 1.x for ELMo, because trere are still no ELMo for tensorflow 2.0%tensorflow_version 1.ximport tensorflow_hub as hubimport tensorflow as tf# Download pretrained ELMo model from Tensorflow Hub https://tfhub.dev/google/elmo/3elmo = hub.Module("https://tfhub.dev/google/elmo/3", trainable=True)sentences = \['king arthur, also called arthur or aathur pendragon, legendary british king who appears in a cycle of \medieval romances (known as the matter of britain) as the sovereign of a knightly fellowship of the round table.','it is not certain how these legends originated or whether the figure of arthur was based on a historical person.','the legend possibly originated either in wales or in those parts of northern britain inhabited by brythonic-speaking celts.','for a fuller treatment of the stories about king arthur, see also arthurian legend.']
为了将句子输入到模型训练,我们需要将它们分成单词数组和填充数组,并保持相同的长度。另外,我们将创建“mask”数组来表示每个element是一个实词还是填充符号(在我们的示例中为“ _”)。稍后我们将使用“掩码”数组进行可视化,来显示真实存在的单词。
words = []mask = []masked_words = []for sent in sentences:splitted = sent.split()for i in range(36):try:words.append(splitted[i])except:words.append('_')for word in words:if word == "_":mask.append(False)else:mask.append(True)masked_words.append(word)
使用ELMo创建嵌入:
embeddings = elmo(sentences,signature="default",as_dict=True)["elmo"]
将Tensorflow张量转换为numpy数组。
%%timewith tf.Session() as sess:sess.run(tf.global_variables_initializer())sess.run(tf.tables_initializer())x = sess.run(embeddings)embs = x.reshape(-1, 1024)masked_embs = embs[mask]
使用PCA可视化词嵌入
from sklearn.decomposition import PCApca = PCA(n_components=10)y = pca.fit_transform(masked_embs)from sklearn.manifold import TSNEy = TSNE(n_components=2).fit_transform(y)import plotly as pyimport plotly.graph_objs as godata = [go.Scatter(x=[i[0] for i in y],y=[i[1] for i in y],mode='markers',text=[i for i in masked_words],marker=dict(size=16,color = [len(i) for i in masked_words], #set color equal to a variableopacity= 0.8,colorscale='Viridis',showscale=False))]layout = go.Layout()layout = dict(yaxis = dict(zeroline = False),xaxis = dict(zeroline = False))fig = go.Figure(data=data, layout=layout)fig.show()
Transformers
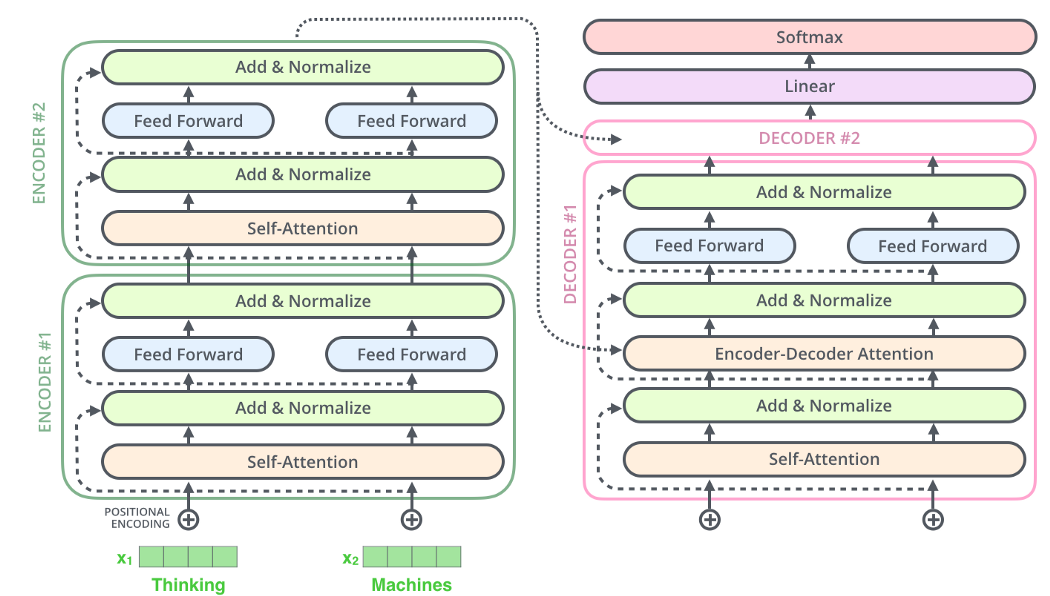
最后,是时候使用最新技术- Transformers。著名的GPT-2,BERT,CTRL 都是基于Transformers生成上下文相关的词嵌入。但是与ELMo 不同,Transformers不使用RNN,它们不需要一个接一个地顺序处理句子中的单词。句子中的所有单词都是并行处理的,这种方法可以加快处理速度,并解决梯度消失的问题(vanishing gradient problem)。
Transformers 使用注意力机制来描述每个特定单词与句子中所有其他单词的联系和依存关系。Jay Alammar在精美插图中详细描述了Transformers 的这种机制和主要原理。
示例,我们将使用 Hugging face 开源的Transformers库,其中包含最新的基于Transformers的模型(例如BERT,XLNet,DialoGPT或GPT-2)。
使用BERT获取词嵌入。首先,我们需要安装Transformers库。
!pip install transformers
现在,我们导入pytorch, the pretrained BERT model, and a BERT tokenizer,它将句子转换为适合BERT的输入格式(标记自身并添加特殊标记,例如[SEP]和[CLS])的所有必需工作。
import torchtorch.manual_seed(0)from transformers import BertTokenizer, BertModelimport loggingimport matplotlib.pyplot as plt% matplotlib inline# Load pre-trained model tokenizer (vocabulary)tokenizer = BertTokenizer.from_pretrained('bert-base-uncased', do_lower_case=True)
输入一些句子并将其标记化。
sentences = \['king arthur, also called arthur or aathur pendragon, legendary british king who appears in a cycle of \medieval romances (known as the matter of britain) as the sovereign of a knightly fellowship of the round table.','it is not certain how these legends originated or whether the figure of arthur was based on a historical person.','the legend possibly originated either in wales or in those parts of northern britain inhabited by brythonic-speaking celts.','for a fuller treatment of the stories about king arthur, see also arthurian legend.']# Print the original sentence.print(' Original: ', sentences[0][:99])# Print the sentence splitted into tokens.print('Tokenized: ', tokenizer.tokenize(sentences[0])[:15])# Print the sentence mapped to token ids.print('Token IDs: ', tokenizer.convert_tokens_to_ids(tokenizer.tokenize(sentences[0]))[:15])

请注意,某些标记可能看起来像这样:[‘aa’, ‘##th’, ‘##ur’, ‘pen’, ‘##dra’, ‘##gon’]。这是因为 BERT tokenizer 是使用WordPiece模型创建的。该模型贪婪地创建一个固定大小的词汇表,其中包含最适合我们的语言数据的单个字符,子词和单词。BERT tokenizer 生成器使用的词汇表包含所有英语字符,以及在该模型所训练的英语语料库中找到的约30,000个最常见的单词和子单词。因此,如果词汇表中未提及该词,则该词将分为子词和字符。某些子词之前的两个井号(##)表明该子词是较大词的一部分,并在另一个子词之前。
我们将使用 tokenizer.encode_plus 函数,该函数:
- 将句子拆分为 tokens
- 添加特殊的[CLS]和[SEP] tokens
- 将令牌映射到其ID
- 将所有句子填充或截断为相同长度
# Tokenize all of the sentences and map tokens to word IDs.input_ids = []attention_masks = []tokenized_texts = []for sent in sentences:encoded_dict = tokenizer.encode_plus(sent,add_special_tokens = True,truncation=True,max_length = 48,pad_to_max_length = True,return_tensors = 'pt',)# Save tokens from sentence as a separate array.marked_text = "[CLS] " + sent + " [SEP]"tokenized_texts.append(tokenizer.tokenize(marked_text))# Add the encoded sentence to the list.input_ids.append(encoded_dict['input_ids'])# Convert the list into tensor.input_ids = torch.cat(input_ids, dim=0)
Segment ID. BERT通过使用1和0来区分两个句子这种方式训练的。我们将分别对每个句子进行编码,因此我们将每个句子中的每个标记标记为1。
segments_ids = torch.ones_like(input_ids)
现在,我们可以调用BERT模型,并最终获得模型隐层状态,然后根据这些状态创建单词嵌入。
with torch.no_grad():outputs = model(input_ids, segments_ids)hidden_states = outputs[2]
Let’s examine what we’ve got
print ("Number of layers:", len(hidden_states), " (initial embeddings + 12 BERT layers)")print ("Number of batches:", len(hidden_states[0]))print ("Number of tokens:", len(hidden_states[0][0]))print ("Number of hidden units:", len(hidden_states[0][0][0]))# 13# 4# 48# 768
# Concatenate the tensors for all layers.token_embeddings = torch.stack(hidden_states, dim=0)# Swap dimensions, so we get tensors in format: [sentence, tokens, hidden layes, features]token_embeddings = token_embeddings.permute(1,2,0,3)
我们将使用最后四个隐层来创建每个单词嵌入。
processed_embeddings = token_embeddings[:, :, 9:, :]
将每个token的四层连接起来以创建嵌入
embeddings = torch.reshape(processed_embeddings, (4, 48, -1))
让我们检查一下第一句的嵌入。首先,我们获取需要比较的令牌ID
for i, token_str in enumerate(tokenized_texts[0]):print (i, token_str)
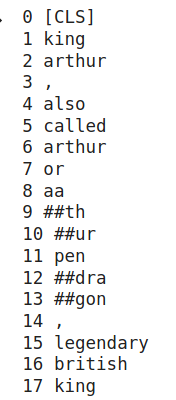
我们可以看到“king”一词位于索引1和17。我们将检查嵌入1和17之间的距离。此外,我们还将检查“arthur”一词的嵌入是否更接近“king”,然后是否接近“table”。
from scipy.spatial.distance import cosinekings = cosine(embeddings[0][1], embeddings[0][17])king_table = cosine(embeddings[0][1], embeddings[0][46])king_archtur = cosine(embeddings[0][2], embeddings[0][1])print('Distance for two kings: %.2f' % kings)print('Distance from king to table: %.2f' % king_table)print('Distance from Archtur to king: %.2f' % king_archtur)# 0.21# 0.73# 0.40
因此,我们看到两个“king”的嵌入非常相似,但不完全相同,并且Archtur更像是king而不是table。
使用 simplerepresentations 模块可能会更简单。该模块完成了我们之前所做的所有工作-从BERT中提取所需的隐层状态,并在几行代码中创建词嵌入。
!pip install simplerepresentationsimport torchfrom simplerepresentations import RepresentationModeltorch.manual_seed(0)model_type = 'bert'model_name = 'bert-base-uncased'representation_model = RepresentationModel(model_type=model_type,model_name=model_name,batch_size=4,max_seq_length=48,combination_method='cat',last_hidden_to_use=4)text_a = sentencesall_sentences_representations, all_tokens_representations = representation_model(text_a=text_a)
Check distaces between Archtur, king and table.
from scipy.spatial.distance import cosinekings = cosine(all_tokens_representations[0][1], all_tokens_representations[0][17])king_table = cosine(all_tokens_representations[0][1], all_tokens_representations[0][46])king_archtur = cosine(all_tokens_representations[0][2], all_tokens_representations[0][1])print('Distance for two kings: %.2f' % kings)print('Distance from king to table: %.2f' % king_table)print('Distance from Archtur to king: %.2f' % king_archtur)# 0.21# 0.73# 0.40
结果相同,代码更少。
结论
希望阅读本文后,对当前的词嵌入方法有了一个概念,并开始了解如何在Python中快速实现这些方法。NLP的世界是多种多样的,并且有更多的嵌入模型和方法。
参考资料

若有收获,就点个赞吧
0 人点赞
