图形
canvas只支持两种初始形状:
- 矩形
- 路径:点到点之间的连线形状,来创建复杂的图形。
矩形
关键点矩形的轨迹 + 绘制的函数集成到一起,比路径的绘制更加方便。fillRect(x, y, width, height)
语义填充 + 矩形。strokeRect(x, y, width, height)
语义描边 + 矩形。clearRect(x, y, width, height)
语义透明填充 +矩形。
关键点在动画中,经常用于清除画布。clearRect(x, y, canvas.width, canvas.height)Rect(x, y, width, height)
语义矩形。只有轨迹,没有渲染,还需要fill( )、stroke( )方法,渲染矩形。路径
由一系列点连接成的形状。
关键点一条路径可能有各种子路径直线 + 圆弧 +曲线组成。
关键点默认情况,多条子路径是首尾相连的。除非在绘制路径的时候,使用moveTo( )重新设置子路径的起点。
关键点子路径可能是连续的,也可能是断开的,但是它们渲染的样式是一样的。
- beginPath( ):创建新路径。
- moveTo( ):路径的开始点。
- 各种函数,绘制路径。
- fill( )、stroke( ):渲染路径。
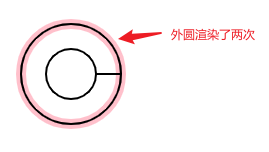
重复绘制外轮廓
语义在一条路径里,多次使用stroke( )方法,会使得子路径多次渲染。
关键点对于fill( )方法也是同样的问题。
代码案例
var canvas = document.getElementsByTagName('canvas')[0];var ctx = canvas.getContext('2d');ctx.beginPath();ctx.lineWidth = 10;ctx.strokeStyle = 'pink';ctx.arc(80, 80, 50, 0, Math.PI*2, true);ctx.stroke();ctx.lineWidth = 2;ctx.strokeStyle = 'black';ctx.arc(80, 80, 25, 0, Math.PI*2, false);ctx.stroke();
stroke( )和fill( )的顺序
语义stroke( )和fill( )的顺序,因为这两个路径的渲染效果有重叠部分,不同的顺序下,后一个会覆盖前一个。
代码案例
ctx.beginPath();ctx.arc(80, 80, 50, 0, Math.PI*2, true);ctx.lineWidth = 10;ctx.strokeStyle = 'pink'ctx.stroke();ctx.fill();
输出图形 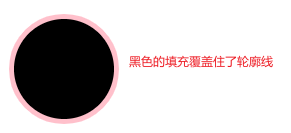
代码案例交换stroke( )和fill( )的顺序
ctx.beginPath();ctx.arc(80, 80, 50, 0, Math.PI*2, true);ctx.lineWidth = 10;ctx.strokeStyle = 'pink'ctx.stroke();ctx.fill();
输出图形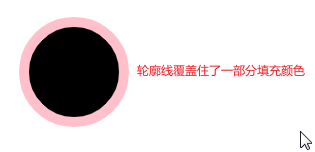

若有收获,就点个赞吧
0 人点赞
